74
SC-LX82
1
2
3
4
A
B
C
D
E
F
1
2
3
4
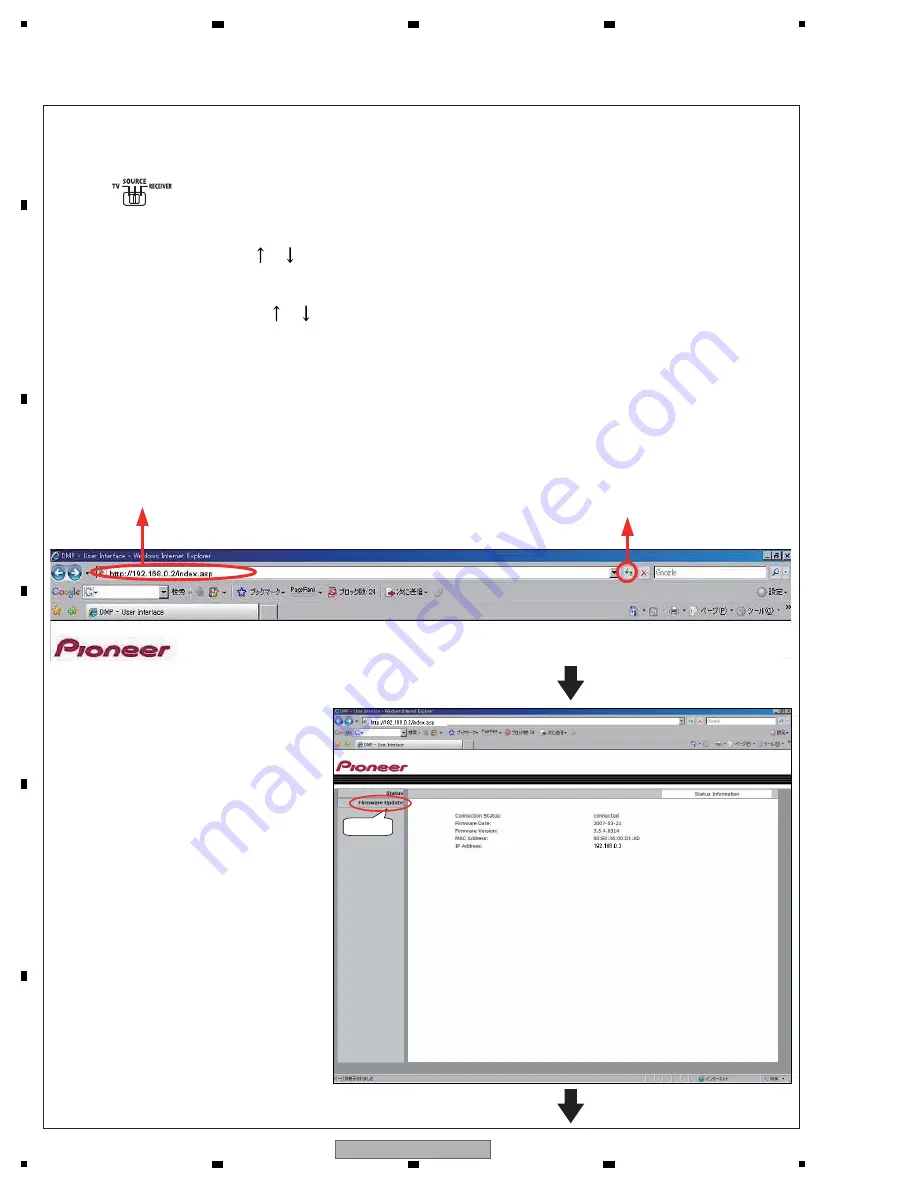
The following screen will be displayed.
Click on “Firmware Update.”
Click.
3.
The following steps are to be performed on the PC.
Open Internet Explorer on the PC.
When the AV amplifier is directly connected with the PC, enter “http:// 192. 168. 000. 002” in the address box then
press the Enter key.
When the AV amplifier is connected via a DHCP router, enter the IP address of the AV amplifier you noted in the
address box then press the Enter key.
(1) Enter “http:// ***. ***. ***. *** (IP address of the AV amplifier).”
(2) Click on the Update button or press the Enter key.
(1) Set the remote control operation switch to SOURCE (SC-LX82 only).
(2) Press the HOME MEDIA GALLERY button to set the input function to Home Media Gallery.
(3) Select “Setup,” using the or key, then press ENTER.
(4) Select “Information” then press ENTER. The version of the network firmware will be displayed.
(5) Change displays, using the or key, to check the “IP Address.”
(6) To return to the Top menu screen, press the Return button twice.
[When the PC and AV amplifier are connected via a DHCP router]
Be sure to confirm and note the IP address.
How to Confirm the IP Address
Summary of Contents for SC-LX72
Page 10: ...10 SC LX82 1 2 3 4 A B C D E F 1 2 3 4 2 2 PANEL FACILITIES 1 Front Panel ...
Page 11: ...11 SC LX82 5 6 7 8 5 6 7 8 A B C D E F 2 Display ...
Page 12: ...12 SC LX82 1 2 3 4 A B C D E F 1 2 3 4 ...
Page 13: ...13 SC LX82 5 6 7 8 5 6 7 8 A B C D E F 3 Rear Panel ...
Page 14: ...14 SC LX82 1 2 3 4 A B C D E F 1 2 3 4 ...
Page 15: ...15 SC LX82 5 6 7 8 5 6 7 8 A B C D E F 4 Remote Control In case of SC LX82 ...
Page 16: ...16 SC LX82 1 2 3 4 A B C D E F 1 2 3 4 ...
Page 17: ...17 SC LX82 5 6 7 8 5 6 7 8 A B C D E F ...
Page 18: ...18 SC LX82 1 2 3 4 A B C D E F 1 2 3 4 5 Remote Control In case of SC LX72 ...
Page 19: ...19 SC LX82 5 6 7 8 5 6 7 8 A B C D E F ...


