background image


PDP-425MX

18

1

2

3

4

1

2

3

4

C

D

F

A

B

E


4. ADJUSTMENT

1. SERVICE MODE

1.1  How to check the accumulated power-on time (This function is not available for models with Serial
 

No. XXX or before.)

• Service mode

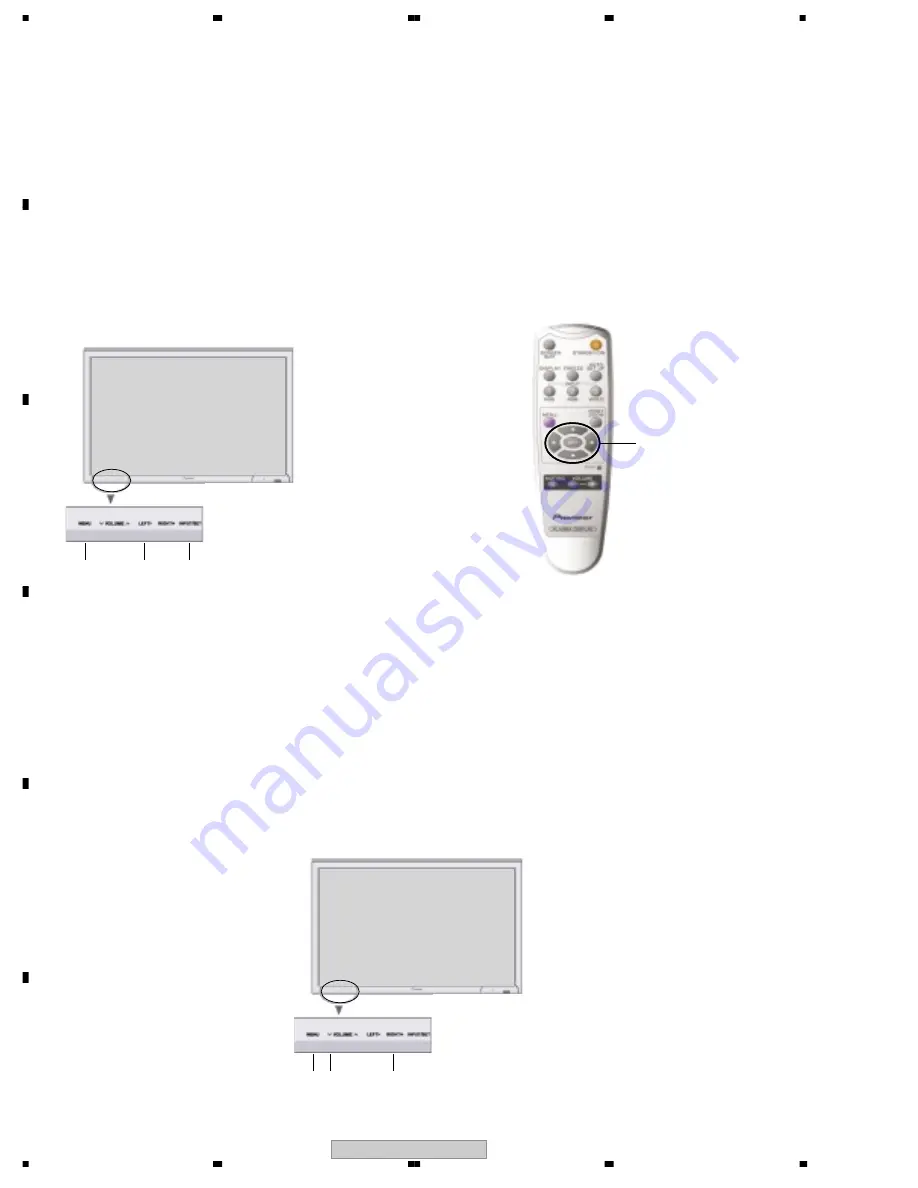
To enter Service mode, simultaneously press the INPUT/SET key (

A

) and LEFT/- key (

B

) located at the lower left of the front panel of 

the unit. Then press the Menu key (

C

) to display the Service Mode menu. To display the accumulated power-on time, select HOUR 

METER, using the CURSOR keys (

D

) on the remote control unit. (See Figs. 1 and 2)

Notes:

 1.  If no signal is input to INPUT 1, the Service Mode menu will be displayed for an instant but disappear immediately.


Supply signals from a PC to INPUT 1.


2.  If no signal is input to any input connector of the unit, the system enters Burn-In mode.

D

Fig. 2

2. FACTORY MODE (User setting values will be reset to default/initial settings.)

2.1 How to enter Factory mode

To enter Service/Factory mode, simultaneously press the VOL- key (

A

) and RIGHT+ key (

B

) of the unit. (See Fig. 3)

Then press the Menu key (

C

) to display the Service/Factory menu. The menu displays the data from the input sources that offer 

corresponding adjustment items.

Notes:

 1.  If no signal is input to INPUT 1, the Service Mode menu will be displayed for an instant but disappear immediately.


Supply signals from a PC to INPUT 1.


2.  If no signal is input to any input connector of the unit, the system enters Burn-In mode.

B

A

C

D

B

A

C

B

C

A

Fig. 1

Fig. 3

Summary of Contents for PDP-425MX

Page 1: ...IONEER ELECTRONICS ASIACENTRE PTE LTD 253 Alexandra Road 04 01 Singapore 159936 PIONEER CORPORATION 2005 PDP 425MX PROVISIONAL PLASMA DISPLAY PDP 425MX PDP 42FXE10 THIS MANUAL IS APPLICABLE TO THE FOLLOWING MODEL S AND TYPE S Model Type Power Requirement Remarks PDP 425MX KUCXZC AC 100 120 V PDP 42FXE10 TLXZC5 AC 100 240 V For details refer to Important Check Points for good servicing T IZY DEC 20...

Page 2: ...e put back in place such as barriers nonmetallic knobs adjustment and compartment covershields isolation resistor capacitor etc 3 When service is required observe the original lead dress Extra precaution should be taken to assure correct lead dress in the high voltage circuitry area 4 Always use the manufacture s replacement components Especially critical components as indicated on the circuit dia...

Page 3: ... Any current measured must not exceed 0 5mA ANY MEASUREMENTS NOT WITHIN THE LIMITS OUTLINED ABOVE ARE INDICATIVE OF A POTENTIAL SHOCK HAZARD AND MUST BE CORRECTED BEFORE RETURNING THE SET TO THE CUSTOMER PRODUCT SAFETY NOTICE Many electrical and mechanical parts in PIONEER set have special safety related characteristics These are often not evident from visual inspection nor the protection afforded...

Page 4: ...the product Please check that neither solder debris nor screws remain inside the product 8 There should be no semi broken wires scratches melting etc on the coating of the power cord Damaged power cords may lead to fire accidents so please be sure that there are no damages If you find a damaged power cord please exchange it with a suitable one 9 There should be no spark traces or similar marks on ...

Page 5: ...D PARTS LIST 8 2 1 PACKING SECTION 8 2 2 EXTERIOR SECTION 10 2 3 PDP MODULE NP42H5MF01QA 14 3 BLOCK DIAGRAM 16 3 1 OVERALL DIAGRAM 16 3 2 MAIN BOARD and AUDIO BOARD BLOCK DIAGRAM 17 4 ADJUSTMENT 18 5 PCB PARTS LIST 31 6 DISASSEMBLY 34 7 DIAGNOSIS OF THE PDP MODULE 39 8 PANEL FACILITIES 61 ...

Page 6: ... RCA pin x 1 S video S video DIN 4 pin x 1 Audio Stereo RCA x 2 INPUT5 Component RCA pin Y Pb Cb Pr Cr x 1 Audio Stereo RCA x 2 RS 232C D sub 9 pin x 1 Sound Output 8W 8W at 6 ohm Power Supply AC120V 60Hz Current Rating 2 8A Standby Power Consumption 1 7W Dimensions 1080 W x 614 H x 89 D mm Weight 29 5 kg Environmental Considerations Operating Temperature 0 C to 40 C 32 F to 104 F EMI Class B FAN ...

Page 7: ...PDP 425MX 7 5 6 7 8 5 6 7 8 C D F A B E ...

Page 8: ... some component parts indicates the importance of the safety factor of the part Therefore when replacing be sure to use parts of identical designation Screws adjacent to mark on product are used for disassembly For the applying amount of lubricants or glue follow the instructions in this manual In the case of no amount instructions apply as you think it appropriate NOTES 1 11 12 13 14 10 3 2 4 6 8...

Page 9: ... HBPH3005014 HBPH3005 REV3A 7 EPE Bag VG3 HAVG3001018 HAVG3001 REV3A 8 Carton BASE PH3 HFPH3001012 HFPH3001 REV3A 9 Carton CLASP VV3 JXVV3001013 JXVV3001 REV3A 10 Box Accessory PH3 HEPH3001011 HEPH3001 REV3B 11 PWR Cord See Contrast table 2 12 Remote Control DQ700709610 7096 01 0013 DQP C962 LF NSP 13 Battery LR03 K Alkaline 1 5V EP AHDALR03138 14 Clean Cloth PH3 JXPH3002016 JXPH3002 REV3A 15 Cabl...

Page 10: ... 99 97 38 31 98 56 57 107 49 45 41 34 61 71 72 94 62 62 76 63 74 88 75 92 100 115 113 91 106 1 2 4 6 6 59 58 60 102 114 95 5 3 55 77 77 70 68 55 67 15 82 36 81 2 79 2 86 4 85 25 87 9 89 20 111 67 83 14 90 8 84 11 109 3 A C B D E F I L K J G H 78 64 101 112 96 21 110 103 66 93 78 53 69 102 105 104 ...

Page 11: ...PDP 425MX 11 5 6 7 8 5 6 7 8 C D F A B E A B C D E F G H I J K L 11 10 9 8 14 13 17 20 22 24 32 33 16 19 25 27 29 30 30 23 23 23 28 2 33 37 40 40 39 35 36 43 43 44 42 48 46 51 50 47 ...

Page 12: ...4 x 8 PH3 EBPH3011014 EBPH3011 REV 3A 30 Cable Clip 21 x 17 PH3 EBPH3014013 EBPH3014 REV 3A 31 PH3 Bracket Audio Assy 39PH3BR0041 32 BKT Audio 42 x M3 PH3 FAPH3013016 FAPH3013 REV 3D 33 Cable Clip 21 x 17 PH3 EBPH3014013 EBPH3014 REV 3A 34 PH3 Bracket 232C Assy 39PH3BR0067 35 BKT 232C 42 x M3 PH3 FAPH3014012 FAPH3014 REV 3A 36 Cable Clip 19 x 12 PH3 EBPH3010018 EBPH3010 REV 3A 37 Gasket EMI 3 PH3 ...

Page 13: ...rew T3 x 12 P BNI ME30120PJ64 88 Screw M4 x 8 B BNI MM40080BK40 89 Screw T4 x 12 B BNI ME40120BJ24 90 IO Nut PH3 MBPH3001019 MBPH3001 REV 3A Mark No Description Part No 91 Cable Assy PH3 Audio A DD0PH3AB009 11P 11P 2A EU 92 Cable Assy PH3 Button A DD0PH3TH001 8P 7P 2A EU 93 Cable Assy PH3 Button B DD0PH3TH108 7P 7P 2A EU 94 Cable Assy PH3 Switch DD0PH3PI005 9P 9P 2A EU 95 Cable Assy PH3 LED DD0PH3...

Page 14: ...he same version of Scan Relay Board Up 02A 01C 01C 02C 02C Scan Relay Board Down PKG42H5E2 01A 01A 02A Scan Relay Board up should be combined with the same version of Scan Relay Board Down 02A 01A 01C 02C 02C Scan Relay Board Up PKG42H5E1 01A 01A 02A 02A Common Relay Board PKG42H5J3 01A Scan Relay Board Center PKG42H5E3 50X6E3 01A 01A 02A 01A 02A 02A 02A Data Relay Board Right Up PKG42H5J6 01A 01A...

Page 15: ...12 FFC42H5 05 9S500025 1 㪩㪼㪽㪼㫉㩷㫋㫆㩷㫋㪿㪼㩷㪹㪼㫃㫆㫎㩷㪽㫀㪾㫌㫉㪼 13 FFC42H5 01 9S500021 1 㪩㪼㪽㪼㫉㩷㫋㫆㩷㫋㪿㪼㩷㪹㪼㫃㫆㫎㩷㪽㫀㪾㫌㫉㪼 14 FFC61C2 08 9S500020 1 㪩㪼㪽㪼㫉㩷㫋㫆㩷㫋㪿㪼㩷㪹㪼㫃㫆㫎㩷㪽㫀㪾㫌㫉㪼 15 FFC42H5 02 9S500022 1 㪩㪼㪽㪼㫉㩷㫋㫆㩷㫋㪿㪼㩷㪹㪼㫃㫆㫎㩷㪽㫀㪾㫌㫉㪼 16 FFC42H5 03 9S500023 1 㪩㪼㪽㪼㫉㩷㫋㫆㩷㫋㪿㪼㩷㪹㪼㫃㫆㫎㩷㪽㫀㪾㫌㫉㪼 17 FFC42H5 04 9S500024 1 㪩㪼㪽㪼㫉㩷㫋㫆㩷㫋㪿㪼㩷㪹㪼㫃㫆㫎㩷㪽㫀㪾㫌㫉㪼 18 CABLE42H5 01 9S600016 2 㪩㪼㪽㪼㫉㩷㫋㫆㩷㫋㪿㪼㩷㪹㪼㫃㫆㫎㩷㪽㫀㪾㫌㫉㪼 19 CABLE42H5 02 9S600017 2 㪩㪼㪽㪼㫉㩷㫋㫆㩷㫋㪿㪼㩷㪹...

Page 16: ...ERALL DIAGRAM Audio Board Power Board LVDS cable PV 8pin PA 7pin Button A 7pin Button B 7pin LED 5pin Audio B 3pin Audio A 11pin Switch 9pin PN 12pin Button Board IR Board Power Switch Board Main Board To FAN To sensor 50 model only System Block and Wiring Diagram ...

Page 17: ...PIO FAN Control Circuit Audio Switch 1 De interlacer 2 Video Enhancement a DCTI DLTI b W B expansion c Digital brightness contrast hue and saturation control 3 Image Scaling Pixelworks PW318B 1 Internal SW 2 Volume and Tone Control 3 Build in AGC Function Pre Amplifier NJW1141 1 Class T Architecture 2 8W 8W Output Audio Amplifier TAA2008 R G B Hs Vs Digital Output DR G B 0 29 U5 Receiver DS90CF388...

Page 18: ...instant but disappear immediately Supply signals from a PC to INPUT 1 2 If no signal is input to any input connector of the unit the system enters Burn In mode D Fig 2 2 FACTORY MODE User setting values will be reset to default initial settings 2 1 How to enter Factory mode To enter Service Factory mode simultaneously press the VOL key A and RIGHT key B of the unit See Fig 3 Then press the Menu ke...

Page 19: ...ntrol unit CURSOR key VOLUME key or Remote control unit CURSOR key STADBY ON POWER OFF Menu key Input key HOURMETER SIGNAL CHECK mode Burn In mode Check input source signal Auto Adjustment OSD Menu Screen auto adjust Auto White Balance ADC IC Select ADC chip Initial EEPROM Color temperature select R G B Gain and Bias set No Signal Service Factory Mode ...

Page 20: ...OL key to execute the adjustment Press the menu again to close the service factory mode 2 3 2 Service Menu P A H x _ 1 S _ I C J P _ 0 _ B F o a c t o d I e N P U T 1 r y M A t d j u s N O I M D x x x x x x x x x x x x x x x x x x 0 3 3 0 A u t o t m e n a l E E I n i t i M o v e t t e S i n g t e R M E N U u r n P R O M e t m p C o l o r n R G a i n G G a i n B G a i s R B i a s G B i a s B B i a...

Page 21: ...the gains and biases adjustment for R G B three Channels in ADC device Enable Disable ADC IC To select which device is selected for Auto White Balance PW3300 AD9883 Initial EEPROM Execute the initial setting of EEPROM device Yes No Color Temperature Change the color temperature setting value Low Middle Low Middle Middle High High R GAIN Gain value for Red Channel of ADC device 0 255 G GAIN Gain va...

Page 22: ...e Menu key B to open the Service factory Menu Press the RIGHT RIGHT key C to select the adjustment item Press the VOL VOL D to execute the adjustment Press the Menu key B again to close the service factory mode See Fig 4 P A H x _ 1 S _ I C J P _ 0 _ B F o a c t o d I e N P U T 2 r y M A t d j u s N O I M D x x x x x x x x x x x x x x x x x x A u t o t m e n a l E E I n i t i M o v e t t e S i n g...

Page 23: ...ddle Middle High High R GAIN Gain value for Red Channel of ADC device 0 512 G GAIN Gain value for Green Channel of ADC device 0 512 B GAIN Gain value for Blue Channel of ADC device 0 512 R BIAS Black level for Red Channel of ADC device 0 512 G BIAS Black level for Green Channel of ADC device 0 512 B BIAS Black level for Blue Channel of ADC device 0 512 2 4 3 Key command Rem Code Key Name Key Pad F...

Page 24: ...t source to input 5 Press the input 5 key on RUC or INPUT SET A key Press the Menu key B to open the Service factory Menu Press the RIGHT RIGHT key C to select the adjustment item Press the VOL VOL D to execute the adjustment Press the Menu key B to close the service factory mode See Fig 5 P A H X _ 1 S _ I C J P _ 0 _ B F o a C t o d I e N P U T 3 r y M W a h i t e 8 3 9 8 N O I M D x x x x x x x...

Page 25: ... Black level for Green Channel of ADC device 0 512 BIAS Black level for Blue Channel of ADC device 0 512 Timing Mode 720 x483 59 94 Hz 483p Test Pattern SMPTE COLOR BAR 6 To leave service factory mode Press the VOL A and RIGHT B two keys again in the key pad simultaneously and current system working mode is in the serv factory mode the system will leave the service factory mode and do the service ...

Page 26: ...nd Memu BHI 000 100 Adjusts the B High for color temp User Picture Menu BLW 000 100 Adjusts the B Low for color temp User Picture Menu BRT 000 100 Adjusts the brightness Picture Menu CFR 000 100 Adjusts the clock Screen Menu CLSS01 Color system AUTO Options Menu 1 CLSS02 Color system NTSC Options Menu 1 CLSS03 Color system PAL Options Menu 1 CLSS04 Color system SECAM Options Menu 1 CLSS05 Color sy...

Page 27: ...en Menu IDC Clear the ID set to 0x00 t b f IDSS 00 FF Set the ID 00 FF Options Menu 1 INPS01 Switches the main screen to INPUT1 IR key input1 INPS02 Switches the main screen to INPUT2 IR key input2 INPS03 Switches the main screen to INPUT3 IR key input3 INPS04 Switches the main screen to INPUT4 IR key input 4 INPS05 Switches the main screen to INPUT5 IR key input 5 LGES01 Language English Options ...

Page 28: ...u 2 SMLS04 Side mask level 4 Options Menu 2 SOFS00 Soft focus OFF Options Menu 2 SOFS01 Soft focus 1 Options Menu 2 SOFS02 Soft focus 2 Options Menu 2 SOFS03 Soft focus 3 Options Menu 2 SOFS04 Soft focus 4 Options Menu 2 SZMS00 Sets the screen size to Dot by Dot SZMS01 Sets the screen size to 4 3 SZMS02 Sets the screen size to FULL SZMS03 Sets the screen size to ZOOM SZMS05 Sets the screen size to...

Page 29: ...0 28 13 74 25 Tri_level Tri_level SIGNAL V Freq Hz H Freq kHz Dot Clock MHz H Sync Polarity V Sync Polarity RGB Select DVI Standard 640 x 400 PC98 70 1 31 5 25 2 NEGA NEGA N A PC98 PC by NEC 640 x 480 VGA 59 9 31 5 25 2 NEGA NEGA N A VESA standard 72 8 37 9 31 5 NEGA NEGA N A VESA standard 75 0 37 5 31 5 NEGA NEGA N A VESA standard 85 0 43 3 36 0 NEGA NEGA N A VESA standard 848 x 480 WVGA 60 0 31 ...

Page 30: ...7 100 0 Sync on G Sync on G N A Mac 21 sync on G 1440 x 900 59 9 55 9 106 5 NEGA NEGA N A Apple17 1280 x 1024 EWS4800 1 60 0 64 6 1 NEGA NEGA N A EWS Work Station 1280 x 1024 EWS4800 71 2 75 1 125 0 NEGA NEGA N A EWS Work Station 1280 x 1024 HP 72 0 78 1 135 0 POSI POSI N A HP Work Station 1152 x 900 SUN 66 0 61 8 92 9 C sync C sync N A SUN C sync 76 0 71 7 105 6 C sync C sync N A SUN C sync 1280 ...

Page 31: ...G 2K SOIC EP AKE3K8B0Y50 Q26 Q28 Q33 TRAN SMD MMBT3906LT1G 40V 200MA EP BA039060013 U1 IC 16P MAX232DR SOIC EP AL000232019 IC 8P LM393DR2G SO 8 EP AL000393047 PH3 M B S S ASSY M M M MI I I IS S S SC C C CE E E EL L L LL L L LA A A AN N N NE E E EO O O OU U U US S S S L1 L3 IND 560NH 230MA 5 LLQ2012 FR56J EP CV 5603JN03 L4 L6 IND SMD 10NH 5 300MA HK212510NJ T EU CVA1003JZ17 FB1 FB9 EMI FBMA 10 1608...

Page 32: ...P 27MHZ 20PPM 20PF 9B27000100 EP BG627000220 Y2 XTAL 14 318MHZ 20PPM 16PF 9B14300511 EP BG614318188 PCB AUDIO B PH3 AB ASSY M M M MI I I IS S S SC C C CE E E EL L L LL L L LA A A AN N N NE E E EO O O OU U U US S S S D90 D92 DIODE SMD SW1010CPT 100V 100MA EP BC001010Z17 U900 IC 30P NJW1141M ZZZB SDMP EP AL001141017 U901 IC 3P MM1117DTA TO 252 EP AL0011170W7 U902 IC 32P TAA2008 QFN EP AL002008001 FB...

Page 33: ...U U US S S S S1 S2 S3 S4 S5 S6 SWITCH PUSH BUTTON STS 017 A EP DHPSTS01705 PH3 BUTTON B ASSY M M M MI I I IS S S SC C C CE E E EL L L LL L L LA A A AN N N NE E E EO O O OU U U US S S S CN1 CONN DIP HEADER 7P 1R MR P1 25 H3 5 EP DFHD07MR0A2 PCB SENSOR B ASSY M M M MI I I IS S S SC C C CE E E EL L L LL L L LA A A AN N N NE E E EO O O OU U U US S S S Q1 TRANSISTOR DIP 2N3904RLRAG TO 92 EP BAN39040D01...

Page 34: ...e the Back cover Refer to Back cover section 2 Remove the Front panel 2 Remove the Front panel Back Cover Front Panel Assy Back Cover section Front Panel section 1 4 1 x 8 1 x 6 2 2 2 1 3 2 2 2 1 x 5 1 x 5 3 3 3 x 37 x 6 x 4 x 3 x 2 x 6 x 2 x 3 x 2 x 6 x 2 1 Remove the 6 screws x 6 Back Cover Back Cover Front panel 1 1 1 1 1 1 2 1 1 1 Method 1 Method 2 ...

Page 35: ...Assy 10 Remove the M B Assy 9 Remove the 6 Hexagon head screws 3 Remove the 4 screws 2 Remove the bracket option L Assy 4 Remove the shield cover main Assy 5 Disconnect the 4 connectors 1 Disconnect the 3 connectors 6 Remove the screw and GND terminal Input Block 2 Power Block 3 1 1 5 7 7 8 9 8 7 5 5 3 2 4 6 10 2 2 2 2 1 1 1 2 2 Pwr Assy Input Assy ...

Page 36: ...e the 2 screws 5 Remove the 17 screws 3 Remove the 4 screws 2 4 6 Remove the screw and GND terminal 7 Disconnect the connectors Sub flme Assy Block 4 1 1 6 7 6 5 7 3 2 4 5 5 5 5 5 5 5 Remove the bracket option L Assy Remove the shield cover main Assy ...

Page 37: ...PDP 425MX 37 5 6 7 8 5 6 7 8 C D F A B E 1 1 Remove the sub flame Assy Block 1 2 Remove the Gasket 2 1 Remove the module Block Sub flme Assy Block Panel module Block Module Block ...

Page 38: ...PDP 425MX 38 1 2 3 4 1 2 3 4 C D F A B E 1 Remove the 12 screws 2 Remove the 12 screws 3 Remove the 12 screws Front Panel Assy Block 5 3 3 3 2 1 1 2 x 6 x 6 x 6 x 6 x 6 x 3 x 3 ...

Page 39: ...the product 1 Model Serial No and Panel ID 2 Panel Crack Exchange PDP Reconnect or exchange Reuse 3 Connectors Cables Phenomenon NG NG OK OK OK NG Reproduction Follow the procedure below for failure diagnosis Keep wearing Antistatic List Band until you finish the work 4 Pixel Defect 8 Power off 5 Vertical Line 6 Horizontal Line 7 Picture Defect ...

Page 40: ...e photographs below to find Model Serial No and Panel ID 2 Panel Crack Refer to the photographs below to check panel for crack Panel may be cracked due to handling during or after transportation Model Serial No Panel ID 222407145612 Above Example Model NP42H5MF01AA Serial No 408200943 ...

Page 41: ...ng right procedure of connection Caution Take care for the cable handling Careless handling in production line may cause this failure Common Voltage Flexible Cable Data Relay Flexible Cable UP Data Relay Flexible Cable Down Data Relay Board LD Digital Board Data Relay Board RD Scan Relay Board D Scan Relay Board U Data Relay Board LU Data Relay Board RU Scan Voltage Flexible Cable High Voltage Boa...

Page 42: ...ked High voltage Board Photo Digital Board Scan Relay Board Photo Panel Common Relay Board Photo Panel Digital Board Photo High Voltage Board High Voltage Board Photo Data Relay Board High Voltage Board Photo Scan Relay Board Photo Data Relay Board Photo Panel Common Connection Board Photo Common Relay Board High Voltage Board Photo Common Relay Board Photo ...

Page 43: ...fect Refer to the below for diagnosis Symptom Bright defect or dark defect Cause Countermeasure PDP failure if out of spec Exchange PDP Note Typical Symptom are only shown Another Symptom might appear 1 pixel 2 pixels 2 pixels 3 pixels 3 pixels 3 pixels ...

Page 44: ...ttern Normal All Blue Pattern Red 1 Line All Black Pattern Normal All Green Pattern Red 1 Line All Blue Pattern Red 1 Line All Black Pattern Normal Cause Countermeasure 1 Failure in Data IC Exchange PDP 2 Failure in panel Exchange PDP Cause Countermeasure 1 Open or contact failure of Data flexible cable Clean Reconnect or exchange connector 2 Failure in Data IC Exchange PDP Cause Countermeasure 1 ...

Page 45: ...y Board U D Clean Reconnect or exchange connector 3 Contact failure of connector between Scan Board and Scan Relay Board Clean Reconnect or exchange connector 4 Short between terminals of Scan IC due to screw dust Clean around the terminals 7 Picture Defect 7 1 Symptom No Picture Priming flash Note Typical symptom are only shown Another Symptom might appear Cause Countermeasure 1 F302 open Exchang...

Page 46: ... Pin 1 and GND Pin 2 or 6 Data Relay Board RU is failed Exchange Data Relay Board RU Data Relay Board LD Data Relay Board RD CN7909 CN7909 CN7808 CN7908 Cause Countermeasure 4 If the connector CN7909 disconnected from Data Relay Board RD is short circuited between Pin 1 or 2 and GND Pin 3 or 4 Data IC is broken Exchange PDP 5 If the connector CN7909 disconnected from Data Relay Board RD is short c...

Page 47: ...15 18 E 24 F 33 35 G 39 40 H 49 50 I 53 J 55 56 7 2 Symptom No Picture Priming doesn t flash if W X terminals are short circuited Cause Countermeasure No Diode characteristic Exchange High Voltage Board 7 3 Symptom No Picture Priming doesn t flash Cause Countermeasure R146 open Exchange High Voltage Board R146 High Voltage Board Surface High Voltage Board Reverse Check points OK Diode characterist...

Page 48: ...ngular color shear color discrepancy shear in display Out of synchronization or duplication Mosaic One or more vertical bands Multiple vertical lines Cause Countermeasure 1 Contact failure of connector adjacent to Digital Board or short circuit due to conductive obstacle Clean or Reconnect 2 Failure in circuit on Digital Board Failure in Digital Board ...

Page 49: ...ymptom are only shown Another Symptom might appear F1 Cause Countermeasure 1 F301 open Exchange High Voltage Board 2 FU801 open Exchange Digital Board 3 F1 open Exchange High Voltage Board Chip Fuse FU801 Digital Board OK Short NG Open Glass Fuse F301 High Voltage Board OK Short NG Open High Voltage Board OK Short NG Open ...

Page 50: ...tween NEGA POSI on High Voltage Board Exchange High Voltage Board 5 Short between NEGA POSI on Scan Relay Board U Exchange Scan Relay Board U 6 Short between NEGA POSI on Scan Relay Board D Exchange Scan Relay Board D Scan Relay Board U High Voltage Board Scan Relay Board D High Voltage Board Checkpoint NEGA POSI OK More than KΩ NG Short Checkpoint NEGA POSI OK More than KΩ NG Short ...

Page 51: ...25MX 51 5 6 7 8 5 6 7 8 C D F A B E 8 2 Symptom No Picture Power off Priming flash Cause Countermeasure R91 open Exchange High Voltage Board Fuse Resistor R91 R91 OK About 2 2Ω 1W NG Open High Voltage Board ...

Page 52: ...ange High Voltage Board 8 4 Symptom White Pattern even in no signal Power off Cause Countermeasure R150 open Exchange High Voltage Board Dark and rough picture Many light spots on dark portion Fuse Resistor R150 Fuse Resistor R43 R61 R43 OK About 3 3Ω 2W NG Open R61 OK About 4 7Ω 2W NG Open R150 OK About 4 7Ω 2W NG Open ...

Page 53: ...duct 1 Disconnect connectors and cables on failed Board 2 Detach failed Board 2 Put on good Board 3 Connect connectors and cables Follow the procedure below for diagnosis Procedure Caution Put cushion under failed PDP to cover general surface of glass before laying it s screen down ...

Page 54: ... next Page for the procedure 2 Loosen screws of failed Board and put on good Board Data Relay Board LU 3 screws Common Connection Board 9 screws Scan Relay Board U 2 screws Scan Relay Board D 2 screws Scan Relay Connection Board 2 screws Data Relay Board RU 3 screws Data Relay Board LD 3 screws Data Relay Board RD 3 screws Caution Be careful not to leave screwdriver screw or screw dust Be sure to ...

Page 55: ...Sink heat conductive silicone sheet See Photo 4 Heat Sink Repeat 1 2 3 4 1 Slowly swing Heat Sink back and forth 1 2 2 Gently lift Heat Sink up from Data TCP 1 2 3 Repeat 1 and 2 until Heat Sink is taken off 3 Before detaching Heat Sink and Data TCP Reverse of Heat Sink Heat conductive silicone sheet Data TCP mounted On flexible cable Be careful of sticking ...

Page 56: ... Data Relay Board Data Relay Board LU 8 connectors Common Connection Board 5 connectors Scan Relay Board U 5 connectors Scan Relay Board D 5 connectors Data Relay Board RU 9 connectors Data Relay Board LD 8 connectors Data Relay Board RD 9 connectors Common Relay Board 1 connector Digital Board 7 connectors High Voltage Board 6 connectors ...

Page 57: ...Inspection Voltage Adjust Aging Display Inspection Trouble Shooting Reuse next process Detach PDP from Jig Keep it if PDP is assembled Into product set Caution Be sure to connect a Signal Cable and two Power Cables Otherwise High Voltage Board may be broken OK NG Example of mounting to jig ...

Page 58: ...irm voltages on Voltage label before conducting adjustment 3 Adjustment of Vsw1 Vsw2 Caution Use the nearest chassis for grounding Vsw1 Adjust VR3 so that the voltage between Test Pad TP328 and GND becomes Rated Voltage on Label 0 5V Vsw2 Adjust VR4 so that the voltage between Test Pad TP310 and GND becomes Rated Voltage on Label 0 5V Example Vbw 115 2 Vsw1 220 2 Vp 249 8 Vsw2 210 1 s190 0 d70 0 1...

Page 59: ...arest chassis for grounding Vp Adjust VR1 so that the voltage between Test Pad TP327 and GND becomes Rated Voltage on Label 0 5V Vbw Adjust VR2 so that the voltage between Test Pad TP329 and GND becomes Rated Voltage on Label 0 5V TP327 Vp TP329 Vbw VR2 Vbw VR1 Vp High Voltage Board ...

Page 60: ...minutes Caution Do not use a fixed pattern such as window or cross hatch for aging White Red Green Blue Color Bars Gray Scale 6 Display Inspection Confirm that every signal picture is good Caution PDP module may have instable picture display if electrified after a long storage Then conduct aging for about 2 hours ...

Page 61: ...e 10 INPUT 5 COMPONENT Direct access of input 5 YUV source 11 MENU Displays the menus screen Leave the menus screen 12 UP ARROW Navigate up in the OSM 13 LEFT ARROW Navigate left in the OSM 14 RIGHT ARROW Navigate right in the OSM 15 DOWN ARROW Navigate down in the OSM 16 SET Accept the selected item in the OSM Change the setting value of selected item which don t has the sub menu Return to the pr...

Reviews: