English
OSD (On Screen Display) Controls
14
En
Picture Settings Menu
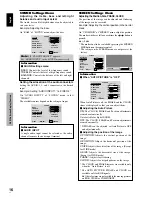
Adjusting the picture
The contrast, brightness, sharpness, color and tint can be
adjusted as desired.
Example: Adjusting the contrast
On “CONTRAST” of “PICTURE” menu, adjust the contrast.
PICTURE
1 / 2
CONTRAST
BRIGHTNESS
SHARPNESS
COLOR
TINT
AV SELECTION
DNR
NEXT PAGE
: STD
: OFF
SEL.
ADJ.
EXIT RETURN
CONTRAST
5 2
Note:
If “CAN NOT ADJUST” appears ...
When trying to enter the PICTURE submenu, make sure
AV SELECTION is not set to DEFAULT.
Information
Picture adjustment screen
CONTRAST:
Changes the picture’s white level.
BRIGHTNESS:
Changes the picture’s black level.
SHARPNESS:
Changes the picture’s sharpness.
Adjusts picture detail of VIDEO display.
COLOR:
Changes the color density.
TINT:
Changes the picture’s tint. Adjust for natural
colored skin, background, etc.
Adjusting the computer image
Only the contrast and brightness can be adjusted when
a computer signal is connected.
Restoring the factory default settings
Select “DEFAULT” under the “AV SELECTION”
settings.
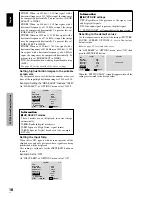
Setting the picture modes according to the
brightness of the room
There are four picture modes that can be used effectively
according to the environment in which you are viewing
the display.
Example: Setting the “MOVIE 1” mode
On “AV SELECTION” of “PICTURE” menu, select
“MOVIE 1”.
PICTURE
1 / 2
CONTRAST
BRIGHTNESS
SHARPNESS
COLOR
TINT
AV SELECTION
DNR
NEXT PAGE
:
STD
: OFF
SEL.
ADJ.
EXIT RETURN
AV SELECTION
:
MOVIE 1
Information
Types of AV SELECTIONS
MOVIE 1, 2:
Set this mode when watching video in a
dark room.
This mode provides darker, finer pictures, like the
screen in movie theaters.
For a darker image, select MOVIE 2.
STD:
Set this mode when watching video in a bright room.
This mode provides pictures with distinct differences
between light and dark sections.
DYNAMIC:
This mode provides brighter pictures than
STD.
DEFAULT:
Use this to reset the picture to the factory
default settings.
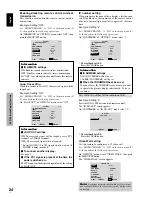
Reducing noise in the picture
Use these settings if the picture has noise due to poor
reception or when playing video tapes on which the picture
quality is poor.
Example: Setting “HIGH”
On “DNR” of “PICTURE” menu, select “HIGH”.
PICTURE
1 / 2
CONTRAST
BRIGHTNESS
SHARPNESS
COLOR
TINT
AV SELECTION
DNR
NEXT PAGE
: STD
:
OFF
SEL.
ADJ.
EXIT RETURN
DNR
:
HIGH
Information
DNR
* “DNR” stands for Digital Noise Reduction.
* This function reduces noise in the picture.
Types of noise reduction
There are three types of noise reduction. Each has a
different level of noise reduction.
The effect increases stronger in the order of LOW, MID
and High.
OFF:
Turns the noise reduction function off.
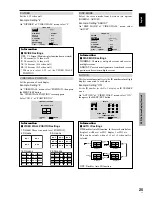
Setting the color temperature
Use this procedure to set color tone produced by the plasma
display.
Example: Setting “HIGH”
On “COLOR TEMP.” of “PICTURE” menu, select “HIGH”.
PICTURE
2 / 2
PREVIOUS PAGE
COLOR TEMP.
GAMMA
LOW TONE
C.DETAIL ADJ.
:
HIGH
: 2
: AUTO
SEL.
ADJ.
EXIT RETURN
Information
Setting the color temperature
LOW:
Redder
MID LOW:
Slightly red
MID:
Standard (slightly bluer)
HIGH:
Bluer


