background image

6

En

PTY list

For more details about PTY list, visit the following site:
http://www.pioneer.eu/eur/products/25/121/tech/CarAudio/PTY.html

Disconnect headphones from the device before connecting it to the unit.

USB devices (including Android)

1

Open the USB port cover.

2

Plug in the USB device using an appropriate cable.

 CAUTION

Use an optional Pioneer USB cable (CD-U50E) to connect the USB device as any device 
connected directly to the unit will protrude out from the unit, which could be dangerous.

Before removing the device, stop playback.

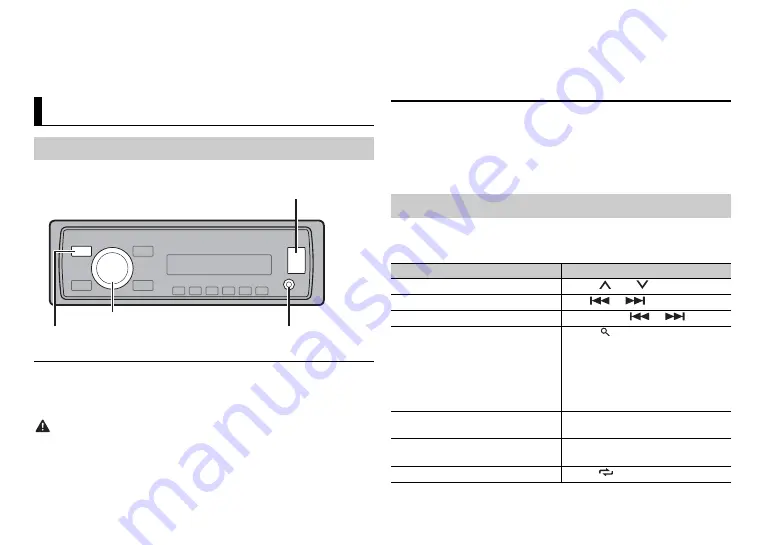
USB/AUX

Playing back

AUX input jack (3.5 mm stereo jack)

USB port

SRC (source)/OFF

M.C. (multi-control) dial

MTP connection

A device installed with Android OS 4.0 or later can be connected to the unit via MTP, using 
the cable supplied with the device. However, depending on the connected device and the 
numbers of the files in the device, audio files/songs may not be able to be played back via 
MTP. Note that MTP connection is not compatible with WAV file formats.

AUX

1

Insert the stereo mini plug into the AUX input jack.

2

Press 

SRC

/

OFF

 to select [AUX] as the source.

NOTE

If [AUX] is set to [OFF] in the SYSTEM settings, [AUX] cannot be selected as a source (page 9).

You can make various adjustments in the FUNCTION settings (page 7).
Note that the following operations do not work for an AUX device. To operate 
an AUX device, use the device itself.

Operations

Purpose

Operation

Select a folder/album*

Press 

1

/


or 

2

/

.

Select a track/song (chapter)

Press 

 or 

.

Fast forward or reverse

Press and hold 

 or 

.

Search for a file from a list

1

Press 

 to display the list.

2

Turn the 

M.C.

 dial to select the 

desired file (folder) name or 
category, then press to confirm.

3

Turn the 

M.C.

 dial to select the 

desired file, then press to confirm.
Playback starts.

View a list of the files in the selected 
folder/category*

Press the 

M.C.

 dial when a folder/

category is selected.

Play a song in the selected folder/
category*

Press and hold the 

M.C.

 dial when a 

folder/category is selected.

Repeat play

Press 

6

/

.

Summary of Contents for MVH-089UB

Page 1: ...English DIGITAL MEDIA RECEIVER MVH 089UB Owner s Manual ...

Page 2: ...tall or service this product by yourself Installation or servicing of this product by persons without training and experience in electronic equipment and automotive accessories may be dangerous and could expose you to the risk of electric shock injury or other hazards Do not attempt to operate the unit while driving Make sure to pull off the road and park your vehicle in a safe location before att...

Page 3: ...ad is connected to the vehicle s auto antenna relay control terminal the vehicle s antenna extends when this unit s source is turned on To retract the antenna turn the source off Display indication Detach the front panel to prevent theft Remove any cables and devices attached to the front panel and turn off the unit before detaching it Return to the normal display from the menu Press BAND Indicati...

Page 4: ...ng step from 10 kHz or 9 kHz 10 9 Detach Attach To return to the first item of the setup menu turn the M C dial to select QUIT NO then press to confirm 4 Press the M C dial to confirm the settings NOTES You can cancel the menu setting by pressing SRC OFF These settings can be made at any time from the SYSTEM settings page 8 and INITIAL settings page 4 1 Press the M C dial to display the main menu ...

Page 5: ...ng preset stations Best stations memory BSM Menu Item Description 1 After selecting the band press the M C dial to display the main menu 2 Turn the M C dial to select FUNCTION then press to confirm 3 Turn the M C dial to select BSM then press to confirm To seek a station manually 1 After selecting the band press to select a station Press and hold then release to seek an available station Scanning ...

Page 6: ... be able to be played back via MTP Note that MTP connection is not compatible with WAV file formats AUX 1 Insert the stereo mini plug into the AUX input jack 2 Press SRC OFF to select AUX as the source NOTE If AUX is set to OFF in the SYSTEM settings AUX cannot be selected as a source page 9 You can make various adjustments in the FUNCTION settings page 7 Note that the following operations do not ...

Page 7: ...e device class protocol only Press BAND Settings FUNCTION settings Purpose Operation Menu Item Description BSM Store the six strongest stations on the number buttons 1 to 6 automatically REGIONAL ON OFF Limit the reception to the specific regional programs when AF alternative frequencies search is selected Available only when FM band is selected LOCAL FM OFF LV1 LV2 LV3 LV4 AM OFF LV1 LV2 Restrict...

Page 8: ...s You can also switch the equalizer by pressing repeatedly Menu Item Description USB 1 Not available when SUB W SUB W is selected in SP P O MODE in the INITIAL settings page 5 2 Not available when REAR REAR is selected in SP P O MODE in the INITIAL settings page 5 3 Not available when OFF is selected in SUB W You can also access to these menus when the unit is turned off LOUDNESS OFF LOW MID HI Co...

Page 9: ...f the screw for the ground wire loosens or falls out it could result in fire generation of smoke or malfunction Important When installing this unit in a vehicle without an ACC accessory position on the ignition switch failure to connect the red cable to the terminal that detects operation of the ignition key may result in battery drain Use this unit with a 12 volt battery and negative grounding on...

Page 10: ...ons when not connecting a rear speaker lead to a subwoofer Perform these connections when using a subwoofer without the optional amplifier Important In the case of above two 4 Ω subwoofers wired in parallel will represent a 2 Ω load To power cord input Left Right Front speaker Rear speaker White White black Gray Gray black Green Green black Violet Violet black Black chassis ground Connect to a cle...

Page 11: ...mounting sleeve by using a screwdriver to bend the metal tabs 90 into place Dashboard Mounting sleeve Make sure that the unit is installed securely in place An unstable installation may cause skipping or other malfunctions When not using the supplied mounting sleeve 1 Line up the holes on the mounting bracket with the holes on the sides of the unit to attach the bracket 2 Screw in one screw on eac...

Page 12: ...ity enabled Additional Information Troubleshooting Error messages Follow the USB device instructions to disable the security SKIPPED TheconnectedUSB device contains DRM protected files The protected files are skipped PROTECT All the files on the connected USB device are embedded with DRM Replace the USB device N A USB The connected USB device is not supported by this unit Disconnect your device an...

Page 13: ...1 1 2 2 2 3 2 4 ID3 tag Version 2 x is given priority over Version 1 x M3u playlist Not compatible MP3i MP3 interactive mp3 PRO Not compatible File extension wav Quantization bits 8 and 16 LPCM 4 MSADPCM Sampling frequency 16 kHz to 48 kHz LPCM 22 05 kHz and 44 1 kHz MS ADPCM USB device There may be a slight delay when starting playback of audio files on a USB storage device with numerous folder h...

Page 14: ...cy 50 Hz 63 Hz 80 Hz 100 Hz 125 Hz 160 Hz 200 Hz Slope 12 dB oct 24 dB oct Gain 6 dB to 24 dB Phase Normal Reverse USB USB standard specification USB 2 0 full speed Maximum current supply 1 A USB Protocol MSC Mass Storage Class MTP Media Transfer Protocol File system FAT12 FAT16 FAT32 MP3 decoding format MPEG 1 2 Audio Layer 3 WMA decoding format Ver 7 7 1 8 9 10 11 12 2 ch audio Windows Media Pla...

Page 15: ...15 En English ...

Page 16: ... QRB3559 A ID 2015 PIONEER CORPORATION All rights reserved ...

Reviews: