30
1
2
4
1
2
4
F
E
D
C
B
A
GM-8437ZT/WL
7. GENERAL INFORMATION
7.1 DIAGNOSIS
7.1.1 DISASSEMBLY
2
1
1
1
1
1
1
Fig.1
DSP Unit
-
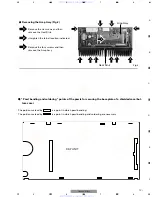
Removing the Case (not shown)
-
Removing the DSP Unit (Fig.1)
1. Remove the two screws and then remove the Case.
Remove the four screws and then
remove the DSP Unit and the
Shield Case together.
Remove the solder and then straighten
the tabs at seven locations indicated.
1
1
2
2
2
2
A
DSP UNIT
AMP ASSY
A
-
Rear View
Tweezers
< Cautions and Techniques for removing the DSP Unit >
There are some cautions and techniques for removing the DSP Unit.
1
Use a pair of tweezers as a lever.
Insert the tips into the upper side-slits (A in Rear View) and get the bottom side of the Shield.
Push the tweezers down in the direction indicated by an arrow in Side View.
2
Now one of the 18-pin connectors gets disconnected from the DSP Unit by doing
1
so that it becomes
easier to detach the DSP Unit.
Lift and remove the DSP Unit and the Shield together.
Be careful not to give any stress to the 18-pin connectors on both sides when removing the DSP Unit
and the Shield.
Shield
www. xiaoyu163. com
QQ 376315150
9
9
2
8
9
4
2
9
8
TEL 13942296513
9
9
2
8
9
4
2
9
8
0
5
1
5
1
3
6
7
3
Q
Q
TEL 13942296513 QQ 376315150 892498299
TEL 13942296513 QQ 376315150 892498299


