


FH-P800BT/XJ/UC
2
1
2
3
4
1
2
3
4
C
D
F
A
B
E
SAFETY INFORMATION
-
Safety Precautions for those who Service this Unit.
When checking or adjusting the emitting power of the laser diode exercise caution in order to get safe, reliable
results.
Caution:
1. During repair or tests, minimum distance of 13 cm from the focus lens must be kept.
2. During repair or tests, do not view laser beam for 10 seconds or longer.
CAUTION:
USE OF CONTROLS OR ADJUSTMENTS OR PERFORMANCE OF PROCEDURES OTHER THAN THOSE
SPECIFIED HEREIN MAY RESULT IN HAZARDOUS RADIATION EXPOSURE.
CLASS 1
LASER PRODUCT
Where in a manufacturer’s service documentation, for example in circuit diagrams or lists
of components, a symbol is used to indicate that a specific component shall be replaced only
by the component specified in that documentation for safety reasons, the following symbol shall
be used:
CAUTION
This service manual is intended for qualified service technicians; it is not meant for the casual do-it-yourselfer.
Qualified technicians have the necessary test equipment and tools, and have been trained to properly and safely repair
complex products such as those covered by this manual.
Improperly performed repairs can adversely affect the safety and reliability of the product and may void the warranty.
If you are not qualified to perform the repair of this product properly and safely, you should not risk trying to do so
and refer the repair to a qualified service technician.
WARNING
This product contains lead in solder and certain electrical parts contain chemicals which are known to the state of
California to cause cancer, birth defects or other reproductive harm.
Health & Safety Code Section 25249.6 - Proposition 65
Summary of Contents for FH-P6050UB
Page 7: ...FH P800BT XJ UC 7 5 6 7 8 5 6 7 8 C D F A B E 2 SPECIFICATIONS 2 1 SPECIFICATIONS ...
Page 8: ...FH P800BT XJ UC 8 1 2 3 4 1 2 3 4 C D F A B E ...
Page 13: ...FH P800BT XJ UC 13 5 6 7 8 5 6 7 8 C D F A B E FH P6050UB XJ ES ...
Page 14: ...FH P800BT XJ UC 14 1 2 3 4 1 2 3 4 C D F A B E FH P6050UB XJ ES ...
Page 15: ...FH P800BT XJ UC 15 5 6 7 8 5 6 7 8 C D F A B E FH P6050UB XJ ES ...
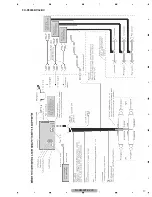
Page 16: ...FH P800BT XJ UC 16 1 2 3 4 1 2 3 4 C D F A B E 2 4 CONNECTION DIAGRAM FH P800BT XJ UC ...
Page 17: ...FH P800BT XJ UC 17 5 6 7 8 5 6 7 8 C D F A B E FH P8000BT XJ UC ...
Page 18: ...FH P800BT XJ UC 18 1 2 3 4 1 2 3 4 C D F A B E FH P80BT XJ EW5 ...
Page 19: ...FH P800BT XJ UC 19 5 6 7 8 5 6 7 8 C D F A B E FH P6050UB XJ ES ...
Page 23: ...FH P800BT XJ UC 23 5 6 7 8 5 6 7 8 C D F A B E ...
Page 28: ...FH P800BT XJ UC 28 1 2 3 4 1 2 3 4 C D F A B E ...
Page 45: ...FH P800BT XJ UC 45 5 6 7 8 5 6 7 8 C D F A B E ...
Page 49: ...FH P800BT XJ UC 49 5 6 7 8 5 6 7 8 C D F A B E ...
Page 50: ...FH P800BT XJ UC 50 1 2 3 4 1 2 3 4 C D F A B E 9 2 EXTERIOR 1 A A D E A A ...
Page 53: ...FH P800BT XJ UC 53 5 6 7 8 5 6 7 8 C D F A B E ...
Page 54: ...FH P800BT XJ UC 54 1 2 3 4 1 2 3 4 C D F A B E 9 3 EXTERIOR 2 B ...
Page 73: ...FH P800BT XJ UC 73 5 6 7 8 5 6 7 8 C D F A B E D D BLUETOOTH UNIT CN800 A ...
Page 77: ...FH P800BT XJ UC 77 5 6 7 8 5 6 7 8 C D F A B E ...
Page 80: ...FH P800BT XJ UC 80 1 2 3 4 1 2 3 4 C D F A B E A A COMBI PWB UNIT ...
Page 81: ...FH P800BT XJ UC 81 5 6 7 8 5 6 7 8 C D F A B E A SIDE B ...
Page 83: ...FH P800BT XJ UC 83 5 6 7 8 5 6 7 8 C D F A B E B SIDE B B KEYBOARD UNIT A CN80 ...