background image

Connecting up

02

10

En

2

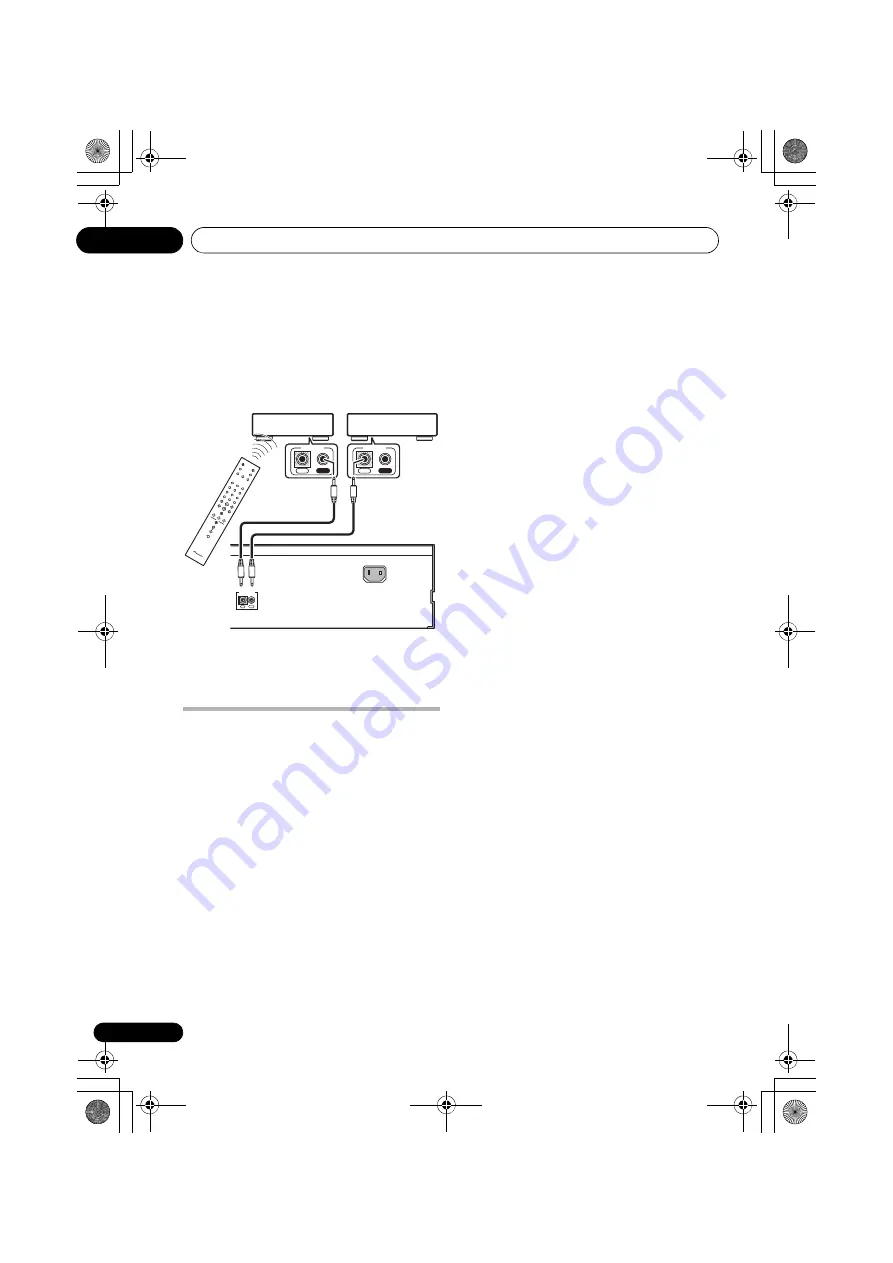
Connect the CONTROL OUT jack of that 

component to the CONTROL IN jack of 
another Pioneer component.

Use a cable with a mono mini-

p

lug on each 

end fo

r

 the connection.

3

Continue the chain in the same way for as 

many components as you have.

Plugging in

Make su

r

e to com

p

lete all connections befo

r

connecting to an AC outlet.

Connect the AC power cord to the AC IN 

inlet on the rear panel of the player, then 
plug into a power outlet.

IN

OUT

CONTROL

AC IN

IN

CONTROL

IN

OUT

CONTROL

OUT

This player

Pioneer component

Pioneer component

PD-D9MK2_en_CUXJ.book  10 ページ  2009年4月3日 金曜日 午後8時52分

Summary of Contents for Elite PD-D9MK2-K

Page 1: ...s ca Canada Protect your new investment The details of your purchase will be on file for reference in the event of an insurance claim such as loss or theft Improve product development Your input helps us continue to design products that meet your needs Receive a free Pioneer newsletter Registered customers can opt in to receive a monthly newsletter Receive free tips updates and service bulletins o...

Page 2: ...rence by one or more of the following measures Reorient or relocate the receiving antenna Increase the separation between the equipment and receiver Connect the equipment into an outlet on a circuit different from that to which the receiver is connected Consult the dealer or an experienced radio TV technician for help D8 10 1 2_A1_En CAUTION USE OF CONTROLS OR ADJUSTMENTS OR PERFORMANCE OF PROCEDU...

Page 3: ...rms or when unused for long periods of time Refer all servicing to qualified service personnel Servicing is required when the apparatus has been damaged in any way such as power supply cord or plug is damaged liquid has been spilled or objects have fallen into the apparatus the apparatus has been exposed to rain or moisture does not operate normally or has been dropped P1 4 2 2_En 11 12 13 14 CAUT...

Page 4: ...u can maximize the fun and excitement your equipment offers This manufacturer and the Electronic Industries Association s Consumer Electronics Group want you to get the most out of your equipment by playing it at a safe level One that lets the sound come through loud and clear without annoying blaring or distortion and most importantly without affecting your sensitive hearing Sound can be deceivin...

Page 5: ...g up Connecting to an amplifier 9 Using the remote sensor of another Pioneer component 9 Plugging in 10 03 Controls and displays Front panel 11 Display 11 Remote control 12 04 Getting started Switching on 13 Playing discs 13 Other playback features 14 05 Other settings and features Listening to Pure Audio 16 Using the SACD CD 16 Using Legato Link Pro 16 Dimming the display 16 Displaying disc infor...

Page 6: ...to Link Conversion Pro and Hi Bit Pioneer s unique Legato Link Conversion system restores high frequency dynamics lost in the digital recording process to fully reproduce all the shading and detail of the original musical performance This results in a minimum amount of phase shift across the entire hearable audio spectrum Twin D A converter 192 kHz 24 bit The on board Twin Wolfson 192 kHz 24 bit D...

Page 7: ... use new and old batteries together Insert the plus and minus sides of the batteries properly according to the marks in the battery case Batteries with the same shape may have different voltages Do not use different batteries together When disposing of used batteries please comply with governmental regulations or environmental public institution s rules that apply in your country or area WARNING D...

Page 8: ...e of which contains DVD content video audio etc while the other side contains non DVD content such as digital audio material The non DVD audio side of the disc is not compliant with the CD Audio specification and therefore may not play For more detailed information on the DualDisc specification please refer to the disc manufacturer or disc retailer Media Compatible formats CD R RW CD Audio ISO 966...

Page 9: ...of an analog connection Using the remote sensor of another Pioneer component Many Pioneer components have SR CONTROL jacks which can be used to link components together This allows you to use the remote sensor of just one component which is useful if you want to put several components out of view for example in a closed shelf space When you use a remote control the control signal is passed along t...

Page 10: ...the chain in the same way for as many components as you have Plugging in Make sure to complete all connections before connecting to an AC outlet Connect the AC power cord to the AC IN inlet on the rear panel of the player then plug into a power outlet IN OUT CONTROL AC IN IN CONTROL IN OUT CONTROL OUT This player Pioneer component Pioneer component PD D9MK2_en_CUXJ book 10 ページ 2009年4月3日 金曜日 午後8時52...

Page 11: ...DBY PURE AUDIO D9 3 4 1 7 2 5 6 8 Note 1 When the unit is in the standby mode if the power is turned off by pressing the main unit s POWER button the power will not turn on if the button is pressed again To turn on the power in this case press either the remote control unit s CD PLAYER button or a different button other than the POWER button on the main unit When the unit is in the standby mode if...

Page 12: ...emote and the remote sensor on the unit The remote has a range of about 7 m 23 ft at an angle of about 30º from the remote sensor Remote operation may become unreliable if strong sunlight or fluorescent light is shining on the unit s remote sensor Remote controllers for different devices can interfere with each other Avoid using remotes for other equipment located close to this unit Replace the ba...

Page 13: ...disc with the label side facing up using the disc tray guide to align the disc Once properly seated press to close the disc tray 4 Press play to start playback Basic playback controls The table below shows the basic controls for playing discs ON OFF POWER STANDBY PURE AUDIO POWER OFF ON CD PLAYER OPEN CLOSE TIME DIMMER SACD CD PUREAUDIO CLEAR ENTER ENTER LEGATO LINK 1 2 3 4 5 6 7 8 0 9 CD PLAYER O...

Page 14: ...ollowing controls during random play Creating a program list This feature lets you program the play order of tracks on a disc 2 1 While stopped press PROGRAM 2 Use the number buttons and ENTER to select a track for the current step in the program list If you accidently enter the wrong track press CLEAR to delete it 3 Repeat step 2 to build up a program list A program list can contain up to 24 trac...

Page 15: ...til you stop playback press play after stop to start normal playback Press PROGRAM then play to restart program play To add more tracks to the program list repeat steps 1 and 2 When the disc is stopped press PROGRAM then CLEAR to erase one track at a time from the end of the list or simply press CLEAR to erase all tracks PD D9MK2_en_CUXJ book 15 ページ 2009年4月3日 金曜日 午後8時52分 ...

Page 16: ...al shadings and nuances above 20 kHz These signals contain important clues about musical texture and shape that define a live musical event Pioneer s Legato Link Pro Conversion system uses psychoacoustic processing to restore missing high frequency dynamics to fully recapture all the shading and detail of the original performance Press LEGATO LINK to switch Legato Link Pro Conversion on or off The...

Page 17: ...he television uses an indoor antenna Use in a kitchen or other room where the player may be exposed to smoke or steam Use on a thick rug or carpet or cover with cloth this may prevent proper cooling of the unit Place on an unstable surface or one that is not large enough to support all four of the unit s feet Taking care of your player and discs General Hold discs by the edge or by the center hole...

Page 18: ...ead the instructions carefully before use These cloths may leave smear marks on half mirror finish surfaces if this happens finish with a dry cloth Cleaning the pickup lens The player s lens should not become dirty in normal use but if for some reason it should malfunction due to dust or dirt consult your nearest Pioneer authorized service center We do not recommend using commercially available le...

Page 19: ...oid using the player near an air conditioning unit The remote control doesn t seem to work The remote control is too far from the player or the angle with the remote sensor is too wide Use the remote within its operating range page 12 If you re trying to switch on using the remote control make sure the front panel POWER button is switched on first The battery is exhausted Replace the battery page ...

Page 20: ...ion is a technology designed to prevent unauthorized copying by restricting playback etc of compressed audio files on devices other than the PC or other recording equipment used to record it For detailed information please see the instruction manuals or help files that came with your PC and or software File extension A tag added to the end of a filename to indicate the type of file For example mp3...

Page 21: ...ono stereo audio cable 1 SR control cable 1 Power cable 1 Warranty card Operating Instructions This document Note Specifications and the design are subject to possible modifications without notice due to improvements Published by Pioneer Corporation Copyright 2009 Pioneer Corporation All rights reserved PD D9MK2_en_CUXJ book 21 ページ 2009年4月3日 金曜日 午後8時52分 ...

Page 22: ...e D3 4 2 1 7c _A1_Fr PRÉCAUTION DE VENTILATION Lors de l installation de l appareil veillez à laisser un espace suffisant autour de ses parois de manière à améliorer la dissipation de chaleur au moins 5 cm sur le dessus 10 cm à l arrière et 5 cm de chaque côté AVERTISSEMENT Les fentes et ouvertures du coffret sont prévues pour la ventilation pour assurer un fonctionnement stable de l appareil et p...

Page 23: ... attacher à d autres câbles Les câbles d alimentation doivent être posés de façon à ne pas être écrasés Un câble abîmé peut provoquer un risque d incendie ou un choc électrique Vérifier le câble d alimentation de temps en temps Contacter le service après vente PIONEER le plus proche ou le revendeur pour un remplacement S002 _Fr ATTENTION Cet appareil est un produit laser de Classe 1 mais la diode ...

Page 24: ...tilisation du capteur à distance d un autre appareil Pioneer 8 Branchement 9 03 Commandes et écrans Panneau avant 10 Écran 10 Télécommande 11 04 Démarrage Mise sous tension 12 Lecture d un disque 12 Autres fonctions de lecture 13 05 Autres réglages et fonctions Écoute en mode Pure Audio 15 Utilisation du SACD CD 15 Utilisation de Legato Link Pro 15 Atténuation de l affichage 15 Affichage des infor...

Page 25: ...e reproduction du son de haute fidélité Legato Link Conversion Pro et Hi Bit Le système Legato Link Conversion unique de Pioneer rétablit les pertes dynamiques de haute fréquence dans le processus d enregistrement numérique pour reproduire complètement toutes les nuances et les détails de l événement musical original Cela entraîne une quantité réduite de glissements de phase sur l ensemble du spec...

Page 26: ...et négatif des piles en suivant les marques du boîtier Des piles de forme identique peuvent présenter des tensions différentes Utilisez uniquement des piles du même type Lorsque vous vous débarrassez de piles usées veuillez vous conformer aux réglementations gouvernementales ou environnementales des institutions publiques en vigueur dans votre pays ou votre région AVERTISSEMENT N utilisez pas et n...

Page 27: ...tant du contenu DVD vidéo audio etc et l autre comportant du contenu non DVD tel que des données audio numériques La face audio non DVD du disque n est pas conforme aux spécifications des CD audio et il se peut donc que la lecture soit impossible Pour de plus amples informations sur les caractéristiques des DualDisc veuillez consulter le fabricant ou le détaillant du disque Support Formats compati...

Page 28: ...rée par ces prises cette connexion doit donc être utilisée en plus et non pas en remplacement d une connexion analogique Utilisation du capteur à distance d un autre appareil Pioneer Bon nombre d appareils Pioneer sont équipés de prises SR CONTROL qui peuvent être utilisées pour relier des composants Cela permet d utiliser le capteur à distance d un seul composant ce qui est utile pour masquer plu...

Page 29: ...ilisez un câble avec une mini prise mono à chaque extrémité pour le branchement 3 Continuez la chaîne de la même façon pour tous les autres appareils dont vous disposez Branchement Assurez vous que tous les branchements sont effectués avant de relier l appareil au secteur Branchez le câble d alimentation à la prise AC IN sur le panneau arrière du lecteur puis à une prise secteur IN OUT CONTROL AC ...

Page 30: ... est en veille si vous le mettez hors tension en appuyant sur le bouton POWER de l unité principale il ne se remettra pas sous tension si vous appuyez une nouvelle fois sur le bouton Pour remettre l appareil sous tension dans ce cas appuyez sur la touche CD PLAYER de la télécommande ou sur un bouton différent autre que le bouton POWER de l unité principale Lorsque l appareil est en veille si vous ...

Page 31: ...entre la télécommande et le capteur de l appareil La télécommande a une portée d environ 7 mètres avec un angle de 30 par rapport au capteur de télécommande Le fonctionnement de la télécommande peut être perturbé si le capteur est soumis à un éclairage trop puissant rayons solaires ou lumière fluorescente L utilisation simultanée de plusieurs télécommandes peut brouiller leur fonctionnement Évitez...

Page 32: ...ce imprimée orientée vers le haut Une fois correctement inséré appuyez sur pour refermer le tiroir 4 Appuyez sur lecture pour démarrer la lecture Commandes de lecture de base Le tableau ci dessous indique les commandes de base pour la lecture de disques ON OFF POWER STANDBY PURE AUDIO POWER OFF ON CD PLAYER OPEN CLOSE TIME DIMMER SACD CD PUREAUDIO CLEAR ENTER ENTER LEGATO LINK 1 2 3 4 5 6 7 8 0 9 ...

Page 33: ...manière aléatoire Vous pouvez commander la lecture au hasard lorsque la lecture du disque est en cours ou arrêtée 1 Appuyez sur RANDOM pour démarrer la lecture au hasard La lecture au hasard reste active RANDOM s allume à l écran jusqu à ce que vous appuyiez sur ou de nouveau sur RANDOM pour l annuler Note Utilisez les touches suivantes pour la lecture au hasard Appuyez sur cette touche pour lance...

Page 34: ... appuyez sur lecture La lecture programmée reste active PGM s affiche à l écran jusqu à ce que vous l arrêtiez appuyez sur lecture après arrêt pour démarrer la lecture normale Appuyez sur PROGRAM puis sur lecture pour redémarrer la lecture programmée Pour ajouter d autres plages au programme de lecture répétez les étapes 1 et 2 Lorsque le disque est arrêté appuyez sur PROGRAM puis sur CLEAR pour s...

Page 35: ...ssus de 20 kHz Ces signaux contiennent d importants indices sur la texture musicale et la forme qui définissent un événement musical en direct Le système Legato Link Pro Conversion de Pioneer utilise le traitement psychoacoustique pour rétablir les dynamiques haute fréquence manquantes afin de rétablir complètement les nuances et les détails du morceau original Appuyez sur LEGATO LINK pour activer...

Page 36: ...uillages notamment si le téléviseur est équipé d une antenne interne Utiliser l appareil dans une cuisine ou toute autre pièce où il serait exposé à la fumée ou à la vapeur Poser l appareil sur de la moquette ou un tapis épais ou le recouvrir d un linge ce qui empêcherait son refroidissement correct Placer l appareil sur une surface instable ou trop petite pour porter les quatre pieds de son socle...

Page 37: ...imprégné de produits chimiques respectez attentivement les instructions d utilisation Ces chiffons peuvent laisser des marques sur les surfaces vitrées dans ce cas essuyez avec un chiffon sec Nettoyage de l optique du capteur L optique du capteur du lecteur ne devrait pas se salir lors d une utilisation normale mais si pour une raison quelconque des poussières ou saletés perturbent son fonctionnem...

Page 38: ...eur La télécommande ne fonctionne pas La télécommande est trop éloignée du lecteur ou encore l angle entre le faisceau de télécommande et le capteur est trop obtus Utilisez la télécommande à l intérieur de sa portée page 11 Si vous essayez de mettre l appareil sous tension à l aide de la télécommande vérifiez d abord que le bouton POWER du panneau avant est activé La pile est épuisée Remplacez la ...

Page 39: ...ence d échantillonnage et Audio analogique DRM La protection DRM Digital Rights Management est une technologie conçue pour empêcher les copies illégales en restreignant la lecture etc des fichiers audio comprimés sur tout appareil autre que l ordinateur ou autre matériel d enregistrement utilisé pour les enregistrer Pour de plus amples informations veuillez vous reporter au manuel d instruction ou...

Page 40: ...l the number shown below 1 8 0 0 4 2 1 1 4 0 4 Please do not ship your product to Pioneer without first calling the Customer Support at the above listed number for assistance Pioneer Electronics Service Inc P O BOX 1760 Long Beach CA 90801 1760 U S A For warranty information please see the Limited Warranty sheet included with your product Should this product require service in Canada please contac...

Reviews: