Audio Settings menu
06
52
En
2
Highlight ‘Legato PRO’, then use the
Joystick (left/right) to change the setting.
There are four settings, plus
Off
.
• Off
•
Standard
– gives the sound a more
forward, live feel
•
Effect 1
– bright and lively
•
Effect 2
– soft and rich
•
Effect 3
– solid and well-balanced
3
Press ENTER to make the setting and
exit the Audio Settings screen.
• The Legato PRO digital filter affects
mainly frequencies outside of the audible
range.
• Depending on the listening conditions,
you may find that the effect of Legato PRO
difficult to hear.
• The Legato PRO effect is applied only to
the front left/right channels.
• Legato PRO does not work with 192kHz
DVD-Audio discs, or with SACDs.
Hi-Bit
• Default setting:
On
The Hi-Bit feature extends the effective
dynamic range of the front left/right channels
from 16 or 20-bit to 24-bit to reveal more detail
in low-level sounds.
1
Press HOME MENU and select ‘Audio
Settings’ from the on-screen display.
2
Highlight ‘Hi-Bit’, then use the Joystick
(left/right) to change the setting to ‘On’ or
‘Off’, as required.
3
Press ENTER to make the setting and
exit the Audio Settings screen.
Virtual Surround
• Default setting:
Off
Switch on Virtual Surround to enjoy surround
sound effects from just two speakers.
When you play a Dolby Digital or Pro Logic
encoded source, TruSurround technology
from SRS produces a deep, realistic 3D
soundspace from a pair of stereo speakers.
SRS TruSurround is a process certified by
Dolby Laboratories for Virtual Dolby Digital
sound.
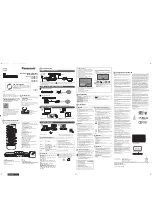
Audio Settings
1/ 2
Audio DRC
Legato PRO
Hi-Bit
Virtual Surround
Channel Level
Off
Off
On
Off
Fix
Audio Settings
1/ 2
Audio DRC
Legato PRO
Hi-Bit
Virtual Surround
Channel Level
Off
Off
On
Off
Fix
DV-989AVi _YP.book Page 52 Thursday, August 11, 2005 3:28 PM