


Connecting up
02
11
En
Chapter 2
Connecting up
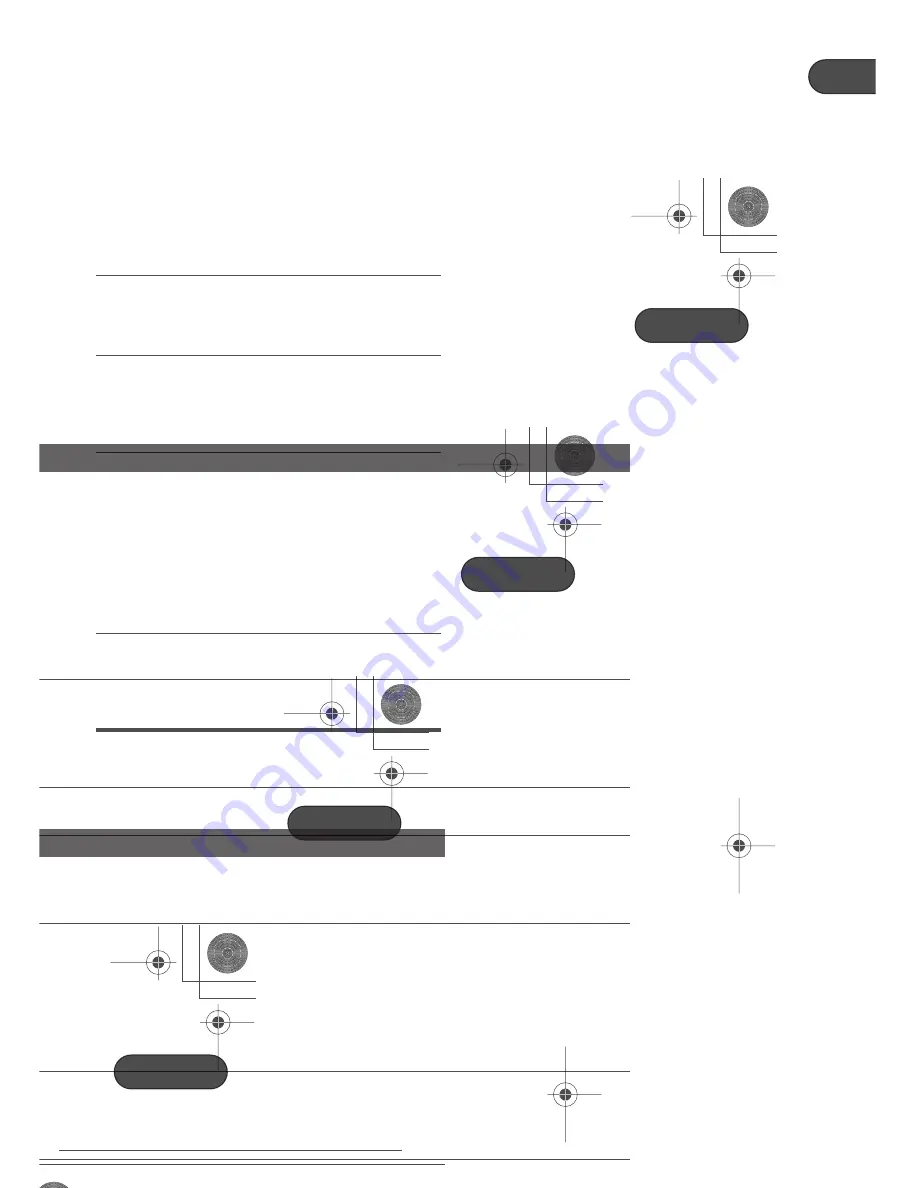
Easy connections
The setup described here is a basic setup that allows you to play discs using just the cables
supplied with the player. In this setup, stereo audio is played through the speakers in your TV.
Important
• This player is equipped with copy protection technology. Do not connect this player to your TV
via a VCR using audio/video or S-video cables, as the picture from this player will not appear
properly on your TV. (This player may also not be compatible with some combination TV/VCRs
for the same reason; refer to the manufacturer for more information.)
S-VIDEO OUT
AUDIO OUT (5.1ch)
COMPONENT VIDEO OUT
AUDIO OUT
(2ch)
COAXIAL
AUDIO OUT
OPTICAL
DIGITAL
VIDEO OUT
P
R
P
B
Y
SL
SR
SW
C
L
L
R
R
L
R
Yellow
White
Red
TV
A/V IN
To power
outlet
DV588A KU_Mid.book Page 11 Monday, April 18, 2005 8:54 PM
Downloaded From Disc-Player.com Pioneer Manuals
13
En
Watching progressive scan video
from the component video outputs
This player can output progressive scan video
from the component video output. Compared
to interlace video, progressive scan video
effectively doubles the scanning rate of the
picture, resulting in a very stable, flicker-free
image.
To set up the player for use with a progressive
scan TV, see
on page 36.
When the player is set to output progressive
scan video, the
PRGSVE
indicator lights in the
front panel display.
Important
• If you connect a TV that is not compatible
with a progressive scan signal and switch
the player to progressive, you will not be
able to see any picture at all. In this case,
switch everything off and reconnect using
the supplied video cable (see
on page 11), then switch back
to
Interlace
(see below).
Switching the video output to interlace
using the front panel controls
Switch the player to standby then, using the
front panel controls, press
STANDBY/ON
while pressing
to switch the player back to
Interlace
.
Compatibility of this player with
progressive-scan and high-definition TVs
This player is compatible with progressive
video Macro Vision System Copy Guard.
Consumers should note that not all high-
definition television sets are fully compatible
with this product and may cause artifacts to be
displayed in the picture. In case of 525
progressive scan picture problems, it is
recommended that the user switch the
connection to the ‘standard definition’ output
(Interlace). If there are questions regarding our
TV set compatibility with this model, please
contact our customer service center.
This player is compatible with the following
Pioneer displays and monitors:
PDP-5040HD, PDP-4340HD, PRO-1000HDI,
PRO-800HDI, PRO-1110HD, PRO-910HD, PDP-
4341HD, PDP-4345HD, PDP-4350HD, PDP-
4351HD, PDP-5041HD, PDP-5045HD, PDP-
5050HD, PDP-5051HD, PDP-4304, PRO-
1410HD, PRO-1120HD, PRO-920HD
SD-533HD5, SD-643HD5, Pro-710HD, Pro-
610HD, Pro-510HD, Pro-720HD, Pro-620HD,
Pro-520HD, Pro-730HD, Pro-630HD, Pro-
530HD, Pro-730HDI, Pro-530HDI
STANDBY/ON
DV588A KU_Mid.book Page 13 Monday, April 18, 2005 8:54 PM
Downloaded From Disc-Player.com Pioneer Manuals
15
En
Connecting the digital output
This player has both optical and coaxial-type
digital audio outputs for connection to an AV
receiver. Connect whichever is convenient.
Depending on the capabilities of your AV
receiver, you might have to set up this player to
output only digital audio in a compatible
format. See
on
page 35 and refer to the operating instructions
that came with your AV receiver.
Note that SACD audio is not output through
these jacks, so this connection should be in
addition to, rather than instead of, a 5.1
channel analog connection.
•
Connect one of the DIGITAL AUDIO OUT
jacks on this player to a digital input on
your AV receiver.
For an optical connection, use an optical cable
(not supplied) to connect the
OPTICAL
DIGITAL AUDIO OUT
jack to an optical input
on your AV receiver.
For a coaxial connection, use a coaxial cable
(similar to the supplied video cable) to connect
the
COAXIAL DIGITAL AUDIO OUT
jack to a
coaxial input on your AV receiver.
COAXIAL
AUDIO OUT
OPTICAL
DIGITAL
AV receiver
DIGITAL IN
(OPTICAL)
DIGITAL IN
(COAXIAL)
DV588A KU_Mid.book Page 15 Monday, April 18, 2005 8:54 PM
Downloaded From Disc-Player.com Pioneer Manuals
Controls and displays
03
17
En
Remote control
1
STANDBY/ON
(page 18)
2
AUDIO
(page 31)
3
SUBTITLE
(page 31)
4
Number buttons
(page 21)
5
TOP MENU
(page 22)
6
ENTER & cursor buttons
(page 18)
7
HOME MENU
(page 18)
8
and
(page 21, 24)
9
(page 21)
10
(page 21)
11
(page 21)
12 PLAY MODE
(page 27)
13 SURROUND
(page 33)
14
OPEN/CLOSE
(page 20)
15 ANGLE
(page 32)
16 CLEAR
(page 29)
17 ENTER
(page 18)
18 MENU
(page 22)
19 RETURN
(page 18)
20
and
(page 21, 24)
21
(page 21)
22
(page 21)
23 DISPLAY
(page 32)
24 ZOOM
(page 31)
Using the remote control
Keep in mind the following when using the
remote control:
• Make sure that there are no obstacles
between the remote and the remote sensor
on the unit.
• The remote has a range of about 7m(23ft.).
• Remote operation may become unreliable
if strong sunlight or fluorescent light is
shining on the unit’s remote sensor.
• Remote controllers for different devices
can interfere with each other. Avoid using
remotes for other equipment located close
to this unit.
• Replace the batteries when you notice a
fall off in the operating range of the remote.
0
1
2
3
4
5
6
7
8
9
CLEAR
ENTER
ANGLE
AUDIO
TOP MENU
HOME
MENU
SUBTITLE
PLAY MODE SURROUND
ZOOM
DISPLAY
MENU
RETURN
ENTER
STANDBY/ON
OPEN/CLOSE
1
14
15
16
17
18
19
20
21
23
2
4
5
6
7
8
10
12
13
3
9
11
22
24
DV588A KU_Mid.book Page 17 Monday, April 18, 2005 8:54 PM
Downloaded From Disc-Player.com Pioneer Manuals
Getting started
04
19
En
Note
• From here on in this manual, the word
‘select’ generally means use the cursor
buttons to highlight an item on-screen,
then press
ENTER
.
Setting up the player for your
TV
If you have a widescreen (16:9) TV, you should
setup the player so that the picture will be
presented correctly. If you have a conventional
(4:3) TV, you can leave the player on the default
setting and move on to the next section.
1
Press HOME MENU and select ‘Initial
Settings’.
2
Select ‘TV Screen’ from the ‘Video
Output’ settings.
3
If you have a widescreen (16:9) TV,
select ‘16:9 (Wide)’.
If you have a conventional (4:3) TV, you can
change the setting from
4:3 (Letter Box)
to
4:3
(Pan & Scan)
if you prefer. See
on page 36 for more details.
4
Press HOME MENU to exit the menu
screen.
Setting the language of this
player’s on-screen displays
This sets the language of the player’s on-
screen displays.
1
Press HOME MENU and select ‘Initial
Settings’.
2
Select ‘OSD Language’ from the
‘Display’ settings.
3
Select a language.
The on-screen language will change according
to your selection.
4
Press HOME MENU to exit the menu
screen.
DV588A KU_Mid.book Page 19 Monday, April 18, 2005 8:54 PM
Downloaded From Disc-Player.com Pioneer Manuals
Getting started
04
21
En
Basic playback controls
The table below shows the basic controls on
the remote for playing discs. The following
chapter covers other playback features in more
detail.
Resume and Last Memory
With the exception of DVD-Audio and SACD
discs, when you stop playback of a DVD, CD,
Video CD or DivX video discs,
RESUME
is
shown in the display indicating that you can
resume playback again from that point.
If the disc tray is not opened, the next time you
start playback the display shows
RESUME
and
playback resumes from the resume point. (If
you want to clear the resume point, press
(stop) while
RESUME
is displayed.)
With DVDs and Video CDs, if you take the disc
out of the player after stopping playback, the
last play position is stored in memory. If the
next disc you load is the same one, the display
shows
LAST MEM
and playback will resume.
For DVD-Video discs, the player stores the play
position of the last five discs. When one of
these discs is next loaded, you can resume
playback.
Note
• The Last Memory function doesn’t work
with VR format DVD-RW, DVD-Audio or
SACD discs.
Button
What it does
Starts playback.
If the display shows
RESUME
or
LAST MEM
playback starts from the
resume or last memory point (see
also
below.)
Pauses a disc that’s playing, or
restarts a paused disc.
Stops playback.
See also
below.
(remote
only)
Press to start fast reverse scanning.
Press
(play) to resume normal
playback.
(remote
only)
Press to start fast forward scanning.
Press
(play) to resume normal
playback.
Skips to the start of the current
track, title or chapter, then to
previous tracks/titles/chapters.
Skips to the next track, title or
chapter.
Numbers
(remote
only)
Use to enter a title/chapter/track
number. Press
ENTER
to select.
• If the disc is stopped, playback
starts from the selected title (for
DVD), group (for DVD-Audio) or
track (for CD/SACD/Video CD).
• If the disc is playing, playback
jumps to the start of the selected
title (VR mode DVD-RW), chapter
(DVD-Video) or track (DVD-Audio*/
SACD/CD/Video CD).
Button
What it does
DV588A KU_Mid.book Page 21 Monday, April 18, 2005 8:54 PM
Downloaded From Disc-Player.com Pioneer Manuals
Getting started
04
23
En
FAQ
Most likely, the disc is the wrong region for
your player. The region number should be
printed on the disc; check it against the
region number of the player (which you can
find on the rear panel). See also
on page 47.
If the region number is OK, it may be that
the disc is damaged or dirty. Clean the disc
and look for signs of damage. See also
on
page 45.
First check that you loaded the disc the
right way up (label side up), and that it’s
clean and undamaged. See
on page 45 for
information on cleaning discs.
If a disc loaded correctly won’t play, it’s
probably an incompatible format or disc
type, such as DVD-ROM. See
on
page 8 for more on disc compatibility.
Some movie formats are such that even
when played on a widescreen TV, black
bars are necessary at the top and bottom of
the screen. This is not a malfunction.
Some discs override the display
preferences of the player, so even if you
have
4:3 (Pan & Scan)
selected, those
discs will still be shown in letter box format.
This is not a malfunction.
For digital copy-protection purposes, some
96/88.2kHz DVD discs only output digital
audio downsampled to 48/44.1kHz. This is
not a malfunction.
To fully take advantage of the high
sampling rate audio, connect the analog
audio outputs to your amplifier/receiver.
SACD audio is only available through the
analog outputs. This is not a malfunction.
Some DVD-Audio discs too only output
audio through the analog outputs.
Some DVD-Audio discs do not output
anything through the digital outputs, and
multichannel discs are downmixed to
stereo for the digital output. In addition,
high sampling rate DVD-Audio discs
(higher than 96kHz) automatically
downsample audio output from the digital
outputs.
Using the multichannel analog audio
outputs for DVD-Audio have none of these
limitations.
The disc may have been illegally copied.
Displays the previous menu page
(if there is one).
Displays the next menu page (if
there is one).
Button
What it does
DV588A KU_Mid.book Page 23 Monday, April 18, 2005 8:54 PM
Downloaded From Disc-Player.com Pioneer Manuals
Playing discs
05
25
En
Frame advance/frame reverse
You can advance or back up DVD-Video and
DVD-R/RW discs frame-by-frame. With Video
CDs and DivX video file you can only use frame
advance.
1
During playback, press
(pause).
2
Press
or
to reverse or
advance a frame at a time.
3
To resume normal playback, press
(play).
• Depending on the disc, normal playback
may automatically resume when a new
chapter is reached.
Viewing a JPEG slideshow
After loading a CD/CD-R/RW containing JPEG
picture files, press
(play) to start a slideshow
from the first folder/picture on the disc. The
player displays the pictures in each folder in
alphabetical order.
Pictures are automatically adjusted so that
they fill as much of the screen as possible (if
the aspect ratio of the picture is different to
your TV screen you may notice black bars at the
sides, or at the top and bottom of the screen).
While the slideshow is running:
Note
• The time it takes for the player to load a file
increases with large file sizes.
Browsing DVD or Video CD disc
with the Disc Navigator
Use the Disc Navigator to browse through the
contents of a DVD-Video,DVD-RW or Video CD
disc to find the part you want to play.
Important
• You can’t use the Disc Navigator with
Video CDs in PBC mode.
1
During playback, press HOME MENU
and select ‘Disc Navigator’ from the on-
screen menu.
2
Select a view option.
Button
What it does
Pauses the slideshow; press again to
restart.
Displays the previous picture.
Displays the next picture.
Pauses the slideshow and rotates the
displayed picture 90º (counter)
clockwise. (Press
(play) to restart
slideshow.)
Pauses the slideshow and flips the
displayed picture horizontally or
vertically. (Press
(play) to restart
slideshow.)
ZOOM
Pauses the slideshow and zooms the
picture. Press again to toggle
between 1x, 2x and 4x zoom. (Press
(play) to restart slideshow.)
MENU
Displays the Disc Navigator screen
(see below).
Button
What it does
Disc Navigator
Title
Chapter
DV588A KU_Mid.book Page 25 Monday, April 18, 2005 8:54 PM
Downloaded From Disc-Player.com Pioneer Manuals
Playing discs
05
27
En
• When a JPEG file is highlighted, a
thumbnail image is displayed on the right.
3
To play the highlighted track or DivX
video file or display the highlighted JPEG
file, press ENTER.
• When a WMA/MP3 or DivX video file is
selected, playback begins, starting with the
selected file, and continues until the end of
the folder.
• When a JPEG file is selected, a slideshow
begins, starting with that file, and
continues to the end of the folder.
Tip
• To play the contents of the whole disc
rather than just the current folder, exit the
Disc Navigator and start playback using
the
(play) button.
Looping a section of a disc
The A-B Repeat function allows you to specify
two points (A and B) within a track (CD, Video
CD) or title (DVD-Video and DVD-RW) that form
a loop which is played over and over.
• You can’t use A-B Repeat with DVD-Audio,
SACD, Video CDs in PBC mode, or WMA/
MP3/DivX video files.
1
During playback, press PLAY MODE and
select ‘A-B Repeat’ from the list of
functions on the left.
2
Press ENTER on ‘A(Start Point)’ to set
the loop start point.
3
Press ENTER on ‘B(End Point)’ to set the
loop end point.
After pressing
ENTER
, playback jumps back to
the start point and plays the loop.
4
To resume normal playback, select ‘Off’
from the menu.
File1
File2
File3
File4
File5
Folder 2
00:00/ 00:00 0kbps
DV588A KU_Mid.book Page 27 Monday, April 18, 2005 8:54 PM
Downloaded From Disc-Player.com Pioneer Manuals
Playing discs
05
29
En
2
Select a random play option.
The random play options available depend on
the kind of disc loaded. For example, for DVD-
Video discs, you can select
Random Title
or
Random Chapter
(or
Random Off
).
• For DVD-Audio discs, select
Random
Group
or
Random Track
, (or
Random
Off
).
• For CDs, SACDs and Video CDs, select
On
or
Off
to switch random play on or off.
Tip
• Use the following controls during random
play:
Creating a program list
This feature lets you program the play order of
titles/chapters/groups/tracks on a disc.
Important
• You can’t use Program play with VR format
DVD-RW discs, Video CDs playing in PBC
mode, WMA/MP3 discs, DivX video discs,
or while a DVD disc menu is being
displayed.
1
Press PLAY MODE and select ‘Program’
from the list of functions on the left.
2
Select ‘Create/Edit’ from the list of
program options.
3
Use the cursor buttons and ENTER to
select a title, chapter or track for the
current step in the program list.
For a DVD-Video disc, you can add a title or a
chapter to the program list.
• For a DVD-Audio disc, you can add a whole
group, or a track within a group to the
program list.
• For a CD, SACD or Video CD, select a track
to add to the program list.
Button
What it does
Selects a new track/title/chapter
at random.
Returns to the beginning of the
current track/title/chapter;
further presses select another
random track/title/chapter.
DV588A KU_Mid.book Page 29 Monday, April 18, 2005 8:54 PM
Downloaded From Disc-Player.com Pioneer Manuals
Playing discs
05
31
En
• Some DVD-Audio discs feature pages of
browsable pictures. Enter the page
number you want.
4
Press ENTER to start playback.
Switching subtitles
Some DVD-Video and DivX video discs have
subtitles in one or more languages; the disc
box will usually tell you which subtitle
languages are available. You can switch
subtitle language during playback.
1
Press SUBTITLE repeatedly to select a
subtitle option.
Note
• Some discs only allow you to change
subtitle language from the disc menu.
Press
TOP MENU
or
MENU
to access.
• To set subtitle preferences, see
on page 36.
• See
on page 9
for more on DivX subtitles.
Switching audio language/
channels
When playing a DVD-Video and DivX video disc
recorded with dialog in two or more languages,
you can switch audio language during
playback.
When playing a VR format DVD-RW disc
recorded with dual-mono audio, you can
switch between the main, sub, and mixed
channels during playback.
When playing a DVD-Audio disc, you may be
able to switch channels—see the disc box for
details. (When you change the audio channel,
playback restarts from the beginning of the
current track.)
When playing a Video CD, you can switch
between stereo, just the left channel or just the
right channel.
1
Press AUDIO repeatedly to select an
audio language/channel option.
The language/channel information is shown
on-screen.
Note
• Some DVD discs only allow you to change
audio language from the disc menu. Press
TOP MENU
or
MENU
to access.
• To set DVD audio language preferences,
see
on page 36.
Zooming the screen
Using the zoom feature you can magnify a part
of the screen by a factor of 2 or 4, while
watching a DVD, DivX video title or Video CD or
playing a JPEG disc.
1
During playback, use the ZOOM button
to select the zoom factor (Normal, 2x or
4x).
• Since DVD, Video CD, DivX video title and
JPEG pictures have a fixed resolution,
picture quality will deteriorate, especially at
4x zoom. This is not a malfunction.
2
Use the cursor buttons to change the
zoomed area.
You can change the zoom factor and the
zoomed area freely during playback.
• If the navigation square at the top of the
screen disappears, press
ZOOM
again to
display it.
DV588A KU_Mid.book Page 31 Monday, April 18, 2005 8:54 PM
Downloaded From Disc-Player.com Pioneer Manuals
Audio Settings and Video Adjust menus
06
33
En
Chapter 6
Audio Settings and Video
Adjust menus
Audio Settings menu
The Audio Settings menu offers features for
adjusting the way discs sound.
1
Press HOME MENU and select ‘Audio
Settings’ from the on-screen display.
2
Select and change settings using the
(cursor) buttons, and ENTER.
Audio DRC
• Settings:
High
,
Medium
,
Low
,
Off
When watching Dolby Digital DVDs at low
volume, it’s easy to lose the quieter sounds
completely—including some of the dialog.
Switching Audio DRC (Dynamic Range
Control) to on can help by bringing up the
quieter sounds, while controlling loud peaks.
How much of a difference you hear depends on
the material you’re listening to. If the material
doesn’t have wide variations in volume, you
may not notice much change.
Note
• Audio DRC is only effective with Dolby
Digital audio sources.
• Audio DRC is only effective through the
digital output when
Digital Out
is set to
On
, and
Dolby Digital Out
is set to
Dolby
Digital > PCM
(see
on page 35).
• The effect of Audio DRC also depends on
your speakers and AV receiver settings.
Virtual Surround
• Settings:
On
,
Off
Switch on Virtual Surround to enjoy realistic
surround sound effects from just two speakers.
Tip
• You can also use the
SURROUND
button
on the remote control to switch Virtual
Surround on.
Note
• 96kHz linear PCM audio is automatically
downsampled to 48kHz if Virtual Surround
is switched on.
• The
Audio Output Mode
(see page 41)
must be set to
2 Channel
in order to be
able to use Virtual Surround.
DV588A KU_Mid.book Page 33 Monday, April 18, 2005 8:54 PM
Downloaded From Disc-Player.com Pioneer Manuals
Initial Settings menu
07
35
En
Chapter 7
Initial Settings menu
Using the Initial Settings menu
The Initial Settings menu provides audio and
video output settings, parental lock settings,
and display settings, among others.
If an option is grayed out it means that it
cannot be changed at the current time. This is
usually because a disc is playing. Stop the
disc, then change the setting.
1
Press HOME MENU and select ‘Initial
Settings’.
2
Use the cursor buttons and ENTER to
select the setting and option you want to
set.
All the settings and options are explained on
the following pages.
Note
• In the table below, the default setting is
shown in
bold
: other settings are shown in
.
• The Digital Audio Out settings only need to
be set if you have connected the digital
output of this player to an AV receiver, or
other equipment.
• Check the operating instructions supplied
with your other equipment to see which
digital audio formats it’s compatible with.
• Some settings, such as
TV Screen
,
Audio
Language
and
Subtitle Language
may be
overridden by the DVD disc. Often these
settings can also be made from the DVD
disc menu.
Digital Audio Out settings
Setting
Option
What it means
Digital Out
On
Digital audio is output from the digital outputs.
No digital audio output.
Dolby Digital Out
Dolby Digital
Dolby Digital encoded digital audio is output when playing a
Dolby Digital DVD disc.
Dolby Digital audio is converted to PCM audio before being
output.
DTS Out
DTS
DTS encoded digital audio is output when playing a DTS disc.
(Noise will be output if your amplifier/receiver is not compatible
with DTS audio.)
No digital audio is output when playing a DTS disc.DTS audio
is converted to PCM audio before being output.
DV588A KU_Mid.book Page 35 Monday, April 18, 2005 8:54 PM
Downloaded From Disc-Player.com Pioneer Manuals
Initial Settings menu
07
37
En
Display settings
Options settings
Subtitle Language
(See also
on
page 9.)
English
If there are English subtitles on the disc then they will be
displayed.
If there is the subtitle language selected on the disc, then it will
be displayed.
Select to choose a language other than the ones displayed (see
page 47).
DVD Menu
Language
w/Subtitle Lang.
DVD disc menus will be displayed in the same language as
your selected subtitle language, if possible.
DVD disc menus will be displayed in the selected language, if
possible.
Select to choose a language other than the ones displayed (see
page 47).
Subtitle Display
On
Subtitles are displayed according to your selected subtitle
language (see above).
Subtitles are always off by default when you play a DVD disc
(note that some discs override this setting).
Setting
Option
What it means
Setting
Option
What it means
OSD Language
English
On-screen displays of the player are in English.
On-screen displays are shown in the language selected.
Angle Indicator
On
A camera icon is displayed on-screen during multi-angle
scenes on a DVD disc.
No multi-angle indication is shown.
Setting
Option
What it means
Parental Lock
–
See
on page 38.
DVD Playback
Mode
DVD-Audio
All material on a DVD-Audio disc is playable.
Only the DVD-Video part of a DVD-Audio disc is playable.
DV588A KU_Mid.book Page 37 Monday, April 18, 2005 8:54 PM
Downloaded From Disc-Player.com Pioneer Manuals
Initial Settings menu
07
39
En
Setting/changing the Parental Lock
1
Select ‘Level Change’.
2
Use number buttons to enter your
password, then press ENTER.
3
Select a new level and press ENTER.
• Press
(cursor left) repeatedly to lock
more levels (more discs will require the
password); press
(cursor right) to
unlock levels. You can’t lock level 1.
This sets the new level and you will return to the
Options menu screen.
Setting/changing the Country/Area
code
You can find the
on
page 48.
1
Select ‘Country Code’.
2
Use number buttons to enter your
password, then press ENTER.
3
Select a Country/Area code and press
ENTER.
There are two ways you can do this:
• Select by code letter: Use
(cursor up/
down) to change the Country/Area code.
• Select by code number: Press
(cursor
right) then use the number buttons to enter
the 4-digit Country/Area code.
The new Country/Area code is set and you will
return to the Options menu screen. Note that
the new Country/Area code doesn’t take effect
until the next disc is loaded (or the current disc
is reloaded).
DTS Downmix
• Default setting:
Stereo
If you’ve selected
DTS > PCM
in
on
page 35 or
2 Channel
in
on
page 41, you can choose the way the signal is
downmixed to PCM audio.
Stereo
will
downmix the DTS signal to 2-channel stereo,
whereas
Lt/Rt
will downmix to a 2-channel
signal compatible with Dolby surround matrix
decoders. (This allows you to hear surround
sound if your AV receiver or amplifier has Dolby
Pro Logic capability.)
About DivX
®
VOD content
In order to play DivX VOD (video on demand)
content on this player, you first need to register
the player with your DivX VOD content
provider. You do this by generating a DivX VOD
registration code, which you submit to your
provider.
Important
• DivX VOD content is protected by a DRM
(Digital Rights Management) system. This
restricts playback of content to specific,
registered devices.
• If you load a disc that contains DivX VOD
content not authorized for your player, the
message
Authorization Error
is displayed
and the content will not play.
DV588A KU_Mid.book Page 39 Monday, April 18, 2005 8:54 PM
Downloaded From Disc-Player.com Pioneer Manuals
Initial Settings menu
07
41
En
Speakers settings
Audio Output Mode
• Default setting:
2 Channel
If you connected this player to your amplifier
using the 5.1 channel analog outputs (front,
surround, center and subwoofer outs), set this
to
5.1 Channel
; if you connected only the
stereo outs, set to
2 Channel
.
Note
• Even if you set
Audio Output Mode
to
5.1
Channel
, you’ll only get sound from all
speakers when playing a 5.1 channel multi-
channel disc.
• When set to
5.1 Channel
, only the front
left/right channels are output from the
AUDIO OUT (2ch)
jacks. Change to
2
Channel
if you want to listen to downmixed
stereo audio (for example, because you are
listening through the TV’s built-in
speakers).
• When set to
5.1 Channel
there is no digital
output when playing DVD-Audio.
• If you set to
2 Channel
, Dolby Digital, DTS
and MPEG audio is mixed down to two
channels so you still hear all the audio
recorded on the disc. With DTS encoded
audio, you can choose how the signal is
downmixed to PCM audio. See
on page 39 to change the
downmix setting.
• Some DVD-Audio discs don’t allow down-
mixing of audio. These discs always output
multi-channel audio regardless of the
setting made here.
Setting
Option
What it means
Audio Output
Mode
2 Channel
The player outputs analog audio in stereo only. See also
below.
The player outputs 5.1 channel analog audio. See also
below.
Speaker
Installation
–
Specify the number and size of speakers in your system. See
also
on page 44.
Speaker Distance
–
Specify the distance of your speakers from your listening
position.
on page 43.
DV588A KU_Mid.book Page 41 Monday, April 18, 2005 8:54 PM
Downloaded From Disc-Player.com Pioneer Manuals
Initial Settings menu
07
43
En
Speaker Distance
• Default settings: all speakers
10.0ft.
To get the best surround sound from your
system, you should set up the speaker
distances from your listening position.
1
Use the
(cursor up/down) to select
a speaker.
• The
L
and
R
speakers are paired; you can’t
set them differently.
2
Press
(cursor right) to change the
speaker distance for the highlighted
speaker.
3
Use the
(cursor up/down) to
change the distance.
• When you change the distance settings of
the front left (
L
) or front right (
R
) speakers,
all the other speaker distances change
relative to it.
• Front left/right (
L
/
R
) speaker distances can
be set from 1 ft. to 30 ft. in 1 ft. increments.
• The center speaker (
C
) can be set from –7
ft. to 0.0 ft. relative to the front left/right
speakers.
• Surround left/right (
SL
/
SR
) speakers can
be set from –20 ft. to 0.0 ft. relative to the
front left/right speakers.
• You can’t set the subwoofer (
SW
) distance.
4
Press
(cursor left) to go back to the
speaker list if you want to modify another
speaker, or press ENTER to exit the Speaker
Distance screen.
Note
During playback of SACD and MPEG-audio
DVD-Video discs, the effective
C
,
SL
and
SR
speaker distance settings are –3.0ft. to 0.0ft.
relative to the front left/right speakers.
DV588A KU_Mid.book Page 43 Monday, April 18, 2005 8:54 PM
Downloaded From Disc-Player.com Pioneer Manuals
Additional information
08
45
En
Chapter 8
Additional information
Taking care of your player and
discs
General
Hold discs by the edge or by the center hole
and edge.
When you're not using a disc, return it to its
case and store upright. Avoid leaving discs in
excessively cold, humid, or hot environments
(including under direct sunlight).
Don't glue paper or put stickers on to discs. Do
not use a pencil, ball-point pen or other sharp-
tipped writing instrument to write on the disc.
Don’t use self-adhesive disc labels on discs as
these can cause the disc to warp slightly
during playback causing distortion in the
picture and/or sound.
Damaged and shaped discs
Do not use cracked, chipped, warped, or
otherwise damaged discs as they may damage
the player.
This player is designed to be used only with
conventional, fully circular discs. Do not use
shaped discs. Pioneer disclaims all liability
arising in connection with the use of shaped
discs.
Cleaning discs
Fingerprints and dust on discs can affect
playback performance. Clean using a soft, dry
cloth, wiping the disc lightly from the center to
the outside edge as shown below.
If necessary, use a cloth soaked in alcohol, or a
commercially available CD/DVD cleaning kit to
clean a disc more thoroughly. Never use
benzine, thinner or other cleaning agents,
including products designed for cleaning vinyl
records.
Cleaning the unit’s exterior
Unplug the unit before cleaning.
Use a dry cloth to wipe off dust and dirt. If the
surfaces are very dirty, wipe with a soft cloth
dipped in some neutral cleanser diluted five or
six times with water and wrung out well, then
wipe again with a dry cloth.
Do not use furniture wax or cleaners. Never
use thinners, benzine or insecticide sprays or
other chemicals on or near this unit.
DV588A KU_Mid.book Page 45 Monday, April 18, 2005 8:54 PM
Downloaded From Disc-Player.com Pioneer Manuals
Additional information
08
47
En
Note
• Using the
16:9 (Wide)
setting with a
standard 4:3 TV, or either of the 4:3 settings
with a widescreen TV, will result in a
distorted picture.
Resetting the player
Use this procedure to reset all the player’s
settings to the factory default.
1
Switch the player into standby.
2
Using the front panel buttons, hold
down the
(stop) button and press
STANDBY/ON to switch the player back
on.
All the player’s settings are now reset.
DVD-Video regions
All DVD-Video discs carry a region mark on the
case somewhere that indicates which
region(s) of the world the disc is compatible
with. Your DVD player also has a region mark,
which you can find on the rear panel. Discs
from incompatible regions will not play in this
player. Discs marked
ALL
will play in any
player.
The diagram below shows the various DVD
regions of the world.
Selecting languages using the
language code list
Some of the language options (such as ‘DVD
Language’ in the Setup Navigator) allow you to
set your preferred language from any of the 136
languages listed in the language code list on
page 48.
1
Select ‘Other Language’.
2
Use the
(cursor left/right) buttons
to select either a code letter or a code
number.
3
Use the
(cursor up/down) buttons
to select a code letter or a code number.
See
on page 48 for a
complete list of languages and codes.
1
2
2
5
5
6
3
2
1
4
4
DV588A KU_Mid.book Page 47 Monday, April 18, 2005 8:54 PM
Downloaded From Disc-Player.com Pioneer Manuals
Additional information
08
49
En
Troubleshooting
Incorrect operation is often mistaken for trouble or malfunction. If you think that there is
something wrong with this component, check the points below. Sometimes the trouble may lie in
another component. Inspect the other components and electrical appliances being used. If the
trouble cannot be rectified after checking the items below, ask your nearest Pioneer authorized
service center or your dealer to carry out repair work.
Problem
Remedy
The disc won’t play or is
automatically ejected
after loading.
• Make sure the disc is free from dirt and dust and is not damaged
(page 45).
• Make sure the disc is loaded with the label side face-up and aligned
properly in the disc tray guide.
• Incompatible region number: If the region number on a DVD-Video
disc does not match the number on the player, the disc cannot be
used (page 47).
• Condensation inside the player: Allow time for condensation to
evaporate. Avoid using the player near an air-conditioning unit.
• Disc is loaded upside down: Reload the disc with the label side face
up.
• A Super VCD that does not conform with the IEC standards might
not play normally.
• Check that the disc is not a DualDisc or other incompatible format
disc (page 8).
DVD-Audio playback
stops.
• The disc may have been illegally copied.
Picture playback stops
and the operation
buttons cannot be used.
• Press
, then start playback again (
).
• Press and hold the front panel
STANDBY/ON
button for about 10
seconds to switch the unit off, then press again to switch back on.
• Switch the power off once, unplug from the wall socket, then plug
back in and switch on again using the front panel
STANDBY/ON
button.
New settings made in the
Setup screen menus while
a disc is playing are
ineffective.
• Some settings can be changed while a disc is playing, but are not
effective until the disc is stopped then restarted: Press
, then start
playback again (
).
Settings are canceled.
• When the power is cut due to power failure or by unplugging the
power cord, settings will be canceled: Press
STANDBY/ON
on the
front panel to turn the player off. Wait for
--OFF--
to disappear from
the display, then unplug the power cord.
The remote control
doesn't seem to work.
• The remote control is too far from the player, or the angle with the
remote sensor is too wide: Use the remote within its operating range
(page 17).
• The batteries are exhausted: Put in new ones (page 7).
DV588A KU_Mid.book Page 49 Monday, April 18, 2005 8:54 PM
Downloaded From Disc-Player.com Pioneer Manuals
Additional information
08
51
En
Cannot play multi-
channel audio
• Make sure that
Audio Output Mode
is set to
5.1 Channel
(page 41).
• Check that the Dolby Digital, DTS and MPEG Out settings
(pages 35–36) are suitable for your amplifier/receiver—check the
instruction manual that came with your amplifier/receiver.
• DVD-Audio and SACDs do not output multichannel digital audio.
Listen through the player’s analog outputs.
• Check that the settings in the Speaker Installation screen are
correct (page 44).
• Check the audio options available from the disc menu.
Cannot listen to high-
sampling rate audio
through the digital
output.
• Make sure that
Linear PCM Out
is set to
Downsample Off
(page 36).
• As a copy-protection measure, some DVDs do not output 96kHz
audio. In this case, even if set to
Downsample Off
, the player
automatically outputs the audio at 48 kHz. This is not a malfunction.
Cannot output 192kHz or
176.4kHz digital audio.
• The player does not output digital audio at these sampling rates. The
digital output is automatically downsampled.
Cannot output 96kHz or
88.2kHz digital audio.
• Check that
Linear PCM Out
is set to
Downsample Off
(page 36).
• Some discs are digital copy protected and do not output high
sampling rate digital audio. In this case the output is automatically
downsampled.
No DTS audio output.
• If this unit is connected to a non-DTS compatible amplifier or
decoder using a digital audio cable, set
DTS Out
to
DTS
>
PCM
(page 35). If you do not do this, noise will be output when you play a
DTS disc.
• If this unit is connected to a DTS-compatible amplifier or decoder
using a digital audio cable, check the amplifier settings, and that the
cable is properly connected.
Audio mix does not
sound right or sounds
incomplete (for example,
inaudible dialog).
• Make sure that
Audio Output Mode
is set to
2 Channel
if you've
connected to the stereo inputs on your amplifier or TV (page 41).
Can’t hear effect of
Virtual Surround
• Virtual Surround does not work with SACD or DVD-Audio.
• The Virtual Surround effect is only output through the
AUDIO OUT
(2ch)
analog audio outputs.
• Make sure that
Audio Output Mode
is set to
2 Channel
(page 41).
• The effectiveness of Virtual Surround varies with the disc.
Problem
Remedy
DV588A KU_Mid.book Page 51 Monday, April 18, 2005 8:54 PM
Downloaded From Disc-Player.com Pioneer Manuals
Additional information
08
53
En
Progressive
scan video
All the lines that make up a video
picture are updated in one pass
(compared to interlace which takes two
passes to update the whole picture).
Regions
(DVD-Video
only)
These associate DVD-Video discs and
players with particular areas of the
world. See
on
page 47 for more information.
Sampling
frequency
The rate at which sound is measured to
be turned into digital audio data. The
higher the rate, the better the sound
quality. CD is 44.1 kHz; DVD can be up
to 96 kHz. See also
.
WMA
WMA is short for Windows Media Audio
and refers to an audio compression
technology developed by Microsoft
Corporation. Files are recognized by
their file extension “.wma”.
Microsoft, Windows Media, and the
Windows logo are trademarks, or
registered trademarks of Microsoft
Corporation in the United States and/or
other countries.
Super Audio
CD (SACD)
Super Audio CD is a high quality audio
disc format that can accommodate high
sampling rate stereo and multi-channel
audio, as well as conventional CD audio
all on the same disc.
DV588A KU_Mid.book Page 53 Monday, April 18, 2005 8:54 PM
Downloaded From Disc-Player.com Pioneer Manuals
Summary of Contents for DV-588A-S
Page 6: ......
Page 8: ......
Page 10: ......
Page 12: ......
Page 14: ......
Page 16: ......
Page 18: ......
Page 20: ......
Page 22: ......
Page 24: ......
Page 26: ......
Page 28: ......
Page 30: ......
Page 32: ......
Page 34: ......
Page 36: ......
Page 38: ......
Page 40: ......
Page 42: ......
Page 44: ......
Page 46: ......
Page 48: ......
Page 50: ......
Page 52: ......
Page 54: ......


