DEH-P790BT/XN/UC
67
5
6
7
8
5
6
7
8
C
D
F
A
B
E
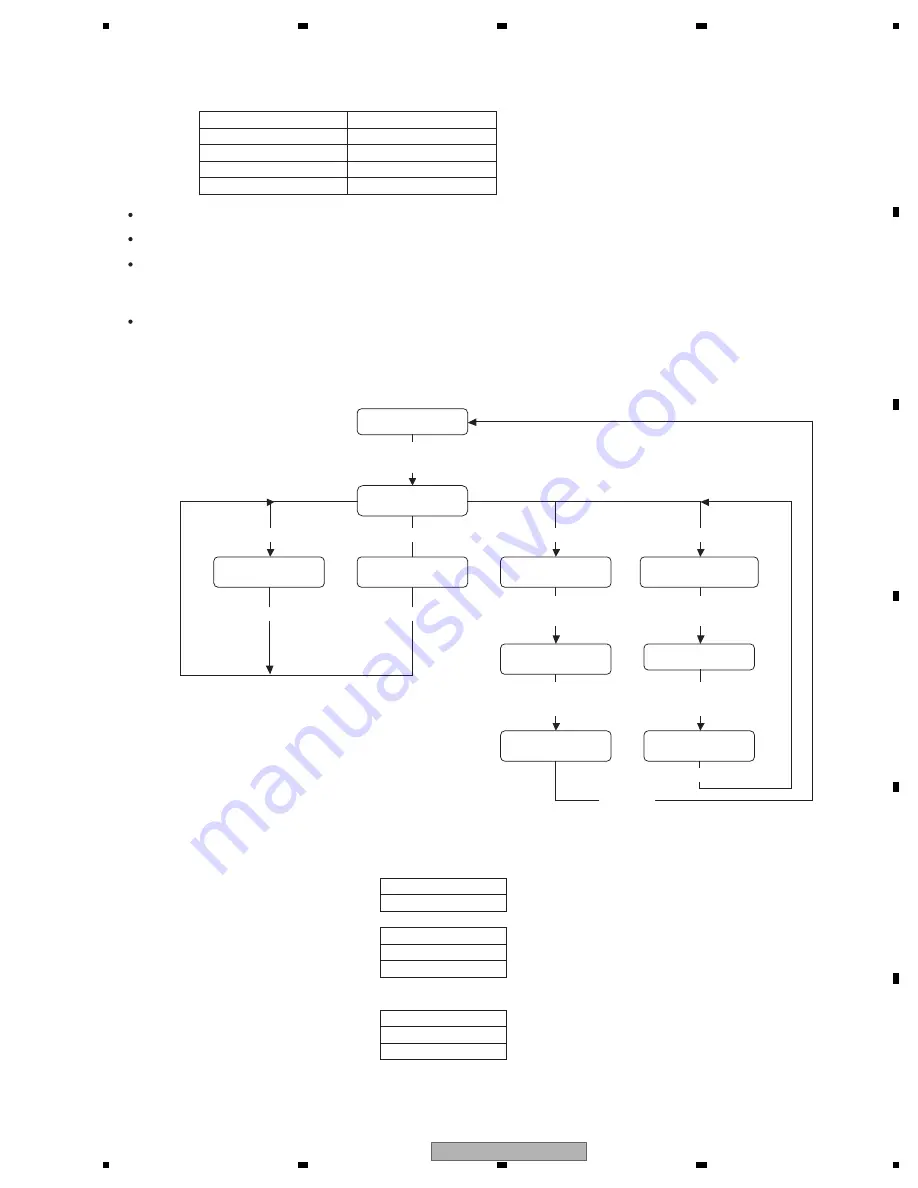
6.5 TEST MODE (USB)
V e r * . * *
V e r * . * *
U P D T 0 0 0
R E A D Y 0 0 0
MIN
SEC
SEC
C O M P L E T E
D e v i c e I n
C o n n e c t
M
S
C
Indication of system microcomputer Ver
Indication of TCC firmware Ver
TCC firmware VerUp is getting ready.
TCC firmware VerUp is started.
TCC firmware VerUp is completed.
Confirmation on connection mode is
getting ready.
Now connecting
Indication of connection mode
When a device supporting mass storage class is connected:
Displays 0:00 to 5:00 (in increments of minutes and seconds)
Displays 0:00 to 5:00 (in increments of minutes and seconds)
* The time increment stops when it reaches 5:00.
-
Indications
Normal connection
Indication of TCC
firmware Ver
In the test mode
Indication of system
microcomputer Ver
TCC firmware VerUp
is started.
Activate the test mode
[LIST] + [CLK]
Enter the TEST1 command
TCC firmware VerUp
is completed.
Indication of
connection mode
Enter the TEST3 command
Passage of time : For about
several tens of seconds
Enter the TEST4 command
Insert a USB device
for confirmation
Enter the TEST2 command
TCC firmware VerUp
is getting ready.
Indication of connection
mode is getting ready.
Insert a USB device
for updating
Reset start
Now connecting
Passage of time : For about
several tens of seconds
Enter the TEST0 command
Enter the TEST0 command
Enter the TEST0 command
TEST1 command
TEST2 command
TEST3 command
TEST4 command
TEST0 command
Right key
Left key
LIST key
DISP key
BAND/ESC key
-
Implemented functions
Indication of system microcomputer Ver
Indication of TCC firmware Ver
To enter the TCC firmware UpDate mode:
→
Set this mode and insert a USB device having the UpDate program to start rewriting the device.
* If you carry out the TEST 3 command with the USB device inserted, a correct result is not displayed.
Confirmation on connection mode (mass storage class connection)
→
Set this mode and insert a USB device. Then, the connection mode is displayed.
* Do not insert a USB device having the UpDate program.
* If you carry out the TEST 4 command with the USB device inserted, a correct result is not displayed.
Be sure to insert a USB device when "DeviceIn" is being displayed.
Summary of Contents for DEH-P7700MP - In-Dash CD/MP3/WMA/WAV/iTunes AAC Car Stereo Receiver
Page 5: ...DEH P790BT XN UC 5 5 6 7 8 5 6 7 8 C D F A B E 1 SPECIFICATIONS ...
Page 6: ...DEH P790BT XN UC 6 1 2 3 4 1 2 3 4 C D F A B E ...
Page 7: ...DEH P790BT XN UC 7 5 6 7 8 5 6 7 8 C D F A B E ...
Page 16: ...DEH P790BT XN UC 16 1 2 3 4 1 2 3 4 C D F A B E 2 5 CD MECHANISM MODULE ...
Page 28: ...DEH P790BT XN UC 28 1 2 3 4 1 2 3 4 C D F A B E 3 3 KEYBOARD UNIT B A CN801 ...
Page 29: ...DEH P790BT XN UC 29 5 6 7 8 5 6 7 8 C D F A B E B B KEYBOARD UNIT OEL UNIT MXS8231 ...
Page 33: ...DEH P790BT XN UC 33 5 6 7 8 5 6 7 8 C D F A B E C a C b C b 2 3 A CN701 6 ...
Page 39: ...DEH P790BT XN UC 39 5 6 7 8 5 6 7 8 C D F A B E D D BLUETOOTH UNIT A CN521 ...
Page 47: ...DEH P790BT XN UC 47 5 6 7 8 5 6 7 8 C D F A B E C SIDE B C CD CORE UNIT S10 5COMP2 ...
Page 93: ...DEH P790BT XN UC 93 5 6 7 8 5 6 7 8 C D F A B E 8 OPERATIONS ...
Page 94: ...DEH P790BT XN UC 94 1 2 3 4 1 2 3 4 C D F A B E ...
Page 95: ...DEH P790BT XN UC 95 5 6 7 8 5 6 7 8 C D F A B E ...
Page 96: ...DEH P790BT XN UC 96 1 2 3 4 1 2 3 4 C D F A B E ...
Page 97: ...DEH P790BT XN UC 97 5 6 7 8 5 6 7 8 C D F A B E ...


