


c
VOLUME buttons
Press to increase or decrease the volume.
d
MUTE button
Press to turn off the sound. To turn on the
sound, press again.
e
a
/
b
/
c
/
d
buttons
Press to perform manual seek tuning, fast
forward, reverse and track search controls.
Also used for controlling functions.
f
AUDIO button
Press to select an audio function.
g
DISP button
Press to select different displays.
Press and hold to scroll the text information.
h
e
(pause) button
Press to turn pause on or off.
i
FUNCTION button
Press to select functions.
j
LIST/ENTER button
Press to display the track title list, folder list,
file list or preset channel list depending on
the source.
While in the operating menu, press to con-
trol functions.
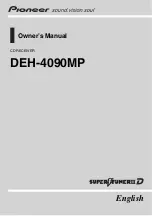
Display indication
1
Main display section
Displays band, frequency, elapsed playback
time and other settings.
!
Tuner
Band and frequency are displayed.
!
Built-in CD Player
Elapsed playback time and literal infor-
mation are displayed.
2
c
indicator
Appears when an upper tier of folder or
menu exists.
3
(folder) indicator
Appears when operating list function.
4
d
indicator
Appears when a lower tier of folder or menu
exists.
5
(artist) indicator
Appears when the disc (track) artist name is
displayed on the main display section.
6
(disc) indicator
Appears when the disc name is displayed
on the main display section.
7
(track) indicator
Appears when the track name is displayed
on the main display section.
8
LOC indicator
Appears when local seek tuning is on.
9
5
(stereo) indicator
Appears when the selected frequency is
being broadcast in stereo.
a
F-REPEAT indicator
Appears when folder repeat is on.
When repeat function is on, only
REPEAT
is
displayed.
b
F-RANDOM indicator
Appears when folder random is on.
When random function is on, only
RANDOM
is displayed.
c
(loudness) indicator
Appears when loudness is on.
Operating this unit
En
8
Section
02


