background image

5

En

Before 

start

What’s in the box

!

  CD-ROM (Installation Disc)

!

  AC adapter

!

  Power plug

1

!

  USB cable

!

  Warranty (for some regions only)

2

!

  Read Before Use (Important)/Quick Start Guide

1

  The number of power plugs included differs depending on the 

region.

2

  Japanese and European models only. (For North American models, 

warranty information is provided at the end of the “Read Before Use 
(Important)/Quick Start Guide” booklet.)

About the AC adapter

Safety instructions

To ensure your personal safety and to maximize the full operating poten-
tial of your unit, read and follow these safety instructions.

Read & Retain Instructions

Read all operating and user information provided with this product.

Cleaning

Use a damp cloth to clean the exterior housing. Avoid using any fluids 
including liquid, aerosol or alcohol-based cleaning products.

Water or Moisture

Avoid operating or locating this product near water or other sources of 
fluid.

Accessories

Do not place this product on an unstable cart, stand, or table. The prod-
uct may fall and be seriously damaged.

Ventilation

Do not block or cover this product in use. This unit should not be placed 
in a built-in installation unless properly ventilated.

Environment

Avoid placing this product in a location with exposure to large quantities 
of dust, high temperatures, high humidity, or subject to excessive vibra-
tions or shocks.

Power Sources

Operate this product only from the recommended power sources. If 
you are unsure of the power source, consult an authorized Pioneer 
representative.

Power-Cord Protection

When unplugging the unit, pull on the plug – not on the cord. Do not 
handle the cord or plug with wet hands; doing so could cause an electric 
short or shock. Do not allow anything to pinch or rest on the power cord 
and do not place in a walkway.

Power

Turn OFF the system before installing this or any other hardware device.

Overloading

Avoid connecting too many devices to a single wall socket or power 
source as this can cause fires or short circuits.

Object & Liquid Entry

Never push inappropriate objects in to the device. Avoid spilling any 
liquids in to or on the outside of the drive.

Servicing

Opening or removing the cover exposes you to possible electrical shock 
or other danger. Contact a Pioneer authorized service representative for 
repairing this product (refer to the enclosed Service & Support Card).

Damage Requiring Service

Unplug the unit and refer servicing to qualified service personnel in the 
following situations:

%

  When the power cord, plug, or chassis is damaged.

%

  If liquid has been spilled, or objects have fallen into the product.

%

  If the product has been exposed to rain or water.

%

  If the product does not operate normally when the operating instruc-

tions are followed. Adjust only those controls that are covered by the 
operating instructions. Improper adjustment of other controls may 
result in damage and can require extensive work by a qualified tech-
nician to restore the unit to its normal operation.

%

  When the product exhibits a distinct change in performance – this 

indicates a need for service.

Check that there are no irregularities with the AC adapter or power plug, 
then insert the power plug into the specified position of the AC adapter 
using the specified procedure until a click is heard. For details, see 

Mounting the power plug

 on page 6.

If there are irregularities with the AC adapter or power plug, ask your 
nearest Pioneer authorized service center or your dealer to carry out 
repair work.

!

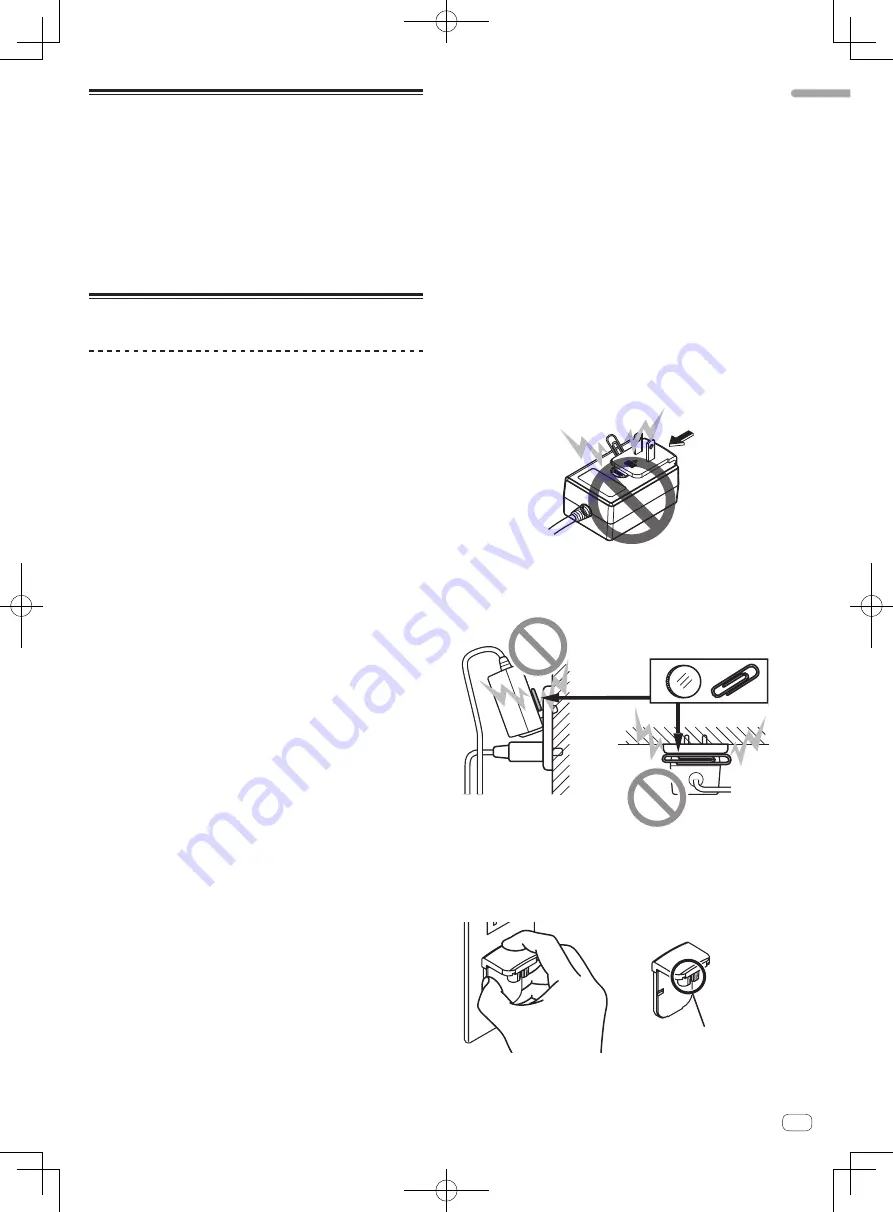
  Do not use this unit with a coin, paper clip or other metal object 

stuck between the AC adapter and power plug. Doing so could cause 
a short circuit, leading to fire or electric shock.

!

  When mounting the AC adapter on a wall outlet, make sure there is 

no space between the AC adapter and the wall outlet. Faulty contact 
or a coin, paper clip or other metal object getting stuck in the space 
could cause a short circuit, leading to fire or electric shock.

Coin, paper clip or other metal object

Top

Side

!

  The power plug could come detached from the AC adapter and 

remain in the power outlet if someone trips on the AC adapter’s 
power cord or if something hits the AC adapter. If this happens, 
remove the power plug remaining in the outlet with dry hands, hold-
ing it as shown on the diagram below and without touching metal 
parts. Do not use any tools to remove it.

Do not touch.

Summary of Contents for DDJ-SX

Page 1: ...J support site shown above offers FAQs information on software and various other types of information and services to allow you to use your product in greater comfort http serato com For the latest version of the Serato DJ software access Serato com and download the software from there ...

Page 2: ...es such as radios and televisions use shielded cables with Ferrite cores attached and connectors for connections D8 10 3b_A1_En NOTE This equipment has been tested and found to comply with the limits for a Class B digital device pursuant to Part 15 of the FCC Rules These limits are designed to provide reasonable protection against harmful interference in a residential installation This equipment g...

Page 3: ...ons of functions of this unit as hardware For detailed instructions on operating the Serato DJ soft ware see the Serato DJ software manual The Serato DJ software manual can be downloaded from Serato com For details see Downloading the Serato DJ software manual p 31 The latest version of these operating instructions can be down loaded from the Pioneer support site For details see Downloading the la...

Page 4: ...n trols on this unit are preset to associate them with the software so DJ performances can be held immediately simply by connecting this unit to a computer Furthermore the Dual Deck Control and Slip functions have been developed in cooperation with Serato DUAL DECK CONTROL The two tracks currently playing on the two decks can be operated simultaneously with a single player interface This enables p...

Page 5: ... spilling any liquids in to or on the outside of the drive Servicing Opening or removing the cover exposes you to possible electrical shock or other danger Contact a Pioneer authorized service representative for repairing this product refer to the enclosed Service Support Card Damage Requiring Service Unplug the unit and refer servicing to qualified service personnel in the following situations Wh...

Page 6: ...r more of RAM 64 bit version Intel processor Core 2 Duo 2 4 GHz or better 4 GB or more of RAM Others Optical drive Optical disc drive on which the CD ROM can be read USB port A USB 2 0 port is required to connect the computer with this unit Display resolution Resolution of 1 280 x 720 or greater Internet connection An Internet connection is required for registering the Serato com user account and ...

Page 7: ...g the software The personal information input when registering a new user account may be collected processed and used based on the privacy policy on the Serato website 9 Click the link in the e mail message sent from Serato com This takes you to the Serato DJ download page Proceed to step 11 10 Log in Input the e mail address and password you have registered to log in to Serato com 11 Download the...

Page 8: ... Pioneer DDJ_SX DDJ_SX ASIO Settings Utility Adjusting the buffer size In the same way as the buffer size setting in the Serato DJ software decreasing the value of the Kernel Buffers setting lowers the transfer delay latency of the audio data while increasing the value reduces the tendency for dropouts in the audio data breaks in the sound The setting at USB BUFFER SIZE LATENCY in the Serato DJ so...

Page 9: ...l Connects a microphone here The INPUT SELECT switch on the main unit s front panel must be set to MIC2 5 CD terminals Connect to a DJ player or other line level device The INPUT SELECT switch on the main unit s front panel must be set to CD 6 PHONO LINE input terminals Connect a phono level output device analog player for MM car tridges etc or a line level output device DJ player etc here Switch ...

Page 10: ...y 3 seconds when switched to PHONO 4 INPUT SELECT switch Selects the input source of each channel from the components con nected to this unit PC Select this to use the track loaded in the Serato DJ soft ware s deck PHONO Select this to use a phono level for MM cartridges output device analog player etc connected to the PHONO LINE input terminals LINE Select this to use a line level output device D...

Page 11: ...4 1 LOAD button Press The selected tracks are loaded to the respective decks When the LOAD button is pressed twice the tracks loaded in the selected deck on the opposite side are loaded into the deck whose LOAD button was pressed When this is done while a track is playing the track is played from the same position Instant Double SHIFT press The library s track list is sorted when one of the LOAD b...

Page 12: ...es SHIFT press The TEMPO slider s range of variation switches each time the but ton is pressed 8 16 50 Press for over 1 second Sets the tempo BPM of the currently playing track back to its origi nal tempo 6 TAKEOVER indicator When decks are switched while the sync function is off the position of the controller s TEMPO slider may not match the software s tempo pitch To regain control of the tempo f...

Page 13: ...page 25 SHIFT press This will be used with future function enhancements of the Serato DJ software For function enhancements see the Pioneer DJ support site below http pioneerdj com support g Performance pads The performance pads are used to control the hot cue loop roll slicer and sampler functions Using the performance pads p 22 h PARAMETERc button PARAMETERd button Use these to set the loop roll...

Page 14: ...eadphones CUE button is pressed is output to the headphones When the headphones CUE button is pressed again monitoring is canceled When the INPUT SELECT switch for channel 3 or 4 is set to MIC1 or MIC2 the talkover function can be turned on or off When the talkover function is on the headphones CUE MIC TALK OVER button flashes When a sound of over 15 dB is input to the microphone the sound other t...

Page 15: ...the effects parameters 2 FX BEATS control Adjusts the effect time 3 Effect parameter buttons Press Turns the effect on and off or switches the parameter SHIFT press Switches the effect type 4 TAP button Press The BPM used as the base value for the effect is calculated by the interval at which the button is tapped with a finger When the button is pressed and held the effect time is reset SHIFT pres...

Page 16: ... to the BOOTH terminals For details on the connections of the input output terminals see Connections p 9 3 Connect this unit to your computer via a USB cable 4 Turn on the computer s power 5 Connect the power plug to the AC adapter Slide the power plug into the AC adapter s guide rails as shown on the diagram and press in until a click is heard For detailed cautions on the AC adapter see About the...

Page 17: ...iver software may appear when this unit is first connected to the computer or when it is connected to a different USB port on the computer Wait a while until the message Your devices are ready for use appears 8 Turn on the power of the devices connected to the output terminals powered speakers power amplifier components etc When a microphone DJ player or other external device is con nected to inpu...

Page 18: ...With Serato DJ SYNC PREFERENCE is set to Simple sync by default but this must be switched to Smart sync in order to perform beat grid operations SETUP DJ Preference SYNC PREFERENCE For instructions on displaying the settings screen and details on the beat grid see the Serato DJ manual Computer screen when a track is loaded in the Serato DJ software A A C B A Deck section The track information the ...

Page 19: ...contents of your computer or the peripheral connected to the computer are displayed in the Files panel 2 Click the folder on the Files panel containing the tracks you want to add to the library to select it 3 On the Serato DJ software screen drag and drop the selected folder to the crates panel A crate is created and the tracks are added to the library a b a Files panel b Crates panel Loading trac...

Page 20: ...nd will be output if the volume is set too high a b d c e 4 8 7 5 6 9 f h g 4 TRIM control 5 EQ HI MID LOW controls 6 FILTER control 7 Headphones CUE button 8 Channel fader 9 Crossfader Assign Switch a MASTER LEVEL control b BOOTH MONITOR LEVEL control c HEADPHONES MIXING control d MASTER CUE button e Crossfader f HEADPHONES LEVEL control g INPUT SELECT switch h Crossfader curve selector control 1...

Page 21: ...rclockwise 1 Press the headphones CUE button for the channel 1 2 Turn the HEADPHONES LEVEL control Adjust the sound level output from the headphones to an appropriate level Note This unit and the Serato DJ software include a variety of functions enabling individualistic DJ performances For details on the respective functions see the Serato DJ software manual The Serato DJ software manual can be do...

Page 22: ...ed The following four settings can be made 1 4 beats from 1 32 2 8 beats from 1 16 3 16 beats from 1 8 4 32 beats from 1 4 For example with the 8 beats from 1 16 setting the pads settings are as shown below 1 16 beat 1 8 beat 1 4 beat 1 2 beat 1 beat 2 beats 4 beats 8 beats The range of beats set for the loop roll is displayed on the computer s screen 3 Press and hold one of the performance pads A...

Page 23: ... position returns to the begin ning of the range that was sliced into eight equal parts 1 2 3 4 5 6 7 8 Using the sampler function Tracks loaded in the sampler slots of the sampler SP 6 can be played with the performance pads 1 Press the PANEL SELECT button to open the SP 6 panel on the computer s screen 2 Press the SAMPLER mode button The SAMPLER mode button lights and the mode switches to the sa...

Page 24: ...OOP OUT button Loop playback starts Normal playback continues in the background even during loop playback 3 Press the LOOP OUT button while pressing the SHIFT button Looping is canceled and playback starts from the position reached in the background To cancel the slip mode press the SLIP button again Slipping using a loop in a loop slot 1 Press the SLIP button The mode switches to the slip mode 2 ...

Page 25: ...is started with the channel fader start function When the channel fader is moved from the back to the position near est you while pressing the SHIFT button when standing by at a cue track playback starts from the set cue Using the sampler velocity mode When the SAMPLER mode button is pressed for over one second the sampler velocity mode turns on and off When the sampler velocity mode is on the sam...

Page 26: ...it 3 dB SLICER mode button lit 6 dB Disabling the slip mode flashing setting When the slip mode is on the buttons that can be operated in the slip mode jog dial indicator AUTO LOOP button PLAY PAUSE f button etc flash This setting can be used to disable the flashing of these buttons By default slip mode flashing is enabled Press the SLIP button on the left deck SLIP button lit Slip mode flashing e...

Page 27: ...ault is 3 ms Press the SHIFT button on the left deck The MIDI message sending interval setting changes each time the but ton is pressed The currently set value is indicated by how the master level indicator is lit 3 ms 4 ms 5 ms 6 ms 7 ms 8 ms 9 ms 10 ms 11 ms 12 ms 13 ms Switching the jog dials illumination mode The lighting pattern of the illumination at the center of the jog dial can be switche...

Page 28: ...D LOW con trols and filter effects can be applied to the respective channels with the FILTER control Mixing the sound of a DJ player etc 1 Connect the DJ player or other line level output device to the CD or PHONO LINE terminals 2 Start up the system Starting the system p 18 3 Set the INPUT SELECT switch to CD or LINE 4 Operate the TRIM control and the channel faders to adjust the audio level outp...

Page 29: ...ontains any tracks or add tracks to the crate or subcrate Music files in the library cannot be edited changing track names etc Is Protect Library at the SETUP menu s Library Display tab enabled Disable Protect Library Recording is not possible Is the recording level low Adjust the gain control on the REC panel in the Serato DJ software Have you saved the recording after completing it Save the reco...

Page 30: ...channel fader start function does not work Is a cue set Set a cue page 25 Are the utility settings wrong In the utility settings set the channel fader start setting to Channel fader start with the sync mode set or Channel fader start without the sync mode set The BPM is not displayed The sync and auto loop functions do not work Has the track been analyzed Analyze the file Is Set Auto BPM checked i...

Page 31: ...ns begins Downloading the Serato DJ software manual 1 Insert the CD ROM into the computer s optical drive The CD ROM menu is displayed If the CD ROM s menu does not appear when the CD ROM is inserted perform the operations below For Windows Open the optical drive from Computer or My Computer in the Start menu then double click the CD_menu exe icon For Mac OS X In Finder double click the CD_menu ap...

Page 32: ... secret and other intellectual property rights in the Program and Documentation and any derivative works thereof You do not acquire any other rights express or implied beyond the limited license set forth in this Agreement 4 No Support Pioneer has no obligation to provide support maintenance upgrades modifications or new releases for the Program or Documentation under this Agreement 3 WARRANTY DIS...

Page 33: ...h Live ITCH and Serato DJ Intro are registered trademarks of Serato The names of companies and products mentioned herein are the trade marks of their respective owners This product has been licensed for nonprofit use This product has not been licensed for commercial purposes for profit making use such as broadcasting terrestrial satellite cable or other types of broadcast ing streaming on the Inte...

Reviews: