background image

CDJ-100S

39

P94/FIP6

P93/FIP5

P92/FIP4

P91/FIP3

P90/FIP2

P81/FIP1

P80/FIP0

P27/SCK0

P26/SO0/SB1

P25/SI0/SB0

P24/BUSY

P23/STB

P22/SCK1

P21/SO1

P20/SI1

RESET

P74

P73

AVss

P17/ANI7

P16/ANI6

P15/ANI5

P14/ANI4

P32/TO2

P31/TO1

P30/TO0

P03/INTP3/CI0

P00/INTP0/TI0

IC

P72

P71

P70

Vcc

P127/FIP33

P126/FIP32

P125/FIP31

P124/FIP30

P123/FIP29

P122/FIP28

P121/FIP27

P120/FIP26

P117/FIP25

P116/FIP24

P115/FIP23

P114/FIP22

P113/FIP21
P112/FIP20
P111/FIP19
P110/FIP18
P107/FIP17
P106/FIP16

P105/FIP15
P104/FIP14
P103/FIP13
P102/FIP12
P101/FIP11
P100/FIP10

P97/FIP9
P96/FIP8
P95/FIP7

V

LOAD

P02/INTP2

P01/INTP1

P13/ANI3

P12/ANI2

P11/ANI1

P10/ANI0

P04/XT1

XT2

Vss

X1

X2

P37

P36/BUZ

P35/PCL

P34/TI2

P33/TI1

AV

DD

AV

REF

V

DD

1

2

3

4

5

6

7

8

9

10

11

12

13

14

21

22

23

24

15

16

17

18

19

20

64

63

62

61

60

59

58

57

56

55

54

53

52

51

44

43

42

41

50

49

48

47

46

45

65
66
67
68
69
70
71
72
73
74
75
76
77
78
79
80

40
39
38
37
36
35
34
33
32
31
30
29
28
27
26
25

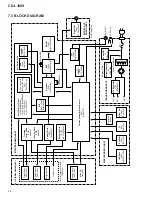
IC701

(PD4977B)

16-bit TIMER/

EVENT COUNTER

TO0/P30

TI0/INTP0/P00

TO1/P31

TI1/P33

BUZ/P36

INTP0/TI0/P00 – INTP3/CI0/P03

PCL/P35

CI0/INTP3/P03

CI0/SB0/P25

CO0/SB1/P26

SCK0/P27

CI1/P20

SO1/P21

SCK1/P22

STB/P23

BUSY/P24

RESET
X1
X2
XT1/P04
XT2

FIP0 – FIP33

P120 – P127

P110 – P117

P100 – P107

P30 – P37

P20 – P27

P10 – P17

P00
P01 – P03
P04

P90 – P97

P80, P97

P70-P74

V

LOAD

6-bit UP/DOWN

COUNTER

SERIAL

INTERFACE 0

SERIAL

INTERFACE 1

A/D CONVERTER

BUZZER OUTPUT

CLOCK OUTPUT

CONTROL

INTERRUPT

CONTROL

8-bit TIMER/

EVENT COUNTER 1

WATCHDOG TIMER

WATCH TIMER

PORT0

PORT1

PORT2

78K/0

CPU

CORE

PORT3

PORT7

RAM

ROM

PORT8

PORT9

PORT10

PORT11

PORT12

FIP CONTROLLER/

DRIVER

SYSTEM

CONTROL

TO2/P32

TI2/P34

8-bit TIMER/

EVENT COUNTER 2

ANI0/P10 – ANI0/P17

V

DD

V

SS

IC

AV

DD

AV

SS

AV

REF

7. GENERAL INFORMATION

 Pin Assignment (Top view)

7.1 PARTS

The information shown in the list is basic information and may
not correspond exactly to that shown in the schematic diagrams.

 PD4977B (IC701: MOTHER BOARD ASSY)
 System Control Micro-computer

 Block Diagram

7.1.1  IC

Summary of Contents for CDJ-100S

Page 1: ...V With the voltage selector WY AC220 240V COMPACT DISC PLAYER RRV2027 T DZY SEPT 1998 Printed in Japan CDJ 100S 1 SAFETY INFORMATION 2 2 EXPLODED VIEWS AND PARTS LIST 4 3 SCHEMATIC DIAGRAM 10 4 PCB CONNECTION DIAGRAM 24 5 PCB PARTS LIST 30 6 ADJUSTMENT 33 CONTENTS 7 GENERAL INFORMATION 39 7 1 PARTS 39 7 1 1 IC 39 7 1 2 DISPLAY 41 7 2 DIAGNOSIS 42 7 2 1 ERROR DISPLAY 42 7 2 2 DISASSEMBLY 42 7 3 BLO...

Page 2: ...as Simpson Model 229 2 or equivalent between the earth ground and all exposed metal parts of the appliance input output terminals screwheads metal overlays control shaft etc Plug the AC line cord of the appliance directly into a 120V AC 60 Hz outlet and turn the AC power switch on Any current measured must not exceed 0 5 mA FOR USA MODEL ONLY Also test with plug reversed Using AC adapter plug as r...

Page 3: ...de the interlock mechanism will not function Laser diode oscillation will continue if pin 33 of CXA1782CQ IC101 on the MOTHER BOARD ASSY is connected to GND or pin 43 of IC701 LDON is connected to low level ON or else the terminals of Q101 are shorted to each other fault condition 2 When the cover is opened close viewing of the objective lens with the naked eye will cause exposure to a Class 1 las...

Page 4: ...50 0 5 6 Audio Cable L 1 5m VDE1033 7 Operating Instructions See Contrast table 2 NSP 8 Limited Warranty See Contrast table 2 9 Polyethylene Bag Z21 038 0 03 230 340 10 Polyethylene Bag DHL1106 NSP 11 Silica Gel AEN7001 NSP 12 Caution SG DRM1199 NSP 13 Caution Card 220V See Contrast table 2 NOTES Parts marked by NSP are generally unavailable because they are not in our Master Spare Parts List The ...

Page 5: ...28 28 Refer to 2 4 SLOT IN MECHANISM ASSY Refer to 2 3 EXTERIOR 2 2 14 28 28 19 15 28 20 9 23 22 23 22 22 22 23 28 6 28 28 24 21 3 12 28 1 27 7 8 17 31 10 32 11 28 28 25 13 28 28 2 27 5 18 28 23 28 28 26 29 16 32 28 28 6 28 A B B C C A 2 2 EXTERIOR 1 2 ...

Page 6: ...RIOR 1 2 PARTS LIST Mark No Description Part No Mark No Description Part No 1 MOTHER BOARD ASSY See Contrast table 2 2 TRANS BOARD ASSY See Contrast table 2 NSP 3 SL MECHA BOARD ASSY DWS1294 NSP 4 DIGITAL OUT BOARD ASSY See Contrast table 2 5 Strain Relief See Contrast table 2 6 Earth Lead Unit 300V DDF1010 7 Connector Assy See Contrast table 2 8 Connector Assy 2P See Contrast table 2 9 S Flex DNP...

Page 7: ...Ring Plate DAH1887 13 Jog Washer DBF1001 14 Slide Knob DNK2936 15 Control Panel DNK3552 16 Disc Indicator DNK3555 17 Jog Dial DNK3625 18 Knob A Assy DXA1846 NSP 19 Knob A DAC1890 20 LED Lens PNW2019 21 65 Label See Contrast table 2 22 Screw BPZ30P080FZK 23 Nut M9 DBN1004 NSP 24 Binder Z09 061 25 Earth Plate VBK1070 26 Caution Label See Contrast table 2 NSP 27 Caution Label HE See Contrast table 2 ...

Page 8: ... 18 5 23 8 20 16 6 12 7 17 1 2 11 22 1 2 4 3 14 15 To MOTHER BOARD ASSY CN201 9 9 9 21 10 1 Dyefree ME 413A ZLX ME413A 2 Froil PN 397B ZLB PN397B 2 2 Refer to 2 5 SERVO MECHANISM ASSY SECTION 2 4 SLOT IN MECHANISM ASSY ...

Page 9: ...K3407 7 Loading Gear DNK3409 NSP 8 Worm Gear DNK3410 9 Mount Bush DEB1328 10 Connector Assy PF02PY B27 11 Clamp Arm DNK3404 12 Drive Gear DNK3565 13 Float Base Assy DXB1683 14 Disc Guide DNK3478 15 Front Sheet DED1132 SLOT IN MECHANISM ASSY PARTS LIST Mark No Description Part No Mark No Description Part No 16 Eject Lever DNK3548 17 Loading Lever DNK3406 18 Cushion A DEC2257 19 Cushion B DEC2258 20...

Page 10: ...ECHANISM ASSY S DXX2432 SLOT IN MECHANISM ASSY DXA1845 PULSE MOTOR FRAME DXM1085 LOADING MOTOR ASSY S DEA1008 SL MECHA BOARD ASSY DWS1294 A MOTHER BOARD ASSY DWM2078 KUC type DWM2079 RL and WY types B B 1 3 to B 3 3 EARTH LEAD UNIT PDF1104 Note When ordering service parts be sure to refer to EXPLODED VIEWS AND PARTS LIST or PCB PARTS LIST A ...

Page 11: ...WR1298 KUC type DWR1301 RL type DWR1300 WY type C DIGITAL OUT BOARD ASSY DWZ1082 KUC type Only E MOTHER BOARD ASSY DWM2078 KUC type DWM2079 RL and WY types B B 1 3 to B 3 3 EARTH LEAD UNIT DDF1010 AC POWER CORD PDG1015 KUC PDG1003 RL WY AC120V KUC AC110 120V 220 240V RL AC220 240V WY ...

Page 12: ...LOG SW SPINDLE DRIVE FOCUS DC BOOST TRACKING FOCUS DRIVE LOADING DRIVE TRACKING DC BOOST TZC AMP 7 8 6 4 1 3 2 5 A CN901 To LOADING MOTOR ASSY To SPINDLE MOTOR ASSY To PICKUP ASSY B 3 3 RF and Audio Signal Route Focus Servo Loop Tracking Servo Loop LOADING Drive SIGNAL ROUTE 3 2 MOTHER BOARD ASSY 1 3 B 1 3 ...

Page 13: ... A B C D 5 6 7 8 5 6 7 8 F F F F T T DECODER VCO INVERTER ANALOG SW MP SERVO CONTROL 12 11 13 20 16 17 KUC ONLY E CN801 B 2 3 B 3 3 B 3 3 MOTHER BOARD ASSY 1 3 DWM2078 KUC type DWM2079 RL and WY types B 1 3 B 1 3 ...

Page 14: ... MODE 1 V div 1 ms div 4 TP FODR TEST MODE FOCUS IN 5 V div 200 ms div TP DATA1 TP LRCK1 5 TP TRDR PLAY MODE 1 V div 1 ms div 5 TP TRDR 14T JUMP 1 MODE 1 V div 200 µs div 1 14T JUMP After switching to the pause mode Press the manual search key PLAY MODE 5 V div 2 ms div 6 TP WOUT 7 TP UOUT 8 TP VOUT PLAY MODE 5 V div 5 µs div TP DATA1 TP BCLK1 PLAY MODE 5 V div 200 ns div 6 7 8 4 5 5 3 3 2 1 4 GND...

Page 15: ... V 61 62 0 to 5 0 to 5 0 to 5 0 to 5 2 5 0 0 63 64 65 66 67 0 68 4 9 69 70 71 72 73 4 9 74 75 76 77 78 79 0 to 5 80 No IC303 TC7SU04F Voltage V 1 2 0 2 5 0 2 6 3 4 5 4 9 No IC302 BA7042 Voltage V 1 2 2 4 0 3 4 5 4 9 3 5 2 1 6 2 4 7 8 No IC201 BA6849FP Voltage V 1 2 0 0 6 0 6 0 0 3 4 5 6 6 0 7 0 8 9 10 11 12 13 2 5 0 5 14 15 No Voltage V 16 17 0 0 5 0 18 19 20 21 2 5 4 9 4 9 2 4 2 6 22 23 24 25 26 ...

Page 16: ...01 Pin 25 SCL PLAY MODE 5 V div 20 µs div DRAM 512k 8 bit DSP B 1 3 IC402 MB814800 70PJ 1 4 9 4 9 0 to 5 0 to 5 0 to 5 0 to 5 0 0 0 0 2 3 4 5 6 7 8 9 10 11 12 13 14 15 16 17 18 19 20 21 22 23 24 25 26 27 28 Voltage V Pin No Voltage V Pin No Set DJ MODE PLAY 14 15 RF and Audio Signal Route SIGNAL ROUTE 3 3 MOTHER BOARD ASSY 2 3 B 2 3 ...

Page 17: ... 0 to 5 37 38 39 0 50 46 47 48 49 0 to 5 45 41 42 43 44 80 0 0 0 76 77 4 9 4 9 78 79 1 0 85 81 82 83 84 0 0 90 2 4 86 0 87 1 0 88 2 5 89 100 1 5 1 5 96 0 97 4 9 98 99 0 95 4 9 91 92 93 2 3 94 55 4 9 51 52 53 54 60 0 to 5 56 57 58 59 2 4 65 0 61 2 5 62 2 6 63 4 9 64 0 75 0 71 72 1 4 73 4 9 74 4 9 70 2 5 66 0 67 4 9 68 0 69 Voltage V Pin No Voltage V Pin No Voltage V Pin No Voltage V Pin No Set DJ M...

Page 18: ...P RST POWER OFF 2 V div 10 ms div D712 D713 D729 D730 1SS355 GND GND MOTHER BOARD ASSY 3 3 DWM2078 KUC type DWM2079 RL and WY types B 3 3 B 2 3 To Pulse Motor Frame STEPPING DRIVE AUTO TRACKING BALANCE 2 4 5 2 5 2 5 2 2 IC901 NJM2904M 1 2 0 3 4 6 4 9 7 8 Voltage V Pin No 2 2 5 2 5 2 5 2 6 IC902 NJM2904M 1 2 0 3 4 6 7 4 7 8 Voltage V Pin No Set DJ MODE PLAY Waveforms 10 9 18 3 4 MOTHER BOARD ASSY 3...

Page 19: ...oltage V Pin No IC701 PD4977B IC701 PD4977B 1 0 to 5 0 to 5 30 5 to 5 0 to 5 0 0 4 9 4 8 4 9 4 9 2 4 2 5 2 5 2 2 2 3 2 6 2 5 0 0 0 0 2 3 4 5 6 7 8 9 10 11 12 13 14 21 22 23 24 25 26 27 28 29 30 31 32 33 34 Voltage V Pin No Voltage V Pin No Set DJ MODE PLAY 4 9 4 9 15 16 17 18 19 20 35 36 37 38 39 40 41 4 9 3 0 4 9 0 to 5 4 9 0 0 0 0 30 5 to 5 30 5 to 5 30 5 to 5 0 4 9 30 5 30 5 0 42 43 44 45 46 47...

Page 20: ...INUED PROTECTION AGAINST RISK OF FIRE REPLACE ONLY WITH SAME TIME NO ICP N25 MFD BY ROHM CO LTD FOR IC91 CAUTION FOR CONTINUED PROTECTION AGAINST RISK OF FIRE REPLACE ONLY WITH SAME TIME NO ICP N10 MFD BY ROHM CO LTD FOR IC92 B 2 3 CN705 5V REGULATOR HEAT SINK RF and Audio Signal Route SIGNAL ROUTE 3 5 TRANS BOARD ASSY C ...

Page 21: ...003 AC POWER CORD PDG1003 RL type WY type CAUTION FOR CONTINUED PROTECTION AGAINST RISK OF FIRE REPLACE ONLY WITH SAME TIME AND RATINGS ONLY NOTE FOR FUSE REPLACEMENT CAUTION FOR CONTINUED PROTECTION AGAINST RISK OF FIRE REPLACE ONLY WITH SAME TIME AND RATINGS ONLY NOTE FOR FUSE REPLACEMENT CAUTION FOR CONTINUED PROTECTION AGAINST RISK OF FIRE REPLACE ONLY WITH SAME TIME AND RATINGS ONLY NOTE FOR ...

Page 22: ...0S 22 A B C D 1 2 3 4 1 2 3 4 LED ON OFF D FLIP FLOP ENCODER DISPLAY BOARD ASSY DWG1503 D B 3 3 CN701 FL HOLDER DEB1396 2 Short TEST MODE Short AGING MODE 3 6 DISPLAY BOARD and DIGITAL OUT BOARD ASSEMBLIES D ...

Page 23: ...07 S611 S613 S615 VSG1008 S603 S606 DSG1063 SWITCHES S601 TRACK SEARCH 4 S602 SEARCH 1 S603 PLAY PAUSE 6 S604 TRACK SEARCH S605 SEARCH S606 CUE S607 DIGITAL JOG BREAK JET S608 MASTER TEMPO S609 DIGITAL JOG BREAK ZIP S610 DIGITAL JOG BREAK WAH S611 EJECT 0 S613 TIME MODE AUTO CUE S615 DIGITAL JOG BREAK HPLD GRN GRN GRN YEL RF and Audio Signal Route SIGNAL ROUTE LED HOLDER E D ...

Page 24: ...LIES SL MECHA BOARD ASSY Spindle Motor Assy SLOT IN MECHANISM ASSY Loading Motor Assy A MOTHER BOARD ASSY B Stepping Motor Pickup Assy DNP1873 C VR101 VR104 VC301 IC303 IC302 IC405 IC109 Q403 IC401 IC301 IC203 IC106 Q103 IC103 IC104 IC105 IC201 IC110 IC902 IC901 IC108 IC101 Q101 Q102 IC701 IC107 IC402 IC206 Q404 Q401 Q402 B A SIDE A ...

Page 25: ...ms Symbol in Schematic Diagrams Part Name Transistor Transistor with resistor Field effect transistor B C E B C E B C E D G S B C E B C E B C E D G S D G S 3 The parts mounted on this PCB include all necessary parts for several destination For further information for respective destinations be sure to check with the schematic diagram 4 Viewpoint of PCB diagrams Resistor array 3 terminal regulator ...

Page 26: ...CDJ 100S 26 A B C D 1 2 3 4 1 2 3 4 TRANS BOARD ASSY C DIGITAL OUT BOARD ASSY E DNP1873 C DNP1873 C C E SIDE B ...

Page 27: ...CDJ 100S 27 A B C D 5 6 7 8 5 6 7 8 MOTHER BOARD ASSY B DNP1872 C B SIDE B ...

Page 28: ...CDJ 100S 28 A B C D 1 2 3 4 1 2 3 4 DISPLAY BOARD ASSY D B CN701 DNP1873 C VR601 4 2 DISPLAY BOARD ASSEMBLY D SIDE A ...

Page 29: ...CDJ 100S 29 A B C D 1 2 3 4 1 2 3 4 IC602 Q608 Q609 Q610 Q602 Q603 Q601 DISPLAY BOARD ASSY D DNP1873 C D SIDE B ...

Page 30: ...igits any digit apart from 0 such as 560 ohm and 47k ohm tolerance is shown by J 5 and K 10 560 Ω 56 101 561 RD1 4PU 5 6 1 J 47k Ω 47 10 3 473 RD1 4PU 4 7 3 J 0 5 Ω R50 RN2H Â 5 0 K 1 Ω 1R0 RS1P 1 Â 0 K Ex 2 When there are 3 effective digits such as in high precision metal film resistors 5 62k Ω 562 10 1 5621 RN1 4PC 5 6 2 1 F Mark Symbol and Description Part No KUC type RL type WY type Remarks LI...

Page 31: ...C105 C108 C113 CKSQYB104K25 C128 C135 C137 C151 C152 CKSQYB104K25 C157 C159 C161 C162 CKSQYB104K25 C171 C172 C181 C189 CKSQYB104K25 C193 C195 C202 C206 C210 CKSQYB104K25 C212 C218 C314 C319 CKSQYB104K25 C351 C354 C402 C406 CKSQYB104K25 C408 C412 C416 C433 C434 CKSQYB104K25 C481 C482 C701 C704 C706 CKSQYB104K25 C713 C717 C719 C720 CKSQYB104K25 C901 C902 C94 CKSQYB104K25 C907 CKSQYB105K10 C711 C712 ...

Page 32: ...502 VTL1105 SWITCHES AND RELAYS S1 RSA1001 CAPACITORS C1 C3 10000 pF AC250V ACG7020 C25 CEAT102M16 C21 CEAT103M16 C55 CEAT220M50 C52 C54 CEAT221M50 C32 CEAT471M6R3 C12 C23 C24 C591 C83 CKSQYB104K25 C505 CKSQYF103Z50 C11 C13 C17 C56 CKSQYF104Z50 C501 C502 CQMA152J50 RESISTORS R60 RD1 4VM222J R551 RD1 4VM271J Other Resistors RS1 10S J OTHERS J11 14P PARALLEL WIRE D20PWY1420E HEAT SINK DNG1077 JA501 ...

Page 33: ...crewdriver large 39 kΩ 0 001 µF Low frequency oscillator Dual trace oscilloscope 10 1 probe Low pass filter 1 39 kΩ 0 001 µF 39 kΩ 0 0018 µF 100 kΩ Low pass filter 2 39 kΩ 0 0018 µF Resistor 100 kΩ Page 36 38 2 3 4 5 6 Page 36 38 Exchange MOTHER BOARD ASSY Exchange SERVO MECHANISM ASSY When 6 1 PREPARATIONS 6 1 1 Jigs and Measuring Instruments 6 1 2 Necessary Adjustment Points ...

Page 34: ...ons Short Point KD1 W116 V 5 W120 DISPLAY BOARD ASSY SIDE B 6 2 1 How to Start Cancel Test Mode 6 2 ADJUSTMENT Precautions for Test Mode 1 If a soiled or damaged disc is played back and a GFS error is generated the system may not perform a STOP operation and may run out of control although muting ON OFF will be performed If the system does run out of control press the CUE key to switch the power O...

Page 35: ... in direction towards the outer circumference of the carriage Fine movement in direction towards the inner circumference of the carriage Carriage towards the inner circumference RF Adjustment Mode Outer circumference feed Tracking Balance Adjustment Mode Center circumference feed Note The tracking servo is OFF LD ON Focus ON DISPLAY BOARD ASSY SIDE B MOTHER BOARD ASSY SIDE A 2 1 4 5 3 6 TP1 1 RF 2...

Page 36: ...C voltage 2 5 0 2V DC Mode V 50mV div H 10mSec div Note Adjustment of VC301 may not be made if the SLOT IN MECHANISM ASSY is installed Before adjustment remove the SLOT IN MECHANISM ASSY 6 Test mode None disc VR103 MOTHER BOARD ASSY DC voltage 0 50mV Oscilloscope DC Mode V 5mV div H 10mSec div Probe 10 1 GND START TP1 CN102 Player FOER VC MOTHER BOARD ASSY 4 6 2 4 Check and Adjustment ...

Page 37: ...de FOCUS servo SPDL servo TRKG servo CLOSE CLOSE OPEN TEST DISC PLAY R 35 VC A B GND GND Player TP1 CN102 RF VC START Probe 10 1 Oscilloscope AC Mode V 50mV div H 10mSec div MOTHER BOARD ASSY MOTHER BOARD ASSY MOTHER BOARD ASSY 4 VR 1 1VP P 0 2V Test mode FOCUS servo SPDL servo TRKG servo CLOSE CLOSE CLOSE TEST DISC PLAY PICKUP ASSY LD POWER TIME Key ON Disc Outer circumference 4 6 2 4 Check and A...

Page 38: ...de FOCUS servo SPDL servo TRKG servo CLOSE CLOSE CLOSE TEST DISC PLAY WAH Key ON Disc Center circumference VR101 MOTHER BOARD ASSY UNDER Oscilloscope X Y Mode X 50mV div Y 5mV div GND Probe 10 1 Player START TP1 CN201 TRIN VC UPPER JUST Low frequency oscillator 1 4kHz 2Vp p GND GND Probe 10 1 39kΩ 0 001µF Low pass filter 1 100kΩ TRER 2 3 4 Lissajous Waveform MOTHER BOARD ASSY VR102 MOTHER BOARD AS...

Page 39: ... 76 77 78 79 80 40 39 38 37 36 35 34 33 32 31 30 29 28 27 26 25 IC701 PD4977B 16 bit TIMER EVENT COUNTER TO0 P30 TI0 INTP0 P00 TO1 P31 TI1 P33 BUZ P36 INTP0 TI0 P00 INTP3 CI0 P03 PCL P35 CI0 INTP3 P03 CI0 SB0 P25 CO0 SB1 P26 SCK0 P27 CI1 P20 SO1 P21 SCK1 P22 STB P23 BUSY P24 RESET X1 X2 XT1 P04 XT2 FIP0 FIP33 P120 P127 P110 P117 P100 P107 P30 P37 P20 P27 P10 P17 P00 P01 P03 P04 P90 P97 P80 P97 P70...

Page 40: ... LOAD2 I O Slot in motor output 2 38 S1TJ O Servo control output 1 Track Jump H 39 LOAD I O Slot in motor output 2 40 GFS I Frame sync lock input H OK L NG No Name I O Description 41 STCK O Stepping motor control output 42 XLAT O LSI control data latch pulse 43 LDON O Laser diode output L OFF H ON 44 PALS I Interrupt input for RAM internal display pulses 45 FG I FG pulse input 46 SCOR I Interrupt ...

Page 41: ...P No pin NL No Lead S1 S2 S3 S4 S5 S6 S7 S8 S9 S10 S11 S12 S13 S14 S15 S1 S2 S6 S7 S9 S13 S14 S1 S2 S6 S7 S9 S13 S14 S1 S2 S3 S4 S5 S6 S7 S8 S9 S10 S11 S12 S13 S14 REMAIN S1 S2 S3 S4 S5 S6 S7 S8 S9 S10 S11 S12 S13 S14 M S1 S2 S3 S4 S5 S6 S7 S8 S9 S10 S11 S12 S13 S14 S15 S1 S2 S3 S4 S5 S6 S7 S8 S9 S10 S11 S12 S13 S14 S S1 S2 S3 S4 S5 S6 S7 S8 S9 S10 S11 S12 S13 S14 S1 S2 S3 S4 S5 S6 S7 S8 S9 S10 S1...

Page 42: ...G PULSE ERROR PLAYER ERROR PLAYER ERROR S901 SW MECHANICAL ERROR MECHANICAL TIME OUT 7 2 1 ERROR DISPLAY When the player detects an error during operation if will immediately stop and display an error code in the display window 7 2 2 DISASSEMBLY PRECAUTIONS Be sure to disconnect the power cable from the AC outlet whenever removing the card flexible cable from the connector for maintenance etc Hold...

Page 43: ...ve the four float springs 6 Remove the left side damper slightly raise left side of the slot in mechanism assy and disconnect the flexible cables CN101 CN201 CN202 on the lower side 7 Disconnect the connectors CN103 CN104 and slide the slot in mechanism assy to the side on which the damper has been removed 8 Remove the three screws B and then remove the mecha holder Note An earth spring is located...

Page 44: ...moval of the Each P C Boards TRANS BOARD Assy 1 With the slot in Mechanism Assy removed disconnect the connector CN705 2 Remove the screw C and disconnect the cable stay 3 Remove the seven screws D raise front side of the TRANS BOARD assy and remove it DISPLAY BOARD Assy 1 Remove the jog dial and the slide knob at the top of the body and then remove the nut M9 and jog washer 2 Disconnect the earth...

Page 45: ...09 Rotary Encoder S614 DSX1051 1 Remove the jog dial the nut M9 and the jog washer at the top of the unit Refer to Removal of the DISPLAY BOARD Assy 2 Unsolder the rotary encoder and cut the 8 locations shown in the figure with nippers or similar 3 Raise the P C board while paying attention to the jumper wires and remove the rotary encoder Slide Volume VR601 DCV1009 1 Remove the slide knob from th...

Page 46: ...05RR12 TRANS BOARD ASSY DIGITAL OUT BOARD ASSY DISPLAY BOARD ASSY MOTHER BOARD ASSY SLOT IN MECHANISM ASSY Power SW S1 RSA1001 Voltage Selector S2 DSA1026 Operation Button MUTE Q403 DTC124EK ATB IC901 IC902 NJM2904M System Control Micro computer IC701 PD4977B Pickup Assy DWY1069 Servo Mechanism Assy S DXX2432 Spindle Motor DXM1084 Stepping Motor Inside SW Inside SW Clamp SW Spindle Drive IC201 BA6...

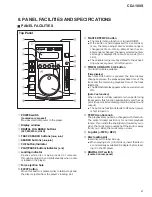
Page 47: ...0 The variable range is set by default to the 10 set ting whenever power is first turned on TIME MODE AUTO CUE button Two functions are available Time display Each time this button is pressed the time display changes between the elapsed playback time of the track and the remaining playback time of the track REMAIN The REMAIN display appears when power is turned ON Auto Cue function When a disc is ...

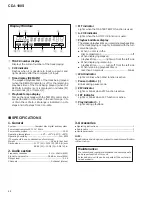
Page 48: ...ay REMAIN The elapsed playback time of the track being played when the REMAIN indicator is off or the remaining playback time of the track being played when the REMAIN indicator is on is displayed in minutes M and seconds S or frames F 4 Playback tempo display Tempo changes made with the TEMPO control knob are performed in 0 1 steps in the 10 range 0 to 10 in the 10 to 16 range is indicated in 0 1...

Reviews: