background image

05

34

En

Chapter 5

Adjusting audio and video

Adjusting the video

The quality of the 

p

layback 

p

ictu

r

e can be adjusted 

acco

r

ding to the TV you a

r

e using.

1

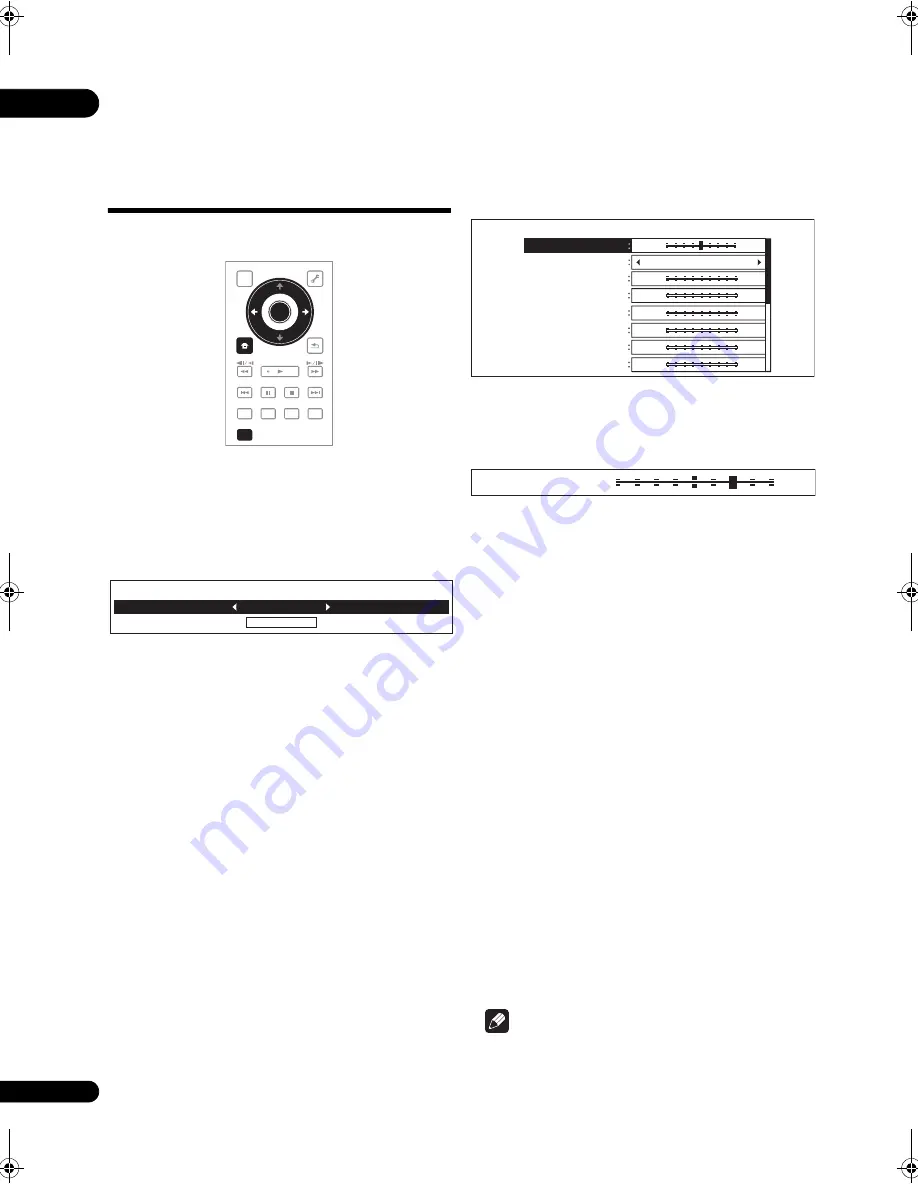
During playback, press VIDEO ADJUST to display 

the Video Adjust screen.

The Video Adjust sc

r

een can also be dis

p

layed by 

selecting 

Video Adjust

 f

r

om the 

TOOLS

 menu.

2

Select a preset.

Select using 

/

 acco

r

ding to the TV being used.

Pioneer PDP

 – Select this when connected to a 

Pionee

r


p

lasma TV.

Pioneer LCD

 – Select this when connected to a 

Pionee

r

 liquid c

r

ystal dis

p

lay TV.

Pioneer Projector

 – Select this when connected to a 

Pionee

r

 f

r

ont 

pr

ojecto

r

.

PDP

 – Select this when connected to a 

p

lasma TV of 

anothe

r

 b

r

and.

LCD

 – Select this when connected to a liquid c

r

ystal 

dis

p

lay of anothe

r

 b

r

and.

Projector

 – Select this when connected to a f

r

ont 

pr

ojecto

r

 of anothe

r

 b

r

and.

Professional

 – With this setting, video signal 

pr

ocessing is 

r

est

r

ained. Select this when connected 

to a 

pr

ofessional monito

r

.

Memory1 to 3

 – Pictu

r

e quality settings with 

adjusted 

p

a

r

amete

r

s can be sto

r

ed in the memo

r

y. 

Fo

r

 a desc

r

i

p

tion of the 

p

a

r

amete

r

s, see 

When 

Memory1, 2 or 3 is selected

 below.

When Memory1, 2 or 3 is selected

1

Select Adjustments.

Use 

 to select 

Adjustments

, then 

pr

ess 

ENTER

A detailed settings sc

r

een a

pp

ea

r

s.

2

Select the item to be adjusted.

Use 

/

 to select.

3

Adjust the picture quality.

When 

/

 a

r

pr

essed, the adjustments can be made 

viewing the 

p

ictu

r

e. The detailed settings sc

r

een 

r

ea

pp

ea

r

s when 

ENTER

 is 

pr

essed.

Prog.Motion

 – Adjust acco

r

ding to the ty

p

e of image 

(moving o

r

 still image). This is effective mainly when 

out

p

utting video mate

r

ials as 

pr

og

r

essive images.

Pure Cinema

 – This setting o

p

timizes the o

p

e

r

ation of 

the 

pr

og

r

essive scanning ci

r

cuit fo

r


p

laying film 

mate

r

ials. No

r

mally set it to 

Auto1

. If the 

p

ictu

r

seems unnatu

r

al, switch this to 

Auto 2

On

 o

r


Off


(

p

age 35).

YNR

 – Reduces noise in the luminance (Y) signal.

CNR

 – Reduces noise in the ch

r

oma (C) signal.

BNR

 – Reduces the block noise (block-sha

p

ed 

disto

r

tion gene

r

ated u

p

on MPEG com

pr

ession).

MNR

 – Reduces the mosquito noise (disto

r

tion along 

the contou

r

s of the 

p

ictu

r

e gene

r

ated u

p

on MPEG 

com

pr

ession).

Detail

 – Adjusts the 

p

ictu

r

e’s contou

r

s.

White Level

 – Adjusts the level of the white 

p

o

r

tions.

Black Level

 – Adjusts the level of the black 

p

o

r

tions.

Black Setup

 – Select the black level as the setu

p

 level. 

No

r

mally select 

7.5 IRE

. If the black level is too b

r

ight 

due to the combination with the connected TV, select 

0 IRE

.

Gamma Correction

 – Adjusts how the da

r

p

o

r

tions 

of the 

p

ictu

r

e look.

Hue

 – Adjusts the balance between g

r

een and 

r

ed.

Chroma Level

 – Adjusts the density of the colo

r

s.

 Note

Prog.Motion

 and 

Pure Cinema

 have the effect only 

fo

r


p

ictu

r

es 

r

eco

r

ded in the inte

r

laced scan fo

r

mat 

(480i o

r

 1080i signals).

TOP MENU

TOOLS

HOME

MENU

RETURN

PLAY

PREV

PAUSE

STOP

NEXT

RED

GREEN

YELLOW

BLUE

VIDEO ADJUST

ENTER

Adjustments

Video Adjust

PDP

Prog. Motion

Pure Cinema

YNR

CNR

BNR

MNR

Detail

White Level

Video Adjust [ Memory1 ]

Motion

Still

Auto1

Off

Max

Off

Max

Off

Max

Off

Max

Soft

Fine

Min

Max

Motion

Still

Prog. Motion

23FD_UXJCA_EN.book  34 ページ  2009年3月3日 火曜日 午後6時48分

Summary of Contents for BDP-23FD - Elite Blu-Ray Disc Player

Page 1: ...Operating Instructions Blu ray Disc PLAYER ...

Page 2: ...llation This equipment generates uses and can radiate radio frequency energy and if not installed and used in accordance with the instructions may cause harmful interference to radio communications However there is no guarantee that interference will not occur in a particular installation If this equipment does cause harmful interference to radio or television reception which can be determined by ...

Page 3: ...led or objects have fallen into the apparatus the apparatus has been exposed to rain or moisture does not operate normally or has been dropped P1 4 2 2_En 11 12 13 14 CAUTION This product is a class 1 laser product but this product contains a laser diode higher than Class 1 To ensure continued safety do not remove any covers or attempt to gain access to the inside of the product Refer all servicin...

Page 4: ...wer cord by the plug Do not pull out the plug by tugging the cord and never touch the power cord when your hands are wet as this could cause a short circuit or electric shock Do not place the unit a piece of furniture etc on the power cord or pinch the cord Never make a knot in the cord or tie it with other cords The power cords should be routed such that they are not likely to be stepped on A dam...

Page 5: ... established a comfortable sound level Set the dial and leave it there Taking a minute to do this now will help to prevent hearing damage or loss in the future After all we want you listening for a lifetime We Want You Listening For A Lifetime Since hearing damage from loud noise is often undetectable until it is too late this manufacturer and the Electronic Industries Association s Consumer Elect...

Page 6: ...itching the subtitles 25 Switching the audio and secondary audio 26 Switching the secondary video 26 Displaying the disc information 26 Playback functions 27 Using the Play Mode functions 28 Playing from a specific time Time Search 28 Playing a specific title chapter or track Search 28 Playing a specific section within a title or track repeatedly A B Repeat 28 Playing repeatedly Repeat Play 29 Pla...

Page 7: ...batteries together To prevent leakage of battery fluid remove the batteries if you do not plan to use the remote control for a long period of time 1 month or more If the fluid should leak wipe it carefully off the inside of the case then insert new batteries If a battery should leak and the fluid should get on your skin flush it off with large quantities of water When disposing of used batteries p...

Page 8: ...go Application format BDMV1 1 Including the AVCHD format BDAV DVD Video DVD VR CD DA DTS CD DATA DISC2 2 Discs on which image or audio files are recorded BD3 3 Including dual layered discs BD ROM BD R4 4 Finalize close them before playing them on this player BD RE DVD DVD ROM DVD R3 4 5 5 DVD R for Authoring discs 3 95 and 4 7 GB cannot be played DVD RW4 6 6 Version 1 0 DVD RW discs cannot be play...

Page 9: ...gos Symbol DTS HD and DTS HD Master Audio Essential are trademarks of DTS Inc 1996 2008 DTS Inc All Rights Reserved Playing BDs BDs BDMV compatible with the formats below can be played Blu ray Disc Read Only ROM Format Version 2 Blu ray Disc Recordable R Format Version 2 Blu ray Disc Rewritable RE Format Version 3 This player supports BD ROM Profile 2 BONUSVIEW functions such as playback of second...

Page 10: ...tailed information on the DualDisc specification please refer to the disc manufacturer or disc retailer Playing discs created on computers or BD DVD recorders It may not be possible to play discs recorded using a computer due to the application settings or computer s environment settings Record discs in a format playable on this player For details contact the dealer It may not be possible to play ...

Page 11: ...14 VIDEO ADJUST page 34 15 OPEN CLOSE Press to open and close the disc tray 16 FL DIMMER When pressed the brightness of the player s front panel display and the status of the indicators on the player s front panel changes 17 ANGLE page 25 18 OUTPUT RESOLUTION page 22 19 PLAY MODE page 28 20 POP UP MENU MENU Press to display the BD ROM or DVD Video menus 21 DISPLAY page 26 22 TOOLS page 21 23 RETUR...

Page 12: ... remote control signals if there is a fluorescent light nearby If this happens move the player away from the fluorescent light 5 Disc tray 6 Blu ray indicator Lights when the power is turned on 7 OPEN CLOSE Press to open and close the disc tray 8 Front panel display 9 PQLS indicator page 15 10 HDMI indicator page 14 11 Press to start playback Front Panel Display 1 page 24 2 page 24 3 HD This light...

Page 13: ...d via System Control point the remote control toward the connected component such as an AV receiver or amplifier The remote will not work correctly when pointed at this player You cannot use System Control with components that do not have a System Control terminal or with components manufactured by companies other than Pioneer 5 DIGITAL OUT OPTICAL terminal page 17 6 HDMI OUT terminal page 16 7 US...

Page 14: ...h x v Color that have the capability to realize a wide gamut color space based on the xvYCC specifications Playing video signals conforming to xvYCC standards on this player when connected to an x v Color compatible TV etc expands color reproduction capabilities allowing natural colors to be reproduced more faithfully than ever x v Color is a promotion name given to the products that have the capa...

Page 15: ... of the Flat Panel TV This function is available only when playback is stopped and the menu screen is not displayed Caution Also refer to the operating instructions of the Flat Panel TV and AV system AV receiver or amplifier etc Note CONTROL on the player s front panel display lights when the KURO LINK function is activated page 12 To use the KURO LINK function The KURO LINK function only works wh...

Page 16: ... cable Placing a load on the plug could result in faulty contact and no video signals being output Connecting an AV receiver or amplifier Connect to an AV receiver or amplifier in order to enjoy the surround sound of Dolby TrueHD Dolby Digital Plus Dolby Digital DTS HD Master Audio DTS HD High Resolution Audio or DTS Digital Surround For instructions on connecting the TV and speakers to the AV rec...

Page 17: ... to Multi channel page 38 Note To connect to the 2 channel audio input terminals on a TV etc connect to FRONT L R Connectingcomponents to the USB port The data downloaded with the BD LIVE function and the data used with the BONUSVIEW function when playing BD ROMs can be stored on a device connected to the USB port external storage About USB external storage devices The USB external storage devices...

Page 18: ...lers or additional audio and subtitle languages and playing on line games can be enjoyed over the Internet The player s software can also be updated over the Internet page 46 Connect an Ethernet hub or a router with hub functionality that is connected to the Internet to the player Be sure to use a 100BASE TX compatible Ethernet hub or router Connecting via an Ethernet hub The player can be connect...

Page 19: ...NU to display the Home Menu select Initial Setup Setup Navigator Start then press ENTER 3 Select the OSD language Use to select then press ENTER When a Pioneer Flat Panel TV that is compatible with KURO LINK is connected to this player s HDMI OUT terminal language settings are imported from the Pioneer Flat Panel TV s language settings before Setup Navigator begins 4 Select and set the video and a...

Page 20: ...ils see About the audio output settings on page 47 When Use is select the player is set to the settings below HDMI Audio Out PCM KURO LINK On PQLS Auto For details on the PQLS function About PQLS function on page 15 9 Check the settings Select Proceed then press ENTER 10 Output test tones Use to select Yes then press ENTER 11 Finish the Setup Navigator menu Use to select Finish then press ENTER To...

Page 21: ... 34 36 42 43 54 06 10 24 25 18 HUANYU 56 HYPSON 07 18 46 ICE 46 47 IMPERIAL 38 42 INDIANA 07 INGELEN 31 INTERFUNK 31 32 07 42 INTERVISION 46 49 ISUKAI 41 ITC 42 ITT 31 32 42 JEC 05 JVC 13 23 KAISUI 18 41 44 KAPSCH 31 KENDO 42 KENNEDY 32 42 KORPEL 07 KOYODA 44 LEYCO 07 40 46 48 LIESENK TTER 07 LOEWE 07 LUXOR 32 42 43 M ELECTRONIC 31 44 45 54 56 07 36 51 MAGNADYNE 32 49 MAGNAFON 49 MAGNAVOX 07 10 03...

Page 22: ...deo and audio are properly output When video signals are being output with a resolution of 1080 24p 1080 60i 1080 60p or 720 60p from the HDMI OUT terminal or COMPONENT VIDEO output terminals the picture may be output with an aspect ratio of 16 9 even if the TV Aspect Ratio is set to 4 3 Standard Item Description Play from Beginning Play the selected title track or file from the start Slideshow Pl...

Page 23: ... HOME MEDIA GALLERY MENU DISPLAY POPUP MENU AUDIO VIDEO SECONDARY OUTPUT RESOLUTION Auto Output Video Resolution Source 1080 60i Current Output 1080 60i Video resolution of the currently playing disc Output video resolution from the player Example Output video resolution setting HDMI1 1 The video output terminal set at Video in the Setup Navigator page 19 or the video output terminal selected with...

Page 24: ...r set for the disc to unlock the protection Check Troubleshooting on page 57 if video or audio signals are not being output properly If the disc menu is displayed For some discs the disc menu is displayed automatically when playback starts The contents of the disc menu and the way to operate differ from disc to disc Resuming playback from where it was stopped resume playback function When STOP is ...

Page 25: ...rward or reverse each time the button is pressed To resume normal playback Press PLAY Switching the camera angles For BD ROM and DVD Video discs on which multiple angles are recorded the angles can be switched during playback During playback press ANGLE The current angle and total number of recorded angles are displayed on the TV screen and on the player s front panel display To switch the angles ...

Page 26: ...h the secondary video Picture in Picture recorded on the BD ROM During playback press SECONDARY VIDEO The current secondary video and total number of recorded secondary video streams are displayed on the TV screen and on the player s front panel display To switch the secondary video press SECONDARY VIDEO again or press The secondary video can also be switched by selecting Secondary Video from the ...

Page 27: ...ile In some cases the subtitle may switch or the switching screen provided on the disc may be displayed immediately without the current subtitle or the total number of subtitles recorded on the disc being displayed Switching the audio8 8 The types of recorded audio streams depend on the disc and file Switching the secondary audio9 9 The types of recorded secondary audio streams depend on the disc ...

Page 28: ...the number buttons 0 to 9 or to input the number Use to move the cursor To search for title 32 input 0 3 and 2 then press ENTER Press CLEAR to clear the values you have input 4 Starting playback from the specified title chapter or track Use to select Search then press ENTER Playing a specific section within a title or track repeatedly A B Repeat Use this procedure to play a specific section within...

Page 29: ... press ENTER During playback press STOP or CLEAR Note The type of repeat modes depends on the disc and file being played See the table on page 30 Repeat Play is canceled in the following cases When the angle is switched for BD ROM and DVD Video discs only When you search outside the repeat range When you start other Repeat Play or Random Play Playing in random order Random Play Use this procedure ...

Page 30: ... B Repeat Playing a title repeatedly Title Repeat Playing a chapter repeatedly Chapter Repeat Playing a track or file repeatedly Track Repeat Playing all the titles tracks or files on the disc repeatedly All Repeat 3 3 The original titles are played repeatedly However the playlist titles cannot be played repeatedly 4 4 The files in the folder are played repeatedly 5 5 The files in the folder or HM...

Page 31: ...Y to display the Home Media Gallery The Home Media Gallery can also be displayed by selecting Home Media Gallery from the Home Menu then pressing ENTER 2 Select the disc Use to select then press ENTER 3 Select Photos Use to select Photos then press ENTER 4 Select Folders or All Photos Use to select then press ENTER Folders The files in the selected folder are displayed All Photos All the recorded ...

Page 32: ...o the HMG Home Media Gallery Playlist are as shown below Audio CDs CD DAs and DTS CDs DVDs CDs on which audio files are recorded Adding tracks files Use this procedure to add tracks and files and create the HMG Playlist 1 Press HOME MEDIA GALLERY to display the Home Media Gallery The Home Media Gallery can also be displayed by selecting Home Media Gallery from the Home Menu pressing ENTER 2 Select...

Page 33: ...t then press ENTER Playback starts from the selected track file and continues until the end of the list is reached Use to play the previous or next track file The Now Playing screen shown below is displayed Deleting tracks files from the HMG Playlist 1 Select the track file to be deleted then press TOOLS to display the TOOLS menu 2 Use to select Delete from HMG Playlist then press ENTER Music 001 ...

Page 34: ...ettings screen reappears when ENTER is pressed Prog Motion Adjust according to the type of image moving or still image This is effective mainly when outputting video materials as progressive images Pure Cinema This setting optimizes the operation of the progressive scanning circuit for playing film materials Normally set it to Auto1 If the picture seems unnatural switch this to Auto 2 On or Off pa...

Page 35: ...Audio DRC screen Press ENTER or HOME MENU Note This only affects the Dolby TrueHD Dolby Digital Plus and Dolby Digital audio signals of BDs and DVDs When Auto is selected the setting has the same effect as High or Off for Dolby TrueHD signals depending on the content For Dolby Digital Plus and Dolby Digital the setting has the same effect as Off Audio DRC affects the audio signals output from the ...

Page 36: ...uto The player automatically adjusts the timing of the video and audio when connected to a device equipped with the HDMI Auto Lipsync Correction feature using an HDMI cable Manual Adjust manually while viewing the video If you have selected Manual proceed to step 5 5 Adjusting the amount of audio delay Press then use to adjust The audio delay can be adjusted from 0 to 250 ms in steps of 5 ms Note ...

Page 37: ...tting Options Explanation Video Out TV Aspect Ratio 16 9 Widescreen Select this when connected to a wide 16 9 TV 4 3 Standard Select this when connected to a conventional TV 4 3 Video Out Full 4 3 pictures are displayed over the entire screen Normal 4 3 pictures are displayed with vertical black bars along the sides Select this when you cannot switch the aspect ratio to 4 3 on the TV 4 3 Video Out...

Page 38: ...s for output DTS Downmix Stereo DTS HD Master Audio signals DTS HD High Resolution Audio signals or DTS Digital Surround audio signals converted to linear PCM audio signals are converted into 2 channel stereo signals for output Lt Rt DTS HD Master Audio signals DTS HD High Resolution Audio signals or DTS Digital Surround audio signals converted to linear PCM audio signals are converted into 2 chan...

Page 39: ...dio signals to be mixed for output or when you want to output prioritizing sampling frequency over the number of channels page 47 Off Select this when you do not want to output the audio from the HDMI output terminal KURO LINK On Select this to control the player with the remote control of the AV device connected using an HDMI cable Also refer to About KURO LINK function on page 15 Off Select this...

Page 40: ...languages is automatically selected and played BDMV DVD Video Menu Lang For some discs it may not be possible to change to the selected language w Subtitle Language Sets the language of BD ROM and DVD Video menus to the same as that set for the subtitle language available languages Choose a language from the listed languages to set the default language for BD ROM and DVD Video menus Other Continue...

Page 41: ...ings or for unlocking to play DVD Video with parental lock feature page 45 DVD Video Parental Lock Change the player s parental lock level page 45 BDMV Parental Lock Change the restricted age page 45 Country Code Change the Country Area code page 45 Options Output Terminal Set the terminals from which the player s video and audio signals are to be output page 46 On Screen Display On Select this to...

Page 42: ...the distance of the different speakers Adjust the distance between you and the different speakers This setting is only valid for the AUDIO OUT terminals Caution This cannot be selected when Audio Output Mode is set to 2 Channel Change the setting to Multi channel page 38 Speaker Distance of the speakers set to None or No at Speaker Setup cannot be adjusted above 1 Select and set Speakers Speaker D...

Page 43: ...r s IP address stipulated by your Internet service provider Note When Auto Set IP Address is set to Off Auto Set DNS Server Address is also set to Off For information on DHCP server function refer to the network device s operating instructions You may need to contact your Internet service provider or network administrator when inputting the IP address manually Setting the proxy server Only set the...

Page 44: ...ENTER 4 Change the language Use to change then press ENTER The language can also be changed using the number buttons Use to move the cursor to Number use the number buttons 0 to 9 to input the number then press ENTER Refer to Language Code Table and Country Area Code Table on page 49 Note If a language not recorded on the BD DVD is set one of the recorded languages is automatically selected and pl...

Page 45: ...ng DVDs Some DVD Video discs containing scenes of violence for example have Parental Lock levels check the indications on the disc s jacket or elsewhere To restrict viewing these discs set the player s level to the level lower than the discs 1 Select and set Parental Lock DVD Video Parental Lock Next Screen Use to select then press ENTER 2 Input the password Use the number buttons 0 to 9 or to inp...

Page 46: ...re intended to download the software from the Internet Steps 5 to 7 are the operations performed automatically by the player they are intended to update the software 1 When playback is stopped display the Home Menu screen Press HOME MENU 2 Select and set Initial Setup Use to select then press ENTER 3 Select and set Options Software Update Start Use to select then press ENTER If the player is alrea...

Page 47: ...f Dolby TrueHD Dolby Digital Plus Dolby Digital DTS HD Master Audio DTS HD High Resolution Audio or DTS Digital Surround the secondary audio and interactive audio signals are not mixed for output 7 If the connected HDMI device is not compatible with Dolby TrueHD or Dolby Digital Plus bitstream the signals are output in linear PCM 7 1 channels or Dolby Digital bitstream If the connected HDMI device...

Page 48: ...s set to 480i or 480p the signals may be output in linear PCM 2 channels or Dolby Digital bitstream depending on HDMI High Speed Transmission setting and or the connected HDMI device page 14 10 If the connected HDMI device is not compatible with DTS HD Master Audio or DTS HD High Resolution Audio the signals are output in linear PCM 7 1 channels or DTS Digital Surround bitstream If the connected H...

Page 49: ...2 Somali so som 1915 Sotho Southern st sot 1920 Spanish es spa 0519 Sundanese su sun 1921 Swahili sw swa 1923 Swati ss ssw 1919 Swedish sv swe 1922 Tagalog tl tgl 2012 Tajik tg tgk 2007 Tamil ta tam 2001 Tatar tt tat 2020 Telugu te tel 2005 Thai th tha 2008 Tibetan bo bod 0215 Tigrinya ti tir 2009 Tonga Tonga Islands to ton 2015 Tsonga ts tso 2019 Tswana tn tsn 2014 Turkmen tk tuk 2011 Turkish tr ...

Page 50: ...OFTWARE IS PROVIDED BY ERIC YOUNG AS IS AND ANY EXPRESS OR IMPLIED WARRANTIES INCLUDING BUT NOT LIMITED TO THE IMPLIED WARRANTIES OF MERCHANTABILITY AND FITNESS FOR A PARTICULAR PURPOSE ARE DISCLAIMED IN NO EVENT SHALL THE AUTHOR OR CONTRIBUTORS BE LIABLE FOR ANY DIRECT INDIRECT INCIDENTAL SPECIAL EXEMPLARY OR CONSEQUENTIAL DAMAGES INCLUDING BUT NOT LIMITED TO PROCUREMENT OF SUBSTITUTE GOODS OR SE...

Page 51: ...ary in your own programs example c Sample code for calling the JPEG library structure doc Overview of the JPEG library s internal structure filelist doc Road map of IJG files coderules doc Coding style rules please read if you contribute code Please read at least the files install doc and usage doc Useful information can also be found in the JPEG FAQ Frequently Asked Questions article See ARCHIVE ...

Page 52: ...rchive sites including the official news answers archive at rtfm mit edu ftp rtfm mit edu pub usenet news answers jpeg faq If you don t have Web or FTP access send e mail to mail server rtfm mit edu with body send usenet news answers jpeg faq part1 send usenet news answers jpeg faq part2 RELATED SOFTWARE Numerous viewing and image manipulation programs now support JPEG Quite a few of them use this...

Page 53: ...ules it contains plus any associated interface definition files plus the scripts used to control compilation and installation of the executable However as a special exception the source code distributed need not include anything that is normally distributed in either source or binary form with the major components compiler kernel and so on of the operating system on which the executable runs unles...

Page 54: ... little to gain by limiting the free library to free software only so we use the Lesser General Public License In other cases permission to use a particular library in non free programs enables a greater number of people to use a large body of free software For example permission to use the GNU C Library in non free programs enables many more people to use the whole GNU operating system as well as...

Page 55: ... rights granted herein You are not responsible for enforcing compliance by third parties with this License 11 If as a consequence of a court judgment or allegation of patent infringement or for any other reason not limited to patent issues conditions are imposed on you whether by court order agreement or otherwise that contradict the conditions of this License they do not excuse you from the condi...

Page 56: ...m room in winter for example or if the temperature in the room in which the player is installed rises suddenly due to a heater etc water droplets condensation may form inside on operating parts and the lens When condensation is present the player will not operate properly and playback is not possible Let the player stand at room temperature for 1 or 2 hours with the power turned on the time depend...

Page 57: ...face before using the disc Troubleshooting Incorrect operation is often mistaken for trouble or malfunction If you think that there is something wrong with this component check the points below Sometimes the trouble may lie in another component Inspect the other components and electrical appliances being used If the trouble cannot be rectified after checking the items below please contact customer...

Page 58: ...e power then turn the power back on If the power cannot be turned off press and hold STANDBY ON on the player s front panel for over 5 seconds The power will turn off Motion is unnatural or picture is not clear Change the Pure Cinema setting page 34 No picture is displayed or picture is not output in high definition when playing BDs With some discs it may not be possible to output the video signal...

Page 59: ...O OUT terminals To listen to 2 channel analog audio connect to FRONT L R of the AUDIO OUT terminals page 13 and set Audio Output Mode to 2 Channel page 38 Are the speakers properly set When the AV receiver or amplifier etc is connected to the AUDIO OUT terminals and Audio Output Mode is set to Multi channel set Speaker Setup properly page 42 Is a DVI device connected The sound will not be output f...

Page 60: ... PQLS to Off page 39 After a disc is inserted Loading stays displayed and playback does not start Are there too many files recorded on the disc When a disc on which files are recorded is inserted depending on the number of files recorded on the disc loading may take several dozen minutes is displayed in file names etc The characters that cannot be displayed on this player are displayed in A messag...

Page 61: ...et to On on the connected device Set KURO LINK to On on the connected device The KURO LINK function operates when KURO LINK is set to On for all devices connected to the HDMI OUT terminal Once connections and settings of all the devices are finished be sure to check that the player s picture is output to the Flat Panel TV Also check after changing the connected devices and connecting and or discon...

Page 62: ...hernet hub or router with hub functionality Problem Check Remedy The player s power turns off automatically Is Auto Power Off set to On If Auto Power Off is set to On the player s power turns off automatically if no operation is performed for over 30 minutes page 41 Is Display Power Off set to On The player s power may turn off together with the power of the TV connected to the HDMI OUT terminal I...

Page 63: ...nnel audio With BD ROMs up to 7 1 channels of digital sound can be recorded Settings you have made have been cleared Have you disconnected the power cord while the player s power was on Has there been a power failure Always press STANDBY ON on the player s front panel or STANDBY ON on the remote control and check that POWER OFF has turned off from the player s front panel display before disconnect...

Page 64: ...ss Control address A hardware identification number assigned specifically to the network device LAN card etc MPEG Moving Picture Experts Group The name of a family of standards used to encode video and audio signals in a digital compressed format The video encoding standards include MPEG 1 Video MPEG 2 Video MPEG 4 Visual MPEG 4 AVC etc The audio encoding standards include MPEG 1 Audio MPEG 2 Audi...

Page 65: ...0 mm W x 83 mm H x 287 mm D Tolerable operating temperature 41 F to 95 F 5 C to 35 C Tolerable operating humidity 5 to 85 no condensation Output terminals HDMI 1 set 19 pin 5 V 250 mA Video outputs Video 1 set RCA jack 1 0 Vp p 75 Ω Component video 1 set RCA jacks Y 1 0 Vp p 75 Ω PB PR 0 7 Vp p 75 Ω Audio outputs 7 1 channel multi channel front left right surround left right center surround back l...

Page 66: ...ease call the number shown below 1 8 0 0 4 2 1 1 4 0 4 Please do not ship your product to Pioneer without first calling the Customer Support at the above listed number for assistance Pioneer Electronics Service Inc P O BOX 1760 Long Beach CA 90801 1760 U S A For warranty information please see the Limited Warranty sheet included with your product Should this product require service in Canada pleas...

Reviews: