background image

11

Chapter 1

How to Use 

Naviga

tion Syste

m

 a

n

d N
ames of 

the Pa

rts

Chapter 1

How to Use Navigation System and Names of the Parts

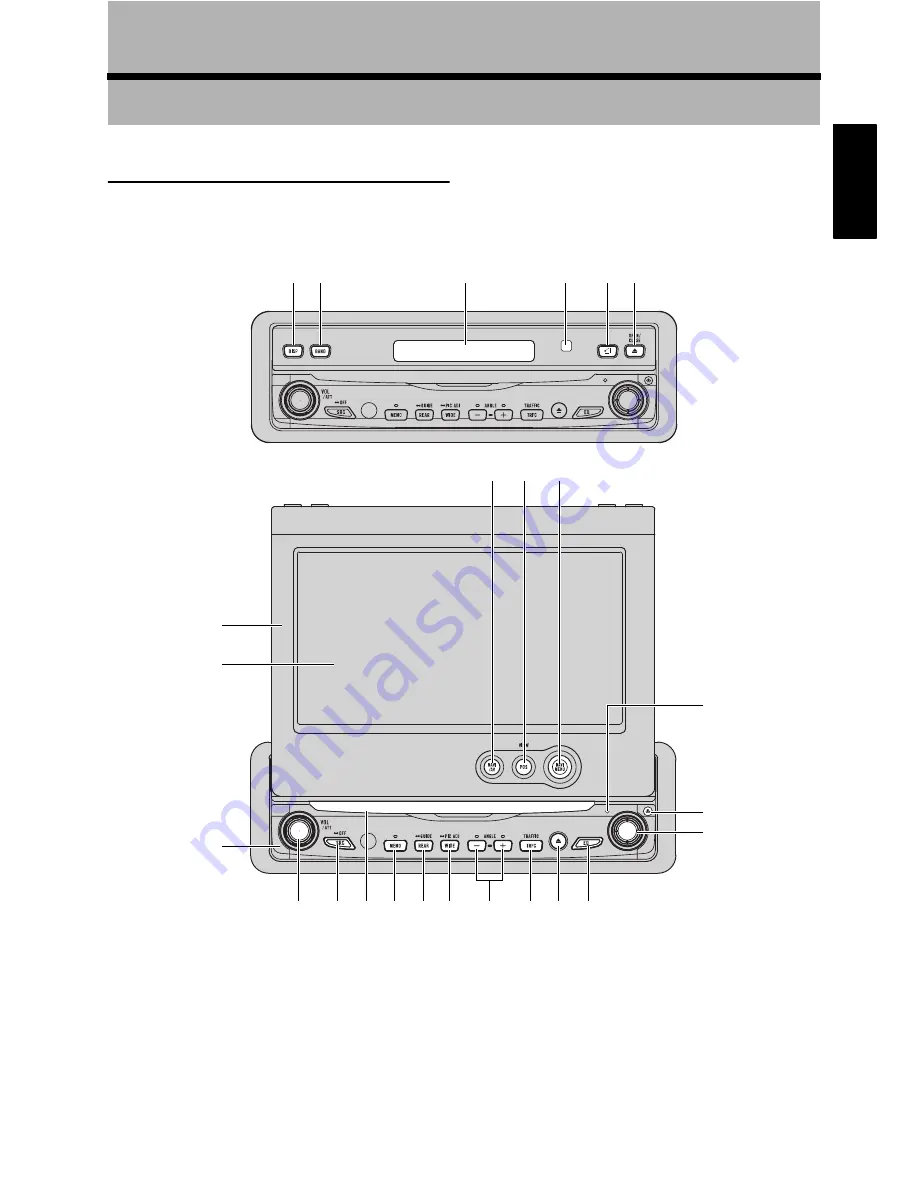
Display unit

This section gives information about the names of the parts and main features using the buttons.

For more detail operation, functional limitations, please refer to the Operation Manual.

1

 DISP button

Press to select different displays.

2

 BAND button

Radio:

Press to select among three FM and one AM 
bands.

Built-in DVD drive:

When playing back a disc containing an MP3 file 
and audio data (CD-DA), pressing this button 
switches playback between the MP3 file and CD-
DA. Touch and hold this button when a disc con-
taining an MP3 file is inserted returns you to the 
root folder.

1 2

3

4

5 6

7 8

9

m

l k j i h

g

f e d

c

b

a

c

n

o

p

Summary of Contents for AVIC-N3

Page 1: ...DVD MULTIMEDIA AV NAVIGATION SERVER AVIC N3 Hardware Manual ...

Page 2: ......

Page 3: ... tions and bold e g Destination Settings Extra information alternative use and other notes are presented like this e g When the source icon is not displayed you can display it by touching the screen The references are indicated like this e g For suitable discs Page 6 Display Definition From here on after the screen that is attached to the body of the product will be referred to as the Front Displa...

Page 4: ... Chapter 1 How to Use Navigation System and Names of the Parts Display unit 11 Turning the Navigation System On and Selecting a Source 13 Loading a Disc 14 Adjusting the Volume 14 Turning the Source Off 14 Using the REAR GUIDE Button 14 Opening and Closing the LCD Panel 14 Adjusting the LCD panel angle 15 Turning the LCD panel horizontal 15 Protecting Your Product from Theft 15 Removing the front ...

Page 5: ...avigation system provides contrary advice Failure to input correct information about the local time may result in the navigation system providing improper routing and guidance instructions Never set the volume of your navigation sys tem so high that you cannot hear outside traf fic and emergency vehicles To promote safety certain functions are dis abled unless the vehicle is stopped and or the par...

Page 6: ...ial may be regulated due to environmental considerations For dis posal or recycling information please con tact your local authorities or the Electronics Industries Alliance www eiae org Do not allow this product to come into contact with liquids Electrical shock could result Also damage to the product smoke and overheating could result from contact with liquids Parking brake interlock Certain fun...

Page 7: ...r more information When using a display connected to REAR OUT This procuct s REAR OUT is for connection of a display to enable passengers in the rear seats to watch visual imeges The map screen navigation images output to the rear display differs from standard NTSC format images Therefore the quality will be inferior to the images that appear on the front display NEVER install the rear display in ...

Page 8: ...Licensing Corporation It is not possible to play back DVD audio discs This DVD drive may not be able to play all discs bearing the marks shown above About DVD Map Disc You can use discs intended for this navigation system Use only discs approved by Pioneer For details on other discs Page 18 After sales service for Pioneer products Please contact the dealer or distributor from where you purchased t...

Page 9: ...le discs Page 6 MP3 file playback It is possible to play back MP3 files recorded on CD ROM CD R CD RW ISO9660 Level 1 Level 2 standard recordings Supply of this navigation system only conveys a license for private non commercial use and does not convey a license nor imply any right to use this product in any commercial i e rev enue generating real time broadcasting ter restrial satellite cable and...

Page 10: ... Reverse engineer ing or disassembly is prohibited Rear entertainment By setting the DVD Video etc in the built in DVD drive you can output images and sounds or sound only from the DVD drive to the rear display even when the screen of this product is display ing navigation and another video source Using the REAR GUIDE Button Page 14 Rear view camera ready You can display what is behind the vehicle...

Page 11: ...ited The viewing angle vertical and horizontal can be increased however by using BRIGHTNESS to adjust the black density of the video When using for the first time adjust the black density in accordance with the viewing angle vertical and horizontal to adjust for clear viewing DIMMER can also be used to adjust the brightness of the LCD screen itself to suit your personal preference Condition Memory...

Page 12: ...t under the fol lowing conditions Prior to using this product for the first time after installation If the product fails to operate properly If there appear to be problems with the opera tion of the system When changing the combination of the equip ment When adding removing additional products that connect to this product When the display and the Hide away units are re connected 1 Turn the ignitio...

Page 13: ...itations please refer to the Operation Manual 1 DISP button Press to select different displays 2 BAND button Radio Press to select among three FM and one AM bands Built in DVD drive When playing back a disc containing an MP3 file and audio data CD DA pressing this button switches playback between the MP3 file and CD DA Touch and hold this button when a disc con taining an MP3 file is inserted retu...

Page 14: ...s to select various equalizer curves e EJECT button Press to eject a disc from this product f TRFC button When the XM tuner is connected Preset button for XM Instant Traffic Weather audio service Select XM audio source and find appropriate Instant Traffic Weather channel Hold down this button while on this channel to assign preset When the XM tuner is not connected Not used XM tuner GEX P10XMT GEX...

Page 15: ...rnal unit 2 AUX Auxiliary equipment Press and hold to turn the source off In the following cases the sound source can not be used When a unit corresponding to each source is not connected to this product When no disc DVD Video CD is set in this product When no disc is set in the DVD player S DVD When no magazine is set in the multi CD player When no magazine is set in the multi DVD player When the...

Page 16: ...duct rotate the VOLUME ATT button to increase or decrease the volume To adjust the navigation volume go to the navigation menu Navigation volume adjustment Opera tion Manual Turning the Source Off Press the SRC button and hold until the source turns off This product can be switched off by turn ing the ACC ignition OFF or detaching the front panel Using the REAR GUIDE Button You can output the soun...

Page 17: ...LCD panel angle be sure to press the ANGLE button Forcibly adjusting the LCD panel by hand may damage it Press the ANGLE button to adjust the LCD panel to an easily viewable angle The LCD panel angle continues changing as long as you press the ANGLE button and hold The adjusted the LCD panel angle will be memorized and the LCD panel will auto matically return to this angle the next time the LCD pa...

Page 18: ...anel 2 Gently grip the right side of the front panel and slowly pull it outward Take care not to drop the front panel and pro tect it from contact with water or other fluids to prevent permanent damage Attaching the front panel Replace the front panel by holding it upright to this product and clipping it securely into the mounting hooks ...

Page 19: ...hout a video is selected Switch the source with a video Operating the PICTURE ADJUSTMENT There is no picture on the rear display while the PICTURE ADJUSTMENT is carried out Nothing is displayed and the touch panel keys cannot use The setting for the rear view camera is incorrect The shift lever was placed in R when the rear view camera was not connected Connect a rear view camera correctly Press t...

Page 20: ...ft cloth to remove the moisture Road shocks may interrupt disc playback DVD discs and other DVD media types With some DVD Video discs it may not be pos sible to use certain functions It may not be possible to play back some DVD video discs When DVD R DVD RW discs are used play back is possible only for discs which have been finalized When DVD R DVD RW discs are used play back is possible only for ...

Page 21: ...files on CD ROM CD R and CD RW discs Disc record ings compatible with level 1 and level 2 of ISO9660 and with the Romeo and Joliet file sys tem can be played back It is possible to play back multi session com patible recorded discs MP3 files are not compatible with packet write data transfer The max number of characters which can be displayed for a file name including the exten sion mp3 is 30 char...

Page 22: ...1 First tier 2 Second tier 3 Third tier Notes This product assigns folder numbers The user can not assign folder numbers If you are using a folder that does not contain an MP3 file the folder itself will display but you will not be able to see any files in the folder MP3 files in up to 8 tiers of folders can be played back However there is a delay in the start of playback on discs with numerous ti...

Page 23: ...icle Please do not press strongly on it as this may damage it Do not place anything on the LCD panel when it is deployed Also do not attempt to carry out angle adjustment or open close the LCD panel by hand Applying strong force to the LCD panel may damage it Do not push the LCD screen with much force as this may scratch it Never touch the LCD screen with anything besides your finger when operatin...

Page 24: ...uorescent tube is used inside the dis play to illuminate the LCD screen The fluorescent tube should last for approx imately 10 000 hours depending on operat ing conditions Using the display unit at low temperatures reduces the service life of the fluorescent tube When the fluorescent tube reaches the end of its useful life the LCD screen will be dark and the image will no longer be projected If th...

Page 25: ... F to 122 F Storage temperature range 4 F to 176 F Angle adjustment 50 to 110 initial settings 110 Audio Continuous power output is 22 W per channel minimum into 4 ohms both channels driven 50 to 15 000 Hz with no more than 5 THD Maximum power output 50 W 4 50 W 2 ch 4 Ω 70 W 1 ch 2 Ω for subwoofer Load impedance 4 Ω 4 Ω to 8 Ω 2 Ω for 1 ch allowable Preout max output level output impedance 2 0 V ...

Page 26: ... 8 dBf 0 7 μV 75 Ω mono S N 30 dB 50 dB quieting sensitivity 10 dBf 0 9 μV 75 Ω mono Signal to noise ratio 75 dB IHF A network Distortion 0 3 at 65 dBf 1 kHz ste reo 0 1 at 65 dBf 1 kHz mono Frequency response 30 Hz to 15 000 Hz 3 dB Stereo separation 45 dB at 65 dBf 1 kHz Selectivity 80 dB 200 kHz Three signal intermodulation desired signal level 30 dBf two undesired signal level 100 dBf AM tuner...

Page 27: ...gapore 159936 TEL 65 6472 7555 PIONEER ELECTRONICS AUSTRALIA PTY LTD 178 184 Boundary Road Braeside Victoria 3195 Australia TEL 03 9586 6300 PIONEER ELECTRONICS OF CANADA INC 300 Allstate Parkway Markham Ontario L3R OP2 Canada TEL 1 877 283 5901 PIONEER ELECTRONICS DE MEXICO S A de C V Blvd Manuel Avila Camacho 138 10 piso Col Lomas de Chapultepec Mexico D F 11000 TEL 55 9178 4270 Published by Pio...

Reviews: