Pioneer AVH-P5350DVD Owner'S Manual Download Page 29

2

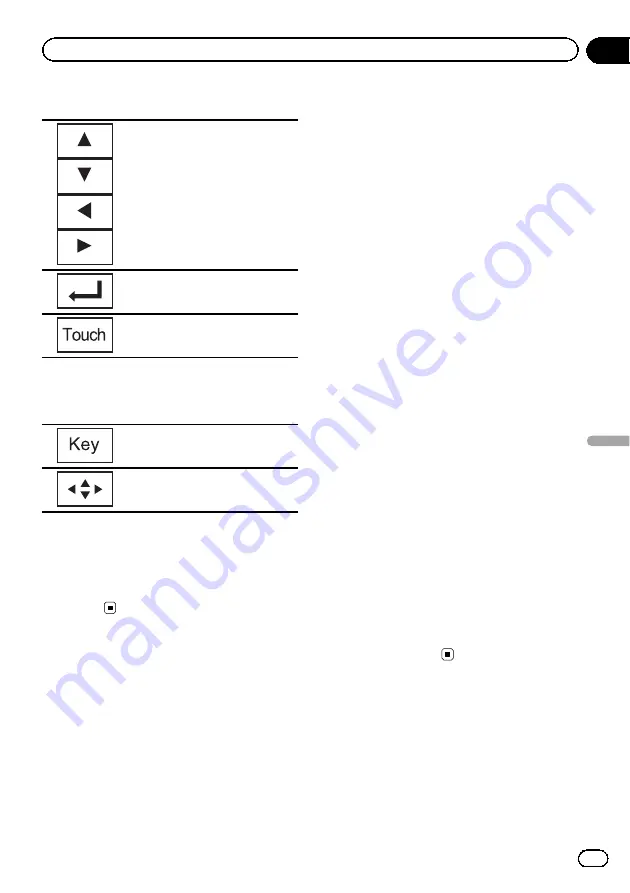
Select the desired menu item.

Selecting the desired menu item.

Starting playback from the se-
lected menu item.

Operating the DVD menu by di-
rectly touching the menu item.

#

When operating the DVD menu by directly

touching the menu item, touch the icon to oper-
ate.

Returning to the normal DVD video
display.

Displaying arrow keys.

#

Ways to display the menu will differ depend-

ing on the disc.

#

Depending on the contents of the DVD disc,

this function may not work properly. In such
cases, use the touch panel keys to operate the
DVD menu.

Operating this unit

s iPod

function from your iPod

You can listen to the sound from your iPod ap-
plications using your car's speakers, when

App Mode

is selected.

This function is not compatible with the follow-
ing iPod models.

!

iPod nano 1st generation

!

iPod 5th generation

!

While this function is in use, the iPod will
not turn off even if the ignition key is turned
off. Operate the iPod to turn off the power.

1

Switch the control mode to App Mode.

Refer to

Introduction of video playback opera-

tions

on page 15.

Refer to

Introduction of sound playback opera-

tions

on page 19.

2

Operate the connected iPod to select a

video/song and play.

Notes

!

The following functions are still accessible
from the unit even if the control mode is set to

App Mode

.

However, the operation will depend on your
applications.

Playing/pausing

Fast forwarding/reversing

Tracking up/down

Moving to a chapter up/down

!

APP mode is compatible with the following
iPod models.

iPhone 4 (software version 4.1 or later)

iPhone 3GS (software version 3.0 or later)

iPhone 3G (software version 3.0 or later)

iPhone (software version 3.0 or later)

iPod touch 4th generation (software ver-
sion 4.1 or later)

iPod touch 3rd generation (software ver-
sion 3.0 or later)

iPod touch 2nd generation (software ver-
sion 3.0 or later)

iPod touch 1st generation (software ver-
sion 3.0 or later)

Random play (shuffle)

Videos/songs can be played back in random
order.

!

Songs

Play back videos/songs in the se-

lected list in random order.

!

Albums

Play back videos/songs from a

randomly selected album in order.

En

29

Section

12

Detailed

instructions

Detailed instructions

Summary of Contents for AVH-P5350DVD

Page 1: ...Owner s Manual DVD AV RECEIVER AVH P6350BT AVH P5350DVD English ...

Page 2: ... 13 Setting the clock 13 Tuner Introduction of tuner operations 14 Playing moving images Introduction of video playback operations 15 TV tuner Introduction of TV tuner operations 18 Playing audio Introduction of sound playback operations 19 Playing still images Introduction of still image playback operations 21 Introduction of still image playback as a slideshow operations 22 Bluetooth Telephone I...

Page 3: ...unit 41 Displaying Bluetooth Device address 41 Entering PIN code for Bluetooth wireless connection 41 Using a cellular phone to initiate a connection 41 Registering a connected cellular phone 41 Voice recognition 42 Connecting a Bluetooth audio player 42 Connecting to a Bluetooth device automatically 42 Displaying Bluetooth Device address 42 Menu operations Introduction of menu operations 43 Audio...

Page 4: ...he parking brake is on and the vehicle is not in motion 10 Never set the volume of your display so high that you cannot hear outside traffic and emergency vehicles WARNING Do not attempt to install or service your display by yourself Installation or servi cing of the display by persons without training and experience in electronic equipment and automotive accessories may be dangerous and could exp...

Page 5: ...he driver can watch a DVD or TV while driving When using the rear view camera With an optional rear view camera this unit can be used as an aid to keep an eye on trai lers or when backing into a tight parking spot WARNING SCREEN IMAGE MAY APPEAR RE VERSED USE INPUT ONLY FOR REVERSE OR MIRROR IMAGE REAR VIEW CAMERA OTHER USE MAY RESULT IN INJURY OR DAMAGE CAUTION The rear view camera function is to...

Page 6: ...isc region numbers Only DVD video discs with compatible region numbers can be played on this player You can find the region number of the player on the bottom of this unit and in this manual refer to Specifications on page 105 Operating environment This unit should be used within the tempera ture ranges shown below Operating temperature range 10 C to 60 C EN300328 ETC test temperature 20 C and 55 ...

Page 7: ...lowing situations Before using this unit for the first time after installation If the unit fails to operate properly When strange or incorrect messages ap pear on the display 1 Turn the ignition switch OFF 2 Press RESET with a pen tip or other pointed instrument RESET button Note Switch your engine ON or set the ignition switch to ACC ON before pressing RESET in the follow ing situations After com...

Page 8: ...eat such as sunshine fire or the like CAUTION Use one CR2025 3 V lithium battery Remove the battery if the remote control is not used for a month or longer There is a danger of explosion if the battery is incorrectly replaced Replace only with the same or equivalent type Do not handle the battery with metallic tools Do not store the battery with metallic objects If the battery leaks wipe the remot...

Page 9: ...con nector lid Part Part 5 SRC OFF b RESET 6 c d TRACK SEEK c SD memory card slot CAUTION Use an optional Pioneer USB cable CD U50E to connect the USB audio player USB mem ory as any device connected directly to the unit will protrude out from the unit and may be dangerous Do not use unauthorized products Notes Insert an SD memory card with the contact surface facing down and press on the card unt...

Page 10: ...ner band when tuner is selected as a source Also used to cancel the control mode of functions Press to switch be tween modes when playing discs with compressed audio and audio data CD DA such as CD EXTRA and MIXED MODE CDs 6 MENU Press to display the DVD menu during DVD playback TOP MENU Press to return to the top menu during DVD playback 7 AUDIO Press to change the audio language during DVD playb...

Page 11: ...DVD player USB iPod USB iPod SD SD memory card EXT1 External unit 1 EXT2 External unit 2 AUX AUX TEL Audio Bluetooth telephone audio Function of AVH P5350DVD When the source icon is not displayed it can be displayed by touching the screen While operating the menu you cannot select a source by touching the source icon Adjusting the volume 1 Turn MUTE to adjust the volume Notes In this manual iPod a...

Page 12: ...k point 1 Drag the scrubber bar on the screen Not available when the scrubber bar is grayed out Activating the touch panel keys Wed 28 May 12 45 PM 01 01 8 12 01 45 02 45 01 L R 1 Return 3 2 Touch panel keys 1 Turning the display to simpli fied display Returning to the normal dis play by touching the screen when playing moving images Returning to the normal dis play by touching same icon when play...

Page 13: ...nition switch ON again or turning it to ACC will not open the LCD panel In this case press OPEN CLOSE to open the LCD panel When closing the LCD panel check to make sure that it has closed completely If the LCD panel has stopped halfway leaving it like this could result in damage CAUTION Keep hands and fingers clear of the unit when opening closing or adjusting the LCD panel Be especially cautious...

Page 14: ...Using the auto equalizer on page 45 3 Displaying the preset chan nel list Refer to Storing and recalling stations on page 28 Refer to Storing the strongest stations on page 28 4 Band Selecting a band FM1 FM2 FM3 for FM or AM 5 Recalling radio station fre quencies assigned to preset tuning keys Manual tuning step by step using the buttons 1 Press c or d TRACK SEEK Seek tuning using the buttons 1 Pr...

Page 15: ... loaded Refer to Resume playback Bookmark on page 31 3 Changing the screen mode Refer to Changing the wide screen mode on page 35 4 Switching the equalizer curves Refer to Using the equalizer on page 44 Touch and hold for more than two seconds to turn the auto equalizer on or off Refer to Using the auto equalizer on page 45 5 Switching between audio languages during playback Refer to Changing audi...

Page 16: ...yback g Moving ahead one frame at a time during playback Refer to Frame by frame play back on page 31 Touch and hold for more than two seconds to slow down playback speed Speeding up the playback speed in four steps during slow motion playback on DVD video Video CD h Speeding down the playback speed in four steps during slow motion playback on Video CD i Return Returning to the specified scene to ...

Page 17: ...aying DivXâ VOD content on page 35 Ejecting a disc 1 Refer to Ejecting a disc on page 13 or Ejecting an SD on page 13 Selecting a chapter using the buttons 1 Press c or d TRACK SEEK Fast forwarding or reversing using the buttons 1 Press and hold c or d TRACK SEEK Fast forward fast rewind may not always be possi ble on some discs In such cases normal play back will automatically resume Notes This D...

Page 18: ...the equalizer on page 44 Touch and hold for more than two seconds to turn the auto equalizer on or off Refer to Using the auto equalizer on page 45 3 Displaying the preset screen Refer to Storing and recalling stations on page 28 Refer to Storing the strongest stations on page 28 4 Band Selecting a band 5 Recalling radio station fre quencies assigned to preset tuning keys Refer to Storing and reca...

Page 19: ... on page 34 4 Switching the equalizer curves Refer to Using the equali zer on page 44 Touch and hold for more than two seconds to turn the auto equalizer on or off Refer to Using the auto equalizer on page 45 5 Displaying a list of track titles to select songs on a CD Refer to Selecting tracks from the track title list on page 33 Displaying the file name list to select the files Refer to Selecting...

Page 20: ...yed it can be displayed by touching the screen Disconnect headphones from the iPod before connecting it to this unit Depending on the iPod model and the amount of data stored in the iPod it may take some time for playback to begin Use the touch panel keys to select the iPod after connecting it to this unit No Device is displayed when disconnecting the iPod Ejecting a disc 1 Refer to Ejecting a dis...

Page 21: ...rting or pausing the sli deshow 6 Rotating the displayed pic ture 90 clockwise 7 Capturing an image in JPEG files Refer to Capture an image in JPEG files on page 35 8 Selecting a folder 9 Switching between media file types Refer to Switching the media file type on page 28 Playing still images 1 Insert the disc into the disc loading slot with the label side up Playback will automatically start When...

Page 22: ...een mode on page 35 4 Selecting a folder 5 Selecting a file 6 Starting or pausing the sli deshow 7 Rotating the displayed pic ture 90 clockwise 8 Capturing an image in JPEG files Refer to Capture an image in JPEG files on page 35 1 Start slideshow when listening to an other source Refer to Common operations for menu set tings lists on page 12 Displaying still images as a slide show 2 Select the de...

Page 23: ... Indicates that an incoming call has been re ceived and has not been checked yet Not displayed for calls made when your cellular phone is disconnected from this unit Touch panel keys 1 Switching the mode to enter the phone number directly Refer to Making a call by en tering phone number on page 39 2 Switching to the call history list Refer to Using the missed re ceived and dialed call lists on pag...

Page 24: ... you need to connect a Bluetooth telephone to this unit For detailed instructions on connecting your phone to this unit via Bluetooth wireless technol ogy see following section Using a Bluetooth de vice to pair on page 40 and Pairing from this unit on page 39 2 Volume adjustment Adjust the earpiece volume of your cellular phone to your preference The unit will record the ad justed volume level as ...

Page 25: ...es Refer to Using the equalizer on page 44 Touch and hold for more than two seconds to turn the auto equalizer on or off Refer to Using the auto equalizer on page 45 2 Accepting an incoming call Making a phone call when selecting a phone number from the dialed and received call history 3 Ending a call Rejecting an incoming call Canceling call waiting 4 Displaying the received missed call history S...

Page 26: ... via Bluetooth wireless technol ogy see following section Using a cellular phone to initiate a connection on page 41 and Registering a connected cellular phone on page 41 2 Volume adjustment Adjust the earpiece volume of your cellular phone to your preference The unit will record the ad justed volume level as the default setting The volume of the caller s voice and ring tone may vary depending on ...

Page 27: ... two seconds to activate connection mode on this unit and establish a Bluetooth wireless connection from your player Refer to Connecting a Bluetooth audio player on page 42 F2 Playback starts Touch and hold for more than two seconds to terminate the Blue tooth wireless connection Auto Setting the action for c and d icons Switching the equalizer curves Refer to Using the equalizer on page 44 Touch ...

Page 28: ...the display 2 Touch BSM BSSM to turn BSM on The six for tuner 12 for TV strongest broad cast frequencies will be stored under preset tuning keys in order of their signal strength To cancel the storage process touch Cancel Tuning in to strong signals Local seek tuning lets you tune in to only those radio stations with sufficiently strong signals for good reception FM off AM off The highest level se...

Page 29: ... to App Mode Refer to Introduction of video playback opera tions on page 15 Refer to Introduction of sound playback opera tions on page 19 2 Operate the connected iPod to select a video song and play Notes The following functions are still accessible from the unit even if the control mode is set to App Mode However the operation will depend on your applications Playing pausing Fast forwarding reve...

Page 30: ...ct another folder during repeat play the repeat play range changes to Disc If you select USB or SD source the repeat play range changes to All If you perform track search or fast forward reverse during File the repeat play range changes to Folder If you perform title chapter search fast for ward reverse frame by frame playback or slow motion playback during Chapter the repeat play range changes to...

Page 31: ...habet Function for iPod 1 Select a category Refer to Searching for a video music by cate gory on this page 2 Switch to alphabet search mode Switching to alphabet search mode Alphabet search mode is displayed 3 Touch the first letter of the title of the video song you are looking for While searching touch panel key operation is not available To refine the search with a different letter touch Cancel...

Page 32: ...nu to make your selection Refer to Playing moving images on page 15 Changing audio language during playback Multi audio With DVDs DivX files that provides audio play back in different languages and different audio systems Dolby Digital DTS etc you can switch between languages audio systems during playback Notes With some DVDs switching between lan guages audio systems may only be possible using a ...

Page 33: ... can switch the audio output When playing video CDs you can switch be tween stereo and monaural audio output This function is not available when disc playback is stopped L R left and right Left left Right right Mix mixing left and right You may not be able to select or use this func tion depending on the disc and the playback location PBC playback Function for Video CDs During playback of Video CD...

Page 34: ...Note When you use this unit with a multi channel pro cessor DEQ P6600 DEQ P7650 and switch the advanced sound retriever function to or the volume will become slightly lower The volume will become much lower for than it will for Take care when you increase the volume for and then switch to Off because the volume will suddenly seem much louder Changing audiobook speed Function for iPod Playback at a...

Page 35: ... in JPEG files You can capture image data and use it as wall paper Images can be stored and recalled ea sily in this unit Only one image can be stored on this unit Old image is overwritten with the new one 1 Pause the slideshow when the desired image is displayed Refer to Introduction of still image playback op erations on page 21 Refer to Introduction of still image playback as a slideshow operat...

Page 36: ...ight Law The video image will appear coarser when viewed in Cinema or Zoom mode Calling a number in the phone book Function of AVH P6350BT The phone book in your cellular phone will be transferred automatically when the phone is connected to this unit After finding the number you want to call in the phone book you can select the entry and make the call 1 Switch to phone book mode Refer to Introduc...

Page 37: ...ls dialed received and missed are stored in the memory You can browse them and call numbers from these lists 1 Switch to the call history list Refer to Introduction of Bluetooth telephone op erations on page 23 2 Select Missed Calls Dialed Calls or Received Calls Displaying the received call list Displaying the dialed call list Displaying the missed call list 3 Touch the list number to select a ph...

Page 38: ...ormed even while talking on the phone Settings can be stored for each device Switching the ring tone You can select whether or not to use this unit s ring tone If this function is set to on the ring tone for this unit will sound 1 Connect your cellular phone to this unit 2 Turn ring tone on or off AVH P5350DVD Refer to Introduction of Bluetooth telephone op erations on page 25 AVH P6350BT Refer to...

Page 39: ...nnection 01 Phone1 02 Phone2 03 Phone3 04 Phone4 05 Phone5 1 Display the Bluetooth Connection Menu Refer to Introduction of Bluetooth telephone op erations on page 23 2 Touch Connection to select a device 3 Start to search Starting to search While searching is displayed and when available devices are found the device names or Bluetooth device addresses if names can not be obtained are displayed If...

Page 40: ...ired device first Refer to this page 4 Use your Bluetooth device to establish a connection The connection method is different depending on the Bluetooth device Refer to the manual for your Bluetooth device to establish a con nection While connecting Pair your phone is dis played If the connection is established Paired is displayed If the connection fails Error is displayed In such cases try again ...

Page 41: ...ons on page 23 2 Touch PIN Code Input to select PIN code input 3 Touch 1 to 0 to input pin code 4 After inputting PIN code up to 8 di gits store in this unit Storing the PIN code in this unit Using a cellular phone to initiate a connection Function of AVH P5350DVD A Bluetooth wireless connection can be estab lished from your phone by putting the unit into initiating a connection mode You may need ...

Page 42: ...de Put the unit in initiating a connection mode Refer to Bluetooth audio operations on page 26 This unit is now on standby for connection from Bluetooth audio player If your Bluetooth audio player is set ready for Bluetooth wireless connection connection to this unit is automatically established Connecting to a Bluetooth device automatically Function of AVH P5350DVD If this function is set to on a...

Page 43: ... Refer to System settings on page 61 4 Entertainment menu Refer to Entertainment settings on page 68 5 Custom menu You can choose menus within each menu Audio function menu etc and register them to this custom menu Refer to Customizing menus on page 69 Notes If the multi channel processor DEQ P6600 DEQ P7650 is connected to this unit the audio function will change according to the multi channel pr...

Page 44: ...Natural Natural Display Equalizer curve Vocal Vocal Custom1 Custom 1 Custom2 Custom 2 Flat Flat Super Bass Super bass The equalizer curves for Custom1 and Custom2 can be adjusted You cannot select Custom1 and Custom2 when using the auto equalizer When Flat no changes are made to the sound You can check the effects of the equalizer curves by switching alternatively between Flat and another equalize...

Page 45: ... the audio function menu 3 Touch c or d to select a listening posi tion Range Left 7 to Right 7 Adjusting loudness Loudness compensates for deficiencies in the low and high frequency ranges at low volume 1 Display the audio function menu Refer to Introduction of menu operations on page 43 2 Touch Loudness on the audio function menu 3 Touch c or d to select a desired level Off off Low low Mid mid H...

Page 46: ... front or rear speakers Adjusting source levels With SLA source level adjustment the vo lume levels of each source can be adjusted to prevent significant differences between sources Settings are based on the FM volume level which remains unchanged 1 Display the audio function menu Refer to Introduction of menu operations on page 43 2 Compare the FM volume level with the level of the source you wis...

Page 47: ...u cannot switch to Dolby Pro Logic II When the multi channel processor DEQ P6600 DEQ P7650 is connected to this unit you cannot use MUTE function Using the position selector One way to assure a more natural sound is to optimize the stereo image and place you right in the center of the sound field With the posi tion selector function you can automatically adjust the speaker output levels and insert...

Page 48: ... Drama Action Action Jazz Jazz Hall Hall Club Club Off Off Note If the source is a 2 channel LPCM or Dolby Digital audio source we recommend turning Dolby Pro Logic II on when selecting SFC effects that are most suitable for 5 1 channel audio sources such as Musical Drama or Action On the other hand when selecting SFC effects that are suitable for 2 channel audio sources such as Jazz Hall or Club ...

Page 49: ...o settings to check their effectiveness When direct control is on all audio func tions except MUTE and Dolby Pro Logic II are locked 1 Display the DSP function menu Refer to Introduction of menu operations on page 43 2 Touch Digital Direct on the DSP func tion menu 3 Touch d to turn the direct control on To turn direct control off touch c Using Dolby Pro Logic II Dolby Pro Logic II creates five fu...

Page 50: ...ttings such as size bass capacity according to the speakers installed Set the size to Large large if the speaker is capable of reproducing sounds of about 100 Hz and below Otherwise select Small small Low frequency sound is not emitted if the subwoofer is set to Off and the front and rear speakers are set to Small or Off It is imperative that speakers that are not installed be set to Off Set the f...

Page 51: ...erations on page 43 2 Touch Speaker Level 3 Touch a or b to select the speaker to be adjusted Front L left front speaker Center center speaker Front R right front speaker Rear R right rear speaker Rear L left rear speaker Subwoofer subwoofer Speakers with the size set to Off cannot be se lected Refer to Setting the speaker setting on the previous page 4 Touch c or d to adjust the speaker out put l...

Page 52: ...er out put level Range 10 to 10 The test tone will be emitted from the next speaker after about two seconds after the last op eration 5 Touch Stop to end test tone output Notes If necessary select speakers and adjust their absolute output levels Refer to Adjusting the speaker output levels on the previous page You will get the same results whether you ad just the speaker output levels with this mo...

Page 53: ...s are made to the sound You can check the effects of the equalizer curves by switching alternatively between Flat and another equalizer curve When Digital Direct is on the equalizer curve is fixed to Flat 1 Display the DSP function menu Refer to Introduction of menu operations on page 43 2 Touch Parametric EQ 3 Touch a or b to select the Equalizer equalizer 4 Touch d to select the equalizer Powerf...

Page 54: ...nter frequencies cannot be shorter than 1 octave Using the auto equalizer The auto equalizer is the equalizer curve cre ated by auto TA and EQ refer to Auto TA and EQ auto time alignment and auto equalizing on this page You can turn the auto equalizer on or off 1 Display the DSP function menu Refer to Introduction of menu operations on page 43 2 Touch Auto EQ You cannot use this function if auto T...

Page 55: ...auto TA and EQ has been calculated by a computer and is the optimum delay time that will give accurate results Be sure to use the resulting value although it may dif fer from the actual distance when The reflected sound within the car is strong and delays occur The LPF on active subwoofers or exter nal amps delay the lower sounds Auto TA and EQ changes the audio settings as follows The fader balan...

Page 56: ...hin 10 seconds A measurement tone noise is emitted from the speakers and auto EQ measurement be gins When auto EQ is completed Complete is dis played When the car s interior acoustic characteris tics cannot be measured correctly an error message will be displayed Refer to Under standing auto EQ auto TA and EQ error mes sages on page 94 It takes about nine minutes for auto EQ mea surement to be com...

Page 57: ...egistering the code Setting the audio language You can set the preferred audio language 1 Display the Video Setup menu Refer to Introduction of menu operations on page 43 2 Touch Audio Language on the Video Setup menu An audio language menu is displayed 3 Touch the desired language The audio language is set If you have selected Others refer to When you select Others on this page Notes If the selec...

Page 58: ...icture is cut short on the right and left sides of the screen Notes When playing discs that do not specify Pan Scan the disc is played back in Letter Box display even if you select the Pan Scan setting Confirm whether the disc package bears the 16 9 LB mark The TV aspect ratio cannot be changed for some discs For details refer to the disc s in structions Setting the slide show interval JPEG files ...

Page 59: ...on the disc With some discs the parental lock may be ac tive only for certain levels of scenes The play back of those scenes will be skipped For details refer to the instruction manual that came with the disc Changing the level You can change the set parental lock level 1 Display the Video Setup menu Refer to Introduction of menu operations on page 43 2 Touch Parental on the Video Setup menu 3 Tou...

Page 60: ...er it by entering the deregistration code 1 Display the Video Setup menu Refer to Introduction of menu operations on page 43 2 Touch DivX VOD on the Video Setup menu 3 Touch Deregistration Code To cancel deregistration touch Cancel 4 Touch OK The deregistration is complete Setting for digital output Audio which is outputted from digital output of this unit can be selected Normally set to Stream If...

Page 61: ...menu Refer to Introduction of menu operations on page 43 3 Touch Rear Speaker on the system menu to switch the subwoofer output or full range speaker When no subwoofer is connected to the rear output select Full full range speaker When a subwoofer is connected to the rear output select Subwoofer subwoofer Notes Even if you change this setting there will be no output unless you turn the subwoofer o...

Page 62: ...ted from use while driving or require careful attention when operated In such cases a caution will appear on the display You can change the language for caution messages with this setting If the embedded language and the selected language setting are not the same text in formation may not display properly Some characters may not be displayed properly 1 Display the system menu Refer to Introduction...

Page 63: ...nit Setting the automatic open function To prevent the display from hitting the shift lever of an automatic vehicle when it is in the P park position or when you do not wish the display to open close automatically you can set the automatic open function to manual mode 1 Display the system menu Refer to Introduction of menu operations on page 43 2 Touch Auto Flap to select whether to open close the...

Page 64: ...ersed images Otherwise the screen image will appear re versed This unit features a function that automatically switches to the rear view camera video REAR VIEW CAMERA IN when a rear view camera is installed on your car and the gear shift is moved to the REVERSE R position For more details consult your dealer After you set up the rear view camera set ting move the gear shift to REVERSE R and confir...

Page 65: ... Video Signal Setting on the func tion menu Video Signal Setting items are displayed AV Adjusts the AV video signal AUX Adjusts the AUX video signal Camera Adjusts the camera video signal TV Adjusts the TV video signal 3 Touch c or d to select the desired video signal appears Auto PAL NTSC PAL M PAL N SECAM Selecting the area group 1 Select the TV source Refer to Basic operations of this unit on p...

Page 66: ... LPF of an active sub woofer to the highest frequency The distance has been calculated by com puter to be the optimum delay to give accu rate results for the circumstances so please continue to use this value The reflected sound within the car is strong and delays occur The LPF on active subwoofers or exter nal amps delay the lower sounds Auto EQ changes the audio settings as fol lows The fader ba...

Page 67: ...t for an extended period high tempera tures may cause distortion color change or malfunction Note Do not press h eject to open or close the panel when you are using the microphone Correcting distorted sound When listening to a CD or other source on which the recording level is high setting the level of each frequency to high may result in distortion You can switch the digital attenua tor to low to...

Page 68: ...he color 7 Touch the icon and hold to store the customized color in the memory Memo Storing the customized color in the memory The customized color has been stored in the memory The set color will be recalled from the memory the next time you touch the same icon Selecting the OSD color The OSD color can be changed 1 Display the entertainment menu Refer to Introduction of menu operations on page 43...

Page 69: ...tom menu and choose a registered menu Refer to Introduction of menu operations on page 43 Notes You can register up to 12 columns If you register a column from the Audio func tion menu the registration will be cancelled when a DEQ P6600 DEQ P7650 multi channel processor is connected If you register a column from the DSP menu the registration will be canceled when the DEQ P6600 DEQ P7650 multi chan...

Page 70: ...ions of images making the difference between bright and dark more distinct RGB Dot Adjust Adjusts phase shifting by dot clock when a Navigation system is connected You cannot adjust the picture adjustment for the rear view camera when Camera Polarity is set to Off Refer to Setting the rear view camera back up camera on page 64 You can adjust Hue only when the color sys tem is set to NTSC With some...

Page 71: ...ed 6 Press MENU to proceed to 16 point ad justment The 16 point touch panel adjustment screen appears To cancel the adjustment press and hold MENU 7 Gently touch the center of the mark displayed on the screen After you touch all the marks the data for the adjusted position is saved Do not turn off the engine while the data is being saved 8 Press and hold MENU to complete the adjustment Using an AU...

Page 72: ...he external unit Basic operations The functions allocated to the following opera tions will differ depending on the connected external unit For details concerning these functions refer to the owner s manual for the connected external unit Auto Switching to auto or manual Audio Video Switching to video and audio Changing the screen mode Refer to Changing the wide screen mode on page 35 Switching th...

Page 73: ...this point It is extremely dangerous to allow the micro phone lead to become wound around the steering column or gearstick Be sure to in stall the unit in such a way that it will not ob struct driving Make sure that cables will not interfere with moving parts of the vehicle such as the gear shift parking brake or seat sliding mechan ism Do not shorten any cables If you do the pro tection circuit m...

Page 74: ...artment Cover any disconnected cable connectors with insulating tape Do not shorten any cables Never cut the insulation of the power cable of this unit in order to share the power with other devices The current capacity of the cable is limited Use a fuse of the rating prescribed Never wire the negative speaker cable di rectly to ground Never band together negative cables of multiple speakers When ...

Page 75: ...En 75 Section 15 Installation Installation ...

Page 76: ...tion switch 12 V DC Black chassis ground Connect to a clean paint free metal location Left Right Front speaker Front speaker Rear speaker or Subwoofer 4 Ω White Gray Gray black White black Green Violet Green black Violet black Violet Violet black Not used Green Green black When using a subwoofer of 70 W 2 Ω be sure to connect with Violet and Violet black leads of this unit Do not connect anything ...

Page 77: ...rking brake switch Blue white Connect to system control terminal of the power amp or auto antenna relay control terminal max 300 mA 12 V DC Ground side Power supply side Parking brake switch With a 2 speaker system do not connect anything to the speaker leads that are not connected to speakers Note Change the initial setting of this unit The subwoofer output of this unit is monaural When you conne...

Page 78: ...ely Power amp sold separately Subwoofer Subwoofer To front output To rear output To subwoofer output This product Rear output REAR OUTPUT Front output FRONT OUTPUT Subwoofer output SUBWOOFER OUTPUT 13 cm 17 cm 13 cm When you connect the separately sold multi channel processor e g DEQ P6600 DEQ P7650 to this unit do not connect anything to the speaker leads and system remote control blue white When...

Page 79: ...D BTB200 sold separately IP BUS cable Supplied with Bluetooth adapter Black Microphone for hands free phoning supplied with Bluetooth adapter Connecting the system for AVH P6350BT model DVD changer sold separately This product Wired remote input WIRED REMOTE INPUT Hard wired remote control adaptor can be connected sold separately IP BUS input IP BUS cable En 79 Section 15 Installation Installation...

Page 80: ...while driving This product External video component sold separately RCA cables sold separately Audio inputs AUDIO INPUT Video input VIDEO INPUT Display with RCA input jacks sold separately Rear monitor output REAR MONITOR OUTPUT To video input To video output To audio outputs 13 cm Rear audio output REAR MONITOR OUTPUT AUDIO To audio inputs RCA cables sold separately 17 cm Mini pin plug cable sold...

Page 81: ...Microphone for hands free phoning supplied with Bluetooth adapter Black Optical cable connection box CD DD25 DEQ P6600 supplied with multi channel processor DEQ P7650 sold separately To SWL To SWR Blue Blue Multi channel processor DEQ P6600 DEQ P7650 sold separately This product IP BUS input Black Wired remote input WIRED REMOTE INPUT Hard wired remote control adaptor can be connected sold separat...

Page 82: ...nt pur poses Objects in the rear view may appear closer or more distant than they actually are Rear view camera input REAR VIEW CAMERA IN This product 13 cm To video output Rear view camera sold separately Violet white Of the two lead wires connected to the back lamp connect the one in which the voltage changes when the gear shift is in the REVERSE R position This connection enables the unit to se...

Page 83: ...stall this unit near the doors where rainwater is likely to be spilled on the unit In cursion of water into the unit may cause smoke or fire Connecting the optical cable 1 Connect the optical cable and ground lead to the main unit Connect the optical cable so that it does not protrude from the main unit as shown in the illustration Fasten the ground lead to the pro trusion on the back of the main ...

Page 84: ...1 2 1 Wrap with the protection tape 2 Fasten with the lock tie En 84 Section 15 Installation ...

Page 85: ...l when using this unit make sure you leave ample space behind the rear panel and wrap any loose cables so they are not blocking the vents when installing the unit The cords must not cover up the area shown in the figure below This is necessary to allow the amplifiers to radiate freely 1 1 Do not cover this area Make sure you leave enough gap between the dashboard and the LCD panel of this unit so ...

Page 86: ... screws 5 mm 6 mm or flush sur face screws 5 mm 6 mm depending on the shape of screw holes in the bracket 1 2 3 1 Screw 2 Dashboard or console 3 Factory radio mounting bracket Removing the unit Extend top and bottom of the trim ring out wards to remove the trim ring And then loos en the screws 2 mm 3 mm to remove the mounting sleeve When reattaching the trim ring push the trim ring onto the unit u...

Page 87: ...stall the microphone clip on the sun visor With the sun visor up install the microphone clip Lowering the sun visor reduces the voice recognition rate 1 2 1 Microphone clip 2 Clamp Use separately sold clamps to secure the lead where necessary inside the vehicle When installing the microphone on the steering column 1 Install the microphone on the micro phone clip 2 1 3 4 1 Microphone 2 Microphone b...

Page 88: ...ar side of the steering column 1 2 1 Double sided tape 2 Clamp Use separately sold clamps to secure the lead where necessary inside the vehicle Adjusting the microphone angle The microphone angle can be adjusted En 88 Section 15 Installation ...

Page 89: ...ame playback Symptom Cause Action Refer ence page There is no image dis played The parking brake cable is not connected Connect the park ing brake cable and apply the park ing brake The parking brake is not ap plied Connect the park ing brake cable and apply the park ing brake The icon is displayed and operation is not possible The operation is prohibited for the disc This operation is not possibl...

Page 90: ...ect Enter the correct code number Page 58 You have forgot ten your code number Press RESET Page 59 Symptom Cause Action Refer ence page Dialog lan guage and subtitle lan guage cannot be switched The DVD being played does not feature multiple language record ings The language can not be switched if they are not re corded on the disc You can only switch between items indicated in the disc menu Switc...

Page 91: ...Update the iPod version Bluetooth audio telephone Symptom Cause Action The sound from the Blue tooth audio source is not played back There is a call in progress on a Bluetooth con nected cellular phone The sound will be played back when the call is termi nated A Bluetooth con nected cellular phone is cur rently being oper ated Do not operate the cellular phone at this time A call was made with a B...

Page 92: ... sup ported The inserted disc contains a high definition DivX file Select a file that can be played It is not possi ble to write it in the flash Flash memory error Replace the flash memory Your device is not author ized to play this DivX pro tected video This unit s DivX registration code has not been authorized by the DivX VOD con tents provider Register this unit to the DivX VOD contents provide...

Page 93: ...ition switch to OFF then to ACC or ON and then connect a compli ant USB portable audio player USB memory Message Cause Action Error 02 9X DX Communication failed Perform one of the following opera tions Turn the ignition switch OFF and back ON Disconnect the USB portable audio player USB memory Change to a dif ferent source Then return to the USB portable audio player USB memory Rental Ex pired Th...

Page 94: ...r an authorized Pioneer Service Station Understanding auto EQ auto TA and EQ error messages When correct measurement of the car s inter ior acoustic characteristics is not possible using auto TA and EQ an error message may appear on the display In such cases refer to the table below to see what the problem is and how it may be corrected After checking try again Message Cause Action Error Please ch...

Page 95: ...cted fre quency is being broadcast in stereo Indicates that a Bluetooth tele phone is connected Indicates that the digital format is Dolby Digital Indicates that the digital format is MPEG Audio Indicates that the digital format is Linear PCM Indicates the sampling frequency Indicates that the digital format is DTS 1 1ch 2 ch Mch Indicates the audio channel Indicates that a disc with PBC On is bei...

Page 96: ... angle has been selected Shows which audio output has been selected Area 2 Shows the disc album currently being played Shows the track song currently being played Shows the comment currently being played Shows the artist name for the track song currently being played Shows cellular phone information Shows general phone information Shows home phone information Shows office phone information Shows o...

Page 97: ...scs It is not possible to play back DVD RAM discs This unit is not compatible with discs recorded in AVCHD Advanced Video Codec High Definition for mat Do not insert AVCHD discs as you may not be able to eject the disc External storage device USB SD Depending on the external storage device USB SD the following problems may occur Operations may vary The storage device may not be recognized Files ma...

Page 98: ...e cannot be played back Playback of DVD R DVD RW discs may not be possi ble due to disc characteristics scratches or dirt on the disc or dirt condensation etc on the lens of this unit Depending on the application settings and the envir onment playback of discs recorded on a personal computer may not be possible For details contact the manufacturer of the application CD R CD RW discs When CD R CD R...

Page 99: ...vx com Important When naming a JPEG image file add the cor responding filename extension jpg jpeg jpe or jfif This unit plays back files with these filename extensions jpg jpeg jpe or jfif as a JPEG image file To prevent malfunctions do not use these extensions for files other than JPEG image files Compressed audio compatibility disc USB SD WMA File extension wma Bit rate 5 kbps to 320 kbps CBR VB...

Page 100: ...ccepts no responsibility for data lost on the USB memory USB portable audio player SD memory card even if that data is lost while using this unit Do not leave the discs external storage device USB SD or iPod in places with high temperatures iPod compatibility This unit supports only the following iPod models Supported iPod software versions are shown below Older versions may not be supported iPhon...

Page 101: ...EER Service Station Do not use the unit in this condition because doing so may result in fire electric shock or other failure If you notice smoke a strange noise or smell or any other abnormal signs from the display turn off the power immediately and consult your dealer or the nearest authorized PIONEER Service Station Using this unit in this condition may result in permanent da mage to the system...

Page 102: ...ice Station Keeping the display in good condition When removing dust from the screen or cleaning the display first turn the system power off then wipe with a soft dry cloth When wiping the screen take care not to scratch the surface Do not use harsh or abrasive chemical cleaners Copyright and trademark This item incorporates copy protection tech nology that is protected by U S patents and other in...

Page 103: ...been certified by the developer to meet Apple performance standards Apple is not responsible for the operation of this device or its compliance with safety and regulatory standards Please note that the use of this accessory with iPod or iPhone may affect wireless perfor mance Dolby Pro Logic II Manufactured under license from Dolby Laboratories Dolby Pro Logic and the double D symbol are trademark...

Page 104: ...r 0818 Maltese mt 1320 Thai th 2008 Avaric av 0122 Haitian ht 0820 Burmese my 1325 Tigrinya ti 2009 Aymara ay 0125 Hungarian hu 0821 Nauru na 1401 Turkmen tk 2011 Azerbaijani az 0126 Armenian hy 0825 Bokmal nb 1402 Tagalog tl 2012 Bashkir ba 0201 Herero hz 0826 Ndebele North nd 1404 Tswana tn 2014 Belarusian be 0205 Interlingua ia 0901 Nepali ne 1405 Tonga to 2015 Bulgarian bg 0207 Indonesian id 0...

Page 105: ...tem DVD video Video CD CD WMA MP3 AAC DivX JPEG system Usable discs DVD video Video CD CD CD R RW DVD R RW R DL Region number 4 for South American and Oceanian models Region number 2 for Middle East Asian and South African models Frequency response 5 Hz to 44 000 Hz with DVD at sampling frequency 96 kHz Signal to noise ratio 96 dB 1 kHz IEC A net work RCA level Output level Video 1 0 Vp p 75 W 0 2...

Page 106: ...N 30 dB Signal to noise ratio 72 dB IEC A network AM tuner Frequency range 531 kHz to 1 602 kHz 9 kHz 530 kHz to 1 640 kHz 10 kHz Usable sensitivity 25 µV S N 20 dB Signal to noise ratio 62 dB IEC A network Bluetooth AVH P6350BT Version Bluetooth 2 0 certified Output power 4 dBm Maximum Power class 2 Infrared remote control Wavelength 945 nm Output typ 10 mw sr per Infrared LED Note Specifications...

Page 107: ...En 107 ...

Page 108: ...ICS AUSTRALIA PTY LTD 5 Arco Lane Heatherton Victoria 3202 Australia TEL 03 9586 6300 PIONEER ELECTRONICS OF CANADA INC 300 Allstate Parkway Markham Ontario L3R 0P2 Canada TEL 1 877 283 5901 TEL 905 479 4411 PIONEER ELECTRONICS DE MEXICO S A de C V Blvd Manuel Avila Camacho 138 10 piso Col Lomas de Chapultepec Mexico D F 11000 TEL 55 9178 4270 先鋒股份有限公司 台北市內湖區瑞光路407號8樓 電話 02 2657 3588 先鋒電子 香港 有限公司 ...

Reviews: