background image

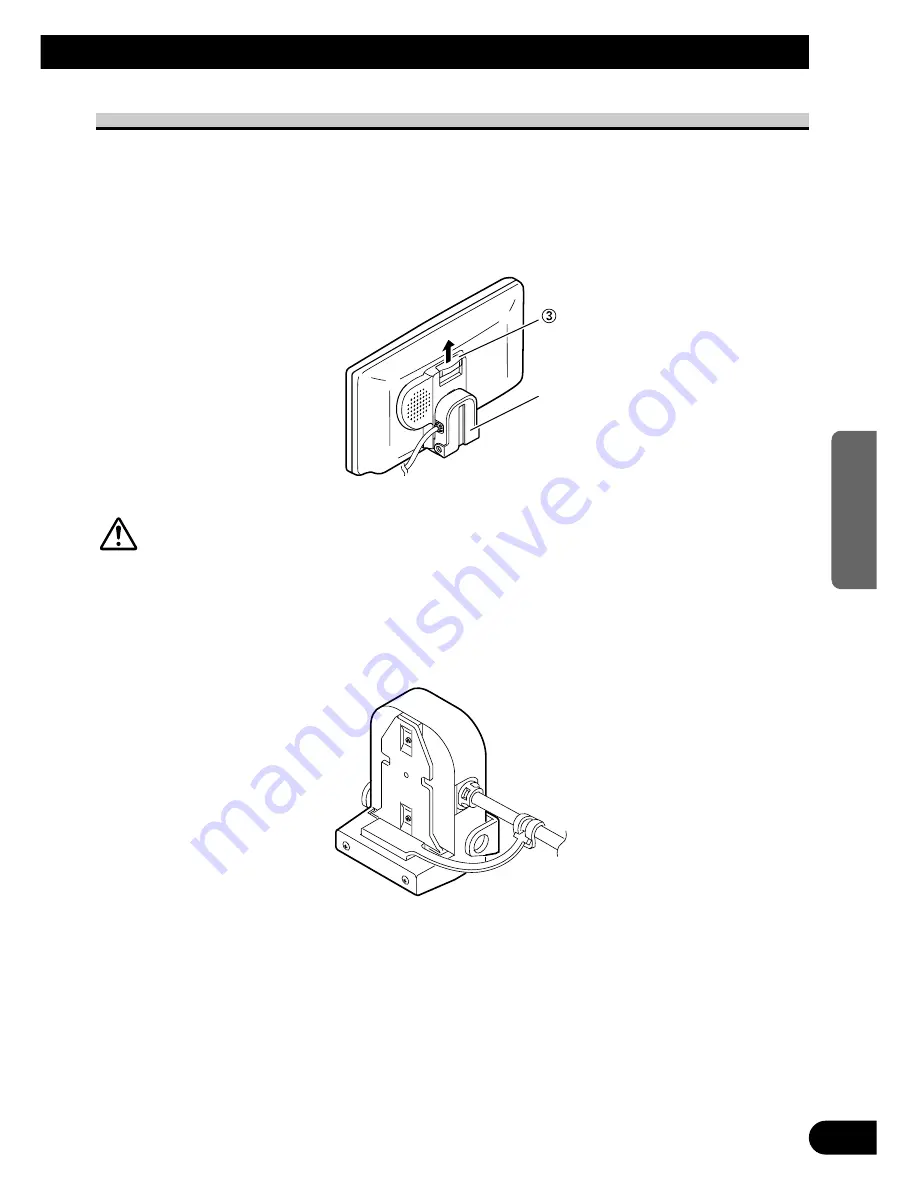
Entfernen des Displays

• Ziehen Sie den Freigabehebel 

3

nach oben und halten Sie ihn in dieser Stellung.

Anschließend ziehen Sie das Display nach oben hin vom Unterbau ab.

• Um einen Diebstahl des Displays zu verhüten, nehmen Sie das Display vor dem Verlassen

des Wagens ab.

VORSICHTSMAßNAHME

Staub oder sonstige Fremdkörper können mangelhaften Anschlusskontakt
verursachen. Wenn das Display nicht in Betrieb ist, sollte deshalb die mit-
gelieferte Abdeckung zum Schutz des Steckers verwendet werden. 
(Siehe Abbildung unten.)

4

ENGLISH

ESPAÑOL

DEUTSCH

FRANÇAIS

ITALIANO

NEDERLANDS

Unterbau

Summary of Contents for AVD-W6210

Page 1: ...ANO NEDERLANDS 16 9 Touch Panel Display Owner s Manual AVD W6210 This product conforms to new cord colors Los colores de los cables de este producto se conforman con un nuevo código de colores Dieses Produkt entspricht den neuen kabelfarben ...

Page 2: ...de Modes Available Operating the Setup Menu 13 Entering the Setup Menu 13 Picture Adjust 14 BRIGHTNESS CONTRAST COLOR HUE DIMMER Video Setting 16 Input Setting AV IN2 Functions for Back up Camera Switching the image of rear display Audio Setting 19 Setting the Mixing of the Guidance Voice GUIDE Using the Display Correctly 20 Handling the Display 20 About the Liquid Crystal Display LCD Screen 21 Ke...

Page 3: ... ty in operating the system or reading the display please park safely before mak ing adjustments 7 Do not attempt to install or service your display by yourself Installation or ser vicing of the display by persons without training and experience in electronic equipment and automotive accessories may be dangerous and could expose you to the risk of electric shock or other hazards 8 Please remember ...

Page 4: ...e display Also take care not to grip the screen or buttons too firmly or to drop the display Do not let any water get on the terminals on the display or on the base and do not allow the ter minals to be shorted by a metal object or the like This can cause system breakdown Be careful not to touch terminals on the display or on the base Doing so may cause connection failures If any terminals are sta...

Page 5: ...ts base To prevent theft of the display remove the display when leaving the vehicle CAUTION Dust or other foreign matter may lead to poor connector contact Be sure to use the supplied cover to protect the connector when the display is not in use Refer to the illustration below 4 ENGLISH ESPAÑOL DEUTSCH FRANÇAIS ITALIANO NEDERLANDS Base ...

Page 6: ... use an older version with the Navigation unit this product may have some faults including an inactivity of the Touch Panel function The NAVI button and the NAVI MENU button cannot function ATT attenuation and MUTE muting cannot function even though you can select them in AUDIO SETTING While showing non navigation images of each source touching the buttons or keys of the remote control may result ...

Page 7: ...e of the LCD screen is limited The viewing angle vertical and horizontal can be increased however by using BRIGHTNESS to adjust the black density of the video When using for the first time adjust the black density in accordance with the viewing angle vertical and horizontal to adjust for clear viewing DIMMER can also be used to adjust the brightness of the LCD screen itself to suit your personal p...

Page 8: ...the RESET button lets you reset the microprocessor to its initial settings without changing the DIMMER setting Reset the microprocessor in the following cases When using this product for the first time after installation When the product fails to operate properly When strange incorrect messages appear on the display 1 Turn the ignition switch OFF ACC OFF 2 Press the RESET button Use a pen tip or o...

Page 9: ...rol buttons Adjust the volume of the built in speaker 0 Note Never set the volume so high that you cannot hear outside traffic and emergency vehicles 6 NAVI AV button Switches the display to the desired indications Use to switch between navigation images and the images of each source 7 NAVI button You press this button to view Navigation Map or return to guidance Also when the map is scrolled pres...

Page 10: ... To turn off the system press the SOURCE POWER button and hold for 2 seconds Volume Adjustment Adjust the volume of audio output from the built in speaker Raise or lower the speaker volume The volume of the built in speaker can be adjusted in a range of 0 to 30 The volume level will be displayed for about 4 seconds VOL 12 AV I N1 GUIDE ACC ON L O C K ST A R T Basic Operation ...

Page 11: ...VD Video playback or nothing is connected to the 26 pin input AV IN1 and AV IN2 are audio and video from the AV equipment connected to the AV IN1 or AV IN2 input terminal Refer to page 26 Verify the correct connection with the AV equipment connected to AV IN1 or AV IN2 AV IN2 is selectable only if either ON or BACK UP CAM has been chosen in VIDEO SET TING Refer to page 16 Pressing the NAVI AV butt...

Page 12: ... button selects the wide mode in the following order FULL JUST CINEMA ZOOM NORMAL Exit to FULL Note Settings are stored for each source NAVI SOURCE AV IN1 AV IN2 When video is viewed in a wide mode that does not match its original aspect ratio it may appear differently Remember that using the wide mode feature of this system for commercial or public viewing pur poses may constitute an infringement...

Page 13: ...ly long video such as movies in which titles overlap the video CINEMA Video enlarges vertically with a aspect ratio falling between FULL and ZOOM This wide mode is suited for horizontally long video such as movies in which titles are displayed in black areas outside the video JUST Video appears more extended hor izontally as it gets closer to both edges of the screen Because video appears in about...

Page 14: ...ng Press 5 or to select a desired item and press the MENU ENTER button For details refer to the pages of each of the setting Picture Adjust PICTURE ADJUST the next page Video Setting VIDEO SETTING P 16 Audio Setting AUDIO SETTING P 19 To exit each menu select RETURN and press the MENU ENTER button MENU P I CTURE ADJUST V I DEO SET T I NG AUD I O SET T I NG RETURN MENU P I CTURE ADJUST V I DEO SET ...

Page 15: ... of BRIGHTNESS and CONTRAST are stored separately for light ambient day time and dark ambient nighttime A yellow mark or blue mark is displayed to the right of BRIGHTNESS and CONTRAST on the screen respectively as the front panel ambient light sensor determines brightness or darkness HUE cannot be adjusted for PAL video COLOR and HUE cannot be adjusted for navigation images D I D I MME MMER RE TUR...

Page 16: ...for adjusting DIMMER is indicated by the mark shown in step 3 and its position The marks indicating the current ambient brightness used for adjusting BRIGHTNESS and CONTRAST may differ slightly The external light level can be adjusted to Dark Intermediate or Bright and the each setting saved This level indicates the brightness of the screen being adjusted The farther yellow moves to the right the ...

Page 17: ...nection mode of the source external unit to the right of AV IN2 Each press of the 2 or 3 button selects the source in the following order OFF ON BACK UP CAM Exit to OFF Note If AV IN2 OFF is chosen the display and built in speaker will not switch to AV IN2 VI DEO SE T T I NG AV I N2 O N REAR SOURCE NAV I POLAR I TY BATTERY P I CTURE ADJUST SET UP P I CTURE MODE STD I MG RETURN VI DEO SE T T I NG A...

Page 18: ...Y 4 Select BATTERY or GND POLARITY BATTERY When the gear shift is moved to the REVERSE R position and the polari ty of the connected lead wire refer to page 29 is positive GND When the gear shift is moved to the REVERSE R position and the polarity of the connected lead wire refer to page 29 is negative 5 Confirm the safety and get into reverse gear Verify that the back up camera image appears on t...

Page 19: ...ear display or the images of each source 1 Press 5 or to select VIDEO SETTING from the setup menu and press the MENU ENTER button 2 Change the rear source setting with 2 3 Pressing 2 3 will switch between NAVI and SOURCE NAVI Navigation images are output from rear display output on the hide away unit when navigation images are displayed on Front display SOURCE Images of the selected source are out...

Page 20: ...dance voice from the Pioneer Navigation unit 1 Display the setup menu and select AUDIO SETTING Refer to page 13 2 Select a desired setting Pressing 2 3 will switch between ATT attenuation MUTE muting and NORMAL normal ATT Volume is set to 1 4 MUTE Volume is turned to 0 NORMAL Volume remains the same 7 SPEAKER You can select ON or OFF for the audio from the built in speaker Note You can hear the Na...

Page 21: ...y as there are high voltage com ponents inside which may cause an electric shock Be sure to consult your dealer or the nearest authorized PIONEER service facility for internal inspection adjustments or repairs Handling the Display When the display is not being used never leave it under the direct sunlight or in extreme temperatures The display should be used within the temperature ranges shown bel...

Page 22: ...t is exposed to direct sunlight Keeping the Display in Good Condition When removing dust from the screen or cleaning the display first turn the system power OFF then wipe with a soft dry cloth When wiping the screen take care not to scratch the surface Do not use harsh or abra sive chemical cleaners Do not use a wet cloth for cleaning Do not use organic solvents such as benzine and thinner About t...

Page 23: ...gine vibration may eventually cause the insulation to fail at the point where the wire passes from the passenger com partment into the engine compartment Take extra care in securing the wire at this point It is extremely dangerous to allow the display lead to become wound around the steering column or gearshift Be sure to install the display in such a way that it will not obstruct driving Make sur...

Page 24: ...nect to the battery This will damage the lead insulation and cause a very dangerous short Do not shorten any leads If you do the protec tion circuit may fail to work when it should Never feed power to other equipment by cutting the insulation of the power supply lead of the unit and tapping into the lead The current capac ity of the lead will be exceeded causing over heating When replacing a fuse ...

Page 25: ...ite red Receives stereo audio as from a VCR DVD player or other AV equipment 6 AV IN2 RCA video input yellow Receives video as from a VCR DVD player back up camera or other AV equipment 7 RESET button Resets the display microprocessor Press with the tip of a ballpoint pen or similar object 8 Power Supply Receives the power cable supplied 9 RCA video output yellow Connects to other AV equipment Vid...

Page 26: ...ith power regard less of ignition switch position Connecting method Clamp the parking brake switch power supply side lead Clamp firmly with needle nosed pliers Red To the electric terminal controlled by the ignition switch 12 V DC ON OFF Do not connect this lead to power source terminals to which power is continuously supplied If the lead is connected to such terminals the battery may be drained B...

Page 27: ...onnected to the AV IN2 input setting may be required Refer to page 16 To audio output To video output AV IN1 INPUT AV IN2 INPUT Hide away Unit AV IN1 RCA audio input white red AV IN1 RCA video input yellow Commercially available portable video component or back up camera with RCA output Commercial RCA cable sold separately 3 m Brown ...

Page 28: ... separately sold Pioneer Navigation unit 27 Connecting the System Display Unit Hide away Unit 26 pin input yellow Yellow Black Pioneer Navigation unit sold separately 26 pin output black 26 pin cable supplied with the Pioneer Navigation unit 3 m Brown ...

Page 29: ... Refer to page 25 Hide away Unit RCA audio output white red Commercial RCA cable sold separately To audio input R To audio input L To video input Second display video deck etc RCA video output yellow 28 ENGLISH ESPAÑOL DEUTSCH FRANÇAIS ITALIANO NEDERLANDS ...

Page 30: ...s in the REVERSE R position Note When you have completed lead wire connection perform the appropriate settings for the connection method Refer to page 17 CAUTION This function is designed for use with a back up camera only Users may connect the AV IN2 input with REVERSE GEAR SIGNAL INPUT only to a back up camera Users must not connect any other devices to the AV IN2 input with REVERSE GEAR SIGNAL ...

Page 31: ... it will not be hit by the driver or passenger if the vehicle brakes sharply Do not install the display in a position where the fully opened air bag will be obstructed by it Do not install the display in a place where it will impair the performance of any of the vehicle s operating systems including airbags and headrests Make sure there is nothing behind the panels when drilling holes in them Be c...

Page 32: ... conditions Where it does not obstruct the driver s vision and impede the safe operation of the vehicle Where the front of the car is within the driver s field of vision when look ing at the display Where the display does not protrude above the front of the hood as viewed by the driver Before Installing and Fixing Make temporary connections first to check that the unit and system are working prope...

Page 33: ... 1 Paste the cushions onto the bot tom of the display base Paste the cushions onto the bottom of the display base to avoid scratching the dashboard 2 Install the display base and the mounting base on the display Display base Cushions Installing the Display Using the Accessory Mounting Base Mounting base Display base ...

Page 34: ...ges 30 and 31 Install the display in a position where the display can be removed from the display base 4 Paste the mounting base onto the dashboard Make sure the surface is free of mois ture dust grime oil etc before affix ing the mounting base Note The mounting base contains a strong adhesive and may leave a mark on the dashboard if it is removed 33 Installation Dashboard Bend the mounting base t...

Page 35: ...ical posi tion and display angle In order to stabilize the display adjust the display vertical position so that the bottom of the display base contacts the dashboard Adjust the display to a good angle for viewing Note After you have adjusted the display vertical position and angle turn the knobs clockwise to fasten the display in place Tapping screws 3 12 mm If you turn this knob to the left you c...

Page 36: ...rs etc where there is danger of exposure to rain When installing under the front seat make sure there is no hindrance to sliding of the seat Direct installation on the carpet is possible if the hard Velcro tape will adhere to the carpet Do not use the soft Velcro tape in this case Hide away Unit Installation Adhere the hard Velcro tape supplied to the bottom of the hide away unit and adhere the so...

Page 37: ...tem NTSC PAL compatible Operating temperature range 10 50 C Storage temperature range 20 80 C Built in Speaker ø 36 mm Dimensions 188 W 114 H 37 D mm Weight 467 g Hide away Unit External video input level 1 Vp p 75 Ω External audio input level 1 V 22 kΩ Max output impedance 1 Vp p 75 Ω External audio max output level 1 V 1 kΩ Dimensions 162 W 38 H 85 D mm excluding protruding parts Weight 440 g No...

Page 38: ...les Operación del menú de configuración 13 Selección del menú de configuración 13 Ajuste de la imagen 14 BRIGHTNESS CONTRAST COLOR HUE DIMMER regulador de la intensidad luminosa Ajuste de vídeo 16 Configuración de la entrada AV IN2 Funciones para cámara de marcha atrás Cambio la imagen de pantalla posterior Ajuste de audio 19 Ajuste de la mezcla de voz de orientación GUIDE Uso correcto de la panta...

Page 39: ...l utilizar el sistema o al leer el contenido de la pantalla estacione el vehículo en un lugar seguro antes de hacer ajustes 7 No intente instalar o revisar usted mismo su pantalla La instalación o revisión de la pantalla por personas sin formación ni experiencia en equipos electrónicos y accesorios para automóviles puede ser peligroso y podría exponerle a una descarga eléctrica o a otros peligros ...

Page 40: ...raer la pantalla Tenga también cuida do para no sujetar la pantalla ni pulsar sus botones con mucha fuerza y no permita que ésta se caiga No deje que se mojen los terminales de la pantalla o de la base y no permita que los terminales sean cortocircuitados por un objeto metálico o algo similar Esto puede causar averías en el sis tema Tenga cuidado para no tocar los terminales de la pantalla y de la...

Page 41: ...dir que le roben la pantalla llévela consigo cuando salga del automóvil PRECAUCIÓN El polvo y las materias extrañas pueden ocasionar un contacto deficiente del conector Asegúrese de poner la tapa suministrada para proteger el conector cuando no se esté utilizando la pantalla Consulte la ilustración a continuación 4 ENGLISH ESPAÑOL DEUTSCH FRANÇAIS ITALIANO NEDERLANDS Base ...

Page 42: ...una versión más antigua con la unidad de navegación puede que este producto funcione incorrectamente incluyendo una falla de la función del panel de toque El botón NAVI y el botón NAVI MENU no funcionan La función ATT atenuación y MUTE silenciamiento no funcionan aunque que selecciónelas en AUDIO SETTING Mientras se visualizan imágenes que no sean de navegación de cada fuente tocar en los botones ...

Page 43: ...ar Debido a su propia construcción la pantalla LCD tiene un ángulo de visión limitado Sin embargo es posible aumentar el ángulo de visión vertical y horizontal utilizando el mando BRIGHTNESS para ajustar la densidad del negro de la imagen Cuando lo utilice por primera vez ajuste la densidad del negro de acuerdo con el ángulo de visión vertical y horizontal para obtener una imagen nítida También po...

Page 44: ...el botón RESET le permite reposicionar el microprocesador a sus ajustes iniciales sin cambiar el ajuste DIMMER Reposicione el microprocesador en los siguientes casos Cuando utilice este producto por la primera vez después de la instalación Cuando el producto no funciona apropiadamente Cuando mensajes extraños incorrectos aparecen en la pantalla 1 Gire la llave de ignición a OFF ACC OFF 2 Presione ...

Page 45: ...ste el volumen del altavoz incorpo rado 0 Nota No ajuste nunca el volumen a un nivel tan alto que no le permita escuchar el ruido del tráfico exterior y de los vehículos de emergencia 6 Botón NAVI AV Cambia la pantalla a las indicaciones deseadas Utilice para cambiar entre imágenes de navegación e imágenes de cada fuente 7 Botón NAVI Pulse este botón para visualizar la mapa de navegación o volver ...

Page 46: ...R Para apagar el sistema mantenga pulsado el botón SOURCE POWER durante 2 segundos Ajuste del volumen Ajuste el volumen de la salida de audio desde el altavoz incorporado Suba o baje el volumen del altavoz El volumen del altavoz incorporado se puede ajustar en el margen de 0 a 30 El nivel del volumen se visualiza durante aproximadamente 4 segundos VOL 12 AV I N1 GUIDE ACC ON L O C K ST A R T Opera...

Page 47: ...eer sin reproducción de DVD Vídeo o nada está conectado a la entrada de 26 clavijas AV IN1 y AV IN2 son el audio y vídeo del equipo de AV conectado al terminal de entrada AV IN1 o AV IN2 Vea la página 26 Compruebe la conexión correcta con el equipo de AV conectado a AV IN1 o AV IN2 AV IN2 se puede seleccionar solamente si la opción ON o BACK UP CAM ha sido selecciona da en VIDEO SETTING Vea la pág...

Page 48: ...l modo ancho cambia en la secuencia siguiente FULL JUST CINEMA ZOOM NORMAL Salida a FULL Nota Las configuraciones se almacenan para cada fuente NAVI SOURCE AV IN1 AV IN2 Cuando se selecciona un modo ancho que no coincida con la relación de aspecto original del vídeo es posible que se vea de distinta manera Tenga en cuenta que el uso de la función de modo ancho de este sistema para uso comercial o ...

Page 49: ...os se sobreponen al vídeo CINEMA Cine La imagen se expande verticalmente con una relación de aspecto comprendida entre FULL y ZOOM Este modo ancho es adecuado para ver imágenes horizontalmente largas como películas en donde los subtítulos se visualizan en las áreas negras fuera del vídeo JUST Pantalla justa La imagen se extiende horizontalmente a medida que se acerca a ambos bordes de la pantalla ...

Page 50: ...e 5 o para seleccionar un ítem deseado y pulse el botón MENU ENTER Para los detalles refiérase a las páginas de cada uno de los ajustes Ajuste de imagen PICTURE ADJUST página siguiente Ajuste de vídeo VIDEO SETTING P 16 Ajuste de audio AUDIO SETTING P 19 Para salir de cada menú seleccione RETURN y pulse el botón MENU ENTER MENU P I CTURE ADJUST V I DEO SET T I NG AUD I O SET T I NG RETURN MENU P I...

Page 51: ... la opción Nota Las configuraciones de BRIGHTNESS y CONTRAST se almacenan separadamente para ambi entes luminosos de día y ambientes oscuros de noche Una marca amarilla o marca azul se visualiza a la derecha de BRIGHTNESS y CONTRAST en la pantalla respectivamente según que el sensor de luz ambiental del panel frontal determine brillantez u oscuridad No es posible ajustar HUE para vídeo PAL COLOR y...

Page 52: ...de luz externa usado como un estándar para el ajuste DIMMER se indica por la marca que se muestra en el paso 3 y su posición Las marcas que indican el brillo actual para las opciones BRIGHTNESS y CONTRAST pueden diferir ligeramente El nivel de luz externa se puede ajustar a oscuro intermedio y brillante y cada configuración se almacena Este nivel indica el brillo de la pantalla que está siendo aju...

Page 53: ... un modo de conexión Seleccione el modo de conexión de la unidad externa fuente a la derecha de AV IN2 Cada vez que presiona el botón 2 o 3 la fuente cambia en la secuencia siguiente OFF ON BACK UP CAM Salida a OFF Nota Si se selecciona AV IN2 OFF la pantalla y el altavoz incorporado no conmutan a AV IN2 VI DEO SE T T I NG AV I N2 O N REAR SOURCE NAV I POLAR I TY BATTERY P I CTURE ADJUST SET UP P ...

Page 54: ... POLARITY 4 Seleccione BATTERY o GND POLARITY BATTERY Cuando se desplaza la palanca de cambio de marchas a la posición REVERSE R y la polaridad del cable conectado vea la página 29 es positiva GND Cuando se desplaza la palanca de cambio de marchas a la posición REVERSE R y la polaridad del cable conectado vea la página 29 es negativa 5 Compruebe la seguridad y cambie a marcha atrás Verifique sí la...

Page 55: ...la pantalla posterior o imágenes de cada fuente 1 Pulse 5 o para seleccionar VIDEO SETTING del menú de configu ración y pulse el botón MENU ENTER 2 Cambie el ajuste de fuente posterior con 2 3 Pulsar 2 3 cambia entre NAVI y SOURCE NAVI Las imágenes de navegación se generan por la salida de la pantalla posterior en la unidad oculta alejada cuando se visualizan imágenes de navegación en la pantalla ...

Page 56: ...ón de la unidad de navegación de Pioneer 1 Visualice el menú de configuración y seleccione AUDIO SETTING Consulte la página 13 2 Seleccione un ajuste deseado Pulsar 2 3 cambiar entre ATT atenuación MUTE enmudecimiento y NORMAL normal ATT El volumen se ajusta a 1 4 MUTE El volumen se ajusta a 0 NORMAL El volumen permanece igual 7 SPEAKER Puede seleccionar ON u OFF para el audio del altavoz incorpor...

Page 57: ...nentes de alta tensión que pueden causar una descarga eléctrica Asegúrese de consultar a su concesionario o centro de servicio PIONEER autorizado más cercano para realizar inspecciones internas ajustes o reparaciones Manejo de la pantalla Cuando la pantalla no está siendo usada protéjala de la luz directa del sol y de temperaturas extremas La pantalla debe ser utilizada dentro de la gama de temper...

Page 58: ...d si está expuesta a la luz solar directa Mantenimiento de la pantalla en buenas condiciones Cuando quite el polvo de la pantalla o la limpie desconecte primero la alimentación del sistema y luego pase un paño suave y seco Cuando limpie la pantalla tenga cuidado para no rayar la superficie No utilice limpiadores químicos duros o abrasivos No utilice un paño mojado para la limpieza No utilice solve...

Page 59: ...ión del motor podría estropear el aislamiento en el punto por donde el cable pasa del com partimiento de los pasajeros al compartimiento del motor Tenga mucho cuidado para mantener el buen estado del cable en lo relativo a este punto Es peligrosísimo dejar que el cable de la pantalla se enrolle en la base del volante o en la palanca de cambios Asegúrese de instalar la pantalla de forma que ésta no...

Page 60: ...rificio en el compartimiento del motor para conectar a la batería Esto dañará el material aislante del conductor y causará un cortocircuito peligroso No acorte ningún conductor Si lo hiciera la protección del circuito podría fallar al funcionar cuando debería Nunca alimente energía a otros equipos cortando el aislamiento del conductor de alimentación provista de la unidad y haciendo un empalme con...

Page 61: ...o como de un VCR reproductor de DVD u otro equipo de AV 6 Entrada de vídeo AV IN2 RCA amarillo Recibe vídeo como de una videograbadora reproductor de DVD cámara de marcha atrás u otro equipo AV 7 Botón RESET Reposiciona el microprocesador de la pan talla Presione con la punta de un bolígrafo u otro objeto similar 8 Fuente de alimentación Recibe el cable de alimentación suministrado 9 Salida de víd...

Page 62: ... la posición del interruptor de encendido Método de conexión Apriete el cable del lado de alimentación del interruptor del freno de estacionamiento Apriete firme mente con alicates de punta de aguja Rojo Al terminal eléctrico controlado por el interruptor de encendido 12 V CC ON OFF No conecte este cable a los terminales de ali mentación a los que se suministra alimentación continuamente Si el cab...

Page 63: ...de ser necesario hacer la configu ración Vea la página 16 A la salida de audio A la salida de vídeo Entrada AV IN1 Entrada AV IN2 Unidad oculta alejada Entrada de audio AV IN1 RCA blanco rojo Entrada de vídeo AV IN1 RCA amarillo Componente de vídeo portátil o cámara de marcha atrás con salida RCA disponible comercialmente Cable RCA comercial vendido separadamente 3 m Marrón ...

Page 64: ...endida separadamente 27 Conexión del sistema Unidad de pantalla Unidad oculta alejada Entrada de 26 clavijas amarillo Amarillo Negro Unidad de navegación de Pioneer vendida separadamente Salida de 26 clavijas negro Cable de 26 clavijas suministrado con la unidad de navegación de Pioneer 3 m Marrón ...

Page 65: ... 25 Unidad oculta alejada Salida de audio RCA blanco rojo Cable RCA comercial vendido separadamente A la entrada de audio R A la entrada de audio L A la entrada de vídeo Segunda pantalla vídeo etc Salida de vídeo RCA amarillo 28 ENGLISH ESPAÑOL DEUTSCH FRANÇAIS ITALIANO NEDERLANDS ...

Page 66: ...a la posición REVERSE R Nota Al completar la conexión del conductor realice las configuraciones apropiadas para el método de conexión Vea la página 17 PRECAUCIÓN Esta función ha sido diseñada para uso solamente con una cámara de marcha atrás Los usuarios pueden conectar la entrada AV IN2 solamente con REVERSE GEAR SIGNAL INPUT a la cámara de marcha atrás Los usuarios no deben conectar otros dispos...

Page 67: ...ajero si el vehículo frena repentinamente No instale la pantalla en una posición donde pueda obstruir el air bag en caso de inflarse éste completamente No instale la pantalla en un lugar donde pueda afectar al rendimiento de cualquier sistema de funcionamiento del vehículo incluyendo el air bag y apoyacabezas Asegúrese de que no haya nada detrás del salpicadero u otros paneles al tala drar agujero...

Page 68: ...nde no obstruya la visión del conductor y no impida la conducción segu ra del vehículo Donde la parte frontal del vehículo quede dentro del campo de visión del conductor cuando mire la pantalla Cuando la pantalla no salga arriba de la parte frontal de la capota cuando vista por el conductor Antes de instalar y fijar la pantalla Haga primero conexiones provisionales para comprobar que la unidad y e...

Page 69: ...a parte inferior de la base de la pantalla Pegue las almohadillas en la parte inferior de la pantalla para evitar rayar el salpica dero 2 Instale la base de la pantalla y la base de montaje en la pantalla Display base Cushions Instalación de la pantalla utilizando la base de montaje de accesorios Base de montaje Base de la pantalla Base de la pantalla Almohadillas ...

Page 70: ...s páginas 30 y 31 Instale la pantalla en una posición donde ésta pueda quitarse de su base 4 Pegue la base de montaje en el salpicadero Asegúrese de que la superficie no tenga humedad polvo suciedad aceite etc antes de fijar la base de montaje Nota La base de montaje tiene un adhesivo fuerte y puede dejar una marca en el salpicadero al quitarla 33 Instalación Salpicadero Doble la base de montaje p...

Page 71: ...l y el ángulo de la pantalla Para estabilizar la pantalla ajuste su posición vertical de forma que la parte inferior de la base de la pantalla esté en contacto con el salpicadero Ajuste la pantalla de forma que ofrezca un buen ángulo de visión Nota Después de ajustar la posición vertical y el ángulo de la pantalla gire los mandos hacia la derecha para fijarla en su lugar Tornillos autorroscantes 3...

Page 72: ... etc donde existe el peligro de exposición a la lluvia Asegúrese de que no obstaculice el deslizamiento del asiento cuando la instale debajo del asiento delantero La instalación directa sobre la alfombra es posible si la cinta Velcro dura puede adherirse a la alfombra En este caso no utilice cinta Velcro blanda Instalación de la unidad oculta alejada Pegue la cinta Velcro suministrada sobre la par...

Page 73: ...le con NTSC PAL Gama de temperaturas de funcionamiento 10 50 C Gama de temperaturas para guardar la pantalla 20 80 C Altavoz incorporado ø 36 mm Dimensiones 188 An 114 Al 37 Pr mm Peso 467 g Unidad oculta alejada Nivel de entrada de vídeo exterior 1 Vp p 75 Ω Nivel de entrada de audio exterior 1 V 22 kΩ Impedancia de salida máx 1 Vp p 75 Ω Nivel de salida máx de audio exterior 1 V 1 kΩ Dimensiones...

Page 74: ... Programmquelle 10 Ändern des Breitbildmodus 11 Verfügbare Breitbildmodi Bedienungsweise des Setup Menüs 13 Aufrufen des Setup Menüs 13 Bildeinstellung 14 BRIGHTNESS CONTRAST COLOR HUE DIMMER Video Einstellung 16 Eingangseinstellung AV IN2 Funktionen für eine Rückwärtskamera Umschalten des Bilds des hinteren Displays Audio Einstellung 19 Einstellen des Mischbetriebs der Sprachführung GUIDE Richtig...

Page 75: ...h der Bedienung des Geräts auftreten oder das angezeigte Bild schlecht erkennbar ist sollten weitere Einstellungen erst nach dem sicheren Parken des Fahrzeugs vorgenommen werden 7 Versuchen Sie niemals das Display eigenhändig einzubauen oder zu warten Der Einbau oder die Wartung des Displays durch ungeschulte Personen die im Umgang mit elektronischer Ausrüstung und Fahrzeugzubehör keine Erfahrung ...

Page 76: ...ildschirm und die Tasten nicht mit zu festem Griff zu halten und das Display nicht fallen zu lassen Achten Sie darauf dass kein Wasser an die Anschlüsse des Displays und des Unterbaus gelangt und dass die Anschlüsse nicht mit Metallobjekten in Berührung kommen die einen Kurzschluss verursachen können Andernfalls kann es zum Ausfall des Systems kommen Berühren Sie die Anschlüsse des Displays und de...

Page 77: ... des Displays zu verhüten nehmen Sie das Display vor dem Verlassen des Wagens ab VORSICHTSMAßNAHME Staub oder sonstige Fremdkörper können mangelhaften Anschlusskontakt verursachen Wenn das Display nicht in Betrieb ist sollte deshalb die mit gelieferte Abdeckung zum Schutz des Steckers verwendet werden Siehe Abbildung unten 4 ENGLISH ESPAÑOL DEUTSCH FRANÇAIS ITALIANO NEDERLANDS Unterbau ...

Page 78: ...tionseinheit verwenden können sich bei diesem Produkt Störungen ergeben wie zum Beispiel ein Ausfallen der Tastbedienpanel Funktion NAVI und NAVI MENU Taste funktionieren unter Umständen nicht ATT Dämpfung und MUTE Stummschaltung funktionieren unter Umständen nicht obwohl diese Funktionen in AUDIO SETTING gewählt werden können Betätigen von Bedienungselementen an der Fernbedienung während Anzeige ...

Page 79: ... der Betrachtungswinkel begrenzt Der Betrachtungswinkel vertikal und horizontal kann mithilfe von BRIGHTNESS durch Verändern der Schwarzdichte des Videobilds vergrößert werden Stellen Sie die Schwarzdichte bei der erstmaligen Benutzung je nach dem Betrachtungswinkel vertikal und horizontal ein sodass das Bild deutlich sichtbar ist Mit DIMMER können Sie die Helligkeit des LCD Bildschirms selbst nac...

Page 80: ...ne dass die DIMMER Einstellung verändert wird Eine Rückstellung des Mikroprozessors führen Sie in den folgenden Fällen durch Bei der erstmaligen Inbetriebnahme nach dem Einbau dieses Produkts Wenn das Gerät nicht einwandfrei funktioniert Wenn ungewöhnliche fehlerhafte Meldungen im Display erscheinen 1 Schalten Sie die Zündung aus OFF ACC OFF 2 Drücken Sie die Taste RESET Verwenden Sie hierzu einen...

Page 81: ... des eingebauten Lautsprechers 0 ein Hinweis Die Lautstärke darf niemals so hoch eingestellt werden dass Umgebungsgeräusche und Notfahrzeuge nicht mehr wahrgenommen können 6 Taste NAVI AV Schaltet das Display auf die gewünschten Anzeigen Dient zum Umschalten zwischen Navigationsbildern und den Bildern der jeweiligen Programmquelle 7 Taste NAVI Mit dieser Taste bringen Sie die Navigationskarte zur ...

Page 82: ...ystems drücken Sie die Taste SOURCE POWER 2 Sekunden lang Einstellung der Lautstärke Stellen Sie die Lautstärke des Audio Ausgangs vom eingebauten Lautsprecher ein Erhöhen oder senken Sie die Lautstärke des Lautsprechers Die Lautstärke des eingebauten Lautsprechers kann zwischen 0 und 30 eingestellt werden Der Lautstärkepegel wird etwa 4 Sekunden lang angezeigt VOL 12 AV I N1 GUIDE ACC ON L O C K ...

Page 83: ...hne DVD Video Wiedergabe bzw keine Komponente am 26 Pol Eingang angeschlossen ist AV IN1 und AV IN2 sind Bild und Ton von an der Eingangsbuchse AV IN1 oder AV IN2 angeschlossener AV Ausrüstung Siehe Seite 26 Kontrollieren Sie auf korrekte Verbindung mit der an AV IN1 oder AV IN2 angeschlossener AV Ausrüstung AV IN2 kann nur gewählt werden wenn entweder ON oder BACK UP CAM unter VIDEO SETTING vorge...

Page 84: ... wird der Breitbildmodus in der nachstehenden Reihenfolge gewählt FULL JUST CINEMA ZOOM NORMAL Verlassen zu FULL Hinweis Die Einstellungen werden für jede Programmquelle NAVI SOURCE AV IN1 AV IN2 gespeichert Wird Video in einem Breitbildmodus betrachtet der nicht dem ursprünglichen Bildverhältnis entspricht können Bildunterschiede auftreten Bitte beachten Sie dass der Gebrauch der Breitbildfunktio...

Page 85: ...wie z B bei Filmen bei denen Untertitel mit der Bildfläche überlappen CINEMA KINO Das Bild wird vertikal auf ein Seitenverhältnis zwischen FULL und ZOOM gedehnt Dieser Breitbildmodus eignet sich für horizontal gestreckte Bilder wie z B bei Filmen bei denen Untertitel in den schwarzen Bereichen außerhalb der Bildfläche angezeigt werden JUST JUSTIERT Das Bild wird zu beiden Seitenrändern hin zunehme...

Page 86: ...Wählen Sie den gewünschten Posten mit 5 oder und drücken Sie dann die Taste MENU ENTER Einzelheiten entnehmen Sie bitte den entsprechenden Textstellen für jede Einstellung Bildeinstellung PICTURE ADJUST nächste Seite Video Einstellung VIDEO SETTING S 16 Audio Einstellung AUDIO SETTING S 19 Zum Verlassen jedes Menüs wählen Sie RETURN und drücken Sie die Taste MENU ENTER MENU P I CTURE ADJUST V I DE...

Page 87: ...ellen Sie den Posten ein Hinweis Die Einstellungen für BRIGHTNESS und CONTRAST werden separat für helle Umgebung Tageszeit und dunkle Umgebung Nachtzeit gespeichert Eine gelbe oder blaue Marke erscheint jeweils rechts von BRIGHTNESS und CONTRAST am Schirm während der Umgebungslichtsensor an der Frontplatte Helligkeit oder Dunkelheit abtastet HUE kann für PAL Video nicht eingestellt werden COLOR un...

Page 88: ... wird ist durch die in Schritt 3 gezeigte Marke und deren Position gekennzeichnet Die Marken zur Anzeige der momentanen Umgebungshelligkeit zur Einstellung von BRIGHTNESS und CONTRAST können etwas unterschiedlich sein Der Umgebungslichtstärkepegel kann auf Dunkel Mittel oder Hell eingestellt und jede Einstellung kann gesichert werden Dieser Pegel zeigt die Helligkeit des einzustellenden Schirms an...

Page 89: ...Wählen Sie die Anschlussweise der externen Programmquellen Einheit rechts von AV IN2 Mit jedem Druck auf die Taste 2 oder 3 wird die Programmquelle in der nachstehenden Reihenfolge gewählt OFF ON BACK UP CAM Verlassen zu OFF Hinweis Bei Wahl von AV IN2 OFF schalten Display und eingebauter Lautsprecher nicht auf AV IN2 VI DEO SE T T I NG AV I N2 O N REAR SOURCE NAV I POLAR I TY BATTERY P I CTURE AD...

Page 90: ...ERY Beim Einlegen der Rückwärtsgang REVERSE R und positiver Polung des angeschlossenen Zuleitungskabels siehe Seite 29 GND Beim Einlegen des Rückwärtsgangs REVERSE R und negativer Polung des angeschlossenen Zuleitungskabels siehe Seite 29 5 Legen Sie den Rückwärtsgang ein nachdem Sie sich vergewissert haben dass der Weg nach hinten frei ist Kontrollieren Sie ob das Bild von der Rückwärtskamera am ...

Page 91: ... angezeigt werden 1 Wählen Sie VIDEO SETTING mit 5 oder vom Setup Menü und drück en Sie die Taste MENU ENTER 2 Ändern Sie die Einstellung der hinteren Programmquelle mit 2 3 Durch Drücken von 2 3 wird zwischen NAVI und SOURCE umgeschaltet NAVI Werden Navigationsbilder am vorderen Display angezeigt so werden auch über den Ausgang für das hintere Display an der Hideaway Einheit Navigationsbilder aus...

Page 92: ...t wählen 1 Bringen Sie das Setup Menü zur Anzeige und wählen Sie AUDIO SET TING Siehe Seite 13 2 Wählen Sie die gewünschte Einstellung Durch Drücken von 2 3 wird zwischen ATT Dämpfung MUTE Stummschaltung und NORMAL Normal umgeschaltet ATT Die Lautstärke wird auf 1 4 eingestellt MUTE Die Lautstärke wird auf 0 gestellt NORMAL Die Lautstärke bleibt unverändert 7 SPEAKER Für Audio vom eingebauten Laut...

Page 93: ...m Inneren des Displays Hochspannungsschaltungen befinden die elektrische Schläge verursachen können Für eine Inspektion der Innenbauteile Einstellungen oder Reparaturen wenden Sie sich bitte an einen Fachhändler oder die näch stgelegene PIONEER Kundendienststelle Handhabung des Displays Bei Nichtgebrauch darf das Display auf keinem Fall direkter Sonnenbestrahlung oder extremen Temperaturen ausgese...

Page 94: ...en Pflege des Farbdisplays Vor dem Entfernen von Staub auf dem Bildschirm oder Säubern des Displays schalten Sie zuerst die Stromversorgung zum System aus OFF und wischen Sie das Display anschließend mit einem weichen Tuch sauber Beim Abwischen des Bildschirms achten Sie darauf die Oberfläche nicht zu verkratzen Verwenden Sie auf keinen Fall ätzende oder schleifende chemische Reinigungsmittel Benu...

Page 95: ...ung kann am Über gangspunkt von Insassenraum zum Motorraum durch die Vibration des Motors beschädigt werden Achten Sie darauf das Kabel in diesem Bereich besonders gut zu befestigen Es ist äußerst gefährlich das Display Kabel um die Lenksäule oder den Gangschalthebel zu wickeln Achten Sie beim Einbau unbedingt darauf dass das Display den Fahrer nicht behindert Vergewissern Sie sich dass die Kabel ...

Page 96: ...erung der Leitung beschädigt was zu einem sehr gefährlichen Kurzschluss führen kann Verkürzen Sie keine Leitungen In diesem Fall kann es vorkommen dass die Schutzschaltung nicht arbeitet wenn sie gebraucht wird Führen Sie niemals anderen Geräten Strom zu indem Sie die Isolierung der Stromversorgungsleitung dieser Einheit durchschneiden und davon Strom abzapfen Dadurch wird die Strombelastbarkeit d...

Page 97: ... VCR DVD Player oder anderer AV Ausrüstung 6 AV IN2 RCA Video Eingang gelb Empfang von Video wie z B von VCR DVD Player Rückwärtskamera oder ander er AV Ausrüstung 7 Taste RESET Rückstellung des Display Mikroprozessors Drücken Sie mit der Spitze eines Kugelschreibers oder eines anderen geeigneten Gegenstands auf den Knopf 8 Stromversorgung Hier wird das mitgelieferte Stromversorgungskabel angeschl...

Page 98: ...ng des Zündschalters immer Batteriestrom führt Anschlussmethode Die Betriebsstromseite des Feststellbremssch alters anklemmen Fest mit einer Nadelzange einklemmen Rot An den Stromkreis anschließen der in der Stellung ACC des Zündschalters Strom führend ist Die Sicherung darf nur durch eine neue Sicherung mit der auf dem Sicherungshalter angegebenen Nennbelastung ersetzt werden Schwarz Masse Fest m...

Page 99: ...ng AV IN2 ist unter Umständen eine Einstellung vorzunehmen Siehe Seite 16 Zu Audio Ausgang Zu Video Ausgang AV IN1 Eingang AV IN2 Eingang Hideaway Einheit AV IN1 RCA Audio Eingang weiß rot AV IN1 RCA Video Eingang gelb Im Handel erhältliche tragbare Video Komponente oder Rückwärtskamera mit RCA Ausgang Handelsübliches RCA Kabel getrennt erhältlich 3 m Braun ...

Page 100: ...e Pioneer Navigationseinheit anschließen 27 Anschluss des Geräts Display Einheit Hideaway Einheit 26 Pol Eingang gelb Gelb Schwarz Pioneer Navigationseinheit im Handel erhältlich 26 Pol Ausgang schwarz 26 Pol Kabel mit Pioneer Navigationseinheit mitgeliefert 3 m Braun ...

Page 101: ...iehe Seite 25 Hideaway Einheit RCA Audio Ausgang weiß rot Handelsübliches RCA Kabel getrennt erhältlich Zu Audio Eingang R Zu Audio Eingang L Zu Video Eingang Zweites Display Video Deck usw RCA Video Ausgang gelb 28 ENGLISH ESPAÑOL DEUTSCH FRANÇAIS ITALIANO NEDERLANDS ...

Page 102: ...ach vollständiger Verkabelung nehmen Sie die entsprechenden Einstellungen für das gewählte Anschlussverfahren vor Siehe Seite 17 VORSICHT Diese Funktion ist nur für Gebrauch mit einer Rückwärtskamera vorgesehen Anwender können den AV IN2 Eingang mit REVERSE GEAR SIGNAL INPUT Rückwärtsgang Signaleingang nur an eine Rückwärtskamera anschließen Anwender dürfen keine anderen Geräte an den Eingang AV I...

Page 103: ...ay nicht an einem Platz an wo es die vollständig geöffneten Airbags behindert Das Display darf nicht an einer Stelle installiert werden an der es die Funktion irgendeines Betriebssystems des Fahrzeugs beeinträchtigt einschließlich Airbags und Kopfstützen Vergewissern Sie sich vor dem Bohren von Löchern in Armaturenbrett oder sonstigen Verkleidungen dass sich dahinter keine Gegenstände befinden Ach...

Page 104: ...en erfüllt Das Blickfeld des Fahrers und die sichere Führung des Fahrzeugs dürfen in keiner Weise behindert werden Das Vorderteil des Fahrzeugs muss bei Betrachtung des Displays im Gesichtsfeld des Fahrers liegen Das Display darf vom Fahrer aus gesehen nicht über der Vorderseite der Haube vorstehen Vor Einbau und Befestigung Führen Sie zunächst nur temporäre Anschlüsse aus und prüfen Sie ob das Di...

Page 105: ...die beiden Polster am Boden des Unterbaus an Um Kratzer auf dem Armaturenbrett zu vermeiden kleben Sie die Polster am Boden des Unterbaus an 2 Befestigen Sie den Display Unterbau und die Halterung am Display Display base Cushions Befestigung des Displays mit der mitgelieferten Halterung Halterung Display Unterbau Display Unterbau Polster ...

Page 106: ...gsposition die ein müheloses Abnehmen des Displays ermöglicht 4 Kleben Sie die Halterung auf das Armaturenbrett Vergewissern Sie sich vor dem Aufkleben dass die Klebefläche frei von Feuchtigkeit Staub Schmutz Öl usw ist Hinweis Die Halterung ist mit starkem Klebstoff beschichtet der Rückstände auf dem Armaturenbrett hinterlassen kann falls die Halterung später wieder entfernt wird 33 Einbau Biegen...

Page 107: ...lung und den Winkel des Displays aus Um das Display zu stabilisieren stellen Sie die vertikale Stellung so ein dass die Unterseite der Displaybasis das Armaturenbrett berührt Stellen Sie das Display auf einen Winkel ein der gute Sichtbarkeit bietet Hinweis Nach dem Ausrichten der vertikalen Stellung und des Winkels des Displays drehen Sie die Knöpfe nach rechts um das Display in dieser Stellung zu...

Page 108: ...von Türen usw wo das Gerät Regen ausgesetzt ist Bei Installation unter einem Vordersitz vergewissern Sie sich dass die Sitzverstellung nicht behindert wird Direkte Installation auf dem Teppichboden ist möglich wenn das harte Klettband am Teppich haftet In diesem Fall verwenden Sie das weiche Klettband nicht Installation der Hideaway Einheit Haften Sie das harte Klettband mitgeliefert an der Unters...

Page 109: ...mperaturbereich 10 bis 50 C Lagerungstemperaturbereich 20 bis 80 C Eingebauter Lautsprecher ø 36 mm Abmessungen 188 B 114 H 37 T mm Gewicht 467 g Hideaway Einheit Externer Video Eingangspegel 1 Vs s 75 Ω Externer Audio Eingangspegel 1 V 22 kΩ Maximale Ausgangsimpedanz 1 Vs s 75 Ω Maximaler externer Audio Ausgangspegel 1 V 1 kΩ Abmessungen 162 B 38 H 85 T mm ausschließlich vorstehender Teile Gewich...

Page 110: ......

Page 111: ...ENGLISH ESPAÑOL DEUTSCH FRANÇAIS ITALIANO NEDERLANDS ...

Page 112: ...Long Beach California 90801 1540 U S A TEL 800 421 1404 PIONEER EUROPE NV Haven 1087 Keetberglaan 1 B 9120 Melsele Belgium TEL 0 3 570 05 11 PIONEER ELECTRONICS ASIACENTRE PTE LTD 253 Alexandra Road 04 01 Singapore 159936 TEL 65 6472 1111 PIONEER ELECTRONICS AUSTRALIA PTY LTD 178 184 Boundary Road Braeside Victoria 3195 Australia TEL 03 9586 6300 PIONEER ELECTRONICS OF CANADA INC 300 Allstate Park...

Reviews: