background image

Fran

ç

ais

Fonctionnement avec 

écran large (WIDE)

9

Fr

Opération de taille d’écran 

(manuel)

Cette fonction permet de sélectionner un des six formats
d’écran.

Visualisation de vidéos ou de disques laser
vidéo

1. Appuyer sur la touche SCREEN SIZE de la

télécommande.

2. 

Dans les 3 secondes qui suivent

Appuyer de nouveau sur cette touche SCREEN SIZE.
Les formats d’écran défilent dans la séquence suivante :

 4:3

 PLEIN

→ 

LARGE

→ 

ZOOM 

→ 

2.35:1 

 14:9

A l’entrée d’un signal 720P ou 1080I:

PLEIN


2.35:1

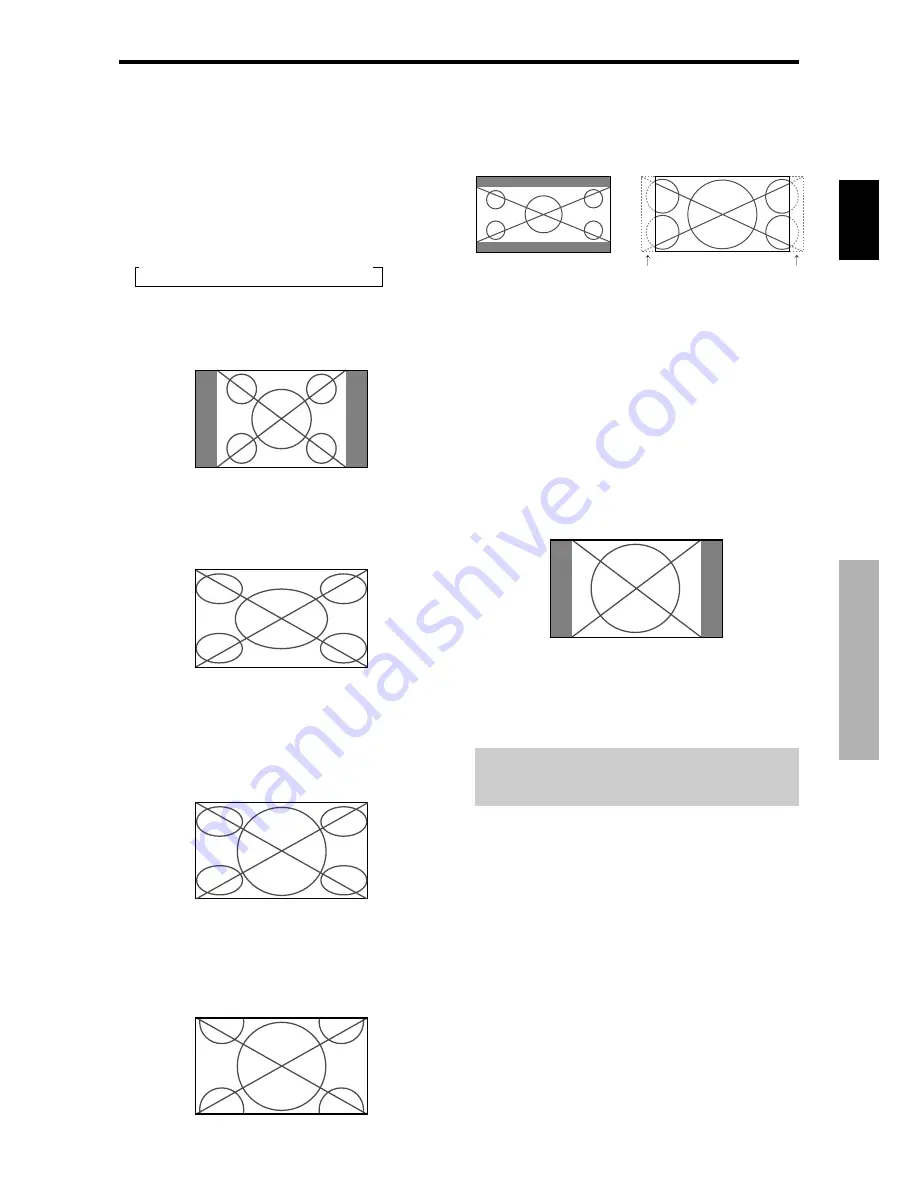
Format d’écran 4:3

L’écran affiche l’image normale.
* L’image a les mêmes proportions que les images vidéo

avec un rapport 4/3.

Format d’écran PLEIN

L’image est étirée sur le plan horizontal
* Les images compressées sur le plan horizontal sont étirées

sur le plan horizontal et affichées sur la largeur totale de
l’écran. (Les images normales sont étirées sur le plan
horizontal.)

Format d’écran LARGE

L’image est agrandie sur les axes vertical et horizontal
avec des rapports différents.
* Utiliser ce format d’écran pour regarder les émissions de

vidéo normales (4/3) sur la totalité du grand écran.

Format d’écran ZOOM

L’image est agrandie sur les axes vertical et horizontal
tout en conservant les proportions originales.
*Utiliser ce mode pour les films de format cinéma (large),

etc.

Format d’écran 2.35:1

L’image filmée comprimée est agrandie au format de
l’écran dans un rapport de 2,35:1. Aucune bande noire
n’est visible en haut ou en bas de l’image mais certaines
informations sont perdues dans les marges gauche et droite.
• Cette fonction est active quand le signal d’entrée est de

type vidéo, composante (480I, 480P, 576I, 576P, 720P,
1080I) ou RGB (signal 525P ou 625P fourni par un
changeur de trame).

* Si une bande noire apparaît en haut ou en bas de l’image

en plein page écran, choisir le format d’écran 2,35:1 pour
éviter les marques de phosphore.

Format d’écran 14:9

L’image est affichée avec un rapport 14:9.
* Cette fonction est disponible pour les signaux d’entrée de

type vidéo, composante ((480I, 480P, 576I, 576P) ou RGB
(signal 525P ou 625P provenant d’un convertisseur de
balayage).

Remarque: 

ne pas laisser l’affichage en mode 4:3

ou mode 14:9 pendant une trop longue période de temps.
Il y a risque de vieillissement des luminophores.

Fonctionnement avec écran large (WIDE)

Perte d’informations de
chaque côté

Image originale

Summary of Contents for 3325A

Page 1: ...Bedienungsanleitung Istruzioni per l utilizzo Manual de instrucciones Инструкция по эксплуатации Gebruiksaanwijzing PLASMA DISPLAY ÉCRAN À PLASMA PLASMA DISPLAY DISPLAY A PLASMA PANTALLA DE PLASMA ПЛАЗМЕННЫЙ ДИСПЛЕЙ PLASMASCHERM PDP 42MVE1 ...

Page 2: ...t useful in the future Note for Dealers After installation be sure to deliver this manual to the customer and explain to the customer how to handle the product Notes on Installation Work This product is marketed assuming that it is installed by qualified personnel with enough skill and competence Always have an installation specialist or your dealer install and set up the product PIONEER cannot as...

Page 3: ... active cells There may be some cells that do not produce light or remain lit For operating safety and to avoid damage to the unit read carefully and observe the following instructions To avoid shock and fire hazards 1 Provide adequate space for ventilation to avoid internal heat build up Do not cover rear vents or install the unit in a closed cabinet or shelves If you install the unit in an enclo...

Page 4: ...to phosphor burn under certain circumstances Certain operating conditions such as the continuous display of a static image over a prolonged period of time can result in phosphor burn if proper precautions are not taken To protect your investment in this plasma monitor please adhere to the following guidelines and recommendations forminimizing the occurrence of image burn Always enable and use your...

Page 5: ...es 89 336 EEC amended by 92 31 EEC and 93 68 EEC Caution This model is for use with the following optional accessories Use with other optional accessories is capable of resulting in instability causing possible injury Speakers PDP S32 LR Table top stand PDK TS09 Wall mount unit PDK WM04 Tilt mount unit PDK WT01 Ceiling mount unit PDK CK01 ...

Page 6: ...Tree 12 Picture Settings Menu 14 Adjusting the picture 14 Setting the picture modes according to the brightness of the room 14 Reducing noise in the picture 14 Setting the color temperature 14 Adjusting the color to the desired level 15 Changing the Gamma Curve 15 Making the Low Tone adjustments 15 Adjusting the colors 15 SOUND Settings Menu 16 Adjusting the treble bass and left right balance and ...

Page 7: ... Failure to follow correct mounting procedures could result in damage to the equipment or injury to the installer Product warranty does not cover damage caused by improper installation Use only the mounting kit or stand provided by manufacturer and listed under Options Drawing B Drawing A How to use the safety metal fittings and the screws for safety metal fittings These are fittings for fastening...

Page 8: ... to the respective monitor INPUT terminals Being used as a video wall function maximaly 4 screen is rough standard with lower than 1024 768 60Hz signal A distribution amplifier is particularly recommended when using 9 screen and over video wall From the second monitor onward connections require a BNC RCA conversion cable or connector a mini D Sub 15 pin cable BNC 5 cable or a conversion connector ...

Page 9: ... 30 The remote control operation may not function if the monitor s remote control sensor is exposed to direct sunlight or strong artificial light or if there is an obstacle between the sensor and the remote control Handling the remote control Do not drop or mishandle the remote control Do not get the remote control wet If the remote control gets wet wipe it dry immediately Avoid heat and humidity ...

Page 10: ...SD mode y VOLUME and Adjusts the volume Functions as the CURSOR buttons in the On Screen Display OSD mode u MENU SET Sets the On Screen Display OSD mode and displays the main menu WARNING The Power on off switch does not disconnect the plasma display completely from the supply mains Part Names and Function Note This plasma monitor has the capasity to display images when connected to European DVD p...

Page 11: ... RGB or component source see page 17 G PC1 mini D Sub 15pin Connect an analog RGB signal from a computer etc here This input can be used for Input or Output see page 24 H PC3 DVI 24pin Connect a digital signal TMDS from a source with a DVI output I RS 232C Never connect any component to this connector without first consulting your Pioneer installation technician This connector is used for plasma d...

Page 12: ...s this button to display the pointer o ZOOM Enlarges or reduces the image 0 VOLUME Adjusts the sound volume 1 MUTING Mutes the sound 2 SCREEN SIZE Automatically detects the signal and sets the aspect ratio SCREEN SIZE button is not active for all signals 3 DISPLAY Displays the source settings on the screen 4 OFF TIMER Activates the off timer for the unit 5 AUTO SET UP Press this button to adjust P...

Page 13: ...le a magnifying glass A press of the ZOOM button will reduce the picture and return it to its original size To change the picture position Select the position with the buttons 2 Press the POINT ZOOM button to delete the pointer AUTO SET UP To adjust the size or quality of the picture automatically Press the AUTO SET UP button Information AUTO SET UP ON setting When RGB still picture input is selec...

Page 14: ...ent ratios Use this for watching normal video programs 4 3 with a wide screen ZOOM size screen The picture is expanded in the horizontal and vertical direction maintaining the original proportions Use this for theater size wide movies etc 2 35 1 size screen The squeezed film image is expanded to fulfill the entire screen at a ratio of 2 35 1 Black bands do not appear at the top and bottom but info...

Page 15: ...ks of IBM Inc of the United States Note Do not allow the displayed in 4 3 mode or 14 9 mode for an extended period This can cause a phosphor burn in SCREEN SIZE Operation with Computer Signals Switch to the wide screen mode to expand the 4 3 image to fill the entire screen 1 Press the SCREEN SIZE button on the remote control 2 Within 3 seconds Press the SCREEN SIZE button again The screen size swi...

Page 16: ...uttons on the remote control 5 The adjustments or the settings that are stored in memory The change is stored until you change it again 6 Repeat steps 2 5 to adjust an additional item or press the EXIT button on the remote control to return to the main menu Whenadjustingusingthebaratthebottomofthescreen press the or button within 5 seconds If not the current setting is set and the previous screen ...

Page 17: ...E L R 22 0 22 YES 16 AUDIO INPUT1 VIDEO 1 3 COMPNT 1 2 PC1DSUB PC2 BNC PC3 DVI YES 16 AUDIO INPUT2 VIDEO 1 3 COMPNT 1 2 PC1DSUB PC2 BNC PC3 DVI YES 16 AUDIO INPUT3 VIDEO 1 3 COMPNT 1 2 PC1DSUB PC2 BNC PC3 DVI YES 16 Main menu Sub menu Sub menu 2 Sub menu 3 Sub menu 4 RESET REFERENCE SCREEN SCREEN SIZE 4 3 FULL WIDE ZOOM 2 35 1 14 9 16 V POSITION 64 0 64 YES 16 H POSITION 128 0 127 YES 16 V SIZE 0 ...

Page 18: ...VIDEO 1 3 COMPNT 1 2 PC1DSUB PC2 BNC PC3 DVI YES 23 KEY LOCK OFF ON YES 23 IR REMOTE OFF ON YES 24 LOOP OUT OFF ON YES 24 ID NUMBER ALL 1 256 YES 24 VIDEO WALL DIVIDER OFF 1 4 9 16 25 YES 24 POSITION No 1 No 4 No 7 No 15 No 16 No 31 No 32 No 56 25 DISP MODE NORMAL ADJUST YES 25 AUTO ID OFF ON YES 25 SCREEN SCREEN SIZE 4 3 FULL WIDE ZOOM 2 35 1 14 9 26 V POSITION 64 0 64 YES 26 H POSITION 128 0 127...

Page 19: ... NEXT PAGE STD OFF SEL ADJ EXIT RETURN AV SELECTION MOVIE 1 Information Types of AV SELECTIONS MOVIE 1 2 Set this mode when watching video in a dark room This mode provides darker finer pictures like the screen in movie theaters For a darker image select MOVIE 2 STD Setthismodewhenwatchingvideoinabrightroom This mode provides pictures with distinct differences between light and dark sections DYNAM...

Page 20: ...he number increases in the sequence of 1 2 3 4 Making the Low Tone adjustments This feature allows more detailed tone to be reproduced especially in the dark area Example Setting 2 Set ADVANCED OSD to ON in the MAIN MENU 1 2 then perform the following operations On LOW TONE of PICTURE menu select 2 PICTURE 2 2 PREVIOUS PAGE COLOR TEMP GAMMA LOW TONE C DETAIL ADJ MID 2 2 SEL ADJ EXIT RETURN Informa...

Page 21: ...tion in the normal mode On V POSITION of SCREEN menu adjust the position The mode switches as follows each time the or button is pressed 4 3 FULL The mode can also be switched by pressing the SCREEN SIZE button on the remote control The settings on the SCREEN menu are not preset at the factory SCREEN SCREEN SIZE V POSITION H POSITION V SIZE H SIZE AUTO PICTURE PHASE CLOCK 4 3 OFF SEL ADJ EXIT RETU...

Page 22: ... lower Setting the PC2 COMPONENT2 connectors Select whether to set the PC2 COMPONENT2 to RGB component or SCART1 2 Example Set the BNC INPUT mode to COMP On BNC INPUT of OPTION1 menu select COMP OPTION1 1 3 OSD BNC INPUT D SUB INPUT RGB SELECT HD SELECT INPUT SKIP ALL RESET NEXT PAGE COMP RGB AUTO 1080B OFF OFF SEL ADJ EXIT RETURN Information BNC INPUT Settings RGB Use the 5BNC terminals for HD VD...

Page 23: ...signals ON If no input signal is present skip that signal SETTING NOW will appear during the input search Setting a computer image to the correct RGB select screen With the computer image select the RGB Select mode for a moving image such as video mode wide mode or digital broadcast Example Setting the RGB SELECT mode to MOTION On RGB SELECT of OPTION1 menu select MOTION OPTION1 1 3 OSD BNC INPUT ...

Page 24: ...reen Red Power management operating status Not activated Activated Description Horizontal and vertical synchronizing signals are present from the computer Horizontal and or vertical synchronizing signals are not sent from the computer Setting the picture to suit the movie The film image is automatically discriminated and projected in an image mode suited to the picture NTSC PAL PAL60 480I 60Hz 525...

Page 25: ...rtical direction TIME Interval of 1 5 minutes 1 horizontal dot or 1 vertical line per interval INVERSE Use this to set the inverse mode or to display a white screen Example Setting INVERSE to WHITE On INVERSE of LONG LIFE menu select WHITE LONG LIFE ABL ORBITER INVERSE SCREEN WIPER SOFT FOCUS AUTO OFF WHITE OFF OFF SEL ADJ EXIT RETURN Information INVERSE Settings ON The picture is displayed altern...

Page 26: ...s the number increases The WAITING TIME can not be set when the WORKING TIME is ON THE WORKINGTIME and WAITINGTIME can be set for up to 12 hours and 45 minutes in units of 3 minutes To select ON for the WORKING TIME Set the hours of the working time to 0H and the minutes to 0M ON will be displayed SOFT FOCUS Reduces edges and softens the image Example Setting SOFT FOCUS to 2 On SOFT FOCUS of LONG ...

Page 27: ...signal BLACK LEVEL is set to LOW automatically STB DVD When connected to the SET TOP BOX DVD etc BLACK LEVEL is set to HIGH automatically BLACK LEVEL settings LOW When connected to the PC signal HIGH When connected to the SET TOP BOX DVD etc Change HIGH into LOW if the black level appears gray Option3 Settings Menu Using the timer This function sets the monitor to turn ON OFF automatically at a se...

Page 28: ...isk means every For example FRI means every Friday and means everyday A hyphen in the ON field or OFF field If any hyphen remains in the ON field or OFF field the FUNCTION can not be set A hyphen in the FUNCTION field A hyphen means last mode the mode that was last selected at the time the power was switched off Setting the power on mode This function sets the input mode at the time the power is s...

Page 29: ...will be displayed regardless of the setting of LOOP OUT ID number setting When using more than one of these displays this function sets ID numbers so that operation of the remote control does not cause multiple monitors to operate at the same time Example Setting 2 Set ADVANCED OSD to ON in the main menu 1 2 then perform the following operations On ID NUMBER of OPTION3 menu select 2 OPTION3 3 3 PR...

Page 30: ... 25 Screens 5 5 video wall When you select 4 25 set the VIDEO WALL POSITION AUTO ID This feature automatically sets the ID numbers of multiple displays connected to each other Example Setting ON Set the ID number for the No 1 display on ID NUMBER menu On AUTO ID of VIDEO WALL menu select ON then press the MENU SET button AUTO ID ON 1 2 4 3 1 2 8 9 3 4 6 5 7 WIRED CABLE CONNECTION TURN ADJ EXIT RET...

Page 31: ...ll turn on and the others will be turned on one by one automatically From the second monitor onward neither the POWER button on the unit nor the POWER ON button on the remotecontrolworks However bypressingandholding the POWER ON button for more than 3 seconds the monitor will be turned on ABL LINK Use this function to set a uniform brightness for each display Turn on the AUTO ID and set the DIVIDE...

Page 32: ...s are available for advanced users OFF Some of the main menu items are not available e g OPTION2 and OPTION3 Color System Settings Menu Setting the video signal format Use these operations to set the color systems of composite video signals or Y C input signals Example Setting the color system to 3 58 NTSC OntheMAINMENU select COLORSYSTEM thenpress the MENU SET button The COLOR SYSTEM screen appea...

Page 33: ...5 16 17 18 19 20 21 22 23 24 Signal Digital T M D S Data 2 T M D S Data 2 T M D S Data 2 Shield No connection No connection DDC Clock DDC Data No connection T M D S Data 1 T M D S Data 1 T M D S Data 1 Shield No connection No connection 5V Power Ground Hot Plug Detect T M D S Data 0 T M D S Data 0 T M D S Data 0 Shield No connection No connection T M D S Clock Shield T M D S Clock T M D S Clock mi...

Page 34: ... YES YES YES YES YES YES YES YES YES YES YES YES YES YES YES YES YES YES YES YES YES YES YES YES YES YES YES YES YES YES YES YES YES YES YES YES 7 YES 7 RGB select 5 STILL STILL WIDE2 WIDE1 STILL STILL STILL STILL STILL WIDE1 WIDE3 WIDE1 WIDE1 WIDE2 WIDE1 WIDE1 WIDE2 STILL WIDE4 WIDE2 WIDE3 WIDE1 WIDE1 MOTION Apple Macintosh 6 8 Horizontal NEG NEG NEG NEG NEG NEG NEG POS NEG POS POS POS POS POS PO...

Page 35: ...OTION 9 CVT standard compliant NOTE While the input signals comply with the resolution listed in the table above you may have to adjust the position and size of the picture or the fine picture because of errors in synchronization of your computer This monitor has a resolution of 853 dots 480 lines It is recommended that the input signal be VGA wide VGA or equivalent With digital input some signals...

Page 36: ...appears on screen Part of picture is cut off or picture is not centered Image is too large or too small Picture is unstable STANDBY ON indicator is lighted in red STANDBY ON indicator is blinking in red STANDBY ON indicator is blinking in green and red or green Checks Are the image and sound normal Is a connected component set directly in front or at the side of the display Are the remote control ...

Page 37: ... down Converter PAL 576I 625I NTSC 480I 525I Digital Zoom Function 100 900 Selectable Video Wall 4 25 multi screen Self Diagnosis Image Burn reduction tools ABL LOCK1 3 INVERSE WHITE ORBITER Auto1 2 Manual SCREEN WIPER Color Temperature select high mid mid low low user has 4 memories Key lock Except power SW Auto Picture Input Skip Color Detail Adjustment Low Tone 3 mode Auto ID Programmable Timer...

Page 38: ...emarque pour le revendeur Après l installation assurez vous de remettre ce mode d emploi à l utilisateur et de lui expliquer comme utiliser ce produit Remarques sur l installation Ce produit est vendu en assumant qu il sera installé par un personnel suffisamment expérimenté et qualifié Faites toujours réaliser le montage et l installation par un spécialiste ou par votre revendeur PIONEER ne peut ê...

Page 39: ...llonge ou une prise murale si les fiches ne peuvent pas être complètement insérées 3 Ne pas exposer cet appareil à la pluie ou à l humidité 4 Eviter d endommager le câble d alimentation et ne pas le modifier 5 Débrancher le câble d alimentation électrique pendant les orages ou les longues périodes d inactivité 6 Ne pas ouvrir le boîtier protégeant les parties dangereuses fonctionnant hauts voltage...

Page 40: ...menu de temps à autre Toujours couper l alimentation après la fin de l utilisation du moniteur Silemoniteuràplasmaestenusagecontinuoudelonguedurée prendre les mesures suivantes afin d éviter l occurence le brûlage du luminophore Abaisser le niveau de l image contraste luminance autant que possible sans faire perdre la lisibilit de l image Afficher une image avec de nombreuses couleurs et graduatio...

Page 41: ......

Page 42: ...tion de la langue des menus 11 Arborescence de menus 12 Menu de réglage de l image 14 Réglage de l image 14 Réglage du mode d affichage en fonction de l éclairage ambiant 14 Réduction du bruit de l image parasites 14 Réglage de la température de couleur 14 Ajustement des couleurs à la qualité désirée 15 Modification de la courbe gamma 15 Réglages des tons bas 15 Réglage des couleurs 15 Menu des ré...

Page 43: ... agréé Si la procédure de montage n est pas correctement suivie l appareil peut être endommagé et l installateur s expose à des risques de blessure La garantie de l appareil ne couvre pas les dégâts occasionnés par une installation Figure B Figure A Ventilation requise pour le montage de l ensemble Afin de dissiper la chaleur laisser un espace libre entre les objets environnants comme indiqué sur ...

Page 44: ...C de 1 à 2 m 3 3 à 6 6 pieds de long d un type disponible dans le commerce Si la qualité de l image est médiocre ne pas raccorder la borne sortie du moniteur Raccorder les signaux composites aux bornesINPUT entrée respectivesdumoniteurenprocédantàl aided unamplificateurdedistribution d untypedisponible dans le commerce Avec la fonction mur d images la projection sur 4 écrans est approximative si l...

Page 45: ...âble Lorsque le mode de télécommande à câble est utilisé la télécommande peut être utilisée même si aucune pile n est insérée Manipulation de la télécommande Ne pas faire tomber ou manipuler incorrectement la télécommande Ne pas mouiller la télécommande Si la télécommande est mouillée l essuyer immédiatement Eviter de l exposer à la chaleur et à l humidité Lorsque la télécommande n est pas utilisé...

Page 46: ...ins fort Réglage du volume Fonctionne comme les boutons du CURSEUR dans le mode d affichage des menus OSD u MENU SET UTILISER L APPAREIL Affiche le mode de menus sur l écran OSD et affiche le menu principal AVERTISSEMENT Le commutateur de Marche Arrêt ne déconnecte pas totalement l affichage plasma de l alimentation secteur Noms des composants et leur fonction REMARQUE Pour les utilisateurs europé...

Page 47: ... réglée pour une utilisation avec une source RGB ou composant voir page 17 G PC1 Raccorder ici les signaux RGB analogiques provenant d un ordinateur ou autre Ce connecteur peut être utilisé en entrée ou en sortie voir page 24 H PC3 DVI à 24 broches Entre un signal RGB numérique TMDS I RS 232 Ne branchez jamais un composant sur cette prise sans consulter au préalable le technicien d installation Pi...

Page 48: ...pour afficher le pointeur o ZOOM Elargit ou réduit la taille de l image 0 VOLUME Réglage du volume sonore 1 MUTING Met le son en sourdine 2 SCREEN SIZE Détecte automatiquement le signal et détermine le rapport hauteur largeur La touche SCREEN SIZE ne fonctionne pas pour tous les signaux 3 DISPLAY Affiche la source sélectionnée à l écran 4 OFF TIMER Active la temporisation de la coupure de l alimen...

Page 49: ...ge et la remettre à sa taille d origine Pour modifier la position de l image Sélectionner la position avec les boutons 2 Appuyer sur le bouton du POINT ZOOM pour le faire disparaître AUTO SET UP REGLAGE AUTO Pour régler automatiquement le format et la qualité de l image Appuyer sur la touche AUTO SET UP Informations Paramètre AUTO SET UP MARCHE Lorsqu une entrée RGB image fixe est sélectionnée Le ...

Page 50: ...a totalité du grand écran Format d écran ZOOM L image est agrandie sur les axes vertical et horizontal tout en conservant les proportions originales Utiliser ce mode pour les films de format cinéma large etc Format d écran 2 35 1 L image filmée comprimée est agrandie au format de l écran dans un rapport de 2 35 1 Aucune bande noire n est visible en haut ou en bas de l image mais certaines informat...

Page 51: ...nc Etats Unis Remarque ne pas laisser l affichage en mode 4 3 ou mode 14 9 pendant une trop longue période de temps Il y a risque de vieillissement dlr luminophor es Opération de taille d écran sur des signaux d ordinateur Commuter vers le mode grand écran pour agrandir l image 4 3 et remplir l écran en entier 1 AppuyersurlatoucheSCREENSIZEdelatélécommande 2 Dans les 3 secondes qui suivent Appuyer...

Page 52: ...mémorisé La modification devient la référence jusqu à nouveau paramétrage 6 Répéter les étapes 2 à 5 pour régler un paramètre supplémentaire ou appuyer sur la touche EXIT sortie de la télécommande pour retourner au menu principal Lors du réglage à l aide de la barre au bas de l écran appuyez sur la touche ou dans les 5 secondes Si vous ne le faites pas la configuration actuelle est sauvegardée et ...

Page 53: ...MPNT 1 2 PC1DSUB PC2 BNC PC3 DVI OUI 16 AUDIO INPUT2 VIDEO 1 3 COMPNT 1 2 PC1DSUB PC2 BNC PC3 DVI OUI 16 AUDIO INPUT3 VIDEO 1 3 COMPNT 1 2 PC1DSUB PC2 BNC PC3 DVI OUI 16 MENU PRINCIPAL SOUS MENU SOUS MENU 2 SOUS MENU 3 SOUS MENU 4 RÉINITIALISATION REFERENCE TRAME TAILLE ÉCRAN 4 3 PLEIN LARGE ZOOM 2 35 1 14 9 16 V POSITION 64 0 64 OUI 16 H POSITION 128 0 127 OUI 16 V HAUTEUR 0 64 OUI 16 H LARGEUR 0...

Page 54: ...R HEURE ENTRÉE FONCTION OUI 23 POWER ON LAST VIDEO 1 3 COMPNT 1 2 PC1DSUB PC2 BNC PC3 DVI OUI 24 VERROU CLÉ ARRET MARCHE OUI 24 IR REMOTE ARRET MARCHE OUI 24 MODE BOUCLE ARRET MARCHE OUI 24 NUMERO ID ALL 1 256 OUI 25 MUR D IMAGE DECOUPAGE ARRET 1 4 9 16 25 OUI 25 POSITION No 1 No 4 No 7 No 15 No 16 No 31 No 32 No 56 25 AFFICHAGE NORMAL RÉGLER OUI 26 AUTO ID ARRET MARCHE OUI 26 TRAME MODE 4 3 PLEIN...

Page 55: ...NÉMA 1 Informations SÉLECTION AV CINÉMA1 2 Choisir ce mode pour visionner une cas sette vidéo dans une pièce sombre Les images sont plus foncées et plus fines comme sur un écran de cinéma Pour une image plus sombre sélectionner CINÉMA2 STD Ce mode s utilise pour regarder laVIDEO dans une pièce éclairée Cemodefournitdesimagesavecunenettedifférenceentre les zones claires et les zones sombres DYNAMIQ...

Page 56: ... est grand dans l ordre 1 2 3 4 plus l image est sombre Réglages des tons bas Cette fonction permet une reproduction plus fine des tons bas en particulier dans les zones sombres Exemple Réglage sur 2 Régler OSD AVANCÉ sur MARCHE dans le MENU PRINCIPAL 1 2 puis procéder à l opération suivante Sur TON BAS dans le menu IMAGE sélectionnez 2 IMAGE 2 2 MEDIUM 2 2 SEL ADJ EXIT RETOUR PAGE TEMP COUL GAMMA...

Page 57: ...AME réglez la position En appuyant sur les touches et les modes défilent dans la séquence suivante 4 3 PLEIN Ce mode peut aussi être activé en appuyant sur la touche SCREEN SIZE de la télécommande Les réglages sur le menu TRAME ne sont pas fixés en usine TRAME 4 3 ARRET SEL ADJ EXIT RETOUR TAILLE ÉCRAN V POSITION H POSITION V HAUTEUR H LARGEUR RÉGLAGE AUTO PHASE HORLOGE V POSITION 64 Informations ...

Page 58: ...D SELECT SELECT SKIP ALL RESET Réglages de ORBITEUR OSD MARCHE Lapositiondumenuestdécaléedehuitpoints chaque fois que OSM est affiché ARRET L OSM s affiche toujours à la même position Réglages de CONTRAST OSD NORMAL La luminosité de OSD est réglée sur normale BASSE La luminosité de OSD est réglée sur faible Réglage des connecteurs PC2 COMPONENT2 Sélectionner l entrée PC2 COMPONENT2 sur RGB système...

Page 59: ...t réglée sur MARCHE les signaux non présents sont ignorés et seules les images dont les signaux sont transmis seront affichées Ce réglage n est possible que pour la touche INPUT EXIT de l appareil Exemple réglage sur MARCHE Sur SELECTSKIP danslemenu OPTION1 sélectionnez MARCHE OPTION 1 1 3 RGB RGB AUTO 1080B MARCHE ARRET SEL ADJ EXIT RETOUR OSD SELECT BNC SELECT D SUB SÉLECT RVB HD SELECT SELECT S...

Page 60: ...dapté Uniquement NTSC PAL PAL60 480I 60Hz 525I 60Hz 576I 50Hz 625I 50Hz 1035I 60Hz et 1080I 60 Hz Exemple Activation du PURECINEMA ARRET Régler OSD AVANCÉ sur MARCHE dans le MENU PRINCIPAL 1 2 puis procéder à l opération suivante Sur PURECINEMA dans le menu OPTION2 sélectionnez ARRET OPTION 2 2 3 ARRET ARRET 3 ARRET SEL ADJ EXIT RETOUR PAGE ECO ÉNERGIE PURECINEMA LONGUE DURÉE MASQUE CÔTÉ S1 S2 DVI...

Page 61: ...rection verticale toutes les 3 minutes Sur ROTATION PIX dans le menu LONGUE DURÉE sélectionnez MANUEL puis appuyez sur la touche MENU SET L écran ROTATION PIX apparaît Réglez les éléments ROTATION PIX 2 DOT 4 LINE 3 M SEL ADJ EXIT RETOUR PIXEL H LIGNE V DURÉE Informations Réglages de la fonction ROTATION PIX PIXEL H Déplacement de 1 à 20 pixels dans la direction horizontale LIGNE V Déplacement de ...

Page 62: ...PS FONCT Régler les heures du TEMPS FONCT sur 0h et les minutes sur 0mn MARCHE apparaît Informations Paramétrage du temps TEMPS FONCT Permet de régler la durée du mode SCREEN WIPER Si le TEMPS FONCT est réglé sur MARCHE cette durée est infinie TEMPS ATTEN Permet de régler le temps d attente avant l entrée dans le mode SCREEN WIPER VITESSE Permet de régler la vitesse de la commutation par SCREEN WI...

Page 63: ...ance des noirs niveau de gris sur les côtés de l écran Le réglage standard est 0 noir Le niveau peut être ajusté de 0 à 15 Le réglage d usine est 3 gris foncé Réglage du niveau des noirs et du signal pour un signal DVI Choisir le signal du connecteur DVI PC ou STB DVD et régler le niveau des noirs Exemple Réglage du mode PLUG PLAY sur STB DVD Régler OSD AVANCÉ sur MARCHE dans le MENU PRINCIPAL 1 2...

Page 64: ...ZOOM ADJ Astérisque dans le champs DATE Un astérisque signifie chaque VEN par exemple signifie chaque vendredi et signifie tous les jours Trait d union dans le champs ON ou le champs OFF Il n est pas possible de régler la rubrique FONCTION si le champs ON ou le champs OFF comporte un trait d union Trait d union dans le champs FONCTION Le trait d union correspond au dernier mode le dernier mode act...

Page 65: ...re utilisée pour PROGRAMMATION HORLOGE Voir page 23 Mise en hors fonction de la transmission des télécommandes par câble Cette fonction permet de mettre en hors fonction la transmission des télécommandes par câble Exemple Réglage ARRET Régler OSD AVANCÉ sur MARCHE dans le MENU PRINCIPAL 1 2 puis procéder à l opération suivante Sur IR REMOTE dans le menu OPTION3 sélectionnez ARRET puis appuyez sur ...

Page 66: ...ID Pour revenir au réglage ALL tout Appuyer sur la touche CLEAR Réglage du mur d images Cette fonction permet de configurer un mur d image 4 25 Régler OSD AVANCÉ sur MARCHE dans le MENU PRINCIPAL 1 2 puis procéder à l opération suivante Sur le menu OPTION3 sélectionnez MUR D IMAGE puis appuyez sur la touche MENU SET L écran MUR D IMAGE apparaît 1 NORMAL ARRET ARRET ARRET ARRET MUR D IMAGE SEL ADJ ...

Page 67: ...ET AUTO ID AUTO ID MARCHE ADJ EXIT RETOUR 1 2 4 3 1 2 8 9 3 4 6 5 7 CONNECTION EN SÉRIE DES MONITEURS TRAME Il est possible de régler la position de l image et d en corriger le scintillement Exemple réglage de la position verticale en mode normal Sur le menu MUR D IMAGE sélectionnez TRAME puis appuyez sur la touche MENU SET L écran TRAME apparaît Sur V POSITION dans le menu TRAME réglez la positio...

Page 68: ...ER ON de la télécommande le moniteur n 1 s allumera et les autres s allumeront automatiquement un par un A partir du second moniteur ni la touche POWER sur l unité ni la touche POWER ON de la télécommande ne fonctionnent Toutefois en maintenant appuyée la touche POWER ON pendant plus de 3 secondes le moniteur s allumera REPEAT TIMER Cette fonction comporte deux minuteries Chaque minuterie peut com...

Page 69: ...MES 3 58NTSC ADJ EXIT RETOUR TV SYSTÈMES Informations Format de signaux de télévision couleur Les signaux vidéo ont un format différent suivant les pays Paramétrez sur le code chromatique en usage dans votre pays AUTO Les codes chomatiques sont identifiés automatiquement et le format est paramétré en conséquence PAL Ce standard est principalement utilisé au Royaume Uni et en Allemagne SECAM Cestan...

Page 70: ...nées 0 pour T M D S Libre Libre Protection de l horloge pour T M D S Horloge pour T M D S Horloge pour T M D S Broche n 1 2 3 4 5 6 7 8 9 10 11 12 13 14 15 Signal Numérique Rouge VERT ou Sync sur Vert BLEU Libre Mise à la terre Rouge mis à la terre Vert mis à la terre Bleu mis à la terre Libre Mise à la terre du signal Sync Libre Données DATA b directionnel SDA Synchro horizontale ou synchro compo...

Page 71: ...I OUI OUI OUI OUI OUI OUI OUI OUI OUI OUI OUI OUI OUI OUI OUI OUI OUI OUI OUI OUI OUI OUI OUI NORMAL 4 3 OUI 2 3 OUI 3 OUI 3 OUI 3 OUI 3 OUI 3 OUI 3 OUI OUI OUI OUI OUI OUI OUI OUI OUI OUI OUI OUI OUI OUI 4 OUI 4 OUI 4 OUI 4 OUI OUI OUI OUI OUI OUI 3 OUI OUI OUI OUI 4 OUI 4 OUI 4 OUI OUI OUI 4 OUI OUI 4 OUI 7 OUI 7 COMPLET 16 9 OUI OUI OUI OUI OUI OUI OUI OUI 3 OUI 3 OUI OUI OUI OUI OUI OUI OUI OU...

Page 72: ... IMA MOV 9 Conforme à la norme CVT REMARQUE Même si les signaux d entrée sont conformes à la résolution indiquée dans le tableau ci dessus il pourra être nécessaire de régler la position et le format de l image ou le piqué en raison d erreurs de synchronisation de l ordinateur Ce moniteur a une résolution de 853 points 480 lignes Il est recommandé d utiliser un signal d entrée VGA wide VGA ou équi...

Page 73: ...indre rapidement l appareil principal Voir 2 Symptôme L appareil émet un bruit de craquement L image est déformée Le son est bruyant La télécommande fonctionne de façon erronée La télécommande ne fonctionne pas Le moniteur ne s allume pas lorsque l on appuie sur la touche marche de la télé commande Le moniteur ne fonctionne pas lorsque l on appuie sur les touches de la télécommand Les boutons du p...

Page 74: ...I 60Hz Convertisseur d appel 2 2 PAL 576I 625I NTSC 480I 525I Fonction zoom numérique réglable 100 900 Mur d images 4 25 à multi écrans Auto diagnostic Anti image rémanente ABL VERROU1 3 INVERS ON ROTATE PIX Auto1 2 Manuel SCREEN WIPE Sélection de la température des couleurs haut medium basse basse 4 réglages utilisateur mémorisables Verrouillage des commandes sauf alimentation électrique Auto ima...

Page 75: ......

Page 76: ...che Dienste leisten Hinweis für den Fachhändler Achten Sie nach der Installation darauf dem Kunden diese Anleitung auszuhändigen und ihm die Handhabung des Produkts zu erklären Hinweis zur Installation Dieses Produkt ist für die Installation durch einen Fachmann bestimmt Der Käufer muss dieses Produkt entweder von einem qualizifierten Techniker oder vom Fachhändler installieren und einrichten lass...

Page 77: ...ent aktiven Zellen U U produzieren einige Zellen kein Licht bzw leuchten ständig Für die Betriebssicherheit und zur Vermeidung von Beschädigungen des Gerätes lesen Sie folgende Hinweise bitte sorgfältig durch und befolgen Sie sie Um Schock und Feuerrisiken zu vermeiden 1 Stellen Sie zur Vermeidung von inneren Hitzestaus ausreichenden Raum für die Belüftung sicher Decken Sie die rückwärtigen Belüft...

Page 78: ... Ihren Plasma Monitor gegen eine solche Entwertung zu schützen beachten Sie bitte die nachstehenden Hinweise und Empfehlungen um das Risiko einer Phosphor Einbrennung zu reduzieren Bei der Benutzung als Computerbildschirm stets die Bild schirmschonerfunktionaktivierenunddenBildschirmschonerverwenden Soweit wie möglich keine Standbilder anzeigen Ändern Sie die Position der Menüanzeige von Zeit zu Z...

Page 79: ......

Page 80: ... 11 Einstellung der Sprache fur die Menüs 11 Menü Baum 12 Bild Einstellungsmenü 14 Einstellung des Bildes 14 Einstellung der Bildbetriebsart entsprechend der Raumhelligkeit 14 Reduzierung von Bildstörungen 14 Einstellung der Farbtemperatur 14 Einstellung der Farbe auf die gewünschte Qualität 15 Ändern der Gammakurve 15 Einstellen der niedrigen Farbtöne 15 Farbeinstellungen 15 Ton Einstellungsmenü ...

Page 81: ...das Gerät beschädigt oder der Installateur verletzt werden Die Produktgarantie deckt keine Schäden ab die von einer unsachgemäßen Installation herrühren Zeichnung B 50mm 2 50 mm 2 50 mm 2 Wand Wand 50mm 2 50mm 2 Zeichnung A Ventilationsanforderungen für Gehäusebefestigung Lassen Sie bei der Instalation Platz swischen umgebenen Gegenständen wie im DIagram beschrieben damit Hitze sich verteilen kann...

Page 82: ...INPUT Eingängen der Monitore zuleiten Die LOOPOUT Funktion ist in der Regel auf vier Monitore von denen die Signale an weitere Monitore weitergeschleift werden beschränkt Für einwandfreie Funktion darf die Auflösung nicht 1024 768 Bildpunkte überschreiten und die vertikale Frequenz muß kleiner sein als 60 Hz Besonders bei einer Videowand mit 9 Bildschirmen oder mehr wird ein Distributionsverstärke...

Page 83: ... Die Fernbedienung könnte nicht funktionieren wenn der Fernbedienungssensor des Monitors direkter Sonnenbestrahlung oder starkem Kunstlicht ausgesetzt ist oder wenn sich ein Hindernis zwischen dem Sensor und der Fernbedienung befindet Etwa 7m 23 Fuß Handhabung der Fernbedienung Lassen Sie die Fernbedienung nicht fallen und hand haben Sie sie nicht falsch Die Fernbedienung nicht naß werden lassen W...

Page 84: ...andby Betrieb ist Leuchtet rot r Eingangs Ausgangswähler INPUT EXIT Mit dieser Funktion können Inputwechsel vorgenommen werden Die verfügbaren Eingänge sind abhängig von der Einstellung von BNC SIGNAL D SUB SIGNAL RGB WÄHLEN und DVI SET UP Funktioniert wie die EXIT Tasten im Anzeigebildschirm Modus OSD Vorderansicht Bezeichnung und Funktion der Komponenten Hinweis Für kunden in Europa welche einen...

Page 85: ...er Komponentenquelle siehe Seite 17 eingestellt werden G PC1 Für den Eingang eines analogen RGB Signals von einem Computer usw Dieser Anschluß kann sowohl als Eingang als auch Ausgang genutzt werden siehe Seite 24 H PC3 DVI 24 pol Schließen Sie ein digitales Signal TMDS von einer Quelle mit DVI Ausgang an I RS 232C Stellen Sie AUF KEINEN FALL ohne vorherige Konsultation des technischen Personals v...

Page 86: ...ese Taste um den Zeiger anzeigen zu lassen o ZOOM Vergrößert oder verkleinert das Bild 0 VOLUME Einstellung der Lautsträrke 1 MUTING Blendet den Ton aus 2 SCREEN SIZE Das Eingangssignal wird automatisch erkannt und das entsprechende Bildseitenverhältnis eingestellt Diese Taste ist nicht für alle Signalarten verfügbar 3 DISPLAY Zeigt die Einstellung der Signalquellen an 4 OFF TIMER Aktiviert den Ab...

Page 87: ...igt wird wird das Bild verkleinert und dann auf sein Originalformat wiederhergestellt Zum Ändern der Bildposition Wählen Sie die Position mit Hilfe der Tasten aus 2 Drücken Sie die POINT ZOOM Taste um den Zeiger wieder ver schwinden zu lassen AUTO SET UP Zum automatischen Einstellen der Größe bzw Qualität des Bilds Drücken Sie die Taste AUTO SET UP Information AUTO SET UP EIN Einstellung Bei Wahl ...

Page 88: ...schirm ZOOM Bilddarstellung Das Bild wird in horizontaler und vertikaler Richtung in den originalen Proportionen vergrößert VerwendenSiediesesFormatfürCinema Filme Breitbild etc 2 35 1 Bildschirmformat Das zusammengedrückte Filmbild wird so weit gedehnt dass es die gesamte Bildschirmfläche in einem Verhältnis von 2 35 1 ausfüllt Dabei erscheinen zwar keine schwarzen Streifen am oberen und unteren ...

Page 89: ...hinesInc in den USA Hinweis Das Gerät nicht über lange Zeit im 4 3 Betrieb oder 14 9 Betrieb geschaltet lassen Andernfalls besteht Bildeinbrenngefahr Ansehen von Computerbildern im Breitbildformat Für die Vergrößerung des 4 3 Bildes auf die gesamte Bildschirmgröße auf den Breitbildformat Modus umschalten 1 Drücken Sie die SCREEN SIZE Taste auf der Fernbedienung 2 Innerhalb 3 Sekunden Drücken Sie n...

Page 90: ...n 6 Wiederholen Sie die Schritte 2 bis 5 zur Einstellung einer weiteren Funktion oder drücken Sie die EXIT Taste der Fernbedienung um zum Hauptmenü zurückzukehren Wenn Sie die Einstellung mit Hilfe der sich unten auf dem Bildschirm befindlichen Leiste ausführen drücken Sie innerhalb von 5 Sekunden die oder Taste Falls nicht ist die aktuelle Einstellung aktiviert und der vorherige Bildschirm ersche...

Page 91: ...JA 16 AUDIO2 VIDEO 1 3 COMPUNT 1 2 PC1DSUB PC2 BNC PC3 DVI JA 16 AUDIO3 VIDEO 1 3 COMPUNT 1 2 PC1DSUB PC2 BNC PC3 DVI JA 16 Hauptmenü Untermenü Untermenü 2 Untermenü 3 Untermenü 4 Zurückstellen Bezugswert BILDSCHIRM BILDGROSSE 4 3 VOLL BREIT ZOOM 2 35 1 14 9 16 V POSITION 64 0 64 JA 16 H POSITION 128 0 127 JA 16 V BILDHOEHE 0 64 JA 16 H BILDBREITE 0 64 JA 16 AUTO PICTURE AUS EIN 2 NEIN 16 PHASE 1 ...

Page 92: ... 24 ID NUMMER ALL 1 256 JA 24 VIDEO WAND TEILER AUS 1 4 9 16 25 JA 25 POSITION No 1 No 4 No 7 No 15 No 16 No 31 No 32 No 56 25 DISP MODE NORMAL EINST JA 25 AUTO ID AUS EIN JA 25 BILDSCHIRM BILDGROSSE 4 3 VOLL BREIT ZOOM 2 35 1 14 9 26 V POSITION 64 0 64 JA 26 H POSITION 128 0 127 JA 26 V BILDHOEHE 0 64 JA 26 H BILDBREITE 0 64 JA 26 AUTO PICTURE AUS EIN 2 NEIN 26 PHASE 1 2 0 64 JA 26 CLOCK 1 2 0 64...

Page 93: ...FILM1 2 Stellen Sie diesen Betrieb ein wenn SieVideo in einem dunklen Raum ansehen wollen Dieser Betrieb erzeugt dunklere und hochwertigere Bilder wie auf der Leinwand eines Filmtheaters Für ein dunkleres Bild FILM2 wählen STD Stellen Sie diesen Betrieb ein wenn Sie VIDEO Bilder in einem hellen Raum betrachten wollen Diese Betriebsart erzeugt Bilder mit klaren Unterschieden zwischen hellen und dun...

Page 94: ... ADJ EXIT ZURÜCK Information GAMMA Einstellungen Das Bild wird mit aufsteigender Zahl 1 2 3 4 dunkler Einstellen der niedrigen Farbtöne Diese Funktion erlaubt eine detaillierte Wiedergabe der niedrigen Farbtöne insbesondere in dunklen Bildbereichen Beispiel Einstellung 2 Stellen Sie im HAUPT MENUE 1 2 ERWEIT OSD auf EIN Dann Wählen Sie unter LOW TONE im BILD Menü 2 BILD 2 2 VORHERIGE FARBTEMP GAMM...

Page 95: ...ion ein Die Betriebsart schaltet beim Drücken einer der Tasten oder wie folgt um 4 3 VOLL Die Betriebsart kann auch durch Drücken der SCREEN SIZE Taste auf der Fernbedienung direkt gewählt werden Die Einstellungen des Bildschirmmenüs sind vom Werk nicht voreingestellt BILDSCHIRM BILDGRÖSSE V POSITION H POSITION V BILDHOEHE H BILDBREITE AUTO PICTURE PHASE CLOCK 4 3 AUS SEL ADJ EXIT ZURÜCK V POSITIO...

Page 96: ...AUS AUS 1024 768 SEL EXIT ZURÜCK OK MENU OSD ORBITER Einstellungen EIN Die Position des Menüs wird jedesmal neu um 8 Punkte verschoben AUS Die Position des Menüs im Bildschirm bleibt unverändert OSD KONTRAST Einstellungen NORMAL OSD Helligkeit ist normal eingestellt NIEDRIG OSD Helligkeit ist gering eingestellt Einstellung der PC2 COMPONENT2 Steckverbinder Den Eingang der PC2 COMPONENT2 auf RGB Ko...

Page 97: ...n Signals mit einer Horizontalfrequenz von 59 8 kHz oder einem 1680 Punkte x 1050 Zeilen Signal mit einer Horizontalfrequenz von 60 kHz kann das Bild in der Waagerechten komprimiert werden Um dies zu verhindern stellen Sie RGB WÄHLEN auf WIDE4 DTV Dieses Modell einstellen wenn digitale Übertragungen 480P angesehen werden Bezüglich Einzelheiten zu den obigen Einstellungen siehe Seite 30 WählenSieun...

Page 98: ...geeingnet ist nur NTSC PAL PAL60 480I 60Hz 525I 60Hz 576I 50Hz 625I 50Hz 1035I 60Hz 1080I 60Hz Beispiel Einstellung von der PURECINEMA auf AUS Stellen Sie im HAUPT MENUE 1 2 ERWEIT OSD auf EIN Dann Wählen Sie unter PURECINEMA im OPTION2 Menü AUS OPTION2 2 3 VORHERIGE POWER MGT PURECINEMA LANGZEIT SEITENMASKE S1 S2 DVI SET UP NÄCHSTE AUS AUS 3 AUS SEL ADJ EXIT ZURÜCK Information PURECINEMA EIN Auto...

Page 99: ... Zeilen in vertikaler Richtung ZEIT Zeitintervalle zwischen 1 und 5 Minuten 1 Punkt in horizontaler oder 1 Zeile in vertikaler Richtung pro Intervall INVERSION Zur Einstellung des Inversions Modus oderAnzeige eines weißen Bildschirms Beispiel Einstellung INVERSION auf WEISS Wählen Sie unter INVERSION im LANGZEIT Menü WEISS LANGZEIT ABL ORBITER INVERSION SCREEN WIPER SOFT FOCUS EIN AUS WEISS AUS AU...

Page 100: ...ige Geschwindigkeiten In Stellung EIN von ARBEITSZEIT ist keine Einstellung der Dauer der Wartezeit möglich ARBEITSZEIT und WARTEZEIT sind in 3 Minuten Schrittenaufmax 12Stundenund45Minuten einstellbar Auswahl von EIN für die ARBEITSZEIT Bei Einstellung der ARBEITSZEIT auf 0H und die Minuten auf 0M wird EIN angezeigt SOFT FOCUS Reduziert Kanten und erhöht die Weichzeichnung des Bildes Beispiel Ein...

Page 101: ... Punkte ein SEL ZEIT AKTUELL MITTWOCH 22 05 00 ZURÜCK SUMMER TIME SET AUS ADJ EXIT ZURÜCK Wählen Sie SET und drücken Sie dann die MENU SET Taste DieEinstellungenwerdengespeichertundeserscheintwieder das TIMER Menü Falls Sie an Stelle der EXIT Taste die MENU SET Taste drücken können keine Einstellungen ausgeführt werden SEL ZEIT AKTUELL MITTWOCH 22 05 00 AUS ZURÜCK SUMMER TIME SET EXIT ZURÜCK OK ME...

Page 102: ...tag und bedeutet Täglich Querstrich im EIN oder AUS Feld Solange in diesen Felder ein Querstrich verbleibt ist keine Einstellung von FUNKTION möglich Querstrich im FUNKTION Feld Ein Querstrich bedeutet Zuletzt gültiger Modus die Betriebsart die beim letzten Ausschalten des Monitors gültig war Einstellen des Einschaltmodus PWR ON MODE Mit dieser Funktion läßt sich das Eingangssignal einstellen daß ...

Page 103: ...llung von SIGNAL AUSG Angezeigt Einstellen der ID Nummer BeiVerwendung von mehreren Monitoren können Sie den einzelnen Monitoren individuelle ID Nummern zuordnen damit bei Fernbedienung wirklich nur der beabsichtigte Monitor angesteuert wird Beispiel Einstellung 2 Stellen Sie im HAUPT MENUE 1 2 ERWEIT OSD auf EIN Dann Wählen Sie unter ID NUMMER im OPTION3 Menü 2 OPTION3 3 3 VORHERIGE TIMER PWR ON ...

Page 104: ... TEILER POSITION DISP MODE AUTO ID BILDSCHIRM P ON VERZÖG ABL LINK REPEAT TIMER 1 EINST AUS AUS AUS AUS SEL ADJ EXIT ZURÜCK Information DISP MODE Einstellungen NORMAL Kombiniert vergrößerte Bildschirmanzeigen zur Erzeugung von Multi Bildschirmen EINST Korrigiert Fehlausrichtung von kombinierten Bildschirmanzeigen zur Erzeugung von Multi Bildschirmen AUTO ID Diese Funktion dient zur automatischen Z...

Page 105: ...derMonitorNo 1angeschaltetund die anderen folgen automatisch nacheinander Vom zweiten Monitor an reagiert weder die POWER Taste am Gerät noch die POWER ON Taste auf der Fernbedienung Durch Gedrückthalten der POWER ON Taste für mehr als 3 Sekunden wird der Monitor wieder angeschaltet ABL LINK Diese Funktion dient zur Einstellung einer gleichmäßigen Helligkeit für alle Monitore Schalten Sie AUTO ID ...

Page 106: ...RCE Signaleingang und ARBEITSZEIT berücksichtigen Schalten Sie AUTO ID ein und stellen Sie DIVIDER vor den folgenden Bedienschritten entsprechend auf 1 4 oder 9 ein Beispiel TIMER1 VIDEO1 wird 3 Minuten lang angezeigt TIMER2 PC1 wird 6 Minuten lang in einer 2 2 Video Wand angzeigt Wählen Sie unter REPEATTIMER im VIDEOWAND Menü zunächst EIN und drücken Sie dann die MENU SET Taste Der REPEAT TIMER B...

Page 107: ...und Deutschland verwendete Standardformat SECAM Dies ist das hauptsächlich in Frankreich und Rußland verwendete Standardformat 4 43 NTSC PAL60 Dieses Format wird für Videos in Ländern verwendet die PAL und SECAM VIDEO Formate verwenden 3 58 NTSC Dies ist das hauptsächlich in den USA und in Japan verwendete Standardformat PAL M DiesistdashauptsächlichinBrasilienverwendete Standardformat PAL N Dies ...

Page 108: ...rün Blau Offen Erde Rote Erde Grüne Erde Blaue Erde Offen Synch Signal Erde Offen Bi direktional DATA SDA Horizontalsynchronisation oder Bildaustast Synchronisation Vertikale Synch Datentakt Pin Nr 1 2 3 4 5 6 7 8 9 10 11 12 13 14 15 16 17 18 19 20 21 22 23 24 Signal Digital T M D S Daten 2 T M D S Daten 2 T M D S Daten 2 Abschirmung Offen Offen DDC Takt DDC Daten Offen T M D S Daten 1 T M D S Dat...

Page 109: ...JA JA JA JA JA JA JA JA JA JA JA JA JA JA JA JA JA JA JA JA JA JA JA JA JA JA JA JA Signaltyp PAL625P NTSC525P Modell Work Station EWS4800 8 WorkStation HP 8 Work Station SUN 8 Work Station SGI IDC 3000G Vertikal frequenz Hz 70 1 59 9 72 8 75 0 85 0 100 4 120 4 60 0 60 0 56 3 60 3 72 2 75 0 85 1 99 8 120 0 60 0 70 1 75 0 85 0 100 6 75 0 56 2 59 8 69 8 60 0 60 0 60 0 60 0 59 9 60 0 75 0 85 0 100 1 ...

Page 110: ...uf BEWEGT 9 CVT Standard kompatibel HINWEIS Obwohl die Eingangssignale mit der in der Tabelle oben aufgeführten Auflösung übereinstimmen müssen Position und Größe des Bilds bzw Feinbilds unter Umständen wegen Synchronisierfehlern des Computers eingestellt werden Dieser Monitor unterstützt Auflösungen von 853 Punkten 480 Linien Das Eingangssignal sollte der Norm VGA oder VGA Breit entsprechen bzw d...

Page 111: ... Bild beim VIDEO Signaleingang Schlechtes Bild beim RGB Signaleingang Schlechter Farbton oder schwache Farben Nichts erscheint auf dem Bildschirm Teile des Bildes fehlen oder das Bild ist nicht zentriert Das Bild ist zu groß oder zu klein Das Bild ist instabil STANDBY ON Anzeige leuchtet rot STANDBY ON Anzeige blinkt rot STANDBY ON Anzeige blinkt grün und rot oder grün Überprüfungen Sind Bild und ...

Page 112: ...6I 625I NTSC 480I 525I Digital Zoom 100 bis 900 wählbar Video Wand mit 4 25 Monitoren Selbstdiagnose Einbrennschutz ABL LOCK 1 bis 3 INVERSE WHITE ORBITER Auto 1 2 Manuell WISCHER Farbtemperaturwahl hoch mittel halbniedrig niedrig 4 Werte speicherbar Tastensperre ausgenommen Hauptschalter Auto Bild Eingangswahl Farbabstimmung Tonart 3 Modi Auto ID programmierbarer Timer Gammakorrektur 4 Modi Durch...

Page 113: ......

Page 114: ... consegnare questo manuale al cliente e di spiegare al cliente stesso le modalità di uso del prodotto Nota sulle operazioni di installazione Precauzioni Questo prodotto viene venduto presumendo che venga installato da personale qualificato con sufficiente capacità e competenza Richiedere sempre ad uno specialista di installazioni o al rivenditore di procedere all installazione e messa in opera del...

Page 115: ...rischio di scosse elettriche 7 Non cercare di sottoporre a manutenzione oppure riparare l unità Il costruttore non può essere ritenuto responsabile per qualsivoglia tipo di lesione fisica o danni causati dal tentativo da parte di personale non qualificato di riparare o semplicemente aprire il pannello posteriore L assistenza deve essere sempre effettuata dai Centri di Assistenza Autorizzati Inform...

Page 116: ... e del contrasto il più possibile senza impedire la leggibilità dell immagine Visualizzate un immagine con molti colori e gradazioni di colori per esempio immagini fotografiche o molto realistiche Create un immagine con un contrasto minimo tra le aree chiare e quelle scure per esempio caratteri bianchi su degli sfondi scuri Quando possibile usate colori complementari o colori pastello Evitate di v...

Page 117: ......

Page 118: ... immagine 14 Impostazione del modo immagine a seconda della luminosità della stanza 14 Riduzione delle interferenze all interno dell immagine 14 Impostazione della temperatura del colore 14 Regolazione del colore alla qualità desiderata 15 Modifica della curva gamma 15 Regolazione dei bassi toni 15 Regolazione dei colori 15 Menu impostazioni SUONO 16 Regolazione di alti bassi e bilanciamento sinis...

Page 119: ... si potrebbero verificare dei danni all attrezzatura o lesioni alla persona La garanzia del prodotto non copre i casi di installazione errata Figura B Figura A Requisiti per la ventilazione nel caso di montaggio in luogo chiuso Per permettere al calore di disperdersi lasciate spazio sufficiente tra gli oggetti come mostrato nel diagramma sotto Modalità di utilizzo degli accessori metallici di sicu...

Page 120: ...ribuzione un tipo qualsiasi disponibile in commercio Impiegato nella funzione di parete video nella configurazione massima da 4 schermi con segnale di risoluzione 1024 768 a 60 Hz permette di ottenere un livello di visualizzazione approssimato Un amplificatore di distribuzione è particolarmente raccomandato quando si utilizza uno schermo 9 e sopra una parete video Dal secondo monitor in poi le con...

Page 121: ...dicontrollosituatosullatoanteriore del monitor e ad angoli orizzontali e verticali che non superino i 30 Iltelecomandopuònonfunzionareseilsensoredelmonitor viene esposto alla luce diretta del sole oppure ad una forte luce artificiale o se vi è un ostacolo tra il sensore ed il telecomando Utilizzo del telecomando Non lasciarlo cadere e non sottoporlo a forti scosse Non lasciatelo in ambienti umidi ...

Page 122: ...o il monitor è in standby luce rossa r Tasti INPUT EXIT Commuta l ingresso Gli input disponibili dipendono dall impostazione di SCELTA BNC D SUB INPUT SCELTA RGB e DVI SET UP Funziona nello stesso modo dei tasti EXIT nel modo del display di visualizzazione sullo schermo OSD Nomi e funzioni delle componenti Vista frontale Nota Per utenti Europei che necessitano connettere DVD con uscita scart Quest...

Page 123: ...nente vedere pagina 17 G PC1 In questo punto collegate il segnale RGB analogico proveniente dal computer Questo ingresso può essere utilizzato come ingresso o uscita vedere a pagina 24 H PC3 DVI 24 pin Immette un segnale RGB digitale TMDS I RS 232C Non effettuare mai alcun collegamento a questo connettore senza aver prima consultato il tecnico esperto di installazioni della Pioneer Questo connetto...

Page 124: ...ZOOM Serve per ingrandire o ridurre l immagine 0 VOLUME Tasti del volume Regola il volume sonore 1 MUTING Pulsante di silenziamento audio Silenzia il suono 2 SCREEN SIZE Pulsante di schermo ampio Rileva automaticamente il segnale ed imposta il rapporto di aspetto Il tasto SCREEN SIZE non è attivo per tutti i segnali 3 DISPLAY Visualizza le impostazioni della fonte sullo schermo 4 OFF TIMER Timer d...

Page 125: ...ento Alla pressione del pulsante ZOOM l immagine viene ridotta al suo formato originale Per cambiare la posizione dell immagine Selezionate la posizione usando i pulsanti 2 Premete il pulsante POINT ZOOM per cancellare il puntatore REGOLAZIONE AUTOMATICA Per regolare il formato o la qualità dell immagine in modo automatico Premete il pulsante AUTO SET UP Funzionamento generale OFF TIMER AUTOSPEGNI...

Page 126: ...rmo formato ZOOM L immagine viene ingrandita in direzione orizzontale e verticale mantenendo le proporzioni originali Funzioni di REG AMPIEZZA Utilizzate questo schermo per film in formato teatro wide ecc Formato di schermo 2 35 1 L immagine compressa si espande in modo da riempire l intero schermo nel formato 2 35 1 Pur non apparendo bande nere superiormente e inferiormente all immagine si ha una...

Page 127: ...rizzontale Schermo formato ZOOM Quando si ricevono segnali di tipo Wide Schermo formato FULL Informazioni Risoluzione supportata Fate riferimento a pagina 30 per ulteriori dettagli sulla visualizzazione in uscita dei vari segnali VESA supportati dal monitor Quando vengono ricevuti segnali da 852 848 punti 480 linee VGA con una frequenza verticale di 60 Hz ed una orizzontale da 31 7 31 0 kHz Scegli...

Page 128: ...La modifica viene conservata sino all esecuzione di una nuova modifica 6 Ripetete le fasi 2 5 per regolare una voce addizionale oppure premete il pulsante EXIT sul telecomando per ritornare al menù principale Quando regolate la barra in fondo allo schermo premete il tasto o entro 5 secondi Se non lo fate viene impostata l impostazione corrente e viene visualizzato lo schermo precedente Nota Il men...

Page 129: ...SÌ 16 AUDIO INPUT2 VIDEO 1 3 COMPNT 1 2 PC1DSUB PC2 BNC PC3 DVI SÌ 16 AUDIO INPUT3 VIDEO 1 3 COMPNT 1 2 PC1DSUB PC2 BNC PC3 DVI SÌ 16 Menu princip Sottomenu Sottomenu 2 Sottomenu 3 Sottomenu 4 Azzeramento RIFERIMENTO SCHERMO FOR SCHERMO 4 3 FULL WIDE ZOOM 2 35 1 14 9 16 V POSIZIONE 64 0 64 SÌ 16 H POSIZIONE 128 0 127 SÌ 16 V ALTEZZA 0 64 SÌ 16 H LARGHEZZA 0 64 SÌ 16 AUTO IMMAG OFF ON 2 NO 16 FASE ...

Page 130: ... PC2 BNC PC3 DVI SÌ 24 BLOCCO CH OFF ON SÌ 24 IR REMOTE OFF ON SÌ 24 SEQUENZA OFF ON SÌ 24 ID NUMBER ALL 1 256 SÌ 25 VIDEO WALL DISTRIBUTORE OFF 1 4 9 16 25 SÌ 25 POSIZIONE No 1 No 4 No 7 No 15 No 16 No 31 No 32 No 56 25 DISP MODE NORMALE REGOL SÌ 26 AUTO ID OFF ON SÌ 26 SCHERMO FOR SCHERMO 4 3 FULL WIDE ZOOM 2 35 1 14 9 26 V POSIZIONE 64 0 64 SÌ 26 H POSIZIONE 128 0 127 SÌ 26 V ALTEZZA 0 64 SÌ 26...

Page 131: ...INE selezionate FILM1 IMMAGINE 1 2 STD OFF SEL ADJ EXIT INVIO V CONTRASTO LUMINOSITÀ DEFINIZIONE COLORE TONALITÀ SELEZIONE AV DNR PROSSIMA PAG SELEZIONE AV FILM 1 Informazioni Tipi di AV SELECTIONS FILM1 2 Impostate questo modo quando si guarda un video in una stanza buia Questo modo fornisce regolazioni fini più scure simili allo schermo di un cinema Per ottenere immagini più scure selezionate FI...

Page 132: ...GAMMA L immagine diviene più scura a mano a mano che il valore aumenta nella sequenza 1 2 3 4 Regolazione dei bassi toni Questa funzione consente di riprodurre toni più definiti specialmente nelle zone scure Esempio impostazione 2 Nel MENU PRINCIP 1 2 impostate su ON la funzione OSD AVANZ e quindi procedete con le operazioni di seguito descritte In TONO BASSO nel menu IMMAGINE selezionate 2 IMMAGI...

Page 133: ...l menu SCHERMO regolate la posizione Quando vengono premuti i pulsanti e la commutazione viene effettuata nell ordine seguente 4 3 FULL Le impostazioni del menu SCHERMO non sono preimpostate in fabbrica La commutazione del modo può essere effettuata anche premendo SCREEN SIZE sul telecomando SCHERMO FOR SCHERMO V POSIZIONE H POSIZIONE V ALTEZZA H LARGHEZZA AUTO IMMAG FASE OROLOGIO 4 3 OFF SEL ADJ ...

Page 134: ...B OFF OFF 1024 768 SEL EXIT INVIO OK MENU Impostazioni dell opzione ORB OSD ON Ogni qualvolta appare l OSD la posizione del menu viene fata scorrere di otto punti OFF L OSD viene sempre visualizzato nella stessa posizione Impostazione dei connettori PC2 COMPONENT2 Selezionate se impostare l ingresso del PC2 COMPONENT2 su RGB componente o SCART1 2 Esempio Impostate su COMP il modo SCELTA BNC In SCE...

Page 135: ...inee con una frequenza orizzontale di 59 8 kHz o un segnale 1680 punti 1050 linee con una frequenza orizzontale di 60 kHz l immagine può essere compressa orizzontalmente Per evitare questo problema impostare SCELTA RGB su WIDE4 DTV Impostate questo modello quando si guarda una trasmissione digitale 480P Vedere pagina 30 per dettagli sulle impostazioni di cui sopra Esempio Impostazione del modo SCE...

Page 136: ...sificata e proiettata nel modo immagine adatto al film solo NTSC PAL PAL60 480I 60Hz 525I 60Hz 576I 50Hz 625I 50Hz 1035I 60Hz 1080I 60Hz Esempio Attivazione del PURECINEMA su OFF Nel MENU PRINCIP 1 2 impostate su ON la funzione OSD AVANZ e quindi procedete con le operazioni di seguito descritte In PURECINEMA nel menu OPTION2 selezionate OFF OPTION2 2 3 PAG PREC RISP ENERGIA PURECINEMA LUNGA DURATA...

Page 137: ...ale e di 4 righe in senso verticale In ORBITANTE nel menu LUNGA DURATA selezionate MANUALE quindi premete il tasto MENU SET Viene visualizzato lo schermo ORBITANTE Regolate le voci ORBITANTE H DOT V LINE TEMPO 2 DOT 4 LINE 3 M SEL ADJ EXIT INVIO Informazioni Impostazioni della funzione ORBITANTE H DOT Sposta da 1 a 20 pixel in direzione orizzontale V LINE Sposta da 1 a 20 righe in direzione vertic...

Page 138: ...re impostata quando DURATA si trova su ON DURATA e TEMPO ATTESA possono essere impostati sino a 12 ore e 45 minuti in passi di 3 minuti Per selezionare ON per DURATA Imposta le ore relative a DURATA a 0H ed i minuti a 0M Verrà visualizzato ON SOFT FOCUS Riduce i margini ed ammorbidisce l immagine Esempio Attivazione del SOFT FOCUS su 2 In SOFT FOCUS nel menu LUNGA DURATA selezionate 2 LUNGA DURATA...

Page 139: ...regolare la luminosità del nero livello del grigio ai lati dello schermo Lo standard è 0 nero Il livello può essere regolato da 0 a 15 L impostazione di fabbrica è 3 grigio scuro Impostazione del segnale e del livello di nero per il segnale DVI Scegliere il segnale per il connettore DVI PC o STB DVD ed impostare il livello del nero Esempio impostazione del modo PLUG PLAY su STB DVD Nel MENU PRINCI...

Page 140: ...M ADJ Un asterisco nel campo DATA Un asterisco significa ogni Ad esempio VEN significa ogniVenerdì mentre significa ogni giorno Un trattino nel campo ON oppure OFF Se nel campo ON oppure OFF rimane il trattino l opzione FUNZIONE non può essere impostata Un trattino nel campo FUNZIONE Il trattino significa il modo più recente il modo selezionato nel momento in cui è avvenuto lo spegnimento del moni...

Page 141: ...or Vedere a pagina 3 Se al momento dell accensione è presente il segnale PC1 L ingresso PC1 viene visualizzato a prescindere dall impostazione della funzione SEQUENZA Impostazione del modo all accensione PWR ON MODE Questa funzione imposta il modo di ingresso nel momento in cui il monitor si accende Esempio impostazione VIDEO2 Nel MENU PRINCIP 1 2 impostate su ON la funzione OSD AVANZ e quindi pro...

Page 142: ...onitor Esempio impostazione 2 Nel MENU PRINCIP 1 2 impostate su ON la funzione OSD AVANZ e quindi procedete con le operazioni di seguito descritte In ID NUMBER nel menu OPTION3 selezionate 2 OPTION3 3 3 LAST OFF ON OFF 2 SEL ADJ EXIT INVIO PAG PREC TIMER PWR ON MODE BLOCCO CH IR REMOTE SEQUENZA ID NUMBER VIDEO WALL Per ripristinare a ALL Premete il pulsante CLEAR Informazioni Impostazioni di ID NU...

Page 143: ...che per il monitor No 1 Premendo il tasto POWER ON sul telecomando il monitor No 1 si accenderà e gli altri si accenderanno automaticamente ad uno ad uno Dasecondomonitorinpoi néiltastoPOWERsull unità né il tasto POWER ON sul telecomando funzionano Tuttavia premendo e mantenendo premuto il tasto POWER ON per più di 3 secondi il monitor si accenderà AUTO ID Questa funzione imposta automaticamente i...

Page 144: ...o Questo può essere impostato solo quando è selezionata una parete video 2 2 o 3 3 OFF Imposta la luminosità individuale di ciascun schermo della parete video Quando questa funzione è impostata su ON collegate ilmonitoralplasmaalcavodeltelecomando opzionale nell ordine dei numeri di posizione indicati per la parete video da 2 2 Vedere l illustrazione che segue In caso di modifiche nelle funzioni D...

Page 145: ...a tutte le opzioni del menu Quando la funzione P ON DELAY o ABL LINK si trova su ON esso si imposta su OFF Esempio impostazione ON In OSDAVANZ nelmenu MENUPRINCIP selezionate ON MENU PRINCIP 1 2 OFF SEL ADJ EXIT EXIT IMMAGINE SUONO SCHERMO OPTION1 OSD AVANZ PROSSIMA PAG MENU PRINCIP 1 2 ON SEL ADJ EXIT EXIT IMMAGINE SUONO SCHERMO OPTION1 OPTION2 OPTION3 OSD AVANZ PROSSIMA PAG Informazioni Impostaz...

Page 146: ... Nessun collegamento Nessun collegamento Schermo dell orologio T M D S Orologio T M D S Orologio T M D S Segnale analogico Rosso Verde o sincronizzazione del verde Blu Nessun collegamento Massa Massa rossa Massa verde Massa blu Nessun collegamento Massa del segnale di sincronizzazione Nessun collegamento DATI bidirezionali SDA Sincronizzazione orizzontale o segnale composito Sincronizzazione verti...

Page 147: ...LARGO2 LARGO3 LARGO1 LARGO1 MOBILE Orizzontale NEG NEG NEG NEG NEG NEG NEG POS NEG POS POS POS POS POS POS POS NEG NEG POS POS NEG POS POS POS NEG NEG NEG POS POS NEG POS POS POS POS NEG POS POS POS POS POS NEG NEG Sinc su G Sinc su G Sinc su G Sinc su G NEG NEG NEG Sinc C Sinc C Sinc C NEG NEG Modello Apple Macintosh 6 8 Stazione di lavoro EWS4800 8 Stazione di lavoro HP 8 Stazione di lavoro SUN ...

Page 148: ... 9 Conforme allo standard CVT NOTA Se i segnali in ingresso sono conformi alle risoluzioni elencate nella tabella che precede potreste dover regolare la posizione e le dimensioni dell immagine o dell immagine fine a causa di errori nella sincronizzazione del vostro computer Questo monitor possiede una risoluzione di 853 punti 480 linee Si raccomanda di ricevere segnale VGA Wide VGA o un segnale ad...

Page 149: ... tonalità oppure i colori sono scadenti Non appare niente sullo schermo Parte dell immagine risulta tagliata o l immagine non è centrata L immagine è troppo grande oppure troppo piccola L immagine è instabile L indicatore STANDBY ON si illumina e diventa rosso L indicatore STANDBY ON lam peggia e diventa rosso L indicatore STANDBY ON lampeggia di colore verde e rosso o verde Verifiche L immagine e...

Page 150: ...down 2 2 PAL 576I 625I NTSC 480I 525I funzione zoom digitale selezionabile 100 900 parete video multischermo 4 25 auto diagnosi anti bruciatura immagine ABL LOCK1 3 INVERSE WHITE ORBITER Autol 2 Manual SCREENWIPER selezionedellatemperatura del colore alta media media bassa bassa 4 memorie utente blocco comandi ad eccezione dell interruttore diaccensione immagineaudio saltodiingresso sintonia color...

Page 151: ......

Page 152: ... siempre a un especialista en instalaciones o a su distribuidor que realice la instalación y configuración del producto PIONEER no se hace responsable de los daños causados por una instalación o montaje incorrectos por la manipulación indebida modificaciones ni desastres naturales Gracias por adquirir este producto PIONEER Antes de utilizar su pantalla de plasma lea atentamente las Información imp...

Page 153: ...l funcionamiento sea seguro y también para evitar daños a la unidad rogamos leer y observar atentamente las siguientes instrucciones Para evitar riesgos de golpes e incendios 1 Disponer de un adecuado espacio para la ventilación y así evitar acumulaciones de calor interno No cubra las rejillas de ventilación posteriores ni instale la unidad en un mueble o en baldas cerradas Si instala la unidad en...

Page 154: ...sultar en una quemadura por fósforo si no se toman las ii Sp ATENCIÓN AL INSTALAR ESTE EQUIPO ASEGÚRESE DE QUE LA TOMA DE CORRIENTE Y EL ENCHUFE ESTÉN FÁCILMENTE ACCESIBLES Este producto cumple con la Directiva de Bajo Voltaje 73 23 CE correcto por la 93 68 CE Directivas EMC 89 336 CE correcto por la 92 31 CE y la 93 68 CE Precaución Este modelo puede utilizarse con los siguientes accesorios opcio...

Page 155: ......

Page 156: ...genes de ordenador con pantalla ancha 10 Controles OSD en pantalla 11 Funciones de Menú 11 Ajuste del idioma de los menús 11 Árbol del Menú 12 Menú de ajustes de la imagen 14 Ajuste de la imagen 14 Ajuste del modo de imagen según sea el brillo de la habitación 14 Reducción del ruido de la imagen 14 Ajuste de la temperatura de color 14 Ajuste del color a la calidad deseada 15 Cambio de la curva gam...

Page 157: ...esiones a la persona que lo instale La garantía de este producto no cubrirá los daños causados por una instalación incorrecta Ilustración B Ilustración A Necesidades de ventilación en el caso de montaje en un sitio cerrado Para permitir que el calor pueda dispersarse deje un espacio entre los objetos circundantes tal como se muestra en el diagrama al instalarlo Cómo utilizar los accesorios metálic...

Page 158: ...sta función de LAZO el máximo número aproximado de monitores que podrá conectarse en lazo será cuatro Además la resolución deberá ser inferior a 1024 768 y la frecuencia vertical deberá ser inferior a 60 Hz Cuando se utilice una pantalla 9 y sobre video wall se recomienda particularmente el uso de un amplificador de distribución Del segundo monitor en adelante las conexiones requieren un conector ...

Page 159: ...nitor Cuando se conecta el cable el modo cambiará automáticamente a mando a distancia con cable Cuando se utilice el modo de mando a distancia con cable el mando a distancia podrá hacerse funcionar incluso aunque no tenga pilas Radio de acción Use el mando a distancia a una distancia de aproximadamente 7 m 23 pies de la parte delantcra del sensor de mando a distancia del monitor y en ángulos horiz...

Page 160: ...e ilumina verde Cuando la alimentación está en el modo en espera se ilumina rojo r INPUT EXIT selección de entrada salir Cambia la entrada de datos Las entradas disponibles dependen del ajuste de SELEC BNC SELEC D SUB SELEC RGB y DVI SET UP Funcionan como botones EXIT salir en modo de visualización en pantalla OSD Vista Frontal Nombres y funciones de las partes Nota Para usuarios europeos que ence...

Page 161: ...a página 17 G PC1 Conecte aquí un señal RGB analógica procedente de un ordenador etc Esta entrada se puede utilizar como entrada o salida consulte la página 24 H PC3 DVI 24 pines Para la entrada de una señal RGB TMDS I RS 232C No conecte nunca ningún componente a este conector sin consultar primero con su técnico en instalaciones de Pioneer Este conector se utiliza para los ajustes de configuració...

Page 162: ...l sonido 2 SCREEN SIZE ancho de pantalla Detecta automáticamente las señales y establece la relación de aspecto El botón SCREEN SIZE no se activa para todas las señales 3 DISPLAY visualizar Muestra los ajustes de la fuente en la pantalla 4 OFF TIMER temporizador de desconexión Activa el temporizador de desconexión automática de la unidad 5 AUTO SET UP Pulse este botón para ajustar automáticamente ...

Page 163: ...to para apagar el aparato El indicador STANDBY ON se iluminará de color rojo y se ajustará el modo en espera sólo cuando se apaga la unidad con el mando a distancia VOLUME volumen Para ajustar el nivel del sonido 1 Mantenga pulsado el botónVOLUME en el mando a distancia o en la unidad para aumentar la salida de sonido al nivel deseado 2 Mantenga pulsado el botónVOLUME en el mando a distancia o la ...

Page 164: ...ntido horizontal y vertical manteniendo las proporciones originales Utiliceestafunciónparapelículasentamañoteatro ancho etc Pantalla de tamaño 2 35 1 La imagen comprimida se expande para llenar toda la pantalla con una relación de 2 35 1 En las partes superior e inferior de la pantalla no aparecen bandas negras pero se pierde información en los márgenes derecho e izquierdo Esta característica se e...

Page 165: ...4 3 durante o 14 9 durante un largo periodo de tiempo porque podría quemarse el fósforo de la pantalla Visión de imágenes de ordenador con pantalla ancha Cambie al modo de pantalla ancha para ampliar la imagen 4 3 y ajustarla al tamaño de la pantalla completa 1 Pulse el botón SCREEN SIZE en el mando a distancia 2 Dentro de los 3 segundos Pulse el botón SCREEN SIZE otra vez El tamaño de la pantalla...

Page 166: ...istancia 5 El ajuste o configuración que usted almacenó permanece El cambio es almacenado hasta que se cambia otra vez 6 Repita los pasos 2 5 para ajustar otro ítem o pulse el botón EXIT del mando a distancia para volver al menú principal Cuandorealiceelajusteutilizandolabarraqueseencuentra en la parte inferior de la pantalla pulse el botón o dentro de los siguientes 5 segundos De lo contrario el ...

Page 167: ...0 32 64 SÍ 15 RESET OFF ON SÍ 15 Menú Principal Submenú Submenú 2 Submenú 3 Submenú 4 Reajuste REFERENCIA SONIDO GRAVES 0 13 26 SÍ 16 AGUDOS 0 13 26 SÍ 16 BALANCE L R 22 0 22 SÍ 16 AUDIO INPUT1 VIDEO 1 3 COMPNT 1 2 PC1DSUB PC2 BNC PC3 DVI SÍ 16 AUDIO INPUT2 VIDEO 1 3 COMPNT 1 2 PC1DSUB PC2 BNC PC3 DVI SÍ 16 AUDIO INPUT3 VIDEO 1 3 COMPNT 1 2 PC1DSUB PC2 BNC PC3 DVI SÍ 16 Menú Principal Submenú Subm...

Page 168: ...1 3 COMPNT 1 2 PC1DSUB PC2 BNC PC3 DVI SÍ 23 BLOQ TECL OFF ON SÍ 23 IR REMOTO OFF ON SÍ 24 LAZO OFF ON SÍ 24 NUMERO ID ALL 1 256 SÍ 24 VIDEO WALL DIVISOR OFF 1 4 9 16 25 SÍ 25 POSICION No 1 No 4 No 7 No 15 No 16 No 31 No 32 No 56 25 MODO DISP NORMAL AJUSTAR SÍ 25 AUTO ID OFF ON SÍ 25 PANTALLA TAM PANTALLA 4 3 COMP ANCHO ZOOM 2 35 1 14 9 26 V POSICION 64 0 64 SÍ 26 H POSICION 128 0 127 SÍ 26 V ALTU...

Page 169: ...ONS PELÍ 1 2 Ajuste este modo cuando vea el vídeo en una habitación oscura Este modo proporciona imágenes más oscuras y definidas como en las pantallas de teatro Para obtener una imagen más oscura seleccione PELÍ2 STD Ajuste este modo cuando vea el vídeo en una habitación iluminada Este modo proporciona imágenes dinámicas con diferenciasdistintivasentrelaspartesluminosasyoscuras Reducción del ruid...

Page 170: ...meros en el orden de 1 2 3 4 Ajustes de tono bajo Esta función permite reproducir tonos más detallados especialmente en las áreas oscuras Ejemplo Ajuste 2 Ponga OSD AVANZADO en ON en el MENU PRINCIPAL 1 2 y luego realice las operaciones siguientes En TONO BAJO del menú IMAGEN seleccione 2 IMAGEN 2 2 PAG ANTERIOR TEMP COLOR GAMMA TONO BAJO AJ COLOR MEDIO 2 2 SEL ADJ EXIT RETURN Información Ajustes ...

Page 171: ...ción vertical en el modo normal En V POSICION del menú PANTALLA ajuste la posición Cuando se pulsan los botones y el modo conmuta en el siguiente orden 4 3 FULL También se puede conmutar este modo pulsando el botón SCREEN SIZE en el mando a distancia Los ajustes del menú PANTALLA no se hacen en fábrica PANTALLA TAM PANTALLA V POSICION H POSICION V ALTURA H ANCHURA AUTO IMAGEN FASE RELOJ 4 3 OFF SE...

Page 172: ...s de OSD ORBITER ON La posición del menú se desplazará dos puntos cada vez que se visualice OSD OFF El OSD se visualizará en la misma posición Configuración de CONTRAST OSD NORMAL el OSD de brillo se configura en nivel normal BAJO el OSD de brillo se configura en nivel bajo Ajuste del conector PC1 Seleccione una de las señales que están siendo transmitidas al terminal RGB1 Ejemplo Para ajustar el ...

Page 173: ...izontalmente Para impedir esto ponga SELEC RGB en ANCHO4 DTV Ajuste este modelo cuando sintonice emisoras digitales 480 P Consulte la página 30 para conocer detalles de los ajustes de arriba Ajuste de una imagen de alta definición para que se adecue al tamaño de la pantalla Utilice este procedimiento para ajustar el número de líneas verticales cuando la recepción de imagen de alta definición sea 1...

Page 174: ...imagen de la película es detectada y proyectada automáticamente en un modo de imagen apropiado sólo NTSC PAL PAL60 480I 60Hz 525I 60Hz 576I 50Hz 625I 50Hz 1035I 60Hz 1080I 60Hz Ejemplo Para ajustar la opción PURECINEMA a OFF Ponga OSD AVANZADO en ON en el MENU PRINCIPAL 1 2 y luego realice las operaciones siguientes En PURECINEMA del menú OPCION2 seleccione OFF OPCION2 2 3 PAG ANTERIOR AHORRO ENER...

Page 175: ...os En ORBITADOR del menú LARGA DURAC seleccione MANUAL luego pulse el botón MENU SET Aparecerá la pantalla ORBITADOR Ajuste los elementos ORBITADOR H DOT V LINE TIEMPO 2 DOT 4 LINE 3 M SEL ADJ EXIT RETURN INVERSIÓN Utilice esto para ajustar el modo de inversión o para visualizar una pantalla blanca Example Ajuste de INVERSIÓN en BLANCO En INVERSIÓN del menú LARGA DURAC seleccione BLANCO LARGA DURA...

Page 176: ...a establecer el nivel de grises de los laterales de la pantalla que no poseen indicación cuando la pantalla se ajusta al tamaño 4 3 o tamaño 14 9 Ejemplo Ajuste de MÁSC LATERAL en 5 Ponga OSD AVANZADO en ON en el MENU PRINCIPAL 1 2 y luego realice las operaciones siguientes En MÁSC LATERAL del menú OPCION2 seleccione 5 OPCION2 2 3 PAG ANTERIOR AHORRO ENERG PURECINEMA LARGA DURAC MÁSC LATERAL S1 S2...

Page 177: ... pulse el botón MENU SET Aparecerá la pantalla TIEMPO PRES Ajuste los elementos SEL TIEMPO PRES MIERCOLES 22 05 00 RETURN DAYLITE SAVE CONFIGURAR OFF ADJ EXIT RETURN Seleccione CONFIGURAR luego pulse el botón MENU SET Los ajustes se guardan y se regresa al menú TEMPORIZADOR Si pulsa el botón EXIT en lugar del botón MENU SET es posible que los ajustes no se puedan llevar a cabo OK MENU SEL TIEMPO P...

Page 178: ...mplo V significa da viernes y significa cada día Un guión en el campo ON o en el campo OFF Si permanece un guión en el campo ON o en el campo OFF FUNCTION no se podrá ajustar Un guión en el campo FUNCTION Un guión significa el último modo el modo que se encontrada activado en el momento de desconectar la alimentación Ajuste del modo de conexión de la alimentación Esta función ajusta el modo de ent...

Page 179: ...un lazo Aunque LAZO esté en ON las señales no se enviarán si la alimentación está desconectada Para conectar otro monitor Consulte la página 3 Si la señal PC1 se encuentra presente en el momento de conectarse la alimentación La entrada PC1 se visualizará independientemente del ajuste de LAZO Ajuste del número de identificación Cuando utilice más de uno de estos monitores esta función ajustará los ...

Page 180: ...arse un método de desconectar la alimentación eléctrica en el caso de producirse una emergencia durante la instalación de una video wall NO 1 NO 2 NO 4 NO 3 NO 7 NO 8 NO 9 NO 10 NO 11 NO 12 NO 13 NO 14 NO 15 Información Ajustes de POSICION VIDEO WALL 1 pantalla No es necesario ajustar POSICION 4 pantallas 9 pantallas 16 pantallas 25 pantallas MODO DISP Selecciona una de dos opciones NORMAL AJUSTAR...

Page 181: ...pal de todas las pantallas al mismo tiempo sólo para las pantallas 16 y 25 MODO1 Activa la alimentación principal de cada pantalla retrasada MODO2 Activa la alimentación de cada pantalla más retrasada Una vez que esta función se ha configurado en ON el botón POWER ON OFF del mando a distancia no funcionará excepto en el caso del monitor nº1 Al pulsar el botón POWER ON del mando a distancia seencen...

Page 182: ...ones siguientes Ejemplo TEMPORIZADOR1 VIDEO1 se visualizará durante 3 minutos TEMPORIZADOR2 PC1 se visualizará durante 6 minutos en una video wall de 2 2 En REPETIR TEMP del menú VIDEO WALL seleccione ON luego pulse el botón MENU SET Aparecerá la pantalla REPETIR TEMP Ajuste los elementos REPETIR TEMP 1 VIDEO1 00H03M 4 PC1DSUB 00H06M SEL ADJ EXIT RETURN 1 DIVISOR FUENTE T FUNCIONA 2 DIVISOR FUENTE...

Page 183: ...utiliza principalmente en Alemania y el Reino Unido SECAM Este es el formato estándar que se utiliza principalmente en Francia y Rusia 4 43 NTSC PAL60 Este formato se utiliza para vídeo en países que usan las señales de VIDEO PAL y SECAM 3 58 NTSC Este es el formato estándar que se utiliza principalmente en los Estados Unidos y Japón PAL M Este es el formato estándar que se utiliza principalmente ...

Page 184: ...S Datos 2 T M D S Datos 2 Blindaje Sin conectar Sin conectar Reloj DDC Datos DDC Sin conectar T M D S Datos 1 T M D S Datos 1 T M D S Datos 1 Blindaje Sin conectar Sin conectar Alimentación 5 V Tierra Detección de clavija caliente T M D S Datos 0 T M D S Datos 0 T M D S Datos 0 Blindaje Sin conectar Sin conectar T M D S Reloj Blindaje T M D S Reloj T M D S Reloj Señal analógica Rojo Verde o Sinc e...

Page 185: ...POS POS POS POS POS NEG NEG POS POS NEG POS POS NEG POS NEG NEG POS POS POS POS POS POS POS NEG POS POS POS POS POS NEG NEG Sincronización en G Sincronización en G Sincronización en G Sincronización en G NEG NEG NEG Sincronización C Sincronización C Sincronización C NEG NEG Polaridad de sincronización Presencia Horizontal SÍ SÍ SÍ SÍ SÍ SÍ SÍ SÍ SÍ SÍ SÍ SÍ SÍ SÍ SÍ SÍ SÍ SÍ SÍ SÍ SÍ SÍ SÍ SÍ SÍ S...

Page 186: ...on el estándar CVT NOTA Mientras que las señales de entrada cumplan con la resolución listada en la tabla de arriba tal vez tenga que ajustar las posiciones y el tamaño de la imagen o la imagen fija debido a errores de sincronización de su ordenador Este monitor tiene una resolución de 853 puntos 480 líneas Se recomienda que la señal de entrada sea VGA VGA panorámica o equivalente Cuando se utiliz...

Page 187: ...NDBY ON se ilumina de color rojo El indicador STANDBY ON parpadea de color rojo El indicador STANDBY ON parpadea de color verde y rojo o verde Comprobaciones Son normales la imagen y el sonido Se ha colocado un componente conectado directamente delante o a un costado de la pantalla de visualización Están gastadas las pilas del mando a distancia Está IR REMOTO en ON Se ha puesto un número de identi...

Page 188: ...all autodiagnóstico prevención de quemado de imagen ABL LOCK1 3 INVERSE WHITE ORBITER Auto 1 2 Manual SCREEN WIPER selección de temperatura del color alta media mediabaja baja 4memoriaparaelusuario bloqueo de control excepto interruptor de la alimentación imagen automática salto de entrada tonalidad de color 3 modos identificación automática temporizador programable correccióngamma 4modos interfaz...

Page 189: ......

Page 190: ...илеров осле установки не забудьте передать данное руководство клиенту и объясните ему как работать с устройством римечания к процедуре установки анное изделие поставляется на рынок с учётом того что оно будет устанавливаться только квалифицированным персоналом имеющим достаточно навыков и компетентности о всех случаях производить установку и пуск изделия должен специалист или аш дилер 2ирма PIONEE...

Page 191: ...илка не вставляется полностью 3 е подвергайте устройство действию воды или влаги 4 1збегайте повреждения шнура питания и не пытайтесь его модифицировать 5 о время грозы или если устройство не будет использоваться длительное время выньте шнур питания из розетки 6 е открывайте корпус так как внутри имеются потенциально опасные детали находящиеся под напряжением случае повреждения устройства гарантия...

Page 192: ...ённых обстоятельствах может быть восприимчивым к выжиганию люминофора Определённые условия работы такие как непрерывное отображение неподвижного изображения на протяжении длительного времени если не принять надлежащих мер могут привести к выжиганию люминофора 5ля защиты аших инвестиций в этот плазменный монитор пожалуйста соблюдайте следующие указания и рекомендации по минимизации выжигания мишени...

Page 193: ......

Page 194: ... меню 12 Bеню параметров изображения 14 астройка изображения 14 астройка режима изображения в соответствии с освёщённостью помещения 14 одавление помех в изображении 14 астройка цветовой температуры 14 астройка цвета на желаемый уровень 15 1зменение кривой гамма распределения 15 астройка функции 1 31 О 15 астройка цветов 15 Bеню звуковых параметров 16 астройка высоких и низких частот левого правог...

Page 195: ...страняется на повреждения обусловленные неправильной установкой ребования к вентиляции при установке в огороженное место 5ля обеспечения рассеивания тепла устанавливая устройство оставляйте свободное пространство между ним и окружающими объектами как показано на приведённой ниже схеме спользование предохранительной металлической арматуры и болтов для неё Эта арматура предназначена для крепления ус...

Page 196: ...продаже кабель ри плохом качестве изображения не используйте выходы монитора 1спользуйте усилитель распределитель любой имеющийся в продаже усилитель распределитель для подключения разделённых сигналов к соответствующим выводам INPUT на мониторе ри использовании функции видеостены грубым стандартом при разрешении менее 1024 768 и сигнале 60 7ц являются максимально 4 экрана ри создании видеостены и...

Page 197: ... пульт дистанционного управления может работать даже без батареек Rтереофонический 1 8 мини кабель нужно приобрести отдельно абочий диапазон 1спользуйте пульт дистанционного управления на расстоянии приблизительно до 7 м 23 футов от расположенного на передней панели монитора сенсора дистанционного управления и под углом приблизительно до 30 по горизонтали и вертикали 5истанционное управление может...

Page 198: ... выключает питание монитора w Окно сенсора дистанционного управления ринимает сигналы от пульта дистанционного управления e ндикатор STANDBY ON сли питание включено светится зелёным светом сли питание находится в режиме ожидания светится красным светом r нопка INPUT EXIT ереключает ввод 1меющиеся входы зависят от установки параметров cО5 BNC cО5 D SUB _8О RGB и УR DVI 1меет те же функции что и кно...

Page 199: ...ником см страницу 17 G 3ывод PC1 mini D Sub 15 выводов 3 этому выводу подключайте аналоговый RGB сигнал от компьютера и т д Это вывод может использоваться как для входа так и для выхода см страницу 24 ид сзади ыводной щиток H 3ывод PC3 DVI 24 вывода 3 этому выводу подключайте цифровой сигнал TMDS от источника с DVI выходом I 3ывод RS 232C Dикогда не подсоединяйте компонент к этому выводу без предв...

Page 200: ...ZOOM Увеличивает или уменьшает изображение 0 нопки VOLUME егулирует громкость звука 1 нопка MUTING Отключает звук аудио 2 нопка SCREEN SIZE Автоматически определяет сигнал и настраивает формат изображения 3нопка SCREEN SIZE не является активной для всех сигналов 3 нопка DISPLAY Отображает на экране исходные параметры 4 нопка OFF TIMER Активирует таймер выключения устройства 5 нопка AUTO SET UP ажм...

Page 201: ...ор изменит свою форму и будет напоминать лупу ажатие кнопки ZOOM уменьшит изображение и вернёт его исходные размеры зменение позиции изображения ыберите позицию с помощью кнопок 2 ажмите кнопку POINT ZOOM чтобы убрать курсор А О А O KАЯ А ОQKА Автоматическая настройка размера или качества изображения ажмите кнопку AUTO SET UP нформация ключение функции AUTO SET UP сли выбран ввод RGB неподвижное и...

Page 202: ...рокоэкранном формате азмер экрана У A 1зображение увеличивается в горизонтальном и вертикальном направлении сохраняя исходные пропорции 1спользуйте это для просмотра широкоформатных видеофильмов и т д анипуляции с функцией WIDE азмер экрана 2 35 1 Аноморфированное киноизображение увеличивается до соответствия полному экрану в соотношении 2 35 1 Aерные полосы вверху и внизу экрана отсутствуют но ин...

Page 203: ... сли на ввод подаются сигналы широкого формата азмер экрана О 7CG нформация оддерживаемые разрешения одробная информация о выходных сигналах поддерживаемых монитором различных стандартов сигналов VESA приведена на странице 30 ри ширине 852 848 точек 480 линий на вход подаются сигналы VGA с частотой кадров 60 Gц и частотой строк 31 7 31 0 кGц ыберите соответствующие настройки для режима _8О RGB вос...

Page 204: ...раняются в памяти 1зменённый параметр сохраняется в памяти до его повторного изменения 6 овторите действия 2 5 для настройки дополнительного пункта или нажмите кнопку EXIT на пульте дистанционного управления для возвращения в главное меню ри настройке с помощью расположенной в нижней части экрана строки кнопку или необходимо нажать в течение 5 секунд 1наче будет установлен исходный параметр и на э...

Page 205: ...NT 1 2 PC1DSUB PC2 BNC PC3 DVI А 16 АУ О О 2 О 1 3 COMPNT 1 2 PC1DSUB PC2 BNC PC3 DVI А 16 АУ О О 3 О 1 3 COMPNT 1 2 PC1DSUB PC2 BNC PC3 DVI А 16 Gлавное меню убменю убменю 2 убменю 3 убменю 4 U О ZMKА 7А68 ОG А HО АHB Э А7А 4 3 О 7CG 68А О7 У A 2 35 1 14 9 16 О О 7 64 0 64 А 16 J О О 7 128 0 127 А 16 АHB 8 0 64 А 16 АHB JО H 0 64 А 16 А 8О HО C 2 HET 16 2АHА 1 2 0 64 А 16 AА6ЬІ 1 2 0 64 128 А 16 ...

Page 206: ...BNC PC3 DVI А 23 О А F C А 23 У C А 24 LOOP OUT C А 24 78 7ОB 6 1 256 А 24 О68 7А 8 Ь C 1 4 9 16 25 А 25 ОH I Я No 1 No 4 No 7 No 15 No 16 No 31 No 32 No 56 25 B Э А7А CTАH HACTP А 25 А 8О 78 C А 25 7А68 HО АHB Э А7А 4 3 О 7CG 68А О7 У A 2 35 1 14 9 26 О О 7 64 0 64 А 26 J О О 7 128 0 127 А 26 АHB 8 0 64 А 26 АHB JО H 0 64 А 26 А 8О HО C 2 HET 26 2АHА 1 2 0 64 А 26 AА6C 1 2 0 64 128 А 26 HА C B1 B...

Page 207: ...бладание синего цвета одавление помех в изображении 1спользуйте эти настройки при наличии на экране помех обусловленных плохим приёмом или при просмотре видеокассет с низким качеством изображения ример Установка режима C6О G пункте DNR меню 3А 1 3А выберите значение _RО31 КАРТИНКА 1 2 CTAHД ВЫКЛ SEL ADJ EXIT НАЗАД К З КОНТРАСТ ЯРКОСТЬ ЧЕТКОСТЬ ЦВЕТ ОТТЕНОК BЫБOP AV DNR СЛЕДУЮЩАЯ DNR ВЫСОКИЙ нформа...

Page 208: ...сти 1 2 3 4 астройка функции PK Q О Эта функция позволяет добиться воспроизведения более детального тона в особенности в тёмных участках ример Установка режима 2 JMА О V Ю 1 2 для QАF 8Q OSD установите значение SM а затем выполните следующие операции пункте 1 31 О меню 3А 1 3А выберите значение 2 КАРТИНКА 2 2 СРЕДНЯЯ 2 2 SEL ADJ EXIT НАЗАД ПРЕДЫДУЩАЯ ЦВЕТ ТЕМП ГАММА НИЗКИЙ ТОН НАСТР ЦВЕТА нформаци...

Page 209: ...M SEL ADJ EXIT НАЗАД ПОЛHЫЙ ВЫКЛ НАСТРОЙКА ИЗОБР РАЗM ЗKPAHA В ПОЛОЖEHИE Г ПОЛОЖEHИE РАЗM ВEPTИK РАЗM ГOPИЗ АВТО ИЗОБ ФAЗA ЧACЫ сли функция А О 1 О8 отключена пункты WА А и AАR_ показываются на экране так чтобы их можно было настроить астройка функции А О PОU астройки функций AАR_ WА А и О 1 1Я проводятся автоматически едоступно для цифровой функции У 1A C астройки функций AАR_ WА А и О 1 1Я прово...

Page 210: ... яркость экранного меню астройка PC2 COMPONENT2 коннекторов ыберите для настройки ввода PC2 COMPONENT2 параметр RGB компонент или SCART1 2 ример Установите для режима О BNC значение COMP пункте cО5 BNC меню О 1Я1 выберите значение COMP ОПЦИЯ1 1 3 OSD ВХОД BNC ВХОД D SUB ВЫБОР RGB ВЫБОР HD ПРОПУСК ВХОД ОБЩ СБРОС СЛЕДУЮЩАЯ COMP RGB АВТО 1080B ВЫКЛ ВЫКЛ SEL ADJ EXIT НАЗАД нформация араметры oО BNC RG...

Page 211: ...берите значение 3 и нажмите кнопку MENU SET ОПЦИЯ1 1 3 RGB RGB АВТО 1080B ВЫКЛ ВКЛ SEL ADJ EXIT НАЗАД OSD ВХОД BNC ВХОД D SUB ВЫБОР RGB ВЫБОР HD ПРОПУСК ВХОД ОБЩ СБРОС СЛЕДУЮЩАЯ ОБЩ СБРОС СОХРАНЕНИЕ 3огда окно RОc А 1 исчезнет будут восстановлены стандартные значения всех параметров нформация ежимы ZUО RGB 5ля правильного изображения указанных ниже сигналов необходимо выбрать один из 8 режимов А 8...

Page 212: ...ажения на экран On кл Off ыкл Hелёный расный 7е активировано Активировано 6игналы строчной и кадровой сигнализации подаются с компьютера 6игналы строчной и или кадровой сигнализации с компьютера не посылаются зображение уже включено риведите в действие клавиатуру или мышку зображение появится вновь астройка изображения на соответствие видеосигналу 3инокадр автоматически распознаётся и проецируется...

Page 213: ...тали или 1 линия по вертикали за интервал 7 6 Я 1спользуйте эту функцию для установки режима инверсии или для отображения белого экрана ример Установка для функции 7 6 Я значения CG пункте 1 R1Я меню LONG LIFE выберите значение 8 _ LONG LIFE АВТО ВЫКЛ БЕЛЫЙ ВЫКЛ ВЫКЛ SEL ADJ EXIT НАЗАД ABL СДВИГ ИНВЕРСИЯ ПРОЖИГ ЭКР СГЛАЖИВАНИЕ нформация араметры функции Я озитивное изображение чередуется на экране...

Page 214: ...ыть установлен если для параметра Я А8О _ выбрано значение 3 араметры Я А8О _ и Я О 15 могут быть установлены в диапазоне до 12 часов 45 минут с интервалами 3 минуты ыбор значения KM для параметра Я АUО Z Установите количество часов рабочего времени на 0H и количество минут на 0M а экране отобразится 3 2ункция 6J А А7 Ослабляет контуры и смягчает изображение ример Установка для функции 6J А А7 зна...

Page 215: ...явится окно 3У Я астройте позиции SEL ТЕКУЩ ВРЕМЯ СРЕДА 22 05 00 НАЗАД ЛЕТНЕЕ ВРЕМЯ УСТАНОВКА ВЫКЛ ADJ EXIT НАЗАД ыберите функцию УR А О 3А и нажмите кнопку MENU SET астройки сохранятся в памяти и на экране вновь появится меню А сли ы вместо кнопки MENU SET нажмёте кнопку EXIT параметры не будут изменены SEL ТЕКУЩ ВРЕМЯ СРЕДА 22 05 00 ВЫКЛ EXIT НАЗАД OK MENU НАЗАД ЛЕТНЕЕ ВРЕМЯ УСТАНОВКА нформация ...

Page 216: ...дую пятницу а означает каждый день ефис в поле или C сли в поле 3 или _3 остаётся дефис значение параметра WУ 3 1Я не может быть установлено ефис в поле 2У7 I Я 5ефис означает последний режим режим который был выбран последним к моменту выключения питания Установка режима включения питания Эта функция устанавливает режим ввода в момент включения питания ример Установка режима VIDEO2 JMА О V Ю 1 2 ...

Page 217: ...ься независимо от установки параметров функции LOOP OUT Установка идентификационного номера ри использовании более чем одного из этих дисплеев эта функция устанавливает идентификационный номер что позволяет при работе с пультом дистанционного управления не посылать команды одновременно нескольким мониторам ример Установка режима 2 Установка идентификационного номера для пульта дистанционного управ...

Page 218: ...ADJ EXIT НАЗАД ДЕЛИТЕЛЬ ПОЗИЦИЯ РЕЖИМ ЭКРАНА АВТО ИДЕНТ НАСТР ИЗОБ ЗАДЕРЖ ВКЛ ABL LINK ТАЙМЕР ПОВТ нформация араметры функции ЭK А А 68А7 3омбинирует увеличенные экраны и создаёт составные экраны 7А68 Устраняет рассогласование комбинированных частей экрана и создаёт составные экраны 1 2 4 3 7 8 9 10 11 12 13 14 15 16 17 18 19 20 21 22 23 24 25 26 27 28 29 30 31 32 33 34 35 36 37 38 39 40 41 42 43 ...

Page 219: ...ная со второго монитора ни кнопка POWER на устройстве ни кнопка POWER ON на пульте дистанционного управления не функционирует Однако при нажатии и удерживании кнопки POWER ON в нажатом состоянии более 3 секунд монитор включится 2ункция ABL LINK 1спользуйте эту функцию для настройки одинаковой яркости на всех дисплеях еред выполнением следующих манипуляций включите функцию А О 15 и настройте параме...

Page 220: ...й будет отображаться BЯ А ожет устанавливаться в диапазоне до 4 часов 15 минут с интервалами 1 минута ри установке обоих таймеров А 1 и А 2 работают последовательно ри использовании с видеостеной таймер 1 может использоваться для одновременного управления всеми дисплеями Эта функция начинает действовать когда экранное меню закрывается еню параметров А T OSD астройка режима меню Эта функция обеспеч...

Page 221: ...му 3 58 NTSC 7 А О Ю выберите R1R А ОR 1 и нажмите кнопку MENU SET оявится окно R1R А ОR 1 меню R1R А ОR 1 выберите значение 3 58NTSC СИСТЕМА ЦВЕТНОСТИ СИСТЕМА ЦВЕТНОСТИ 3 58NTSC ADJ EXIT НАЗАД нформация Sорматы видеосигнала различных странах используются различные форматы видеосигналов астройте монитор на систему цветного изображения которая используется в ашей стране А 8О Rистемы цветного изобра...

Page 222: ...е 6вободный Hаземление сигнала синхронизации 6вободный вусторонняя передача данных SDA 6трочная синхронизация или полный сигнал синхронизации адровая синхронизация 6инхронизатор данных омер штырька 1 2 3 4 5 6 7 8 9 10 11 12 13 14 15 игнал цифровой анные T M D S 2 анные T M D S 2 анные T M D S 2 экран 6вободный 6вободный 6инхронизация IУ анные IУ 6вободный анные T M D S 1 анные T M D S 1 анные T M...

Page 223: ... F О 4 F О 2 F О 3 F О 1 F О 1 О 7 Apple Macintosh 6 8 о горизонтали OTP OTP OTP OTP OTP OTP OTP О OTP О О О О О О О OTP OTP О О OTP О О О OTP OTP OTP О О OTP О О О О OTP О О О О О OTP OTP Sync on G Sync on G Sync on G Sync on G OTP OTP OTP C Sync C Sync C Sync OTP OTP Work Station EWS4800 8 Work Station HP 8 Work Station SUN 8 Work Station SGI IDC 3000G 6овместимые компьютеры IBM PC AT 8 о вертик...

Page 224: ...ет стандарту CVT 7Q8V А 8 есмотря на то что входные сигналы соответствуют разрешению указанному в приведённой выше таблице в случае ошибок синхронизации ашего компьютера ы можете настроить положение и размер изображения или улучшить его качество Этот монитор имеет разрешение 853 точек 480 строк Qекомендуется чтобы входной сигнал был VGA wide VGA или эквивалентный им F цифровым входом некоторые сиг...

Page 225: ...роено разрешение на компьютере 6игнал строчной и кадровой синхронизации при включённом интеллектуальном режиме управления электропитанием отсутствует 6лишком высокая температура внутри основного устройства приведено в действие устройство защиты от перегрева пособ устранения сли с изображением и звуком всё в порядке то шум возникает из за реакции корпуса на изменения температуры Это не влияет на ра...

Page 226: ... Digital Zoom возможность выбора 100 900 мультиэкран 15 ОR А 4 25 самодиагностика средства уменьшения выжигания мишени ABL W13R 1 3 1 R1Я 8 _ R5 17 автоматическое 1 2 ручное О 17 Э3 выбор цветовой температуры высокая средняя средняя низкая низкая 4 пользовательские памяти 8локировка управления за исключением кнопки включения выключения питания автоматическая настройка изображения пропуск входа нас...

Page 227: ......

Page 228: ... product wordt verkocht in de veronderstelling dat de installatie ervan door een erkende installateur met voldoende kennis en ervaring wordt uitgevoerd Laat dit product te allen tijde door een gespecialiseerde installateur of door uw dealer installeren en opstellen PIONEER aanvaardt geen aansprakelijkheid voor schade veroorzaakt door fouten tijdens de installatie of montage door verkeerd gebruik d...

Page 229: ...ven branden Onderstaande instructies moeten aandachtig worden gelezen en nauwlettend worden opgevolgd teneinde het toestel op veilige wijze te kunnen bedienen en beschadigingen te voorkomen Om gevaar voor brand en elektrische schokken te voorkomen 1 Zorg voor voldoende ruimte voor ventilatie om te voorkomen dat de inwendige temperatuur te hoog wordt Voorkom dat de ventilatiegleuven aan de achterka...

Page 230: ...lijk zijn Aanbevelingen om inbranden te voorkomen Zoals alle beeldschermen op fosforbasis en alle overige gasplasmaschermen zijn plasmaschermen onder bepaalde omstandigheden gevoelig voor inbranden Bepaald gebruik zoals het gedurende lange tijd continue weergeven van een statisch beeld kan inbranden tot gevolg hebben als de juiste voorzorgsmaatregelen niet op tijd worden genomen Om uw investering ...

Page 231: ...36 EEG gewijzigd bij 92 31 EEG en 93 68 EEG Let op Dit model is voor gebruik met de volgende optionele accessoires Gebruik met andere optionele accessoires kan resulteren in instabiliteit en lichamelijk letsel tot gevolg hebben Luidspreker PDP S32 LR Stander PDK TS09 Wandbevestiging PDK WM04 Kantelbare bevestiging PDK WT01 Plafondbevestiging PDK CK01 ...

Page 232: ...PICTURE 14 Instellen van het beeld 14 Aanpassen van het beeld aan de hoeveelheid licht in de kamer 14 Onderdrukken van beeldruis 14 Instellen van de kleurtemperatuur 14 Instellen van de kleur op het gewenste niveau 15 Wijzigen van de gammacurve 15 Instellen van de nuance 15 Instellen van de kleuren 15 Het instellingenmenu SOUND 16 Instellen van de hoge en lage tonen de balans en selecteren van de ...

Page 233: ...an het toestel en letsel aan de installateur tot gevolg hebben Schade door een verkeerde installatie valt niet onder de garantie van dit product Gebruik alleen de door de fabrikant geleverde en onder Opties vermelde wandbevestigingen of standers Tekening B Tekening A Gebruik van de metalen veiligheidsaccessoires Dit zijn accessoires waarmee het toestel aan een wand kan worden verankerd om te voork...

Page 234: ...ker een los verkrijgbare van een willekeurig merk om de deelsignalen naar de INPUT aansluitingen van het betreffende scherm te verzenden Bij gebruik als videowand is een wand van 4 plasmaschermen de norm voor een signaal dat lager is dan 1024 768 60 Hz Het verdient aanbeveling een distributieversterker te gebruiken bij een videowand die uit 9 of meer plasmaschermen bestaat Vanaf het tweede plasmas...

Page 235: ...eningssensor in het voorpaneel van het plasmascherm De werking van de afstandsbediening kan worden gehinderd door zonlicht of fel kunstlicht dat op de sensor schijnt en door obstakels die zich tussen de afstandsbediening en de sensor bevinden Hanteren van de afstandsbediening Laat de afstandsbediening niet vallen en behandel hem voorzichtig Voorkom dat de afstandsbediening nat wordt Gebeurt dit to...

Page 236: ...het on screen display OSD y VOLUME en Voor het instellen van het volume Fungeren als cursortoetsen en in het on screen display OSD u MENU SET Activeert het on screen display OSD en geeft het hoofdmenu weer WAARSCHUWING De netschakelaar zorgt er niet voor dat het plasmascherm volledig van de voeding van het elektriciteitsnet wordt losgekoppeld Benaming van de onderdelen en hun functie Opmerking Het...

Page 237: ...ngssignaal zie blz 17 G PC1 15 pins mini D sub Sluit een analoog RGB signaal van een pc e d op deze aansluiting aan Deze aansluiting kan als ingang én als uitgang worden gebruikt zie blz 24 H PC3 24 pins DVI Sluit op deze aansluiting een digitaal signaal TDMS van een bron met een DVI uitgang aan I RS 232C Sluit op deze aansluiting nooit een component aan zonder dat u eerst uw Pioneer installatiemo...

Page 238: ...verkleinen van het beeld 0 VOLUME Voor het instellen van het volume 1 MUTING Voor het dempen van het geluid 2 SCREEN SIZE De beeldverhouding wordt automatisch ingesteld op basis van het gedetecteerde ingangssignaal De SCREEN SIZE toets is niet bij elke signaal geactiveerd 3 DISPLAY Voor weergave op het scherm van de instellingen van de ingangsbron 4 OFF TIMER Activeert de schakelklok voor het uits...

Page 239: ...Wanneer op de ZOOM toets wordt gedrukt wordt het beeld weer verkleind en krijgt het zijn oorspronkelijke beeldpositie terug Om de beeldpositie te wijzigen Bepaal de beeldpositie met behulp van de toetsen 2 Druk op de POINT ZOOM toets om de aanwijzer te laten verdwijnen AUTO SET UP Om het beeldformaat of de beeldkwaliteit automatisch in te stellen Druk op de AUTO SET UP toets Informatie Als automat...

Page 240: ...beeld bekijken van normale videobeelden 4 3 Beeldformaat ZOOM uitvergroot Het beeld wordt in horizontale en in verticale richting uitgerekt waarbij de oorspronkelijke verhoudingen bewaard blijven Gebruik deze instelling voor het bekijken van bioscoopfilms enz Beeldformaat 2 35 1 Het samengedrukte filmbeeld wordt uitgerekt om het gehele scherm te vullen met een beeldverhouding van 2 35 1 Er verschi...

Page 241: ...ijn gedeponeerde handelsmerken van IBM Inc uit de Verenigde Staten Opmerking Gebruik het beeldformaat 4 3 of 14 9 niet gedurende langere tijd Dit kan inbranden veroorzaken SCREEN SIZE Bij weergave van computerbeelden Schakel de stand voor breedbeeld in om het 4 3 beeld schermvullend weer te geven 1 DrukopdeSCREENSIZE toetsvandeafstandsbediening 2 Binnen 3 seconden Druk nogmaals op de SCREEN SIZE t...

Page 242: ...oetsen van de afstandsbediening 5 De aanpassingen of instellingen worden in het geheugen opgeslagen De wijzigen blijven van kracht tot u ze opnieuw veranderd 6 Herhaal de stappen 2 5 om andere items te wijzigen of druk op de EXIT toets van de afstandsbediening om naar het hoofdmenu terug te keren Om de balk onderaan het scherm in te stellen moet de of toets binnen 5 seconden worden ingedrukt Gebeu...

Page 243: ...DIO INPUT1 VIDEO 1 3 COMPNT 1 2 PC1DSUB PC2 BNC PC3 DVI JA 16 AUDIO INPUT2 VIDEO 1 3 COMPNT 1 2 PC1DSUB PC2 BNC PC3 DVI JA 16 AUDIO INPUT3 VIDEO 1 3 COMPNT 1 2 PC1DSUB PC2 BNC PC3 DVI JA 16 Hoofdmenu Submenu Submenu 2 Submenu 3 Submenu 4 RESET REFERENCE SCREEN SCREEN SIZE 4 3 FULL WIDE ZOOM 2 35 1 14 9 16 V POSITION 64 0 64 JA 16 H POSITION 128 0 127 JA 16 V SIZE 0 64 JA 16 H SIZE 0 64 JA 16 AUTO ...

Page 244: ... LAST VIDEO 1 3 COMPNT 1 2 PC1DSUB PC2 BNC PC3 DVI JA 23 KEY LOCK OFF ON JA 23 IR REMOTE OFF ON JA 24 LOOP OUT OFF ON JA 24 ID NUMBER ALL 1 256 JA 24 VIDEO WALL DIVIDER OFF 1 4 9 16 25 JA 25 POSITION No 1 No 4 No 7 No 15 No 16 No 31 No 32 No 56 25 DISP MODE NORMAL ADJUST JA 25 AUTO ID OFF ON JA 25 SCREEN SCREEN SIZE 4 3 FULL WIDE ZOOM 2 35 1 14 9 26 V POSITION 64 0 64 JA 26 H POSITION 128 0 127 JA...

Page 245: ...atie AV SELECTION instellingen MOVIE 1 2 Selecteer deze stand wanneer u in een donkere kamer naar videobeelden kijkt Deze stand biedt een donkerder en fijner beeld zoals u dat in een bioscoop gewend bent Selecteer MOVIE2 voor het meest donkere beeld STD Selecteer deze stand wanneer u in een lichte kamer naar videobeelden kijkt In deze stand is het onderscheid tussen de lichte en de donkere gedeelt...

Page 246: ...oger wordt in de volgorde 1 2 3 en 4 Instellen van de nuance Met deze instellingen kan de nuance wordt verhoogd vooral in de donkere partijen Voorbeeld Instellen op 2 Zet ADVANCED OSD van het hoofdmenu 1 2 op ON en voer daarna de volgende handelingen uit Zet LOW TONE van het PICTURE menu op 2 PICTURE 2 2 PREVIOUS PAGE COLOR TEMP GAMMA LOW TONE C DETAIL ADJ MID 2 2 SEL ADJ EXIT RETURN Informatie LO...

Page 247: ...positie in via V POSITION van het SCREEN menu Het beeldformaat verandert telkens wanneer op de of toets wordt gedrukt in onderstaande volgorde 4 3 FULL Het beeldformaat kan ook worden gewijzigd met behulp van de SCREEN SIZE toets van de afstandsbediening Deinstellingenvanhet SCREEN menuzijnindefabriek niet voorgeprogrammeerd SCREEN SCREEN SIZE V POSITION H POSITION V SIZE H SIZE AUTO PICTURE PHASE...

Page 248: ...Instellen van de PC2 COMPONENT aansluitingen Via de instelling BNC INPUT kan de PC2 COMPONENT2 aansluiting worden ingesteld op RGB component en SCART1 of 2 Voorbeeld Instellen van BNC INPUT op COMP Zet BNC INPUT van het OPTION1 menu op COMP OPTION1 1 3 OSD BNC INPUT D SUB INPUT RGB SELECT HD SELECT INPUT SKIP ALL RESET NEXT PAGE COMP RGB AUTO 1080B OFF OFF SEL ADJ EXIT RETURN Informatie BNC INPUT ...

Page 249: ...et Instellen van de juiste RGB keuzestand voor computerbeelden Selecteer bij computerbeelden de juiste RGB keuzestand voor bewegende beelden zoals video breedbeeld of digitale uitzendingen Voorbeeld Instellen van RGB SELECT op MOTION Zet RGB SELECT van het OPTION1 menu op MOTION OPTION1 1 3 OSD BNC INPUT D SUB INPUT RGB SELECT HD SELECT INPUT SKIP ALL RESET NEXT PAGE RGB RGB MOTION 1024 768 OFF OF...

Page 250: ...I 50 Hz 1035I 60 HZ 1080I 60 Hz Voorbeeld Instellen van PURECINEMA op OFF Zet ADVANCED OSD van het hoofdmenu 1 2 op ON en voer daarna de volgende handelingen uit Zet PURECINEMA vanhet OPTION2 menuop OFF OPTION2 2 3 OFF OFF 3 OFF SEL ADJ PREVIOUS PAGE PWR MGT PURECINEMA LONG LIFE SIDE MASK S1 S2 DVI SET UP NEXT PAGE EXIT RETURN Informatie PURECINEMA instellingen ON Automatische boordeling en projec...

Page 251: ...E Interval van 1 5 minuten 1 horizontale punt of 1 verticale lijn per interval INVERSE Gebruik deze instelling om het beeld invers weer te geven of om een wit scherm weer te geven Voorbeeld Instellen van INVERSE op WHITE Zet INVERSE van het LONG LIFE menu op WHITE LONG LIFE ABL ORBITER INVERSE SCREEN WIPER SOFT FOCUS AUTO OFF WHITE OFF OFF SEL ADJ EXIT RETURN Informatie INVERSE instellingen ON Het...

Page 252: ...AITING TIME kan niet worden ingesteld als WORKING TIME op ON is gezet De WAITING TIME en de WORKING TIME kunnen in stappen van 3 minuten worden ingesteld op maximaal 12 uren en 45 minuten Instellen van WORKING TIME op ON Stel de werktijd in op 0 uren en 0 minuten Op de plaats van de tijdaanduiding verschijnt nu ON SOFT FOCUS Deze instelling vermindert de randen en verzacht het beeld Voorbeeld Inst...

Page 253: ...gesteld op LOW STB DVD Bij aansluiting van een set top box dvd enz BLACK LEVEL wordt automatisch ingesteld op HIGH BLACK LEVEL instellingen LOW Bij aansluiting van een pc HIGH Bij aansluiting van een set top box dvd enz Verander de instelling van HIGH in LOW als het zwartniveau er grijs uitziet Instellingenmenu OPTION3 Gebruik van de timer Met deze functie kan het plasmascherm automatisch op het g...

Page 254: ... Een koppelteken in het ON of OFF veld Een koppelteken in het ON veld of in het OFF veld geeft aan dat de functie niet kan worden ingesteld Een koppelteken in het FUNCTION veld Een koppelteken betekent laatst gebruikte functie de functie die was ingeschakeld op het moment waarop het plasmascherm werd uitgeschakeld Instellen van de aanvangsmodus Met deze instelling kan worden bepaald welke ingang w...

Page 255: ...herm weergegeven ongeacht de instelling van LOOP OUT Instellen van het identificatienummer Hetismogelijkombijgebruikvanmeerdereplasmaschermen een uniek identificatienummer toe te kennen aan elk plasmaschermomtevoorkomendatdiverseplasmaschermen Instellen van het identificatienummer in de afstandsbediening Voorbeeld Instellen op 2 Druk op de ID NO SET toets van de afstandsbediening Het ID NO SET men...

Page 256: ...an deze instellingen heeft gekozen moet u ook de positie van elk individueel plasmascherm in de videowand instellen via VIDEO WALL POSITION AUTO ID Met deze functie kunnen de identificatienummers van meerdere op elkaar aangesloten plasmaschermen automatisch worden toegekend Voorbeeld Instellen op ON Stel eerst het identificatienummer voor plasmascherm nr 1 in via het ID NUMBER menu Zet AUTO ID van...

Page 257: ...ingedrukt worden alle plasmaschermen één voor één ingeschakeld Vanaf het tweede plasmascherm functioneert noch de POWER toets van het plasmascherm noch de POWER ON toets van de afstandsbediening meer U kunt een plasmascherm echter gewoon inschakelen door de POWER ON toets van de bij het scherm behorende afstandsbediening gedurende 3 seconden ingedrukt te houden ABL LINK Gebruik deze functie om erv...

Page 258: ...ige menu is toegankelijk voor geavanceerd gebruik OFF Sommige onderdelen van het menu zoals OPTION2 en OPTION3 zijn niet toegankelijk Instellingenmenu COLOR SYSTEM Instellen van het soort videosignaal Volg deze procedure om de kleursystemen van composiet videosignalen of Y C gescheiden videosignalen in te stellen Voorbeeld Instellen van het kleursysteem op 3 58 NTSC Selecteer COLOR SYSTEM van het ...

Page 259: ...al T M D S data 2 T M D S data 2 T M D S data 2 aarde Geen aansluiting Geen aansluiting DDC klok DDC data Geen aansluiting T M D S data 1 T M D S data 1 T M D S data 1 aarde Geen aansluiting Geen aansluiting 5 V voeding Aarde Hot Plug detectie T M D S data 0 T M D S data 0 T M D S data 0 aarde Geen aansluiting Geen aansluiting T M D S klok aarde T M D S klok T M D S klok 15 pins mini D sub aanslui...

Page 260: ... JA JA 4 JA JA 4 JA 7 JA 7 FULL 16 9 JA JA JA JA JA JA JA JA 3 JA 3 JA JA JA JA JA JA JA JA JA JA JA JA JA JA JA JA JA JA JA JA JA JA JA JA JA JA JA JA JA JA JA JA JA JA JA JA JA JA JA JA JA JA JA JA JA JA JA 7 JA 7 RGB select 5 STILL STILL WIDE2 WIDE1 STILL STILL STILL STILL STILL WIDE1 WIDE3 WIDE1 WIDE1 WIDE2 WIDE1 WIDE1 WIDE2 STILL WIDE4 WIDE2 WIDE3 WIDE1 WIDE1 MOTION Apple Macintosh 6 8 Horizo...

Page 261: ...eit is ingesteld op sync aan groen 9 Voldoet aan de CVT norm OPMERKING Hoewel de ingangssignaal voldoen aan de in bovenstaande tabel genoemde resoluties kan het door synchronisatiefouten van de computer nodig zijn om beeldpositie en formaat af te stellen of fijnafstelling uit te voeren Dit plasmascherm heeft een resolutie van 853 punten 480 lijnen Het is raadzaam om als ingangssignaal VGA wide VGA...

Page 262: ...e REMOTE IN aansluiting bedraad De bedieningsorganen van het plasmascherm functioneren niet als de KEY LOCK toetsvergrendeling is ingeschakeld Zit de stekker van het netsnoer van het plasmascherm in het stopcontact Staat het volume te zacht Is de MUTING dempingsfunctie ingeschakeld Zijn de luidsprekers goed aangesloten Verkeerde beeldinstellingen Plaatselijke interferentie Loszittende kabelaanslui...

Page 263: ...deowand van 4 25 plasmaschermen Zelfdiagnose Hulpmiddelen voor reductie van inbranden ABL LOCK1 3 INVERSE WHITE ORBITER Auto1 2 handmatig SCREEN WIPER Kleurtemperatuurinstelling instelbaar hoog middel middellaag laag 4 gebruikergeheugens Toetsvergrendeling behalve netschakelaar Automatische beeldinstelling Ingangen negeren Kleurdetailinstelling Nuance instelling 3 standen Automatische toekenning i...

Page 264: ......

Page 265: ......

Page 266: ... K TEL 44 1753 789 789 PIONEER ELECTRONICS AUSTRALIA PTY LTD 178 184 Boundary Road Braeside Victoria 3195 Australia TEL 61 39 586 6300 PIONEER ELECTRONICS ASIACENTRE PTE LTD 253 Alexandra Road 04 01 Singapore 159936 TEL 65 6472 1111 PIONEER HK LIMITED Suite 901 906 9th Floor World Commerce Centre Harbour City 11 Canton Road Tsim Sha Tsui Kowloon Hong Kong TEL 852 2848 6488 PIONEER GULF FZE Lob 11 ...

Reviews: