background image

En

25

Advanced 

Operation

!

  When [

BROWSE (SEARCH)

] is touched while the browser screen 

is displayed, the browser screen closes and switches to the normal 
playback screen.


If you touch [

BROWSE (SEARCH)

] again, the last browser screen 

opens.


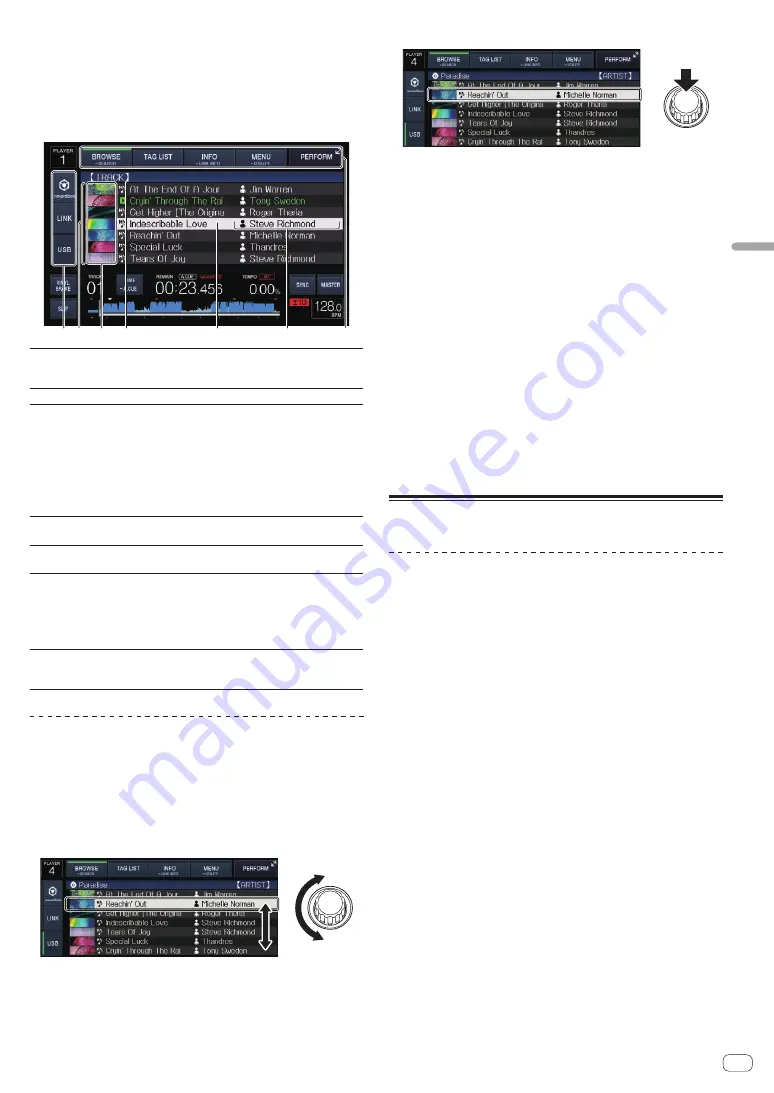
Description of the screen

5

2

6

3

1

4

7

1

Media select

The indicator corresponding to the touched media 
([

USB

], [

LINK

], [

rekordbox

]) lights.

The medium on which the track is loaded flashes.

2

List of contents

The contents of the selected medium are displayed.

3

Jacket photo

Part of the artwork registered in rekordbox is displayed 
here.
When [

INFO (LINK INFO)

] is touched, the jacket photo 

turns off and the track names are displayed along the 
left edge.
For lists of playlists and playing histories, a serial 
number is displayed.
If there is no rekordbox library, the track names are 
constantly displayed along the left edge.

4

Uppermost level

Displays the name of the upper folder or media of the 
displayed item.

5

Cursor

Turn the rotary selector to move the cursor up and 
down.

6

User-set 
categories

The categories displayed with rekordbox can be 
selected.
When [

INFO (LINK INFO)

] is touched, the details of the 

track selected with the cursor are displayed.
If there is no rekordbox library, the details of the track 
selected with the cursor are displayed.

7

Mode select

The indicator corresponding to the touched key 
([

BROWSE (SEARCH)

], [

TAG LIST

], [

INFO (LINK 

INFO)

], [

MENU (UTILITY)

] or [

PERFORM

]) lights.

Basic operations on the browse screen


Selecting items

1  Display the browse screen.

=


Switching to the browse screen

 (p. 24 )

2  Turn the rotary selector to select an item.

The jump function can be used by pressing the rotary selector for over 1 
second.

=


Searching using the jump function

 (p. 26 )

3  Press the rotary selector to enter the item.

When there is a lower layer, that layer opens. When a menu, etc., is 
displayed, the selected item is entered.
When the rotary selector is pressed while the cursor is set at a track, that 
track is loaded in this unit.


Moving back up to a higher layer

Press the [BACK] button while the browser screen is 
displayed.

The screen moves back to the layer above.

!

  When the [

BACK

] button is pressed for over 1 second or the media 

being browsed is touched, the display moves to the topmost level.

!

  To play a track on a USB device or a track in the rekordbox library on 

a computer or a mobile device, the information below can be viewed 
by pressing the [

BACK

] button at the topmost level.

  When there is no rekordbox library information on the USB 

device: That medium’s free space and used space

  When there is rekordbox library information on the USB device: 

That medium’s free space and used space, as well as the num-
ber of tracks, number of playlists and last modified dates in the 
library information

  rekordbox on a computer or mobile device: The number of tracks 

and playlists in the library information

Other browsing operations

Rearranging tracks (Sort menu)

While browsing, the sort menu can be used to change the order of the 
tracks.

!

  This function only works in the following cases:

  When browsing the rekordbox library on a computer or mobile 

device

  When browsing the rekordbox library on a USB device

1  Display the rekordbox library.

=


Playing media connected to or inserted in this unit

 (p. 17 )

=


Playing music files on other DJ players

 (p. 18 )

=


Playing the rekordbox library on a computer or mobile device


(p. 18 )

2  When the list of the tracks is displayed, touch 
[MENU (UTILITY)].

The sort menu appears on the screen.

3  Use the rotary selector to select and enter the sort 
item.

The tracks on the list are sorted according to the selected item.

!

  The sort items displayed on the sort menu can be changed in the 

rekordbox settings. The rekordbox library on the USB device is 
reflected once it is re-exported after changing the settings.

Summary of Contents for rekordbox XDJ-700

Page 1: ...ation and services regarding rekordbox see the Pioneer DJ website above http kuvo com http pioneerdj com support The Pioneer DJ support site shown above offers FAQs information on software and various other types of information and services to allow you to use your product in greater comfort ...

Page 2: ...ration Turning the power on 17 Turning the power off 17 Connecting and disconnecting USB devices 17 Playback 17 Operating the jog dial 19 Advanced Operation Setting Cue 20 Setting loops 20 Setting Hot Cue 21 Storing cue or loop points 22 Deleting stored cue or loop points 22 Setting the cue point for auto cueing 22 Using the slip mode 22 Playing from the touched position on the waveform display 23...

Page 3: ...with this unit In these operating instructions the version of rekordbox for Mac Windows is referred to as rekordbox Mac Windows rekordbox is used to indicate the versions of rekordbox Mac Windows and rekordbox iOS Android simultaneously as well as when referring to rekordbox functions directly rekordbox iOS Android rekordbox iOS Android a smartphone application that can be down loaded free of char...

Page 4: ...track can be grasped instantaneously NEEDLE SEARCH Just touch the overall waveform WAVE with your finger to instantly play the tune next to the touched one A quick point search can be done by instinctive operation HOT CUE This unit has a hot cue that can instantly play back from the cue points that have been set in advance AUTO BEAT LOOP Auto beat loops are prepared for setting loops automatically...

Page 5: ...you cannot return to the normal condition cannot communicate using the above mentioned procedure turn off the power supply unit once and then turn the power on again If multiple partitions are set on the USB device only the first partition can be used When rekordbox library information is present the partition containing the rekordbox library information has priority USB devices equipped with flas...

Page 6: ...ting the mobile device on which rekordbox iOS Android is installed via USB For sup ported devices see the Pioneer DJ support site http pioneerdj com support For details on installing rekordbox iOS Android see the Pioneer DJ website http www rekordbox com Cautions on copyrights rekordbox restricts playback and duplication of copyright protected music contents When coded data etc for protecting the ...

Page 7: ...he protrusions on the stand into the guide holes on the bottom of this unit 2 Push the stand until it clicks into place 3 Check that the two release levers are firmly hooked on this unit and are not released How to remove 1 Move the two release levers on the bottom of the stand inward to release the lock 2 Remove the stand Release lever CAUTION You may drop the product if you release the lock of t...

Page 8: ...mixers up to four PRO DJ LINK compatible players can be connected with LAN cables CAT5e using PRO DJ LINK connections A switching hub commercially available may be necessary depending on the combination of models used Use a switching hub of 100 Mbps or greater Some switching hubs may not operate properly A switching hub commercially available is necessary to connect to a mixer equipped with only o...

Page 9: ...K LINK Export When a computer on which rekordbox is installed is taken into the DJ booth and connected to this unit using a LAN cable CAT5e or wireless LAN Wi Fi router tracks in rekordbox can be selected and played This makes it possible to use such information as playlists cues and loops that have been set ahead of time with rekordbox for performances When a mobile device on which rekordbox iOS ...

Page 10: ...panel without using a hub Using a wireless router and access points rekordbox rekordbox DJ player 3 DJ mixer LAN cable LAN cable 3 Audio cable Audio cable 3 Computer Wireless router and access point Mobile device on which rekordbox is installed Computer L R AC adapter Rear panel To power outlet Cautions In order to maximize the use of music file management functions of rekordbox please match the p...

Page 11: ...IDI or HID compatible DJ software program is installed the DJ software can be operated from this unit The sound of the music file that is playing on the computer can be output from this unit For details see Using the DJ software on page 33 and Installing the driver software on page 32 L R DJ player DJ mixer Audio cable Audio cable USB cable USB cable DJ software Computer AC adapter Rear panel To p...

Page 12: ...nding the beginnings of tracks Track Search p 18 5 IN 4BEAT IN ADJUST button Use this to set and fine adjust the loop in point Setting loops p 20 6 OUT OUT ADJUST button Use this to set and fine adjust the loop out point Setting loops p 20 7 RELOOP EXIT button Use this to return to loop playback reloop or cancel loop playback loop exit Returning to Loop playback Reloop p 21 8 USB STOP button Press...

Page 13: ...6 WIDE button Use this to switch the playing speed adjustment range Adjusting the playing speed Tempo control p 18 i MASTER TEMPO button Use this to turn the master tempo function on and off Adjusting the playing speed without changing the pitch Master Tempo p 19 j TEMPO slider Use this to adjust the track playing speed Adjusting the playing speed Tempo control p 18 k Jog dial This can be used for...

Page 14: ...ying speed without changing the pitch Master Tempo p 19 d Playing speed display The value changes according to the position of the TEMPO slider e BPM display Displays BPM Beats Per Minute of the track currently being played The BPM measured by this unit may differ from the BPM indi cated on the audio source or that of a Pioneer DJ s DJ mixer etc This is due to the different methods used for measur...

Page 15: ...nce screen b CUE LOOP CALL c LOOP 1 2X d LOOP 2X Use these to call out stored cue and loop points Calling out stored cue or loop points p 22 When pressed during loop playback the loop is cut or extended Cutting loops Loop Cut p 21 Extending loops loop doubling p 21 c MEMORY DELETE Use this to store cue and loop points in the memory If you continue to touch and hold for over 1 second the cue point ...

Page 16: ...p automatically based on the track s tempo Auto Beat Loop p 21 2 REV Use this to turn reverse playback on and off Playing in reverse p 19 3 HOT CUE A B C Playing hot cues p 21 4 HOT CUE REC Setting Hot Cue p 21 5 HOT CUE CALL Calling out hot cues p 22 En 16 ...

Page 17: ...device p 18 Playing media connected to or inserted in this unit 1 Load the medium in this unit Connecting USB devices p 17 2 Touch USB The tracks or folders are displayed on a list The contents of the media to be displayed on the main unit display can be switched USB Displays music files in the connected USB device or mobile device on which rekordbox is installed LINK Displays music files in other...

Page 18: ... the rotary selector When the track is loaded the screen switches to the normal playback screen The track is loaded and playback starts Normal playback screen display part p 14 Load previous tracks The names of the last seven tracks that were played can be displayed and these tracks can be selected 1 Display the normal playback screen Normal playback screen display part p 14 2 Touch MENU UTILITY 3...

Page 19: ...l without touching the top The playing speed increases when spun clockwise decreases when spun counterclockwise When spinning is stopped playback returns to the normal speed When the jog mode is set to the CDJ mode the same operation can be performed by spinning the top of the jog dial Scratch When the jog mode is set to the VINYL mode tracks can be played according to the direction and speed at w...

Page 20: ... A CUE for over 1 second again auto cue is set to Off The auto cue level setting remains in the memory even when the power is turned off Setting loops This function can be used to play specific sections repeatedly When the quantize function is on there may be a slight delay in operation of this function in order to synchronize the beat 1 During playback press the IN 4BEAT IN ADJUST button at the p...

Page 21: ...track can no longer continue to play DJ playback is restricted during emergency looping To cancel emer gency looping load the next track Setting Hot Cue When a hot cue is set that point can be called out and played instanta neously Up to 3 hot cues can be set per music track When the quantize function is on there may be a slight delay in operation of this function in order to synchronize the beat ...

Page 22: ...Y PAUSEf Normal or loop playback starts from the point that was called out Deleting stored cue or loop points 1 Load the track containing the cue point or loop points you want to delete 2 Touch CUE LOOPCALLc or CUE LOOPCALLd to call out the point to be deleted The track cues to the called out point and pauses When multiple points are stored a different point is called out each time the buttons CUE...

Page 23: ... different beat without releasing BEAT LOOP the loop set first during playback is called out with the RELOOP EXIT button Slip reverse 1 Touch SLIP The mode switches to the slip mode 2 Touch PERFORM 3 Touch REV REV lights and reverse playback starts Normal playback continues in the background even during reverse playback Slip reverse play is automatically canceled after 8 beats have elapsed from th...

Page 24: ...sing the DJ player not set as the sync master the synchronization is canceled and BEAT SYNC blinks Adjusting the beat grid The enlarged waveform displays the beat grid with red lines The beat grid can be adjusted by the following procedure 1 Press the rotary selector for at least 1 second The mode switches to the GRID ADJUST mode 2 When the rotary selector is turned the beat grid is adjusted You c...

Page 25: ... layer opens When a menu etc is displayed the selected item is entered When the rotary selector is pressed while the cursor is set at a track that track is loaded in this unit Moving back up to a higher layer Press the BACK button while the browser screen is displayed The screen moves back to the layer above When the BACK button is pressed for over 1 second or the media being browsed is touched th...

Page 26: ...certain symbols In the page jump mode 1 Display a list not sorted in alphabetical order Displays the list without sorting in alphabetical order such as folders on a USB device 2 Press the rotary selector for at least 1 second The mode switches to the page jump mode 3 Turn the rotary selector to select the page The display moves to the selected page Using the information jump function The categorie...

Page 27: ... history is loaded as a rekordbox playl ist the previously loaded playing history is deleted from the USB device For tracks in the PLAYLIST category the tracks can be changed from green played to white not played using MENU UTILITY When this change is made the tracks are deleted from the playing history list 7 Use the rotary selector to select and enter OK Editing tag lists Tracks to be played nex...

Page 28: ...d to the end then the stop mode is set The next track is not played Removing one track at a time 1 Touch TAG LIST The tag list is displayed 2 Use the rotary selector to select and enter the medium When a medium is selected that medium s tag list is displayed 3 Use the rotary selector to set the cursor to the track you want to remove 4 Press the TAG TRACK REMOVE button for over 1 second Tracks can ...

Page 29: ...yed Changing track ratings The tracks ratings can be changed 1 Load a track 2 Touch INFO LINK INFO on the normal playback screen The track s details are displayed 3 Select the rating displayed in the detailed information display example 4 Press the rotary selector for over 1 second then turn the rotary selector clockwise or counterclockwise The rating of the loaded track is changed 5 Press the rot...

Page 30: ...color set in the USB device 1 Loading USB devices 2 Touch USB 3 Touch MENU UTILITY Only for the USB device with an audio file or management data exported from rekordbox BACKGROUND COLOR is displayed 4 Turn the rotary selector to select BACKGROUND COLOR of MY SETTINGS 5 Use the rotary selector to choose and decide the color to be set Displaying the UTILITY screen Touch MENU UTILITY for over 1 secon...

Page 31: ... screen p 30 2 Use the rotary selector to select and enter AUTO STANDBY 3 Use the rotary selector to select and enter ON or OFF When AUTO STANDBY is set to ON the auto standby function is activated and the standby mode is set in the cases described below When absolutely no operation is performed for over 4 hours with no USB device connected no PRO DJ LINK connections or computer connected to the U...

Page 32: ...1 Connect this unit to your computer via a USB cable For instructions on connecting see Using the DJ software on page 11 2 Press the u switch Turn on the power of this unit The message Installing device driver software may appear when this unit is first connected to the computer or when it is connected to a different USB port on the computer Wait a while until the message Your devices are ready fo...

Page 33: ...rotary selector to enter 5 Touch MENU UTILITY The previous screen reappears List of MIDI Messages SW Name SW Type MIDI Messages Notes MSB JOG TOUCH Bn 10 dd A linear value corresponding to the speed from stop to 4X 64 for stop 65 0 06X 127 4X in the forward direction 63 0 06X 0 4X in the reverse direction TEMPO SLIDER VR Bn 1D dd 0 127 0 on the side 127 on the side JOG RING Bn 30 dd A linear value...

Page 34: ... 9n 2B dd OFF 0 ON 127 BEAT LOOP 16 GUI button 9n 2C dd OFF 0 ON 127 SLIP GUI button 9n 2D dd OFF 0 ON 127 TAG TRACK SW 9n 30 dd OFF 0 ON 127 BACK SW 9n 32 dd OFF 0 ON 127 ROTARY SELECTOR PUSH SW 9n 33 dd OFF 0 ON 127 NEEDLE GUI Bn 1C dd OFF 0 1 to 127 position data from left to right side n is the channel number ...

Page 35: ...a USB device Are you trying to store more points than the limit Ten cue points or loop points per track can be stored on a USB device If you try to store more points than the limit CUE LOOPPOINT FULL is dis played and the points cannot be stored In this case delete some points before storing new ones Is the USB device write protected If the USB device is write protected USB FULL is displayed and t...

Page 36: ...ble below is displayed or if the same error code is displayed again after taking the indicated action contact your store of purchase Error code Error type Description of error Cause and action E 8302 CANNOT PLAY TRACK Track data files in the USB cannot be read correctly The track data file may be corrupt dCheck whether the track file can be played on another player etc capable of playing the same ...

Page 37: ...istered in the U S and other countries Android is a trademark of Google Inc iOS is a trademark on which Cisco holds the trademark right in the US and certain other countries This software is based in part on the work of the Independent JPEG Group About using MP3 files This product has been licensed for nonprofit use This product has not been licensed for commercial purposes for profit making use s...

Reviews: