


10
www.pilotage-rc.com
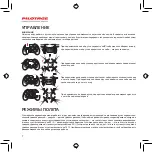
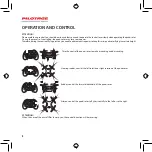
Если невозможно отрегулировать нормальный полет модели при помощи триммеров, пожалуйста, выполните калибровку
акселерометра модели, как описано ниже:
1 . После инициализации модели с передатчиком, пожалуйста, установите квадрокоптер на ровную горизонтальную поверхность .
2 . Включите самую резкую скорость реакции, а затем установите ручку газа в положение до упора на себя .
3 . Одновременно переместите ручку газа в левый нижний угол, а правую ручку передатчика в верхний левый угол . В те-
чение 1–2 секунд индикатор модели будет мигать, указывая, что калибровка произведена успешно .
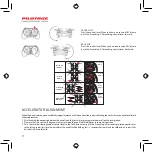
ПРИМЕЧАНИЕ:
Если модель по-прежнему дрейфует в одном и том же направлении, повторите
калибровку, предварительно подложив под стойки модели, в сторону которых
дрейфует квадрокоптер, несколько листов бумаги . Чем сильнее дрейфует модель,
тем больше потребуется листов, чтобы компенсировать угол наклона .
НЕПОЛАДКИ И ИХ УСТРАНЕНИЕ
Если во время полета модель столкнется с препятствием, или по любой другой причине, при которой затрудняется вращение
пропеллеров, то автоматически срабатывает защита, отключающая подачу питания от батареи . Чтобы запустить моторы
вновь, при условии что аккумулятор полностью заряжен, вы можете просто отключить батарею и вновь подключить ее,
чтобы перезапустить систему . Если после переподключения моторы не запускаются, это означает, что энергии батареи
недостаточно . Используйте USB кабель, чтобы зарядить батарею модели .
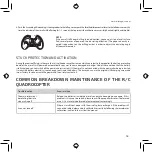
ВКЛЮЧЕНИЕ ПОСЛЕ СРАБАТЫВАНИЯ ЗАЩИТЫ
Неполадка
Метод устранения
Пропеллеры не вращаются
Правильно подключите батарею модели и заново проведите
процесс инициализации . Если проблема не решена,
пожалуйста, проверьте отсутствие повреждений пропеллеров
и моторов, при обнаружении повреждений замените
дефектные узлы на новые .
Модель не может взлететь
При недостатке мощности, пожалуйста, зарядите аккумулятор
модели . Если проблема с устойчивостью, пожалуйста,
правильно откалибруйте акселерометр, как написано
в инструкции .
Summary of Contents for NANO-X2
Page 1: ...NANO X2...
Page 2: ...1 3 4 5 5 6 7 7 8 9 9 10...
Page 4: ...3 1 2 3 4 5 6 7 8 9 10 11 12 13 14 15 16 17 18 14...
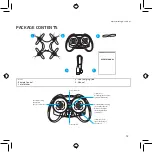
Page 5: ...4 www pilotage rc com 1 2 4 3 5 1 Nano X2 2 3 4 USB 5 USER S MANUAL...
Page 6: ...5 14 25 1 2 3 1 1 2 3...
Page 8: ...7 30 50 70...
Page 9: ...8 www pilotage rc com 3 360C 1...
Page 10: ...9...
Page 11: ...10 www pilotage rc com 1 2 3 1 2 USB...
Page 21: ...20 www pilotage rc com NOTES...
Page 22: ...21...
Page 23: ...22 www pilotage rc com...
Page 24: ...www pilotage rc com...


