27
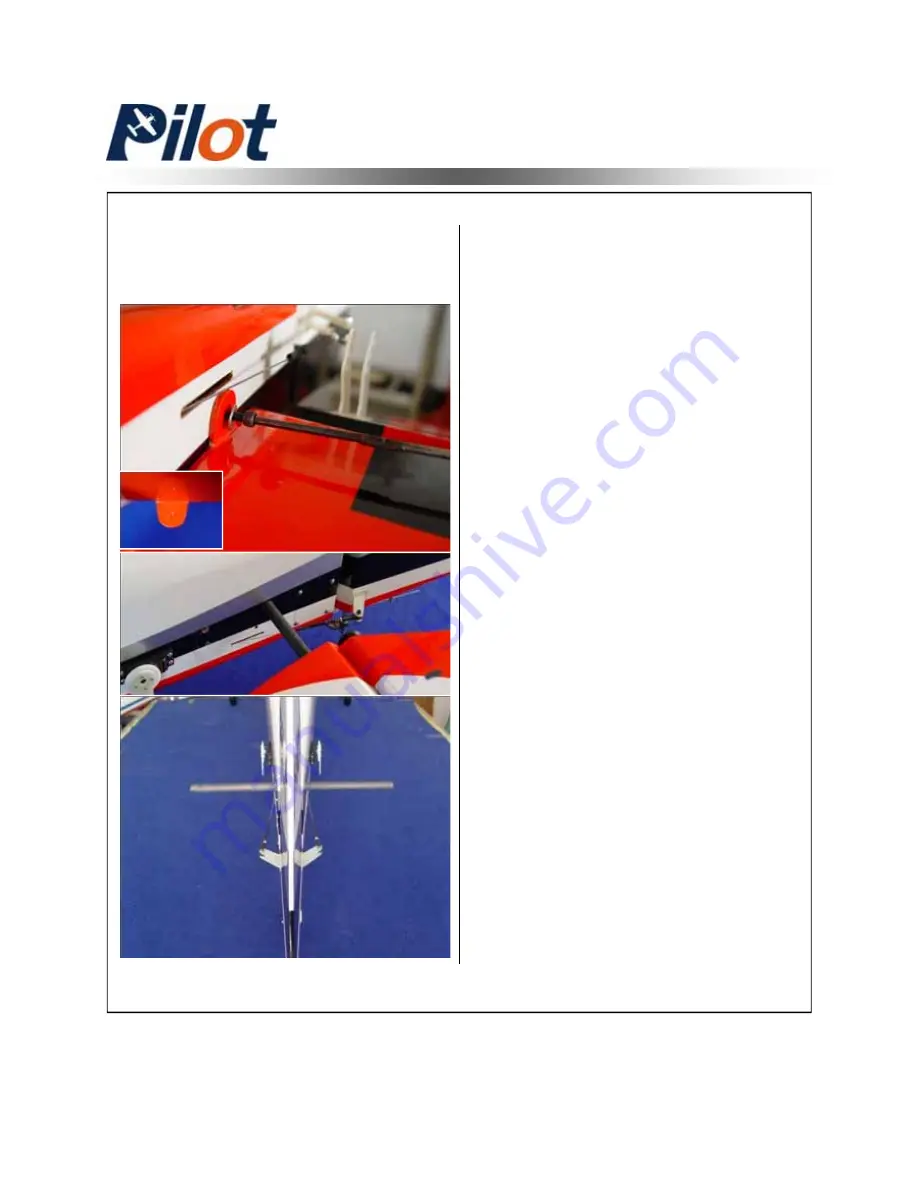
7. Repeat all the step above for the other stabilizer
Elevator Servo Assembly
6. Install the stab with mounting bolts and washers
Page 1: ...www pilot www pilot rc com rc com Wingspan 88 in Wingarea 1479 8 sp in Length 78 8 in Engine 50CC Assembly Manual For Skyline 182...
Page 2: ...ance both the design and manufacturing have been taken care with the highest quality from any hardware covering wood and glue in the construction as well By optimal weight and reliable construction yo...
Page 3: ...e are not responsible for any accident or damage while using this product It is impossible to determine for certain whether crash damage was the result of improper installation of our products a radio...
Page 4: ...perience and competence to an experienced level This plane is not for a beginner If you are in doubt have an experienced pilot at hand Diligent practicing and correct guidance is essential accidents c...
Page 5: ...vo Assembly Rudder Assembly Elevator Servo Assembly Engine Unit Firewall Assembly Engine Assembly Throttle Servo Assembly Ignition Module Hatch And Fuel Tank Final Assembly Unit Cowl Assembly Canister...
Page 6: ...5 Front Landing Gear Installation Landing Gear Assembly...
Page 7: ...re are 6 holes in the bottom of the engine box which are for the front landing gear 2 Mount the front landing gear to the fuselage with 6 bolts 4 Outside view of mounting front landing gear 3 Inside v...
Page 8: ...landing gear put the plastic washer on the top of the arm Then install the circlips 7 Adjust the rod length to make the front wheel in the middle place 8 Finished view 5 Install the servo for front l...
Page 9: ...8 Front Landing Gear Assembly 10 Take off the bottom part of the landing gear 9 Take off this bolt 11 Install the tire into the front landing gear with the circlips outside...
Page 10: ...e pants into the front landing gear 1 There is a hole on the top of the front wheel pants 3 Screw two side bolt to fit the wheel pants Note the front wheel pants are different shape from the rear whee...
Page 11: ...to the landing gear But do not glue it to the fuselage and wheel pant 1 Install the landing gear with the bolts and locking nuts Do not over tighten the hardware 3 Install the landing gear axles with...
Page 12: ...ars using Blue Loctite on the set screws 6 Drill the holes for the mounting bolts and install the blind nuts 7 Finish the wheel pants mounting with the bolts 8 Glue the plastic part for the landing ge...
Page 13: ...12 Rear Landing Gear Assembly 9 Glue the plastic part to the wheel pants...
Page 14: ...ansmitter and plug the servo into receiver Ensure every channel is neutral 2 Ensure the servo arm is 90 degrees with servo as shown Then mark and drill holes with 2mm bit 3 Mounting screws and nuts 15...
Page 15: ...on the horns and locking plates 2 Trace around the locking plate with kinfe and cut off the cover below Then the pre cut slots appear 3 Scuff the horns with a piece of sand paper for good glue bond T...
Page 16: ...r horn and coat the horn with epoxy as shown 5 Slide the horn into slot slightly and Mount the locking plate in place Wipe away excess epoxy with rubbing alcohol Servo Installation Wing Servo Assembly...
Page 17: ...rder to ensure the servo wire can be pulled out without hanging up inside wing 4 Then put the extention lead through the root of wing 5 Find four sets of servo mounting plate Wing Servo Assembly 2 Loc...
Page 18: ...ll the mounting holes Then screw four bolts to fix the servo to the servo mounting 8 Install servo arm Wing Servo Assembly 6 Glue two piece of wood to the servo mounting plate as shown Note Be sure to...
Page 19: ...0 6 Install the servo arms facing toward the wing edge and adjust pushrod in proper length to keep the aileron panel on the neutral position 7 Repeat all the step above for the flap Wing Servo Assembl...
Page 20: ...glue yet So take off the hinges from the rudder Then glue it to the vertical fin at the first Mustl glue the hinges to the vertical fin at the first 2 Open the cover plate on the bottom of the rear o...
Page 21: ...all the horn for the rudder steel axle and servo as the photos show 6 Glue the hinge to the rudder Push the rudder axle into the hole on the rudder when glue the hinge to the rudder 5 There is a hole...
Page 22: ...eceiver Ensure every channel is neutral 2 Ensure the servo arm is 90 degrees with servo as shown Then mark and drill holes with 2mm bit 3 Mounting screws and nuts 180 in zo Metal Gear Digital A drop o...
Page 23: ...on the horns and locking plates 2 Trace around the locking plate with kinfe and cut off the cover below Then the pre cut slots appear 3 Scuff the horns with a piece of sand paper for good glue bond Th...
Page 24: ...with epoxy as shown 5 Slide the horns into slots slightly and Mount the locking plate in place Align the right and left sides before epoxy has cured Wipe away excess epoxy with rubbing alcohol Servo I...
Page 25: ...lead through fuselarge Elevator Servo Assembly 4 Lock the connector with the provided safety clip against vibration and loosened tension as shown 3 Install the servo arm with mounting screw and make i...
Page 26: ...27 7 Repeat all the step above for the other stabilizer Elevator Servo Assembly 6 Install the stab with mounting bolts and washers...
Page 27: ...rust The center of the engine axle will be in the exact center of the cowl 1 Measure the length of the engine from the firewall to the prop thrust washer the cowl and the engine box for the proper dis...
Page 28: ...all according pre set laser holes for DA 100 Otherwise measure your engine s mounting location 3 Drill the screw mounting holes aligning the line you have drawn both side as shown with the firewall ta...
Page 29: ...30 Engine Installation Remember Use Bue Loctite on all engine mounting screws Not Include Throttle servo Installation Engine Assembly 1 Install the engine throttle arm witn a little Blue Loctite...
Page 30: ...ottle servo mounting tray is going to be mounted on the engine box to get the straight and precise throttle linkage connection then make a mark 2 Measure and cut the extra wire Then bend to a sharp of...
Page 31: ...ttach to safety cover surplied as shown 2 Position the ignition outside the engine box to allow the spark plug leads to connect the engine without excess tension Drill for Nylon tie 3 Lock the connect...
Page 32: ...e Box Hatch Epoxy the hatch in place and secure with self tapping screws Fule Tank and Dot Fule tank and fule dot have been installed Just tighten the velcro ties Hatch And Fule Tank Fule line Fule Fi...
Page 33: ...shape Trial fit to make sure there is a minimum of 3 8 around the engine cooling 2 Use a fiber cutting tool to rough cut the cowl and finish with a round sander 3 Ensue all the corner are rounded and...
Page 34: ...35 Canister Assembly Canister Assembly 2 Glue the mounting to the canister room 3 Install the headers 1 Put the canister to the mounting...
Page 35: ...36 Canister Assembly Canister Assembly 4 Cut the covering on the canister room cover This is very important because it will cool the engine...
Page 36: ...sembly 1 All light already pre install in the factory You only need to connect the wire to the flashing controller The lampstand for wing tip and rudder are pre installed You only need to put the ligh...
Page 37: ...tach to the fuselage It is similar to the No 1 part You need to put to the wing or fuselage so you will know which it is 3 for the landing gear which attach to the fuselage 4 for the wheel pants 5 for...
Page 38: ...the aluminium part to the fuselage with the bolt and the nut 6 screw the aluminium part to the wing with the bolt The wing has preinstalled blind nut Then connect the wing strut to the wing 6 cut one...
Page 39: ...tic part to the wing or screw to the wing with the bolts 8 There is a pre dirll hole on the mid of the landing gear the wing strut can close like the left photo show 9 Screw the aluminium part to the...
Page 40: ...eron 30 Degrees on High rate 12 Degrees on Low rate Rudder 30 Degrees on High rate 20 Degrees on Low rate Throttle Adjust idle full Learn to use exponential of about 40 percent on your elevator to mak...
Page 41: ...for damage if you made a bad landing your first time Have an experienced pilot fly it for the first time if you have any doubts in your mind about the maiden flight Take a break after you first flight...