background image

MAINTENANCE

4-10


 /   Husky 12 Foam System

© 2017 Pierce Manufacturing Inc. All Rights Reserved.

4-6.3

Set Startup or Default Foam Source

MODE SELECT 

 SETUP SELECTION 

 SETUP 

 STARTUP SOURCE

NOTE:

The default foam source setting is used to determine which tank will open as the default tank, Class 

A or Class B. On a single tank system it will change the default setting (Class A or Class B). If 

changing a single tank system from A to B default, the foam valve remains plugged into the Class 

A harness. If changing the types of foam in the tank, It is imperative to thoroughly flush out and dry 

the entire system.   

Figure

 4-13:


Setup 

Screen 

Activation

1557E, 1568A, 1569B

1.

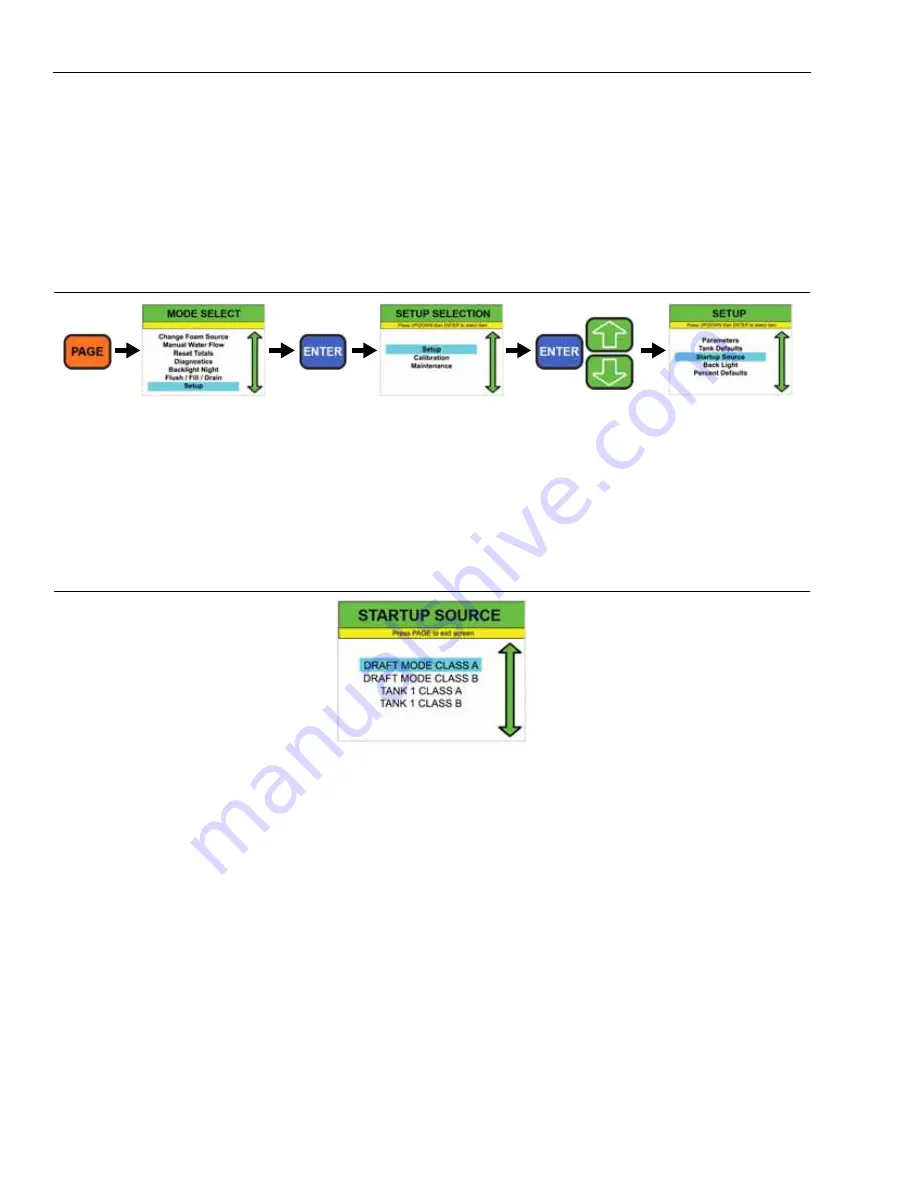
From the normal operation screen (Foam Pump Not Running), navigate to the SETUP screen. Refer to 

Figure

 4-

13

.

2.

Use the UP/DOWN buttons to highlight Startup Source and press ENTER to bring up the STARTUP SOURCE 
screen.

Figure

 4-14:


 Startup Source Screen

1572

3.

Using the UP/DOWN buttons, highlight the desired startup source. 

4.

Press the ENTER button. You will be automatically transfered back to the home screen with that source being 
selected.


HOLD ENTER AND
PRESS ARROWS

PRESS
PAGE

HOLD 5
SECONDS

SCROLL TO
SETUP

SCROLL TO
SETUP

Summary of Contents for HUSKY 12 GPM

Page 1: ... 2017 Pierce Manufacturing Inc Part No PM F OM131 0517 Operation Maintenance Manual HUSKY 12 GPM FOAM SYSTEM ...

Page 2: ......

Page 3: ...2 1 2 1 6 FLUSH SYSTEM 2 2 2 1 7 FOAM CONCENTRATE COMPATIBILITY 2 2 2 2 DESCRIPTION OF MAJOR COMPONENTS 2 2 2 2 1 HYDRAULIC DRIVE SYSTEM 2 2 2 2 1a HYDRAULIC GEAR PUMP 2 3 2 2 1b HYDRAULIC OIL FILTER 2 3 2 2 1c HYDRAULIC OIL RESERVOIR 2 4 2 2 1d HYDRAULIC OIL COOLER 2 4 2 2 1e HYDRAULIC MANIFOLD BLOCK 2 5 2 2 2 FOAM SUPPLY SYSTEM 2 5 2 2 2a FOAM CONCENTRATE TANK 2 5 2 2 2b FOAM SUPPLY VALVE 2 6 2 ...

Page 4: ...NANCE 4 1 MAINTENANCE INTRODUCTION 4 1 4 2 TESTING AFTER SYSTEM MAINTENANCE 4 1 4 3 CHECK CURRENT SOFTWARE REVISION 4 2 4 4 DIAGNOSTICS 4 3 4 4 1 DIAGNOSTIC INPUTS 4 3 4 4 2 DIAGNOSTIC OUTPUTS 4 4 4 5 SET UP CALIBRATION AND MAINTENANCE MODE ACTIVATION 4 5 4 6 SET UP MODE 4 6 4 6 1 PARAMETERS 4 6 4 6 1a SET AUTOMATIC FLUSH TIME 4 7 4 6 1b AUTO START 4 7 4 6 2 TANK DEFAULTS 4 8 4 6 2a TANK FILL ENAB...

Page 5: ... PROCEDURES 4 32 4 12 PREVENTIVE MAINTENANCE CHECKS AND SERVICE 4 33 4 12 1 INTRODUCTION 4 33 4 12 2 EXPLANATION OF COLUMNS 4 33 4 13 AFTER EVERY USE INSPECTION 4 34 4 14 WEEKLY INSPECTION 4 34 4 15 QUARTERLY INSPECTION 4 35 4 16 ANNUAL INSPECTION 4 35 4 17 RECOMMENDED HYDRAULIC OIL FOR HUSKY 12 PROPORTIONING SYSTEM 4 35 4 17 1 CHARACTERISTICS 4 35 4 17 2 RECOMMENDATIONS 4 35 4 17 3 OIL CHANGE INF...

Page 6: ...TABLE OF CONTENTS iv Husky 12 Foam System 2017 Pierce Manufacturing Inc All Rights Reserved ...

Page 7: ...ins scheduled preventive maintenance checks and inspections Appendixes Contains information obtained directly from vendors who supply major components found on this unit 3 Customer Assistance Information Your satisfaction with your Pierce apparatus is important to your dealer and Pierce Manufacturing Inc Normally any question or concern you may have with your apparatus can be handled by your selli...

Page 8: ...FOREWORD vi Husky 12 Foam System 2017 Pierce Manufacturing Inc All Rights Reserved ...

Page 9: ...of this unit 1 1 2 Description of DANGER WARNING and CAUTION THIS SAFETY SYMBOL INDICATES IMPORTANT SAFETY MESSAGES IN THIS MANUAL WHEN YOU SEE THIS SYMBOL CAREFULLY READ THE MESSAGE THAT FOLLOWS THIS SYMBOL BE ALERT TO THE POSSIBILITY OF PERSONAL INJURY OR DEATH Warning labels located on the vehicle and warning statements contained in this manual all use the same terminology to warn of potential ...

Page 10: ...ions TERM DEFINITION AFFF Aqueous Film Forming Foam AR AFFF Alcohol Resistant Aqueous Film Forming Foam FFFP Film Forming Fluoro Protein GPM Gallons per Minute LCD Liquid Crystal Display LPM Liters per Minute NFPA National Fire Protection Association PSI Pounds per Square Inch RPM Revolutions per Minute ...

Page 11: ...r the following minimum foam solution flow rates at accuracies that meet or exceed NFPA requirements at a pump rating of 250 PSI Table 2 1 Maximum Foam Solution Flow The Class A foam setting is in 1 increments from 1 to 1 Typical settings are 3 and 5 The maximum capacity is limited to the plumbing and water pump capacities 2 1 3 Discharges The number of discharges capable of dispensing foam varies...

Page 12: ...tem Diagrams on page 4 37 The following information is intended to identify the various components and describe their function within the system For specific construction maintenance and parts information please refer to applicable service groups chapters in the service manual drawings included in this manual and the parts catalog for this unit 2 2 1 Hydraulic Drive System The hydraulic drive syst...

Page 13: ...ff Hale pump transmission the Waterous impeller shaft or a transmission driven PTO Chelsea controlled by the pump engaged circuit 1659 2 2 1b Hydraulic Oil Filter Figure 2 2 Hydraulic Oil Filter 1002 The Hydraulic Filter is a pressure bypass element type filter manufactured by Hydac The filter element is replaceable The unit is installed inside the pumphouse and is used to filter the pressurized h...

Page 14: ...lic drive system The tank is sufficient size to minimize foaming of the hydraulic fluid and is located to facilitate checking level and adding oil Refer to Recommended Hydraulic Oil for Husky 12 Proportioning System on page 4 35 for recommended hydraulic oil for the Husky 12 system 2 2 1d Hydraulic Oil Cooler Figure 2 4 Hydraulic Oil Cooler 1004 To Hydraulic Pump Shut offValve in line position is ...

Page 15: ...trate to the foam water discharges by use of a foam concentrate tank foam tank shut off valve auxiliary foam inlet in line foam strainer foam pump check valve and foam injection manifold 2 2 2a Foam Concentrate Tank The Foam Concentrate Tank is designed to provide on board storage of foam concentrate Design features shall include construction compatible with foam concentrates foam tank drain valve...

Page 16: ...pply hose This foam supply valve opens automatically when the system is turned ON 2 2 2c Foam Concentrate Pump Figure 2 7 Foam Concentrate Pump 1008 The Foam Concentrate Pump assembly is a brass steel constructed double acting cylinder pump The hydraulic end of the pump is painted steel and controls the speed and direction of both cylinders The hydraulic piston is connected to the foam piston by a...

Page 17: ...The foam concentrate pump has a maximum capacity of 12 GPM with all types of foam concentrates with a viscosity at or below 6000 cps including protein fluoroprotein AFFF FFFP or AR AFFF 2 2 2d Foam Selector Valve Figure 2 8 Foam Selector Valve 1009 The Foam Selector Valve is a 2 way quarter turn ball valve that directs the foam for foam injection normal operation or tank filling A CHECK SELECTOR V...

Page 18: ... to prevent any debris from entering the foam system and possibly interfering with the internal foam pump check valves Removal of the 2 in clean out cap is all that is required to gain access to and remove the stainless steel basket screen The strainer connector is located ahead of the foam concentrate pump inlet port to insure that all agent reaching the foam pump has been strained The external f...

Page 19: ...heck Valve 1013 The Foam Check Valve located in the foam supply line prevents water from flowing backwards through the foam system and contaminating the foam supply 2 2 3 Water Supply System The water supply system supplies water to the foam injection manifold for foam to be added and distributed to the foam water discharges This system consists of an in line water check valve water flowmeter and ...

Page 20: ...r pump condition is desired leave manifold drains open until the fire scene is reached The master pump drain will empty both the discharge and inlet manifolds of water when opened The water pump drain should be pulled opened daily 2 2 3b In line Water Check Valve Figure 2 13 In line Water Check Valve 1014 The In line Water Check Valve prevents foam from entering the water pump and the remainder of...

Page 21: ...m 2 11 GENERAL 2 2 3c Water Flowmeter Figure 2 14 Water Flowmeter 1015 The Water Flowmeter measures the flow of water supplied to the foam water discharges before foam is injected This controls the amount of foam that is injected when the Husky 12 foam system is turned on ...

Page 22: ...and includes six operating buttons System On Off Page Foam Prime Enter Arrow Up Arrow Down The display is a 4 3 diagonally measured color LCD screen System power is indicated by a green LED the foam pump operating is indicated by a green LED The foam system can be turned on or off from most any screen you do not have to be at the home screen to turn the system on and off Information displayed on t...

Page 23: ...drops below 20 GPM the foam system will go into standby until the water flow is increased to 20 GPM or above At the toggle point between 19 20 GPM the system will want to go on and off standby Maintaining water flow above 20 GPM will prevent this 4 Begin flowing water foam pump will activate 5 Use the ARROW UP ARROW DOWN buttons to change percentage if needed 6 When beginning the mop up phase turn...

Page 24: ... percentage if needed 5 See General Flushing Information on page 3 5 3 1 3 Class B Foam Using On Board Foam Tank Figure 3 3 Control Head in Class B Foam Mode 1554 NOTE This operation is only possible when the Class B foam tank is installed and enabled 1 Press the PAGE button until the CLASS B FOAM screen appears then press ENTER The Class A foam valve will close an automatic flush will occur prior...

Page 25: ...he DRAFT CLASS B screen appears then press ENTER On board tank valves will close causing suction to draw from foam inlet NOTE An automatic pre programmed flush of 10 15 seconds will occur when changing from Class A to Class B foam once the water flowmeter senses water flow 3 The default percentage will remain the same as the on board Class B tank current setting 4 Use the ARROW UP ARROW DOWN butto...

Page 26: ...e MODE SELECT screen 2 Use the green UP DOWN arrows to highlight Change Foam Source from the menu 3 Press the ENTER button which will bring you to the SELECT FOAM SOURCE screen NOTE If you highlight a currently used foam type Tank 1 Class A to Draft Class A and press the ENTER button you will be transferred back to the HOME screen with that source enabled If you highlight an alternate class of foa...

Page 27: ...ted or Class B foam was drafted the only system flush that is needed is to turn the system OFF and continue flowing water until the presence of bubbles is minimal When beginning mop up operations at the scene turn the system OFF and use the foam in the hose for mop up When equipped with two on board foam tanks Class A Class B an automatic flush will occur for 10 15 seconds when switching between t...

Page 28: ...e UP DOWN buttons to highlight the flush ON OFF 3 Press the ENTER button once to enable control of the manual flush and the ON OFF highlighted area will begin to flash on and off to indicate that you may toggle the UP DOWN arrows to turn on the manual flush 4 If water is flowing the screen will go to the SYSTEM FLUSH TIME screen and count down the preset seconds for the flush At the end of the flu...

Page 29: ... apparatus otherwise skip to step 5 2 Open foam pump discharge drain 3 Press FOAM PRIME button to activate Release FOAM PRIME button when foam is discharged out of the foam pump discharge drain 4 Close the foam pump discharge drain 5 Open the manifold drain 6 Press FOAM PRIME to activate Release the FOAM PRIME button when foam is discharged out of the manifold drain NOTE Allow water foam solution ...

Page 30: ...ation occurs inside the tank stop pouring until the foam concentrate bubbles dissolve Take care not to allow dirt or debris to enter the tank Pour the foam concentrate down the center of the round tube when filling the tank This tube goes into the tank and allows the foam concentrate to enter under the surface of foam currently in the tank to reduce aeration of the foam per NFPA Do not mix differe...

Page 31: ...CT screen 4 Toggle the UP DOWN buttons to highlight one of the tanks to be filled with foam concentrate 5 Press the ENTER button once to enable control of the manual fill The ON OFF highlighted area will begin to flash indicating that you may toggle to UP DOWN arrows to turn on the manual fill NOTE In the yellow warning bar area on the display a message in red will advise Tank Valve Not Closed if ...

Page 32: ...w 3 Press the ENTER button which will bring up a warning screen giving you a second chance to continue with the manual water flow choice or revert back to the previous auto water flow mode An alternate method would be to set the GPM to a fixed rate and adjust the percentage of foam In this mode the foam pump will run regardless of water flow If discharges are closed these lines may be charged to o...

Page 33: ...check valve the drain cap does not have a check valve Figure 3 11 Setup Calibration and Maintenance Screen Selection Setup Shown 1557A 1561C 2 While in the Mode Select screen use the ARROW UP or ARROW DOWN buttons until Flush Fill Drain is highlighted 3 Press ENTER to activate the Flush Fill Drain screen 4 Use the ARROW UP or ARROW DOWN to select which tank to drain 5 Press ENTER this will turn th...

Page 34: ...OPERATION 3 12 Husky 12 Foam System 2017 Pierce Manufacturing Inc All Rights Reserved ...

Page 35: ...e annual inspection can be provided Additional details can be obtained by contacting Pierce Manufacturing 1 Draining Foam Pump After Testing a Open all drains Remove foam inlet cap If equipped turn the selector valve to the middle position halfway between TANK FILL and INJECT Cycle foam tank valves as needed until tanks and lines are empty Reinstall inlet cap b After moving truck to its destinatio...

Page 36: ...ank fill options d After moving truck to its destination cycle the foam tank valves again to get any residual water out of the lines 4 3 Check Current Software Revision NOTE This information is also displayed when the system is first turned ON Figure 4 1 Control Head showing Software Revision 1567 SOFTWARE REVISION NUMBER ...

Page 37: ...n to bring up the MODE SELECT screen 2 Use the UP DOWN buttons to highlight Diagnostics and press ENTER to bring up the DIAGNOSTICS screen 3 Toggle the UP DOWN buttons to highlight Input and press ENTER to bring up the INPUT information screens 4 Toggle the UP DOWN buttons to go to the two screens containing the circuit status of the inputs on the system 5 Press the PAGE button at any time to go b...

Page 38: ... SELECT screen 2 Use the UP DOWN buttons to highlight Diagnostics and press ENTER to bring up the DIAGNOSTICS screen 3 Toggle the UP DOWN buttons to highlight Output and press ENTER to bring up the OUTPUT information screens 4 Toggle the UP DOWN buttons to go to the three screens containing commanded values actual values and circuit status of the outputs on the system 5 Press the PAGE button at an...

Page 39: ...ormal running mode foam pump not running press the PAGE button to go to the Mode Select Screen 2 Arrow down to Setup 3 Press and hold the ENTER button for 5 full seconds to bring up the Setup Selection screen 4 Use the green up down Arrows to highlight Setup Calibration or Maintenance from the menu 5 Press and hold the ENTER button While holding the enter button press the UP and DOWN arrows simult...

Page 40: ... to highlight Parameters and press ENTER to bring up the PARAMETERS screen Figure 4 6 Parameters Screen 1570B NOTE The English Metric screen provides the option of reading the flow in GPM or LPM 3 Using the UP DOWN buttons highlight the desired selection 4 Press the ENTER button to activate the selection 5 Using the UP DOWN buttons toggle through the list of possible choices 6 Press the ENTER butt...

Page 41: ...TER 2 Press ARROW UP or ARROW DOWN to set the desired flush duration 3 Press ENTER to accept new default value 4 6 1b Auto Start MODE SELECT SETUP SELECTION SETUP PARAMETERS NOTE The auto start option will automatically turn the foam system on the first time the water pump is engaged The option must have sensors installed in the foam system hydraulics and have additional wiring installed in order ...

Page 42: ...e to the SETUP screen Refer to Figure 4 9 2 Use the UP DOWN buttons to highlight Tank Defaults and press ENTER to bring up the TANK DEFAULTS screen Figure 4 10 Tank Defaults Screen 1571A 3 Using the UP DOWN buttons highlight the desired selection 4 Press the ENTER button to activate the selection 5 Using the UP DOWN buttons toggle through the list of possible choices 6 Press the ENTER button to sa...

Page 43: ...ine or the Fill Tank line 2 Press the ENTER button to activate the selection 3 Use the UP and DOWN arrows to toggle the available settings in the selected line 4 When the desired setting is reached press ENTER to save the selection 4 6 2b Select Single or Dual Foam Tank System MODE SELECT SETUP SELECTION SETUP TANK DEFAULTS NOTE In the set up mode there is a screen that allows the software to reco...

Page 44: ...If changing the types of foam in the tank It is imperative to thoroughly flush out and dry the entire system Figure 4 13 Setup Screen Activation 1557E 1568A 1569B 1 From the normal operation screen Foam Pump Not Running navigate to the SETUP screen Refer to Figure 4 13 2 Use the UP DOWN buttons to highlight Startup Source and press ENTER to bring up the STARTUP SOURCE screen Figure 4 14 Startup So...

Page 45: ...4 15 2 Use the UP DOWN buttons to highlight Back Light and press ENTER to bring up the BACK LIGHT screen Figure 4 16 Back Light 1573 3 Use the UP DOWN arrows to select the desired choice 4 Press ENTER to activate the line 5 Use the UP DOWN arrows to make the desired adjustments 6 When the adjustment is complete press ENTER to save the setting 7 Repeat steps 3 through 6 to make additional adjustmen...

Page 46: ...requirements or different types or brands of foam Figure 4 17 Setup Screen Activation 1557E 1568A 1569C 1 From the normal operation screen Foam Pump Not Running navigate to the SETUP screen Refer to Figure 4 17 2 Use the UP DOWN buttons to highlight Percent Defaults and press ENTER to bring up the PERCENT DEFAULTS screen Figure 4 18 Percent Defaults Screen 1582 3 Use the UP DOWN arrows to select t...

Page 47: ...es different flow rates may be obtained by pressing ARROW UP or ARROW DOWN in order to achieve different flow rates other than the default settings The wider the rates are during calibration the more accurate the flowmeter will be over those flow rates 3 Attach the appropriate hose s and nozzle s to one or more foam water discharge s to obtain a known water flow of 50 GPM low gpm flowmeter setting...

Page 48: ...unning navigate to the CALIBRATIONS screen Refer to Figure 4 21 NOTE Ensure the foam pump discharge drain is open before selecting the Foam Pump Sensor screen 2 In the CALIBRATIONS screen use the UP DOWN buttons to highlight Foam Pump Sensor and press ENTER to bring up the Foam Pump Sensor screen This will begin the calibration process Figure 4 22 Pump Position Sensor Screen 1576 3 While the calib...

Page 49: ... display should read CALIBRATE FOAM A 1 00 GPM Press ENTER to begin foam calibration at 1 00 GPM The foam pump will run for five minutes 4 Measure actual flow by measuring the foam water pick up through draft hose 5 When green Foam Pump ON light turns off measure the actual amount of foam concentrate flowed Calculate the gallons per minute GPM used during the five minutes Example 5 5 gallons flowe...

Page 50: ...play should read CALIBRATE FOAM B 1 00 GPM 4 Press ENTER to begin foam calibration at 1 00 GPM The foam pump will run for five minutes 5 Measure actual flow by measuring the foam water pick up through draft hose 6 When green Foam Pump ON light turns off measure the actual amount of foam concentrate flowed Calculate the gallons per minute GPM used during the five minutes Example 5 5 gallons flowed ...

Page 51: ...faults 3 To restore system default settings press ENTER 4 Press PAGE to return to the main screen 5 Review all settings to ensure the Husky 12 system is set to your desired configuration and settings Selecting Restore Defaults with the ENTER button from the Calibrations screen will automatically restore all defaults Do not select Restore Defaults without intending to do so After selecting Restore ...

Page 52: ...e the husky 12 display from the pump panel and locate the cable port 5 Insert the USB drive into the interface cable and insert the cable into the Husky 12 display 6 Turn the main battery switch to the ON position Figure 4 28 Calibrations Screen Activation 1557E 1568B 1574E 7 From the normal operation screen Foam Pump Not Running navigate to the CALIBRATIONS screen 8 In the CALIBRATIONS screen use...

Page 53: ...ene verify the hydraulic oil level continue operation and have service performed upon returning to the station Figure 4 30 Maintenance Screen Activation 1557E 1568C 1581 1 From the normal operation screen Foam Pump Not Running navigate to the MAINTENANCE screen Figure 4 31 Reset Timers Screen 1581 2 In the MAINTENANCE screen use the UP DOWN arrows to select the desired timer to reset zero out 3 Pr...

Page 54: ...trol head is blank and foam system will not turn on Wiring issue Check the ground circuit ckt 1640 pin 2 Check the voltage at the battery Bad control head check for red light on Check the voltage at the control head ckt 2878 pin 1 Voltage at the control head should be within 2 volt of the battery voltage Check for bad foam controller check for flashing green light which indicates a good heart beat...

Page 55: ...anifold drain not bled down Manifold drain should be used after each use 7 Foam tank empty after pumping operation with foam system turned off Bad check valve for foam tank fill Check selector valve for being in INJECTION mode Bad foam injection check valve Check injection check valve to see if foam leaks by Bad tank to pump valve Check tank to pump valve 8 System will not draft foam See Specializ...

Page 56: ...carry over in oil cooler If water is found in the oil change the oil Pressure washing near filler cap on oil reservoir Use caution when pressure washing around oil reservoir 13 System will not pump foam from foam tank See Specialized Troubleshooting System Will Not Pump Foam from Foam Tank on page 4 22 Table 4 2 Specialized Troubleshooting System Will Not Pump Foam from Foam Tank Question Reason f...

Page 57: ...en the foam pump and the foam tank with little or none being injected Remove the tube from the outlet of the tank fill valve Operate the foam system If foam concentrate is discharged the tank fill valve is open NOTE In the TANK FILL mode the tank to pump valve should be closed automatically If this does not occur check for a bad switch at the selector valve Question Reason for Question Test Proced...

Page 58: ...ierce Manufacturing Inc All Rights Reserved Question Reason for Question Test Procedure E Is the wiring OK The foam system will not operate properly if the wiring is faulty Refer to the wiring diagram for circuit information Repair wiring No Yes ...

Page 59: ... F Is the system voltage OK Voltage at the control head must be within 2 volt of the battery voltage for the foam system to operate Check the voltage at the battery 1148 Check the voltage at the control head Voltage at the control head should be within 2 volt of the battery voltage 1146 Repair poor connections loose pins etc No Yes ...

Page 60: ...m Diagrams on page 4 37 for additional circuit information 1149 Question Reason for Question Test Procedure H Is the flowmeter operating correctly The flowmeter provides the foam system with information on how much water is being flowed No signal from the flowmeter will result in the foam system not operating If GPM appears on the display the flowmeter is OK If GPM does not appear replace the flow...

Page 61: ... for Question Test Procedure J Is the foam tank valve open The foam pump will not operate unless the system receives a signal that the the foam tank valve is open NOTE It is possible for the valve to be physically open but a failed limit switch indicates to the system that the valve is not open Visually inspect wiring to foam tank valve Check continuity connectors etc Check if foam is present at f...

Page 62: ...h the valve open it is likely there is contamination in the injection check valve Open the Discharge Foam Pump Drain valve Attempt to operate the system Question Reason for Question Test Procedure L Does the foam pump engage in the manual mode To isolate the flowmeter from the system and eliminate it as a possible cause See Manual Mode Manual Water Flow on page 3 10 Clean replace the injection che...

Page 63: ...r to TBD If the LVDT will not calibrate go to Step 2 2 Remove the cover from the signal condition box 1153 3 Check for voltage on Pins 5 6 output ground A reading of 0 5 volts should be obtained It is normal for the voltage to fluctuate as the foam pump cycles Question Reason for Question Test Procedure N Is the wiring OK The foam system will not operate properly if the wiring is faulty Refer to S...

Page 64: ...edure O Is the system voltage OK Voltage at the control head must be within 2 volt of the battery voltage for the foam system to operate Check the voltage at the battery 1148 Check the voltage at the control head ckt 2878 pin 1 Voltage at the control head should be within 2 volt of the battery voltage 1146 Repair wiring No Yes ...

Page 65: ...estion Test Procedure P Is the ground circuit OK The foam system must have an adequate ground circuit continuity for the system to operate Check ground circuit 1640 Refer to System Diagrams on page 4 37 for additional circuit information 1149 Repair ground circuit No Yes Replace LVDT per service group 7950 P 007 ...

Page 66: ...eaning solvent to clean all metal surfaces Question Reason for Question Test Procedure Q Is the electric tank fill valve OK If the tank fill valve sticks open most of the foam concentrate will circulate between the foam pump and the foam tank with little being injected into the water stream Inspect the valve for proper operation Check the adjustment of the micro switch Inspect the micro switch for...

Page 67: ...been provided to help you keep your equipment in good operating condition and in service The preventive maintenance section is intended to formally maintain and document the device on a regular schedule This schedule is intended as a minimum and is greatly dependent on operating conditions Heavy use and extreme environmental conditions such as heat cold sand or salt spray will demand increased ins...

Page 68: ...1 Hydraulic Oil Level Check the oil level in the hydraulic reservoir 2 Foam Tank Level Check foam concentrate level in the foam tank and fill as necessary 3 Hydraulic System Check hydraulic tubing hoses for leaks loose fittings damage etc 4 Foam System Plumbing Check foam system plumbing for leaks loose fittings damage etc 5 Manifold Drains Open manifold drain Table 4 4 Weekly Inspection Item No I...

Page 69: ...en subjected to extreme cold temperatures for extended periods of time engaging the water pump will allow the hydraulic oil to warm up before initiating operation of the Husky 12 system 4 17 2 Recommendations U S Oil Multi Vis 68R Mobil DTE16M ISO 68 or equivalent Table 4 5 Quarterly Inspection Item No Item to Check Service Procedure 1 Foam Strainer Remove clean out cap and remove basket Inspect f...

Page 70: ...ture oil analysis results Annually obtain an oil sample and compare to previous results If the current sample matches previous test results the oil does not have to be changed Replace oil and filter if test results indicate oil degradation The hydraulic fluid used for cold weather application may not function properly at higher temperatures and must be changed to an appropriate recommended type fo...

Page 71: ... 2017 Pierce Manufacturing Inc All Rights Reserved Husky 12 Foam System 4 37 MAINTENANCE 4 18 System Diagrams Figure 4 32 Husky 12 Hydraulic Schematic 1563671 ...

Page 72: ...MAINTENANCE 4 38 Husky 12 Foam System 2017 Pierce Manufacturing Inc All Rights Reserved Figure 4 33 Husky 12 Wiring Harness 64 5033 H004 ...

Page 73: ... 2017 Pierce Manufacturing Inc All Rights Reserved Husky 12 Foam System 4 39 MAINTENANCE Figure 4 34 Husky 12 Wiring Harness 64 5033 H004 ...

Page 74: ...MAINTENANCE 4 40 Husky 12 Foam System 2017 Pierce Manufacturing Inc All Rights Reserved Figure 4 35 Husky 12 Foam System Schematic 1563917 ...

Page 75: ...s 2 2 Diagnostic Inputs 4 3 Diagnostic Outputs 4 4 Discharges 2 1 Draining Foam Pump After Testing 4 1 E Explanation of Columns 4 33 External Pick Up Connection 2 8 F Filling Foam Tank 3 8 Fill Dome Method 3 8 Pick up Hose Method 3 9 Flush System 2 2 Flushing System 3 5 Foam Check Valve 2 9 Foam Concentrate Compatibility 2 2 Foam Concentrate Pump 2 6 Foam Concentrate Tank 2 5 Foam Proportioner 2 1...

Page 76: ...e of Manual v Q Quarterly Inspection 4 35 R Recommendations Hydraulic Oil 4 35 Recommended Hydraulic Oil for Husky 12 Proportioning System 4 35 Reset Maintenance Reminders Timers 4 19 S Scope v Select Single or Dual Foam Tank System 4 9 Set Automatic Flush Time 4 7 Set Concentrate Default Percentages 4 12 Set Startup or Default Foam Source 4 10 Set up Mode 4 5 System Capacity 2 1 System Diagrams 4...

Reviews: