


H07029460 / DT2001065-01
Dear Customer,
Thank you for having chosen one of our products, which is the result of years of experience and continuous research
aimed at making a superior product in terms of safety, reliability and performance.
This booklet contains information and advice for safe and efficient use of your product.
IMPORTANT INSTRUCTIONS
• Check that the floor where the product will be installed
is perfectly level.
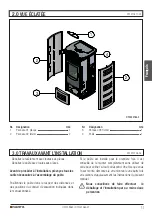
• Take great care in handling the ceramic parts.
• When handling the steel parts of the cladding or the
ceramic parts it is advisable to wear clean cotton gloves
to avoid leaving fingerprints that are difficult to remove
at first time of cleaning.
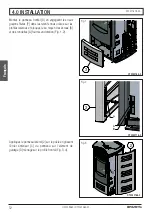
• The cladding must be assembled by two persons.
• To compensate for any errors in levelness and
unevennes, adhesive fibreglass tape is provided with
the product.
• Pursuant to current regulations regarding the safety
of electrical appliances, a Superior After-Sales Service
Centre or qualified persons must be called in for
installing the cladding.
• This booklet has been prepared by the manufacturer
and must always accompany the product. The
information it contains is for the buyer and all those
persons who are concerned with installing, using and
maintaining the product.
• Carefully read the instructions and the technical
information contained in this booklet before installing or
using the product or carrying out any work on it.
• Meticulous design and risk analysis by the factory
have resulted in the manufacture of a safe product. It is,
however, strongly recommended that when carrying out
any operation on the product you scrupulously comply
with the instructions given in the following booklet and
keep it in a handy place for reference.
Manufacturer’s note:
The stove has semi-refractory majolica cladding (not to be confused with other materials such as porcelain).
“Crazing”, “dimples” or “blisters” on the glazed surface are aesthetic features of the material and in no way affect the functionality
and durability of the product.
The ceramic cladding is the result of exclusive craftsmanship; each ceramic piece is unique and any discrepancy in fit or alignment
is due to much of the product being hand made.
See the guarantee certificate enclosed with the product for the terms, limitations and exclusions.
In line with its policy of constant product improvement and renewal, the manufacturer may make changes without notice.
No part of this document may be disclosed to third parties without the written permission. All rights reserved.
2
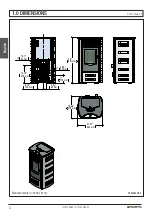
DT2010001-01
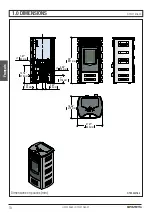
DT2010002-02
English
Summary of Contents for MARCELLA 2.0
Page 14: ...H07029460 DT2001065 01 14...
Page 15: ...H07029460 DT2001065 01 15...


