background image

Requirements

You have read and understood the 

general safety instructions (p. 7)

.

You have mounted the V-417.xx6025E0 

on the surface (p. 13)

 properly.

The V-417.xx6025E0 is not connected to the electronics.

You have prepared the load so that it can be fixed to the mounting holes on the motion
platform:

The distance between the center of gravity of the load and the center of the motion
platform is as small as possible in all directions.

At least three points are provided for fixing the load on the motion platform.

NOTICE

Impermissibly high load on the V-417.xx6025E0

An impermissible high load impairs the motion of the platform and can damage the
V-417.xx6025E0.

Pay attention to the 

maximum permissible forces (p. 25)

 that may act on the motion

platform.

In the case of multi-axis systems, include the masses of the positioners to be moved
when calculating the load.

NOTICE

Excessively long screws and locating pins

Screws and locating pins that are inserted too deeply can damage the V-417.xx6025E0.

Pay attention to the 

depth of the mounting and locating holes (p. 29)

.

Only use screws and locating pins of the correct length for the respective mounting holes.

Fixing the Load

1. If necessary: Insert the locating pins into the corresponding holes in the motion platform.
2. Align the load on the motion platform so that the mounting holes selected in the motion

platform can be used for mounting the load.

3. Place the load onto the motion platform so that the locating pins are inserted into the

corresponding locating holes in the load.

4. Tighten the screws in all mounting holes.
5. Check that the load is fixed firmly to the motion platform.

6.5

Connecting the V-417.xx6025E0

Tools and Accessories

Suitable cable set

If necessary: Suitable screwdriver for the locking screws of the connectors.

Optional: Purge air connector with the following properties:
Pressure: 2 to 6 bar (200 to 600 kPa); purge air hose: Outer diameter 4 mm; air quality as
stated in the 

specifications (p. 25)

Requirements

You have read and understood the 

general safety instructions (p. 7)

.

You have read and understood the user manual for the electronics.

You have installed the electronics properly.

The electronics are switched off.

The V-417.xx6025E0 is connected to the 

protective earth conductor (p. 14)

.

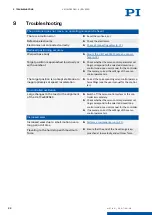
6  INSTALLATION

V417M0010EN 

 4/26/2019

17

M O T I O N   |   P O S I T I O N I N G

Summary of Contents for PIMAG V-417.056025E0

Page 1: ...V417M0010EN 4 26 2019 User Manual V 417 XX6025E0 PIMAG HIGH LOAD LINEAR STAGE M O T I O N P O S I T I O N I N G...

Page 2: ...Scope of Delivery 9 4 4 Overview 10 4 4 1 Base Body 10 4 4 2 Drive 10 4 4 3 Linear Encoder Connector 10 4 4 4 Purge Air System 10 4 5 Suitable Electronics 11 5 Unpacking 12 6 Installation 13 6 1 Moun...

Page 3: ...cations 25 12 2 Maximum Ratings 27 12 3 Ambient Conditions and Classifications 27 12 4 Dimensions 28 13 Old Equipment Disposal 30 14 Appendix 31 14 1 Pin Assignment 31 14 1 1 Drive Connector 31 14 1 2...

Page 4: ...are protected by copyright With regard thereto Physik Instrumente PI GmbH Co KG reserves all rights The use of any text images and drawings is permitted only in part and only when indicating the sourc...

Page 5: ...duct example socket of the RS 232 interface Start Settings Menu path in the PC software example to open the menu the Start and Settings menus must be clicked successively POS Command line or a command...

Page 6: ...ng the access data You need the data storage device for the product to get the access data If a manual is missing or problems occur with downloading contact our customer service department p 24 Downlo...

Page 7: ...Instructions The V 417 xx6025E0 is built according to state of the art technology and recognized safety standards Improper use of the V 417 xx6025E0 may result in personal injury and or damage to the...

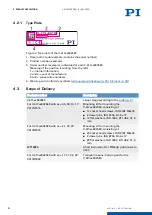
Page 8: ...417 096025E0 204 mm 8 V 417 136025E0 305 mm 12 V 417 176025E0 407 mm 16 V 417 216025E0 508 mm 20 V 417 256025E0 610 mm 24 V 417 336025E0 813 mm 32 4 2 Product Labeling 1 2 1 3 2 6 7 5 4 Figure 1 Produ...

Page 9: ...o the order p 8 For V 417 xx6025E0 with xx 05 09 13 17 V417B0015 Mounting kit for mounting the V 417 xx6025E0 consisting of 12 socket head screws ISO 4762 M6 30 2 dowel pins ISO 8734 4m6 12 12 flat wa...

Page 10: ...the position Therefore no referencing is necessary when switching on The position is measured directly at the motion platform which minimizes the influence of mechanical play and deformation when mea...

Page 11: ...h creates a slight overpressure in the V 417 xx6025E0 and therefore reduces the amount of dust that can penetrate 4 5 Suitable Electronics The V 417 xx6025E0 must be connected to suitable electronics...

Page 12: ...x6025E0 and remove the transport safeguard 1 Unpack the V 417 xx6025E0 with care 2 Compare the contents with the scope of delivery according to the contract and the delivery note 3 Inspect the content...

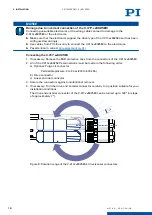
Page 13: ...uired to route cables without bending and according to regulations DANGER Risk of electric shock if the protective earth conductor is not connected If the protective earth conductor is missing or not...

Page 14: ...rface 2 Align the V 417 xx6025E0 on underlying surface so that the corresponding mounting holes in the V 417 xx6025E0 and underlying surface in line 3 Put the V 417 xx6025E0 onto the underlying surfac...

Page 15: ...n the event of malfunction or failure of the system If there are touch voltages touching the V 417 xx6025E0 leads to serious injuries or death by electric shock Connect the V 417 xx6025E0 to a protect...

Page 16: ...locating pins that are inserted too deeply can damage the V 417 xx6025E0 Pay attention to the depth of the mounting and locating holes p 29 in the V 417 xx6025E0 Only use screws and locating pins of...

Page 17: ...ly use screws and locating pins of the correct length for the respective mounting holes Fixing the Load 1 If necessary Insert the locating pins into the corresponding holes in the motion platform 2 Al...

Page 18: ...tive caps from the connectors of the V 417 xx6025E0 2 All of the V 417 xx6025E0 s connections must be made in the following order a Optional Purge air connector Permissible pressure 2 to 6 bar 200 to...

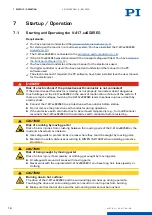
Page 19: ...hock Connect the V 417 xx6025E0 to a protective earth conductor before startup Do not remove the protective earth conductor during operation If the protective earth conductor has to be removed tempora...

Page 20: ...ion is indicated by a humming noise and can result from the following causes The load and or dynamics during operation differ considerably to the calibration settings The V 417 xx6025E0 is operated ne...

Page 21: ...p 24 NOTICE Damage due to unsuitable cleaning agents Some cleaning agents can cause rusting on the V 417 xx6025E0 or dissolve plastics paints or adhesives Do not clean with water or acetone Cleaning...

Page 22: ...table due to inappropriately set speed acceleration Correct the corresponding servo control parame ter settings see the user manual for the control ler Uncontrolled oscillation Large changes to the lo...

Page 23: ...cal load on the V 417 xx6025E0 due to transportation without a safeguard can damage the V 417 xx6025E0 and lead to loss of accuracy Ship the V 417 xx6025E0 in the original packaging only and with the...

Page 24: ...of the controller if applicable Version of the driver or the software if applicable Operating system on the PC if applicable If possible Take photographs or make videos of your system that can be sen...

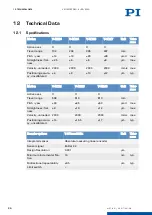
Page 25: ...417 33 Unit Toler ance Active axes X X X Travel range 508 610 813 mm Pitch yaw 40 45 50 rad max Straightness flat ness 9 10 12 m max Velocity unloaded 2000 2000 2000 mm s max Positioning accura cy un...

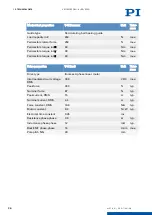
Page 26: ...Unit Toler ance Drive type Ironless 3 phase linear motor Intermediate circuit voltage RMS 300 V DC max Peak force 300 N typ Nominal force 87 N typ Peak current RMS 15 A typ Nominal current RMS 4 4 A t...

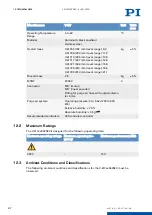
Page 27: ...motor M17 linear encoder Fitting for purge air hose with outside diame ter 4 mm Purge air system Operating pressure 2 to 6 bar 200 to 600 kPa Relative humidity 70 Absolute humidity 35 g m3 Recommended...

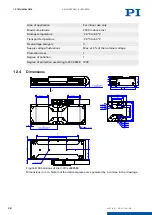
Page 28: ...2 4 Dimensions A D Energychain overlap at hardstop X B center of travel position reference position 6 6 10 8x6 4 15 1 2 LSW LE1 1 2 LSW LE2 1 2 HDS 1 2 HDS 150 C 150 4 x 4 H7x7 10 7 5 8 5 83 5 82 5 X...

Page 29: ...platform of the V 417 xx6025E0 Dimensions and mounting holes Dimensions in mm Note that the decimal places are separated by a comma in the drawings 12 TECHNICAL DATA V417M0010EN 4 26 2019 29 M O T I O...

Page 30: ...order to fulfil the responsibility as the product manufacturer PI miCos undertakes environmentally correct disposal of all PI miCos equipment free of charge if it was made available to the market afte...

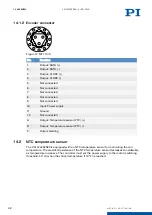
Page 31: ...PE Figure 11 M17 9 f Pin Function A Phase 1 B Phase 2 C Phase 3 1 Output Temperature sensor NTC 2 Output Temperature sensor NTC 3 Not connected 4 Not connected 5 Outer shielding PE Protective earth 1...

Page 32: ...B Output Temperature sensor PTC C Outer shielding 14 2 NTC temperature sensor The V 417 xx6025E0 is equipped with an NTC temperature sensor for monitoring the coil temperature The electrical resistanc...

Page 33: ...7 xx6025E0 electrical resistance over temperature 0 C to 80 C 0 200 400 600 800 1000 1200 1400 80 85 90 95 100 105 110 115 120 125 130 R T C Figure 14 NTC temperature sensor of the V 417 xx6025E0 elec...

Page 34: ...to prevent the motor from overheating The electrical resistance of the PTC temperature sensor increases considerably into the critical temperature range The controller must cut the power supply to th...

Page 35: ...ith the following European directives Low Voltage Directive EMC Directive RoHS Directive The standards applied for certifying conformity are listed below Safety Low Voltage Directive EN 61010 1 EMC EN...

Page 36: ...direct measurement methods the resolution of the sensor system is specified Lateral Force Also lateral load capacity Maximum permissible force orthogonally to the positioning direction This value is v...

Page 37: ...ge The maximum possible travel range is limited by the length of the drive screw A possible gap between the limit switches determines the travel range V417M0010EN 4 26 2019 37 M O T I O N P O S I T I...

Reviews:

Related manuals for PIMAG V-417.056025E0