2) Preparing and Starting
the Virtual Machine
To follow this QuickStart and the descriptions in the Application Guide you need our
phyBOARD-Wega virtual machine hard disk image. The hard disk image includes all
software installations and configurations (e.g. pre-built Yocto BSP, Eclipse, Qt Creator)
necessary for a successful start-up of the phyBOARD-Wega.
You can freely download the compressed virtual machine hard disk image from our
website, if you did not purchase an USB flash drive with our image. The compressed
image (SO-530v4.xz) has a size of approx. 15 GB and includes a virtual machine disk
file (.vmdk) which is suitable for most virtualization software, and which can be moun-
ted to an appropriate Linux machine (tested with VMware Player and VirtualBox).
1.
Plug-in the purchased USB flash drive or download the compressed VM hard disk
image from
http://www.phytec.de/de/support/faq/faq-phyboard-wega.
2.
Unpack the compressed file with an appropriate tool to get the included .vmdk file.
3.
Follow the instructions of your virtualization software to create a new virtual machine.
However, pay regard to the following settings required to obtain a correctly working
virtual machine: - choose Linux-Ubuntu 64-bit version as operating system
- use the unpacked file SO-530v4.vmdk as hard disk
- an Ethernet adapter, as well as a serial interface, or the USB
controller must be available to connect to the phyBOARD-Wega
In order to avoid any conflicts we recommend to have only the Ethernet adapter in the
virtual machine which will be used for the peer to-peer connection between your PC and
the phyBOARD Wega.
4.
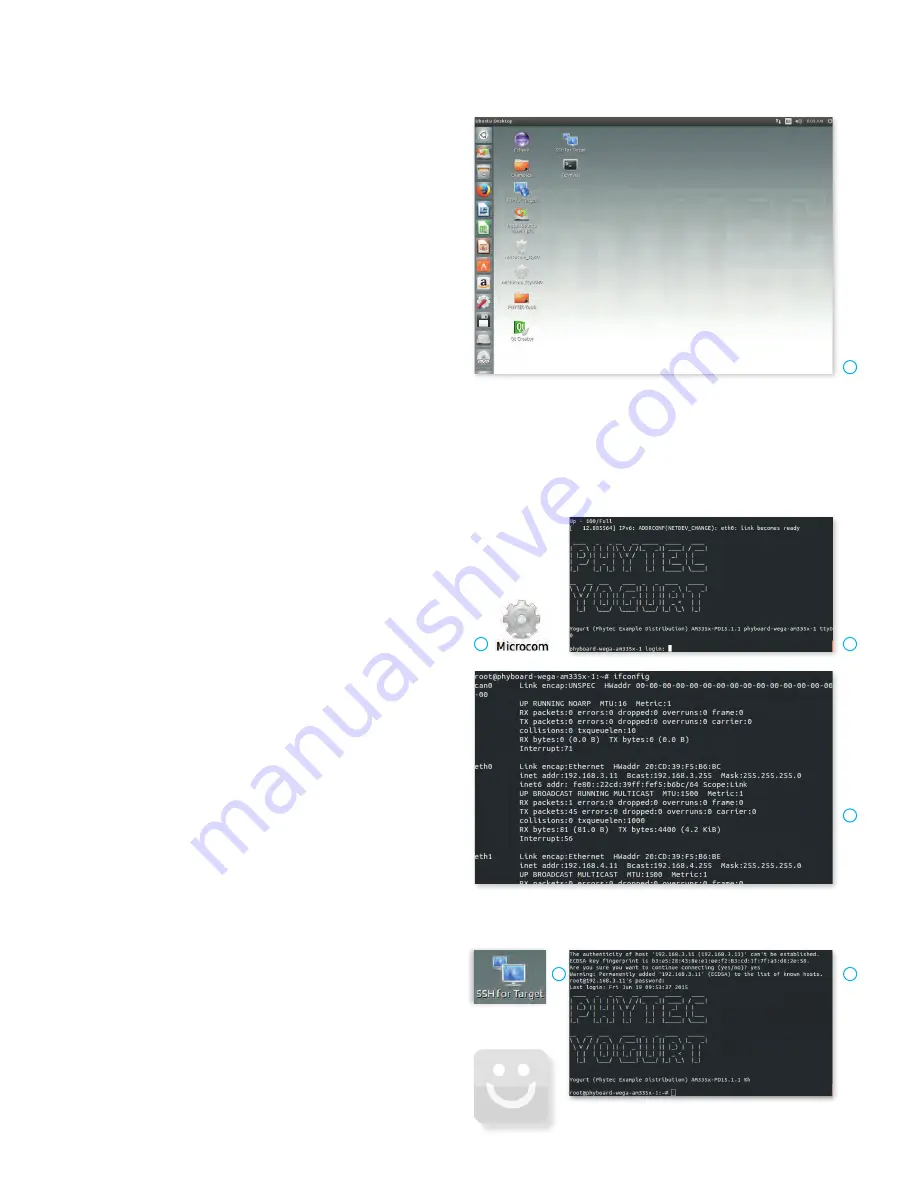
Start the virtual machine with our hard disk image. You will see the modified Ubuntu
desktop
(A)
. For further use of the virtual machine the pre-created login data is:
username: „phyvm“ — password: „phytec“.
Now you are ready to connect your PC with the phyBOARD-Wega.
S e r i a l c o n n e c t i o n
1.
Connect one end of the serial cable to the DB-9 connector on the Evaluation
Module (PEB-EVAL-01).
2.
Connect the other end to the first serial interface of your PC (or to an USB to DB-9
dongle, connected to your host).
3.
Click the
Microcom_ttyS0
icon
(B)
on the Ubuntu desktop (for direct serial interface
connection) or click the
Microcom_ttyUSB0
icon if you are using an USB to DB-9 dongle.
4.
Click the reset button
S2
on the phyBOARD-Wega (or power the board off and on).
A serial console has been started within your virtual machine. You should see a boot
message and the login-prompt on this console
(C)
.
Congratulations!
5.
Use “root” as the login name on the serial console and press
Enter
.
6.
As a good example (and helpful for understanding the next step) enter
ifconfig
.
You will get information about the configuration of the Ethernet interface on the
phyBOARD-Wega
(D)
.
E t h e r n e t c o n n e c t i o n
In the virtual machine hard disk image the Ethernet adapter eth0 is preconfigured to
the IP address 192.168.3.10 and netmask 255.255.255.0 to establish the peer-to-peer
connection to the phyBOARD-Wega.
1.
Connect your preferred Ethernet interface on your PC, which is passed on the
virtual machine, with RJ45 connector
X16
(eth0) on the phyBOARD-Wega using
a standard Ethernet cable.
You are now ready to test the Ethernet network connection.
2.
Click on the
SSH for Target
icon
(E)
on your desktop. A console window will
open and you will see an authentication question. Type
yes
and press
Enter
.
You are now connected to the target
(F)
.
Congratulations!
Y o u r p o s s i b l e n e x t s t e p s
• Read our Application Guide available on the desktop of the virtual machine.
• Check out the FAQ pages on the PHYTEC website for latest information and downloads
(www.phytec.de/de/support/faq/faq-phyboard-wega)
• Contact our support team if you have any questions getting the phyBOARD-Wega up
and running.
E n j o y !
3) Getting Connected
A
C
B
E
F
D


