background image

Operation of the Bin Picking Studio

The Bin Picking Studio is operated through the Vision Controller. First,
you need to plug the Vision Controller into a power outlet using the
provided cables. To work with the Vision Controller, you need to
connect the monitor, keyboard, and mouse (like a standard desktop). It
is not required to have accessories connected the whole time.

Initial setup of the Vision Controller

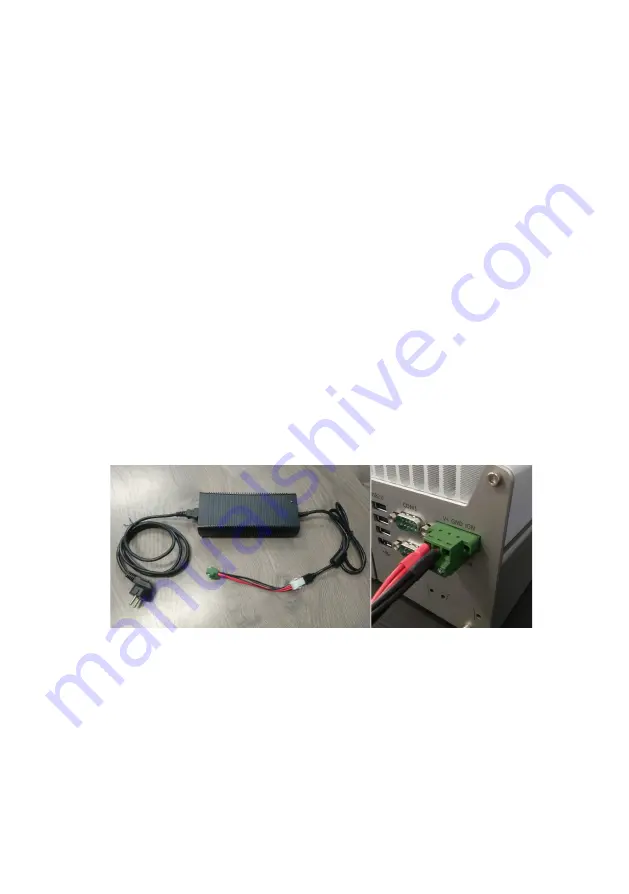
Connect all cables as shown in Figure 1 below. Make sure all cable
connections are secure and all screws on the green connector are
tightened. The green connector has to be secured to the VC with
screws as well.

Fig. 1. Power cables

Connect your Vision Controller to a monitor (using HDMI or
DisplayPort connectors), mouse, and keyboard (using USB connectors).
All connectors are located on the side of the Vision Controller as
displayed in Figure 2 below.

3 / 12

Summary of Contents for Bin Picking Studio

Page 1: ...Bin Picking Studio Quick Start Guide ...

Page 2: ...f Delivery 01 Vision Controller industrial grade device 02 Pre installed Bin Picking Studio software 03 Power adapter 230VAC 20VDC 60W 04 Power cable with an EU plug 05 Power connector 06 Power DC Cables 2 12 ...

Page 3: ...ve accessories connected the whole time Initial setup of the Vision Controller Connect all cables as shown in Figure 1 below Make sure all cable connections are secure and all screws on the green connector are tightened The green connector has to be secured to the VC with screws as well Fig 1 Power cables Connect your Vision Controller to a monitor using HDMI or DisplayPort connectors mouse and ke...

Page 4: ...ed to the Vision Controller and the power you may turn on your Vision Controller When the Vision Controller is booted up the Bin Picking Studio application will launch automatically When Bin Picking Studio runs for the first time a Welcome Page appears which will guide you through the initial setup of BPS 4 12 ...

Page 5: ...Firstly you will be asked to select your local timezone either by clicking on the map or by selecting it from the list 5 12 ...

Page 6: ...tudio from your side It allows full usage and setup of BPS solutions plus access to employee user management In the next step you will see a form to create any number of Employee accounts which have basic access to BPS solutions You may safely skip this step employee accounts can be added later via Account management 6 12 ...

Page 7: ...t and any number of Employee accounts optional Connection to the scanner and robot To connect the VC to the scanner and robot please use 1 Gbit ethernet cable RJ45 not included and connect them to the following ports Figure 4 Please do not use other ports as they are not supported 7 12 ...

Page 8: ...work port internet Fig 5 Bin Picking Studio product topology When the robot and scanner are connected to the VC you need to set up their IP addresses both are mandatory on the Network page Figure 6 of the Bin Picking Studio Fig 6 Network page overview 8 12 ...

Page 9: ...ach robot brand please read the user manuals and tutorials which you can find on the Documentation page Figure 7 To obtain a robotic package for a specific brand modules and robot program please contact support photoneo com Fig 7 Documentation page overview 9 12 ...

Page 10: ...or automatic deployment marked by the label autostart Solution with the flag factory default is preconfigured by Photoneo and cannot be accessed directly must be duplicated Remote support Photoneo offers remote support for its customers To connect to your Vision Controller it needs to be connected to the internet through the Network port Your Vision Controller comes with a pre installed TeamViewer...

Page 11: ...Fig 8 TeamViewer login credentials 11 12 ...

Page 12: ...Contact us Web www photoneo com Support support photoneo com Business Inquiries sales photoneo com Headquarters Photoneo s r o Plynárenská 1 82109 Bratislava Slovakia 12 12 ...

Reviews: