background image

3

IT/GB

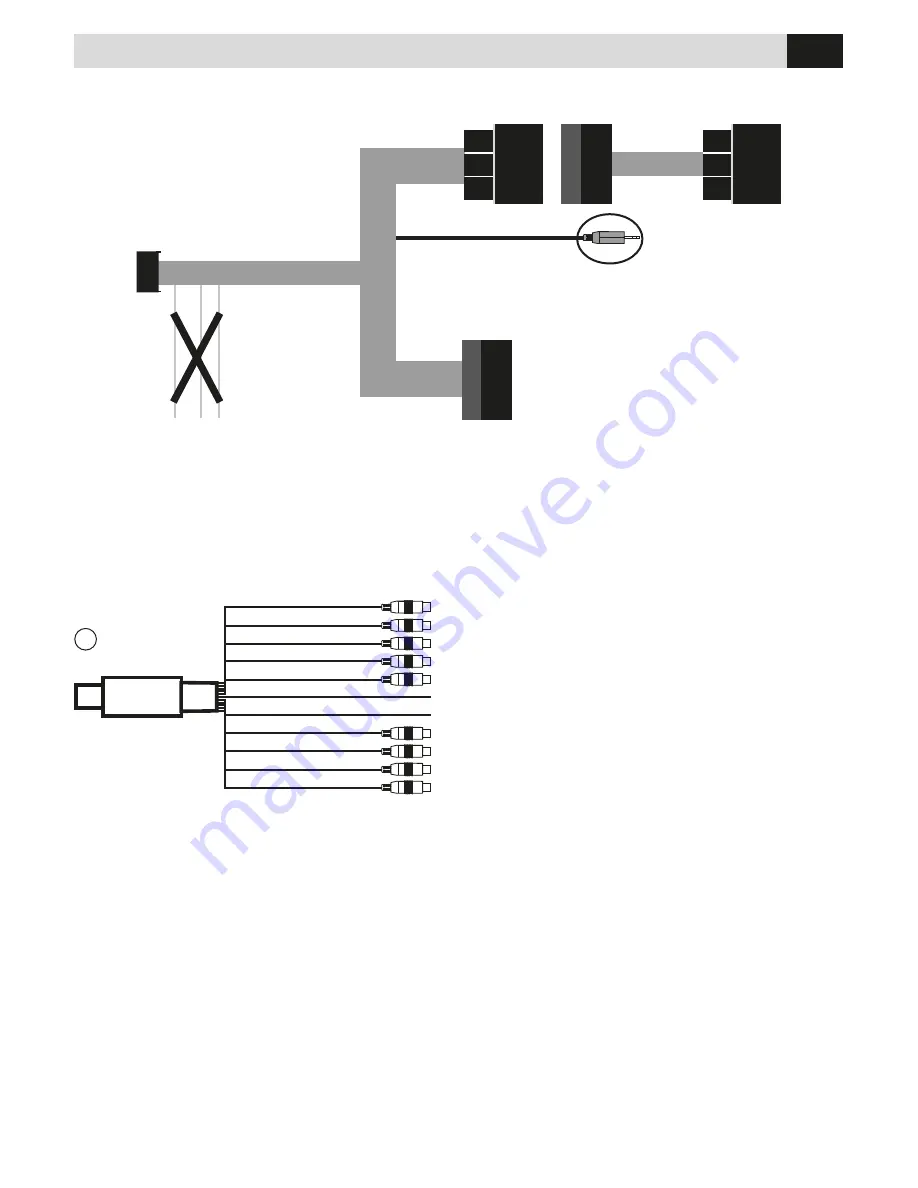
CONNESSIONI • CONNECTIONS   

TV-V-IN

L-OUT

V-OUT

TV-L-IN

REVERSE

TV-R-IN

CCD-IN

R-OUT

MARRONE/BROWN
VIOLA/PURPLE
GRIGIO/GREY
GIALLO/YELLOW
BLU/BLUE
VERDE/GREEN
BLU/BLUE
ROSA/PINK
VERDE/GREEN
ROSSO/RED
NERO/BLACK

INGRESSO VIDEO / 

VIDEO INPUT

NON ATTIVO /

 NOT ACTIVE

USCITA AUDIO SINISTRA / LEFT 

AUDIO OUTPUT

USCITA VIDEO / 

VIDEO OUTPUT

INGRESSO AUDIO SINISTRA / LEFT 

AUDIO INPUT

FRENO A MANO

 / BRAKE

ATTIVAZIONE RETROCAMERA / 

REAR-CAMERA ACTIVATION

INGRESSO AUDIO DESTRA / 

RIGHT


AUDIO INPUT

INGRESSO RETROCAMERA / 

REAR CAMERA INPUT

USCITA AUDIO DESTRA / 

RIGHT


AUDIO OUTPUT

NON ATTIVO /

 NOT ACTIVE

Se l’auto è dotata del kit MEDIA INTERFACE collegare il connettore jack 3,5 alla presa AUX-IN presente 

nel cassetto portaoggetti.
Se l’auto non è dotata del kit MEDIA INTERFACE collegare il jack 3,5 alla presa (9) sul retro del monitor.
L’impianto originale deve essere dotato di ingresso AUX-IN attivo.

When car is fitted with the MEDIA INTERFACE-kit, introduce the 3.5 jack-connector into the AUX-IN-

socket available inside the object-holder case.
When car is NOT fitted with the MEDIA INTERFACE-kit, introduce the 3.5 jack-connector into socket (9) 

situated on the back of the monitor.
The original system must be equipped with AUX-IN input active.

10

NERO/BLACK

NERO/BLACK

BLU/BLUE

NON COLLEGARE

DO NOT CONNECT

Summary of Contents for VM 075

Page 1: ...ANO MERCEDES Compatibilità Compatibility Classe A W176 Sistema Radio audio 20 NTG 4 5 Classe B W242 W246 dal 11 2011 Sistema Radio audio 20 NTG 4 5 display 5 8 Sistema Radio audio 20 con Navigatore Becker Map Pilot NTG 4 5 display 5 8 Solo auto con funzione AUX IN Only cars with AUX IN function ...

Page 2: ...un esposizione rischiosa ai raggi laser se presenti Accendere l apparecchio solo quando la temperatura dell abitacolo è nella norma Mantenere un volume di ascolto che permetta di udire i suoni provenienti dall esterno del veicolo clacson si rene etc Non collegare alcun cavo in luoghi dove potrebbe ostacolare il funzionamento dei dispositivi di sicurezza dell auto Installation to be carried out by ...

Page 3: ...HT AUDIO OUTPUT NON ATTIVO NOT ACTIVE Se l auto è dotata del kit MEDIA INTERFACE collegare il connettore jack 3 5 alla presa AUX IN presente nel cassetto portaoggetti Se l auto non è dotata del kit MEDIA INTERFACE collegare il jack 3 5 alla presa 9 sul retro del monitor L impianto originale deve essere dotato di ingresso AUX IN attivo When car is fitted with the MEDIA INTERFACE kit introduce the 3...

Page 4: ...a Lean the drawer on the car mat Asportare la radio originale Disconnect the original Radio Smontare le bocchette dell aria attrezzo speciale originale Mercedes Ref 140589023300 Dismount the ventilation outlets originale tool Mercedes Ref 140589023300 Smontare le bocchette d aria centrali destra e sinistra Dismount the central ventilatio outlets left and right INSTALLAZIONE INSTALLATION ...

Page 5: ...he monitor Cablaggio e antenna del dispositivo Cable and Antenna of the device Scollegare e rimuovere il monitor originale Disconnect and remove the original monitor Collegare il cablaggio originale dell auto a quello del di spositivo Connect the orignal cable of the car to the positive one Vista lato superiore monitor originale Mercedes View of the Original Mercedes monitor upper side INSTALLAZIO...

Page 6: ...monitor Place the cable of the device in order to reach the monitor Vista cruscotto dopo aver asportato la mascherina View of the dashboard without the frame Smontare il montante destro Dismount the right bracket Smontare il supporto del monitor originale Dismount the original monitor support Risultato dopo lo smontaggio del supporto Result after dismounting the support INSTALLAZIONE INSTALLATION ...

Page 7: ...ivo e relative prove di funzionamento si realizzano in circa 2 ore Finish the installation by mounting all the elements following the same order placed during disassembly The GPS navigation functioning is controller by the touch screen of the monitor All the functions are controller by the original jostick The whole installation and the tests can be done in 2 hours Vista monitor dispositivo acceso...

Page 8: ... pulsante C posto vicino al joystick e premere il touchscreen Per tornare alla funzione precedente premere RETURN Press for about 3 seconds key C located next to the Joystick and press the touchscreen To return to the previous function press RETURN Una volta all interno del menù non originale è possibile effettuare i cambi di sorgente da USB DVD iPOD utilizzando il joystick Once you are inside the...

Page 9: ... MENÙ APPLICAZIONI APPS MENU MENÙ OPZIONI OPTION MENÙ OPZIONI OPTION MENU Lingua Language MENÙ OPZIONI OPTION Data ora Date time MENÙ OPZIONI OPTION Illuminazione Lighting MENÙ SISTEMA SYSTEM Selezionare il file per la navigazione Select navigation file ...

Page 10: ...T GB IMPOSTAZIONI SETUP MENÙ IMPOSTAZIONI AUDIO AUDIO SETTINGS Inserire il jack nella presa originale Insert the jack into the original socket MENÙ IMPOSTAZIONI AUDIO AVANZATE MENU FOR ADVANCED AUDIO SETUP ...

Page 11: ... audio video e foto Introduce USB or SD Card and select the file to be reproduced audio video or photo Inserire USB o SD Card e riprodurre i files musicali presenti entrando nel menù MUSICA Introduce USB or SD Card and reproduce the mu sical files available inside the MUSICAL Menu Menù iPOD Menu for iPOD Menù riproduzione foto Menu for PHOTO reproduction Introduce the micro SD card into the slot N...

Page 12: ...ifferenziata dei rifiuti elettrici ed elettronici oppure riconsegnarle al rivend itore L adeguata raccolta differenziata contribuisce ad evitare possibili effetti negativi sull ambiente e sulla salute e favorisce il reimpiego e o riciclo dei materiali di cui essi sono composti Per ulteriori informazioni consultare il sito www phonocar it This product must NOT be treated as a domestic waste Please ...

Reviews: