


Thank you for purchasing the
PhoneTree
®
VoiceWave
™
Premium
system. Before
beginning installation, verify the following items were included in your shipment:
Software
PhoneTree Hardware
& Vertical Stand
Headset Microphone
Power Adapter
USB Cable
Duplex Adapter
Short Phone Cable
Long Phone Cable
If you are missing any of the above items, please contact PhoneTree Customer
Support at
800.555.0559
or
.
Hardware
This guide will assist you with installing the PhoneTree VoiceWave Premium system
on your computer. Once you have completed steps 1-5, please refer to the
VoiceWave Series User Guide CD
to complete the system’s configurations.
Install the Software
a.
Slide the
Vertical Stand
into the bottom groove of the PhoneTree unit until it snaps into place.
b.
Connect the square end of the
USB Cable
to the PhoneTree unit and the flat end to an available USB
port on your computer.
c.
Connect the
Long Phone Cable
to the PhoneTree unit and the other end to an available analog wall
jack (see step 3).
d.
Connect the
Headset Microphone’s
headphone plug (green) to the
SPKR
jack and microphone plug
(pink) to the
MIC
jack.
e.
Connect the
Power Adapter
to the PhoneTree unit and the other end to an available surge protector
(recommended) or wall outlet.
Your computer’s
USB Jack
Connect the Hardware
a.
Locate the
Serial Key
label inside the software case (required to
install the software).
b.
Insert the
VoiceWave Premium Installation CD
into
your CD/DVD drive. The installer screen should start
automatically (if it does not, double-click on the CD/
DVD drive
£
PhoneTreeMVPu
£
Setup
). Follow the
on screen instructions to complete installation.
When prompted, enter the
Serial Key
and click
Next
to continue the installation process. Once
the installation completes, click
Finish
. If requested,
restart your computer – do not start the VoiceWave
Premium software at this time.
c.
Insert the
Female Voice
CD into your CD/DVD drive. The installer screen should start automatically (if
it does not, double-click on the CD/DVD drive
£
setup
). Follow the on screen instructions to
complete installation. Repeat these steps for the
Male Voice
CD.
Note:
When installing both Voice CDs, the Female Voice CD
must
be installed first.
Proceed to Step 3
Proceed to Step 2
Note:
Before installing the VoiceWave Premium software, ensure the intended Windows
®
operating
system user is a part of the Local Administrative Group, and for computers running Windows Vista
®
or
Windows
®
7, User Account Control (UAC) has been disabled (see insert inside PhoneTree package).
b
c
d
a
e
Installation CD
User Guide CD
Female Voice CD
Male Voice CD
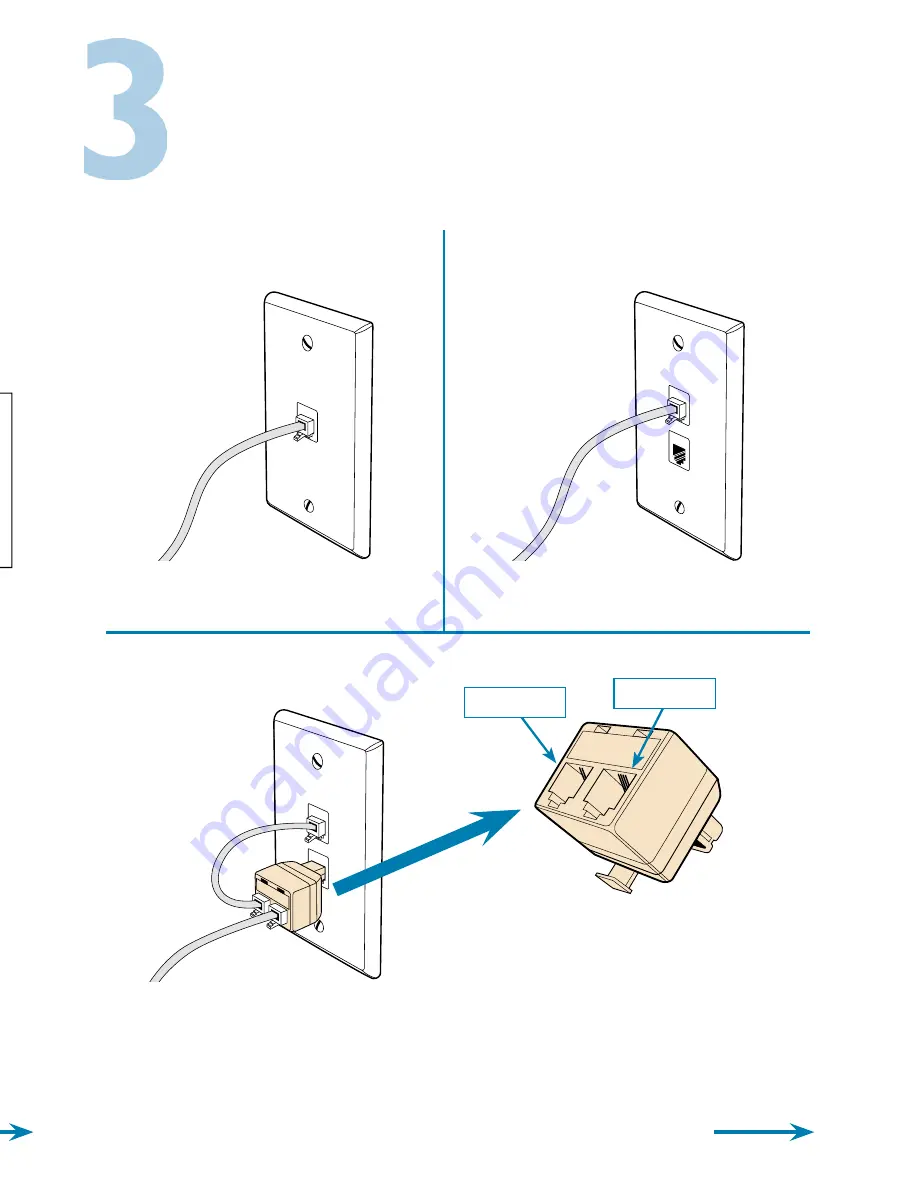
Single, 1 or 2-Line Analog Wall Jack
(1 or 2-Line PhoneTree Unit)
Connect the PhoneTree unit to the
wall jack using the
Long Phone Cable
.
Duplex Analog Wall Jack
1-Line PhoneTree Unit)
The PhoneTree unit’s single phone jack design allows it to be
used as a 1 or 2-line system, based on the number of lines you
purchased. Use the examples below to connect the PhoneTree
unit to your wall jack.
Connect the PhoneTree unit to either
wall jack using the
Long Phone Cable
.
Duplex Analog Wall Jack
(2-Line PhoneTree Unit)
Connect the PhoneTree unit to the
4-wire jack on the
Duplex Adapter
using the
Long Phone Cable
, then plug
the Adapter into either wall jack. Using
the
Short Phone Cable
, connect the
2-wire jack on the Duplex Adapter to
the remaining wall jack.
Please Note:
The
Duplex Adapter
has been
specially wired for exclusive use when
connecting the PhoneTree hardware to a
duplex analog wall jack.
It will not serve as a
standard splitter.
This adapter is not found in
stores and is only sold directly from PhoneTree.
4-Wire Jack
2-Wire Jack
Connect Analog
Phone Cable
Proceed to Step 4