50
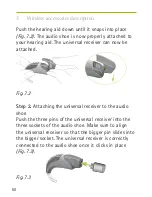
Push the hearing aid down until it snaps into place
(Fig. 7.2). The audio shoe is now properly attached to
your hearing aid. The universal receiver can now be
attached.
Fig. 7.2
Step 2. Attaching the universal receiver to the audio
shoe
Push the three pins of the universal receiver into the
three sockets of the audio shoe. Make sure to align
the universal receiver so that the bigger pin slides into
the bigger socket. The universal receiver is correctly
connected to the audio shoe once it clicks in place
(Fig. 7.3).
Fig. 7.3
7. Wireless accessories description
Summary of Contents for Nathos S+
Page 1: ...User Guide Power hearing aids...
Page 31: ...31 I Do not lift the latch above 90 Fig 11a Fig 11b...
Page 52: ...52 8 Service and warranty Serial number left side Serial number right side Fitting date...
Page 57: ...Notes...
Page 58: ...Notes...
Page 59: ......


