background image

1

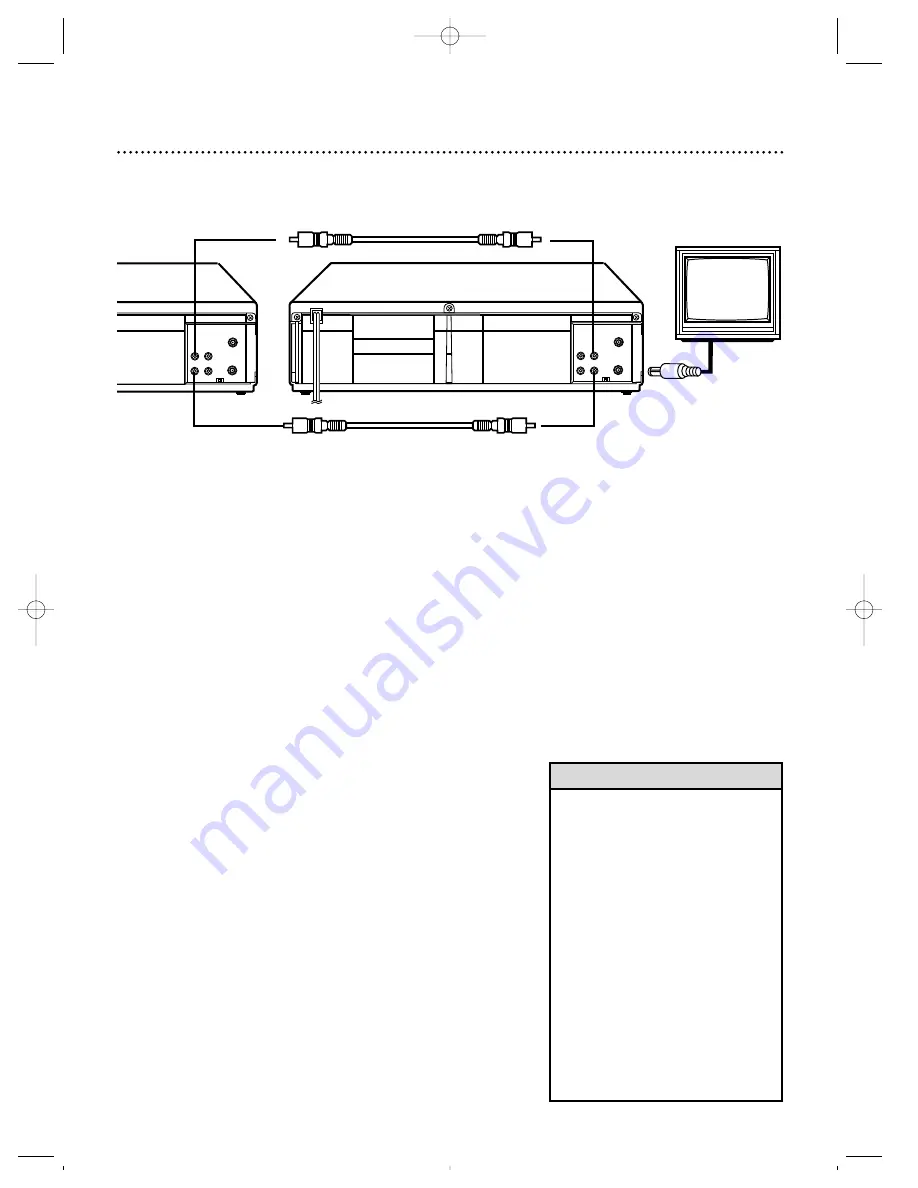
Make the connections shown above.

38  Rerecording (Tape Duplication)

3

VCR 2 will record your tape. Insert a blank tape in VCR 2. The
VCR must be in VCR position. (The VCR light will appear on the display
panel. If it does not, press the  VCR/TV button once.)

4

Turn on the TV and set it to channel 03 or 04, whichever
channel the CH3/CH4 switch on VCR 2 is set to.

5

Point the remote control at VCR 2. Press Number but-
tons 0, 0, 1 or 0, 0, 2.  
(See Helpful Hints at right.)

6

Use the SPEED button to select SP, LP, or SLP at VCR 2.

7

Press the PLAY button on VCR 1 and the REC(ord)/OTR
button on VCR 2 at the same time.
To stop recording, press the STOP/EJECT button on VCR 1, then
press the STOP/EJECT button on VCR 2.

VIDEO

IN

OUT

CH3

CH4

AUDIO

OUT

IN

ANT

VIDEO

IN

OUT

CH3

CH4

AUDIO

OUT

IN

ANT

VCR 1

Playing VCR

VCR 2 - Recording VCR

2

VCR 1 will play your tape. Put a prerecorded tape in VCR 1.

1. Audio cable from AUDIO OUT Jack of
VCR 1 to AUDIO IN Jack of VCR 2

2. Video cable from VIDEO OUT Jack
of VCR 1 to VIDEO IN Jack of VCR 2

3. RF coaxial

cable from VCR’s

OUT Jack to TV’s

ANTENNA IN

Jack

•  If you use the AUDIO and VIDEO

IN Jacks on the back of  VCR 2,
press Number buttons 0, 0, 1.  AV
REAR will appear on-screen.

•  If you use the AUDIO and VIDEO

IN Jacks on the front of  VCR 2,
press Number buttons 0, 0, 2.  AV
FRONT will appear on-screen.

•  Unauthorized recording of copy-

righted television programs, video
tapes, or other materials may
infringe on the rights of copyright
owners and violate copyright laws.

•  These instructions show you how to

copy tapes using two VCRs like
yours. Different VCRs may operate
differently.

Helpful Hints

Audio and Video cables are not supplied.

VRZ241(H1795).QX33  4/9/99 9:17 AM  Page 38

Summary of Contents for VRZ241AT

Page 1: ...Video Cassette Recorder VRZ241AT Owner s Manual TM I M P O R T A N T Return Your Warranty Registration Card Within 10 Days See Why Inside VRZ241 H1795 QX33 4 9 99 9 17 AM Page 1 ...

Page 2: ...S Remember to get the most from your PHILIPS MAGNAVOX product you must return your Warranty Registration Card within 10 days So Know these safetysymbols This bolt of lightning indicates uninsulated material within your unit may cause an electrical shock For the safety of everyone in your house hold please do not remove product covering The exclamation point calls attention to features for which yo...

Page 3: ... and which are labeled with the mark The use of tapes that have not been inspected for use in two four six and eight hour VCRs may result in poor picture quality and excessive deposits on the video heads which may not be covered by the warranty if damage occurs Note to the Cable TV System Installer This reminder is provided to call the Cable TV system installer s attention to Article 820 40 of the...

Page 4: ...rols Remote Control Buttons 20 21 On Screen Status Displays 22 VCR Display Panel 23 Front Panel 24 Rear Panel 25 Basic Operations Playing 26 Recording 27 Recording Recording One Channel Watching Another 28 One Touch Recording 29 Timer Recording 30 33 Setting Up the VCR Plus Programming System 34 35 Timer Recording With the VCR Plus Programming System 36 37 Rerecording Tape Duplication 38 Playing R...

Page 5: ...and man ganese batteries Do not mix old and new batteries Helpful Hints Using the Remote Control Point the remote control at the VCR then press the VCR but ton when using the remote control to operate the VCR Point the remote control at the TV then press the TV button when using the remote control to operate the TV Point the remote control at the Cable Box or Direct Broadcast System DBS then press...

Page 6: ...le Box or a Direct Broadcast System please see pages eight nine If you have a Stereo TV please see page 10 After you hook up the VCR go to page 11 to turn on the VCR ANTENNA IN Jack on back of TV Cable 75 ohm Back of VCR Antenna Indoor Outdoor 300 ohm 1 Disconnect the antenna or cable from your TV 2 Connect the antenna or cable to the ANT enna IN Jack of your VCR Cable 75 ohm Antenna Indoor Outdoo...

Page 7: ...her a snap on type supplied or screw on type of coaxial cable whichever you prefer 5 Set the CH3 CH4 switch on the back of the VCR to CH3 or CH4 whichever channel is not used or least used in your area Set the TV to the same channel For example when playing a tape if the CH3 CH4 switch is set to CH3 the TV should be on channel 03 Hookups Without a Cable Box Direct Broadcast System cont d 7 ANTENNA...

Page 8: ...is step 5 on page 31 Leave the Cable Box DBS on for a timer recording VIDEO IN OUT CH3 CH4 AUDIO OUT IN ANT OUT IN 75V ANT CABLE TV s ANTENNA IN Jack Cable Box DBS VCR Recording Viewing Any Channel Connections 1 With the VCR on and in VCR position the VCR light will appear on the display panel use the CHANNEL o p buttons to set the VCR to the Cable Box DBS output channel channel 03 or 04 2 Set the...

Page 9: ...e VCR in TV position The VCR light will disappear 3 Set the TV to the Cable Box DBS output channel 03 or 04 4 Select the channel you want to watch at the Cable Box DBS TV s ANTENNA IN Jack Cable Box DBS VCR When you play a tape make sure the Cable Box DBS is set to the same channel as the CH3 CH4 switch on the VCR Set the TV to the Cable Box DBS output channel 03 or 04 Helpful Hint 1 Connect a Cab...

Page 10: ...ck on your TV 3 Connect an audio cable to the white AUDIO OUT Jack on the back of the VCR Then connect the other end of the audio cable to the AUDIO IN Jack on your TV If your TV has Right and Left AUDIO IN Jacks you must use a Y splitter audio cable as illustrated to deliver audio to the TV s right and left channels 4 Turn on your TV making sure it is in Line Input mode Please refer to your TV ow...

Page 11: ...o skip this feature and play a tape immediately insert a tape with its record tab removed Or to skip step 3 press the MENU button All on screen displays will be in English To skip step 5 press the STOP button Channels will not be programmed and CHANNELS NOT SET will appear on screen If you try to program channels when there is no antenna or cable connected to the VCR programming will appear to tak...

Page 12: ...H EXIT 4 Press the PLAY o button or the STOP p button to select TV if you have an antenna or CABLE TV if you have a cable connection Then press the F FWD B button ON will appear beside your choice 5 Press the PLAY o button or the STOP p button to select AUTO PROGRAMMING then press the F FWD B but ton The VCR will place all the channels you receive into its memory 6 Wait for a few minutes while the...

Page 13: ... button 5 Press the PLAY o button or the STOP p button until the channel number you want to add or delete appears beside the arrow SELECT op ADD DELETE B 16 DELETED 17 ADDED 18 ADDED 19 ADDED 20 ADDED TO END PUSH EXIT 6 Press the F FWD B button to select ADDED or DELET ED 7 Press the STATUS EXIT button 2 3 4 6 7 1 Press the VCR button 1 5 REW PLAY POWER VCR PLUS ENTER SPEED VCR TIME SEARCH TV MUTE...

Page 14: ...e next screen of channels or you will return to the previous menu 5 Press the STATUS EXIT button once or twice to exit 2 Press the MENU button SELECT op CHOOSE B PROGRAM VCR SET UP TUNER SET UP SET CLOCK TO END PUSH EXIT 3 Press the PLAY o button or the STOP p button to select TUNER SET UP then press the F FWD B button SELECT op CHOOSE B TV CABLE TV ON AUTO PROGRAMMING ADD DELETE CH CH MEMORY REVI...

Page 15: ...n mark to appear on screen To make corrections press the CLEAR button until the space for the number you want to correct is flash ing Then enter the correct number The current time will appear on the VCR display panel when the clock is set The current time will also appear on screen if you press the STATUS EXIT button See page 22 for details Power failures that last for more than one minute can ca...

Page 16: ...in April and turn back one hour in October Daylight Saving Time is set to ON when you receive your VCR Turn Daylight Saving Time ON or OFF by following the steps below Before you begin Make sure the clock is set 1 Press the VCR button 1 REW PLAY POWER VCR PLUS ENTER SPEED VCR TIME SEARCH TV MUTE CBL DBS VCR TV CHANNEL VOLUME REC OTR STATUS EXIT MEMORY SLOW PAUSE STILL MENU CLEAR EJECT STOP F FWD 1...

Page 17: ...AP TO END PUSH EXIT 2 3 4 5 6 If you accidentally select Spanish on screen displays and need English on screen displays 1 Press the VCR button 2 Press the MENU button 3 Press the PLAY o button or the STOP p button to select PREPARE EL VCR then press the F FWD B button 4 Press the PLAY o button or the STOP p button to select LENGUA JE then press the F FWD B button 5 Press the PLAY o button or the S...

Page 18: ...ss Number buttons 0 6 Your VCR remote control may operate your TV If the remote control doesn t operate your TV now follow the steps below 1 Point the remote control at your TV and press the TV button Then press the POWER button If your TV turns on or off try the other TV buttons see pages 20 21 If your TV doesn t turn on or off or if the other buttons don t work go to step 2 2 Find the brand of y...

Page 19: ...ns on or off try the other Cable Box DBS buttons see pages 20 21 If your Cable Box or DBS does n t turn on or off or if the other buttons don t work go to step 2 2 Find the brand of your Cable Box or DBS on the lists below and remember the two digit number beside it 6 Repeat step 1 If the remote control works your Cable Box or DBS you re finished If the remote control still doesn t work your Cable...

Page 20: ...if you have a Magnavox TV press the TV button then press the STATUS EXIT button to see a TV status display or to remove the TV menu Number Buttons Use to select channels at the VCR TV Cable Box or Direct Broadcast System use to set up VCR features such as the clock Channels 1 9 To select press 0 then the channel number you want For example to select channel 7 press 0 7 Channels 100 and above To se...

Page 21: ...R or TV position VCR Position Use to watch a tape to watch a program while recording it or to watch a TV program changing channels at the VCR If the VCR light appears on the display panel of the VCR it is in VCR position TV Position Use to watch a TV program changing channels at the TV or to watch one program while recording another Details are on page 28 If the VCR light doesn t appear on the dis...

Page 22: ...r five seconds only the counter will remain on screen You must press the STATUS EXIT button to remove it If you select STATUS ON then select COUNTER ONLY OFF Whenever you press the STOP p button or the PLAY o but ton the status display will appear for five seconds If you select STATUS OFF The status display will not appear when you press function but tons You must press the STATUS EXIT button to s...

Page 23: ...This light appears when the power is on REW REC OTR PAUSE F FWD CHANNEL VCR TV POWER VIDEO AUDIO STOP EJECT PLAY h e a d Timer Light This light glows when the VCR is turned off to set a timer recording or during a One Touch Recording It flashes if the power is off for a timer recording but there is no tape in the VCR It flashes when all timer recordings are finished Clock Display The current time ...

Page 24: ...motion play back Also press to remove ver tical jitter in a Still picture PLAY Button Press to play a tape Press to release Slow Search or Still mode and return to play back Details are on page 42 REW ind Button When playback is stopped press to rewind the tape at high speed During playback press to rewind the tape while the picture stays on screen Details are on page 42 STOP EJECT Button Press on...

Page 25: ...ils are on pages six nine OUT Jack Use the supplied RF coaxi al cable to connect this jack to the ANTENNA IN Jack on your TV Cable Box or Direct Broadcast System Details are on pages six nine VIDEO OUT Jack Connect a cable going to the VIDEO IN Jack of a camcorder another VCR or an audio visual source laser disc player video disc player etc here Details are on page 38 AC Power Cord Connect to a st...

Page 26: ...nside lights will appear on the display panel If the tape s record tab has been removed playback will start automatically 6 When the tape stops press the EJECT button on the remote control or the STOP EJECT button on the VCR to remove the tape 3 If playback does not start automatically press the PLAY o button 4 Press the STOP p button on the remote control or the STOP EJECT button on the VCR once ...

Page 27: ...R the VCR will eject the tape and PROTECTED CAS SETTE CANNOT RECORD will flash on screen Other recording options are on pages 28 38 You can change the tape speed during a recording but some distor tion will appear on the tape The VCR will record in a preset vol ume Helpful Hints 5 Press the SPEED button until the desired tape speed appears briefly on screen Details about tape speed are on page 32 ...

Page 28: ... 4 Press the TV button then press the CHANNEL o p or Number buttons to choose the channel you want to watch at the TV If the VCR remote control doesn t operate your TV use the TV remote control to select the channel 5 To return to the channel being recorded press the TV button then use the Number buttons to select channel 03 or 04 at the TV whichever channel the CH3 CH4 switch on the back of the V...

Page 29: ... to record the program s Place the VCR in VCR position The VCR light will appear on the display panel If it does not press the VCR TV button once 4 To stop an OTR before recording is finished press the STOP p button or the POWER button To cancel the OTR but continue recording press the REC ord OTR button repeatedly until REC appears in the upper left corner of the TV screen STATUS must be set to O...

Page 30: ...ect PROGRAM then press the F FWD B button SELECT op CHOOSE B ONCE DAILY WEEKLY PROGRAM REVIEW TO END PUSH EXIT 3 Press the PLAY o button or the STOP p button to select a ONCE DAILY OR WEEKLY recording Then press the F FWD B button ONCE The VCR will record a TV program on any day you choose up to 12 months away DAILY The VCR will record every day from Monday to Friday starting at the same time and ...

Page 31: ... has already been used to store a timer recording PREVIOUSLY SET PROGRAM will appear on screen briefly Information about the program in that slot will appear on screen If this happens press the STATUS EXIT button then select another number 5 Use the Number buttons to enter the channel you want to record If you have a basic antenna or cable hookup as shown on pages six seven enter the channel numbe...

Page 32: ...gain from step 1 8 11 Turn off the VCR power The Timer light will appear on the display panel If the timer recording will take place several hours or days from now you may use the VCR until time for the recording Turn off the VCR a few minutes before the recording starts If you forget to turn off the VCR PLEASE TURN OFF VCR FOR TIMER RECORDING flashes on your TV screen two minutes before a timer r...

Page 33: ...lect PROGRAM then press the F FWD B button 3 Press the PLAY o button or the STOP p button to select PROGRAM REVIEW then press the F FWD B button The timer recording information for the program in the lowest numbered slot will appear on screen If no timer recordings are set nothing will happen when you press the F FWD B button 4 Press the F FWD B button repeatedly to review all pro grammed timer re...

Page 34: ...CR with your local channel infor mation To fill in the boxes you will need 1 a cable channel list if applicable you can request one from your cable company and 2 a chart that lists VCR Plus channel numbers which you can find in your TV guide or the TV listings of your local newspaper NOTE If you are using a Cable Box DBS the Cable TV channel must be 03 or 04 the Cable Box DBS output channel for ev...

Page 35: ... recording 7 Press the STATUS EXIT button To erase a Cable TV channel num ber repeat steps 3 5 on this page Then press the PLAY o button or the STOP p button to select it Press the CLEAR button then press the STATUS EXIT button To select line input for the Cable TV channel press 0 0 AUX will appear on screen When you receive the VCR all the VCR Plus channel numbers and Cable TV channel numbers are...

Page 36: ...2 months away DAILY The VCR will record every day from Monday to Friday starting at the same time and recording for the same length of time WEEKLY The VCR will record on the same day at the same time and for the same length of time every week 2 3 4 CODE ERROR may flash on screen after step 3 if you enter an incorrect number for example one that is too short The previous screen will appear Enter th...

Page 37: ...rding to take place Make sure there is a tape in the VCR 6 Press the STATUS EXIT button PROGRAM WAS COM PLETED PLEASE TURN OFF VCR FOR TIMER RECORDING should appear on screen briefly 7 Press the POWER button to turn off the VCR power The Timer light will appear The Timer light will flash if there is not a tape in the VCR If the timer recording will take place several hours or days from now you may...

Page 38: ...N OUT CH3 CH4 AUDIO OUT IN ANT VCR 1 Playing VCR VCR 2 Recording VCR 2 VCR 1 will play your tape Put a prerecorded tape in VCR 1 1 Audio cable from AUDIO OUT Jack of VCR 1 to AUDIO IN Jack of VCR 2 2 Video cable from VIDEO OUT Jack of VCR 1 to VIDEO IN Jack of VCR 2 3 RF coaxial cable from VCR s OUT Jack to TV s ANTENNA IN Jack If you use the AUDIO and VIDEO IN Jacks on the back of VCR 2 press Num...

Page 39: ... button so that OFF appears beside REPEAT PLAY Press the STATUS EXIT button The real time counter memory does not function during Repeat Play Helpful Hints SELECT op CHOOSE B PROGRAM VCR SET UP TUNER SET UP SET CLOCK TO END PUSH EXIT SELECT op CHOOSE B REPEAT PLAY OFF ON SCREEN MODE LANGUAGE VCR PLUS REF MAP TO END PUSH EXIT 2 4 3 6 1 Press the VCR button 1 4 Press the PLAY o button or the STOP p ...

Page 40: ... the specified length of time then begin playback If you want to search for more than 59 minutes you must enter the length of time in hours and minutes For example to search forward 70 minutes press 1 1 0 at step 3 You can not do a Time Search while recording To remove the Time Search display press the TIME SEARCH button again To cancel a Time Search that is in progress press the STOP p button Hel...

Page 41: ...he STOP p button to stop the tape 2 Press the STATUS EXIT button to see the status display 3 While the status display is on screen press the CLEAR button to reset the real time counter to zero STOP 1 08 PM CH10 SLP 0 00 00 4 While the real time counter is on screen press the MEM ORY button so that M appears beside the counter STOP 1 08 PM CH10 SLP M 0 00 00 5 To go to a tape location where the rea...

Page 42: ...AY o button or press the PAUSE STILL button again Viewing a Slow Motion Picture 1 During tape playback press the SLOW button The tape will play in slow motion 2 To return to normal playback press the PLAY o button or press the SLOW button again Slow and Still modes will automati cally switch to Stop mode after five minutes to protect the VCR and the tape from damage SP LP SLP means this feature wi...

Page 43: ...t A tape can be ejected with the VCR power on or off but the VCR must be plugged in If a timer recording is set a tape can only be ejected with the power on Make sure you insert a tape and turn off the VCR power for the timer recording Automatic Tracking Adjustment The VCR adjusts tracking automatically to give you the best possi ble picture quality With some recordings however you may get a bette...

Page 44: ...record tab page five If after programming a timer recording you turn off the VCR power without putting a tape in the VCR the Timer light will blink If the record tab on a tape is missing the VCR will eject the tape The Timer light will blink Make sure the VCR power is off Make sure the clock is set page 15 The VCR may not perform or continue a timer recording if a power interruption of more than o...

Page 45: ... the tape when the REC ord OTR button is pressed or when the VCR power is turned off to set a timer recording Make sure the tape has a record tab page five Channels above 13 cannot be received Select CABLE TV at the TUNER SET UP menu page 12 then let the VCR set up the channels Poor reception You may need to tune your TV again The motor cylinder rotates even when the VCR is in Stop mode To enable ...

Page 46: ...e the Number buttons to select another chan nel OTR One Touch Recording a timed recording that starts imme diately and records for 30 minutes to eight hours Remote Control the small electronic unit that came with your VCR allows you to operate your VCR from a distance You may be able to operate your TV Cable Box or Direct Broadcast System with the remote control RF coaxial cable The cable supplied...

Page 47: ...nsumption 16W Operating Temperature 41 F 5 C to 104 F 40 C Relative Humidity 10 to 80 Weight 5 51 lbs 2 5 kg Dimensions 14 3 16 W x 3 1 16 H x 10 D 360 mm x 92mm x 230mm Tuner Broadcast Channels VHF 2 13 UHF 14 69 Cable TV Channels 2 13 Midband A 1 Superband J W Hyperband A 5 A 1 Special Channel 5A Ultraband 37 94 100 125 NOTE Designs and specifications are subject to change without notice VRZ241 ...

Page 48: ...officially distributed by Philips Consumer Electronics Company In countries where Philips Consumer Electronics Company does not dis tribute the product the local Philips service organiza tion will attempt to provide service although there may be a delay if the appropriate spare parts and technical manual s are not readily available MAKE SURE YOU KEEP Please keep your sales receipt or other documen...

Page 49: ...2 playing 26 power button 20 24 cord 25 pwr power light 23 real time counter 41 rear panel 25 rec otr button 20 24 27 29 rec ord light 23 recording basic 27 one channel watching another 28 timer 30 33 with the vcr plus programming system 34 37 remote control buttons 20 21 sensor 24 using 5 repeat play 39 rerecording 38 rew ind s button 20 24 rf coaxial cable 6 9 38 46 safety precautions 3 searchin...

Page 50: ...VRZ241 H1795 QX33 4 9 99 9 18 AM Page 50 ...

Page 51: ...VRZ241 H1795 QX33 4 9 99 9 18 AM Page 51 ...

Page 52: ... the items on this page are packed with your VCR These accessories are provided to help you use or set up your VCR If any of these items are not included or if you need to replace an item contact Philips Service Solutions Group at the address below Philips Service Solutions Group P O Box 967 Greeneville TN 37744 0967 Or call 1 800 851 8885 VRZ241 H1795 QX33 4 9 99 9 18 AM Page 52 ...

Reviews: