


— 20 —
Always enter “0”
before any single
number entries.
3 Press
CH
5
/
∞
or
Number
buttons to
enter local channel number
(USER CH), then press
OK
/
3
.
• For example, for local channel number 9,
press
0
,
9
.
Always enter “0” for empty digits.
4 Repeat the above procedures until
you set the guide channel for all the
receivable local channels.
3
Finish Setting
Press
EXIT/STATUS
.
To correct a user channel number
and/or a guide channel number,
repeat the same procedures explained
above. This time, enter the correct user
channel number and/or the correct
guide channel number.
A
DVANCED
O
PERATIONS
(C
ONTINUED
)
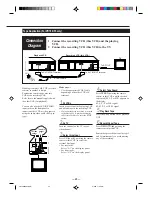
GUIDE CHANNEL SET UP
GUIDE CH
USER CH
254
--
255
--
01
05
02
02
03
03
SELECT OR ENTER USER
CH. NO. THEN PUSH /OK.
TO END PUSH EXIT
3
Select Recording Type
If you want to record the same
programme daily, press
DAILY
(Number button 8).
The VCR will record a TV programme
every day (Monday through Friday) at
the same time and length. (Daily
Recording)
If you want to record the same
programme weekly, press
WEEKLY
(Number button
9
).
The VCR will record a TV programme
once a week at the same day, time, and
length. (Weekly Recording)
If you want to cancel the currently
set programme, press
CLEAR
.
4
Select Tape Speed
Press
SPEED
.
• Each time you press
the button, the tape
speed alternates
between “SP”, “LP”,
or “SLP”.
SP, LP : For PAL signal
SP, SLP : For NTSC signal
• To change the stop time, press
STOP +/–
(number 2 or 5 button).
5
Confirm Programme
Press
EXIT/STATUS
.
“PROGRAM WAS COMPLETED”
appears on the TV screen.
After 5 seconds, the above message
disappears, and the normal TV picture
resumes. The
(timer) indicator
lights up on the display.
• If “PROGRAM NOT COMPLETED”
appears, try again from step 1.
• If “PROGRAM NOT COMPLETED
CLASH” appears, the timer recording
you just programmed overlaps another
timer recording. The timer recording you
just programmed will not take place. The
timer recording menu will reappear.
If you want to store other
programmes, repeat steps 1 to 5.
6
Finish the Settings
Press
POWER
to turn off the VCR.
The VCR must be turned off for a timer
recording to take place. If you forget to
turn off the VCR, “PLEASE TURN
OFF VCR FOR TIMER
RECORDING” flashes on your TV
screen two minutes before a timer
recording starts. To remove the
message, press the
CLEAR
button.
Timer Recording Using
SHOWVIEW FOR VR888/55 ONLY
By entering the SHOWVIEW number
for a particular TV programme, you
can easily programme a timer
recording.
1
Select SHOWVIEW Mode
1 Press
VCR
.
2 Press
TIMER
.
3 Press
5
or
∞
to
select “G-CODE/
SHOWVIEW”
then press
OK/
3
.
The G-CODE/SHOWVIEW entry
menu appears on the TV screen.
2
Enter SHOWVIEW Code
1 Press
Number
buttons to enter the
SHOWVIEW
number assigned to
the TV programme
you want to record.
2 Press
OK
/
3
.
• If “ERROR-RE-ENTER CODE” appears
on the TV, you have entered an incorrect
SHOWVIEW number. If this happens,
press
CLEAR
to erase the number, then
enter the correct number.
• If the guide channel has not yet been set,
THE GUIDE CHANNEL SET UP menu
will appear.
Input the number of the channel on which
the broadcast for the SHOWVIEW
number is received on the VCR, then
press
OK
/
3
and programme screen
appears.
G-CODE/SHOWVIEW PROG.
CODE
TO END PUSH EXIT
G-CODE/SHOWVIEW PROG.
CODE 123
TO SET PUSH /OK
TO CORRECT PUSH CLEAR
TO END PUSH EXIT
ONE TIME PROGRAM
PROGRAM 1
/–
START +/– 08 : 30
STOP +/– 09 : 30
REC SPEED LP
DATE +/– 07/04/98
FRIDAY
SET DAILY=8 OR WEEKLY=9
TO END PUSH EXIT
12
Timer Recording
To record while you’re away, follow step
1 — 10 below. For each programme you
set, the VCR will turn on, start recording,
and turn off automatically. You can store
up to 8 programmes.
Make sure....
• The clock is set to the correct time
before setting timer recording.
• A cassette is inserted in the VCR and
the record tab of the cassette must
not be removed.
• The remote control operation mode
is set correctly for operating your
target component.
– Press
VCR
to operate the VCR.
– Press
TV
to operate the TV.
FOR EACH STEP BELOW, YOU
NEED TO FINISH WITHIN 60
SECONDS; OTHERWISE,
PROGRAMMING WILL HAVE TO
BE RESTARTED FROM STEP 1.
1
Select Timer Mode
Press
TIMER
.
The Timer Recording menu appears.
2
Select Programme mode
1 Press
5
or
∞
to
select “QUICK
PROGRAMMING”
then press
OK/
3
.
The Quick
Programming menu appears.
• If you have already made 8
programmes, “ALL PROGRAMS IN
USE” appears and goes back to the
Timer Recording menu. If this
happens, delete unwanted programmes.
(
✈
P.21)
3
Select Channel
Press
CH
5
or
∞
to
enter the TV channel.
• To record from
external line input,
press
CH
5
or
∞
until “A/V REAR” or
“A/V FRONT” appears.
After a timer recording has taken
place
Press
POWER
to turn on the VCR.
You can operate your VCR normally.
To stop a started timer recording
Press
POWER
.
Recording stops and the VCR turns off.
If it is a Daily or Weekly Recording,
future recordings will be carried out as
programmed.
To check or erase the programmes
See page 21.
ONE TIME PROGRAM
PROGRAM 1
/–
START +/– – –:– –
STOP +/– – –:– –
REC SPEED SP
DATE +/– – –/– –/– –
SET DAILY=8 OR WEEKLY=9
TO END PUSH EXIT
– –
ONE TIME PROGRAM
PROGRAM 1
/–
START +/– – –:– –
STOP +/– – –:– –
REC SPEED SP
DATE +/– – –/– –/– –
SET DAILY=8 OR WEEKLY=9
TO END PUSH EXIT
12
VR788/888-55 NEW
6/3/99, 11:51 PM
20


