Important for the United Kingdom
This apparatus is fitted with an approved moulded 13 Amp
plug. To change a fuse in this type of plug proceed as follows:
a
Remove fuse cover and fuse.
b
Fix new fuse which should be a BS1362 3A, A.S.T.A. or
BSI approved type.
c
Refit the fuse cover.
If the fitted plug is not suitable for your socket outlets, it should
be cut off and an appropriate plug fitted in its place.
If the mains plug contains a fuse, this should have a value of
3A. If a plug without a fuse is used, the fuse at the distribution
board should not be greater than 5A.
D
Note: * The severed plug must be destroyed to avoid a
possible shock hazard should it be inserted into a 13A
socket elsewhere.
How to connect a plug:
The wires in the mains lead are coloured in accordance with
the following code:
BLUE - ’NEUTRAL’ (’N’)
BROWN - ’LIVE’ (’L’)
d
The BLUE wire must be connected to the terminal which
is marked with the letter ’N’ or coloured BLACK.
e
The BROWN wire must be connected to the terminal
which is marked with the letter ’L’ or coloured RED.
f
Do not connect either wires to the earth terminal in the
plug which is marked with the letter ’E’ or by the safety
earth symbol
\
or coloured green or green-and-yellow.
Before replacing the plug cover, make certain that the cord
grip is clamped over the sheath of the lead - not simply over
the two wires.
Connecting to the TV-set
When you install your Video recorder for the first time, please
read:
E
the paragraph ’Connecting with scart cable and Easy
Link/NexTView’, when your TV-set is equipped with ’Easy
Link/NexTView’.
E
the paragraph ’Connecting with scart cable without Easy
Link/NexTView’, when your TV-set is not equipped with
’Easy Link/NexTView’.
E
the paragraph ’Connecting without a scart cable’, when
you do not use a scart cable.
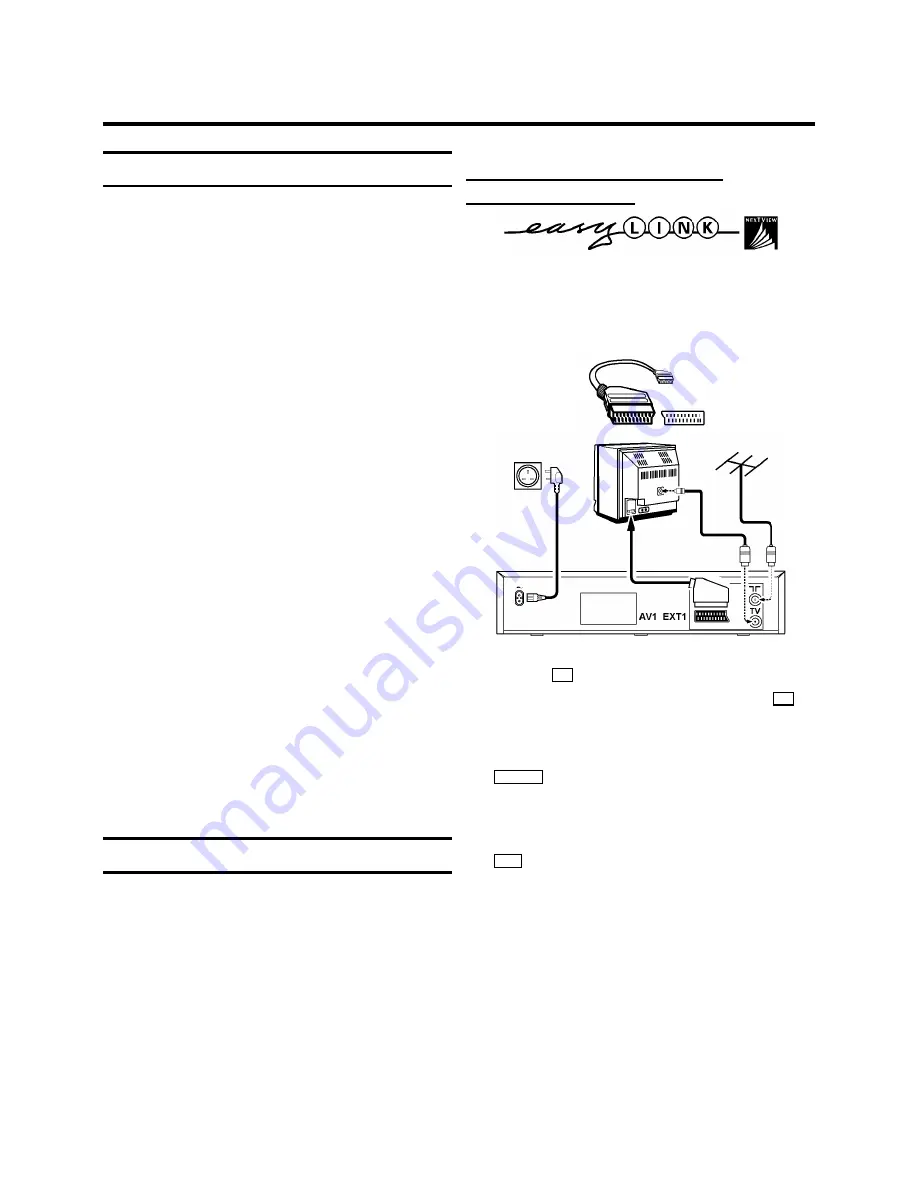
Connecting with scart cable and
’Easy link/NexTView’
With the function ’Easy Link/NexTView’, your video recorder
can exchange information with the television. Heed the
operating instruction of your television.
With ’Easy Link/NexTView’ the TV channels from the TV will
automatically be loaded.
a
Remove the aerial cable plug from your TV set and insert
it into the
2
socket at the back of the video recorder.
b
Plug one end of the aerial cable provided into the
TV
socket on the video recorder and the other end into the
aerial input socket on your TV set.
c
Plug one end of the special scart cable provided into the
AV1 EXT1
scart socket at the back of the video recorder
and the other end into the scart socket on your TV set.
d
Switch on the TV set.
e
Insert one end of the mains cable into the mains socket
4
at the back of the video recorder and the other end
into the wall socket.
f
The video recorder will automatically load all TV chan-
nels stored on your TV, in the same sequence.
This may take several minutes.
When all data (TV channels, language, country) has been
copied, the following text appears on the TV screen:
’EASY LINK LOADING COMPLETE’.
g
Check if clock and date are correct. Read the paragraph
’Setting Time/Date’ in this chapter.
1.
INSTALLATION
2


