background image

I

MPORTANT INFORMATION FOR CUSTOMERS IN

G

REAT

B

RITAIN

E

NGLISH

6

6

IIm

mppoorrttaanntt  iinnffoorrm

maattiioonn  ffoorr  ccuussttoom

meerrss  iinn  G

Grreeaatt  BBrriittaaiinn

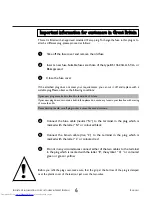
This set is fitted with an approved moulded 13 amp plug.To change the fuse in this plug or to

attach a different plug, please proceed as follows:

1

Take off the fuse cover and remove the old fuse

2

Insert a new fuse. Suitable fuses are those of the type BS 1362 3A,A.S.T.A.- or

BSI-approved

3

Close the fuse cover

If the attached plug does not meet your requirements, you can cut it off and replace with a 

suitable plug. Please observe the following conditions:

If your new plug uses a built-in fuse, this should be a 3A fuse.
If your new plug does not contain a built-in fuse, please do not use any fuses in your fusebox with a rating

of more than 5A.
Please destroy the old, cut-off plug so that it cannot be used elsewhere.

4

Connect the blue cable (neutral “N”) to the terminal in the plug which is 

marked with the letter “N” or coloured black

5

Connect the brown cable (live, “L”) to the terminal in the plug which is 

marked with the letter “L” or coloured red

6

Do not in any circumstances connect either of the two cables to the terminal

in the plug which is marked with the letter “E”, the symbol  “

\

” or coloured

green or green / yellow

Before you refit the plug cover, make sure, that the grip at the bottom of the plug is clamped

over the plastic cover of the lead, not just over the two wires.

!

!

Summary of Contents for VR 210/75

Page 1: ...n Page 20 Searching for tape position with picture picture search Page 20 Searching for tape position without picture forward wind and rewind Page 20 Searching automatically for tape position index search Page 21 Finding a blank position on tape automatically Page 21 Still picture slow motion Page 22 Fine tuning tracking Page 23 Optimizing still picture Page 23 Starting and stopping recording manu...

Page 2: ...VR 210 07 Operating Instructions with ...

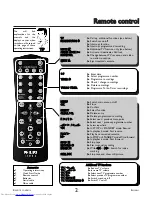
Page 3: ... previousTV programme number T TV V M MU UT TE E y y ä Switch sound on off T TV V S ST TA AN ND DB BY Y O ON N m m ä Switch TV on off A Ac cc ce es ss so or ri ie es s 4 Operating instructions 4 Quick Start Guide 4 Remote control 4 Batteries 4 Aerial cable 4 Mains cable M ME EN NU U ä Switch main menu on off O OK K ä Store ä Confirm S SE EL LE EC CT T ä Select function C CL LE EA AR R C CL L ä Del...

Page 4: ...y there are some components which are constantly operational To switch off the video recorder completely you must disconnect it from the power supply The video recorder does not contain any components that can be repaired by the customer Make sure that air can circulate freely through the ventilation slots on the video recorder Make sure that no objects or liquids enter the video recorder If liqui...

Page 5: ...tem for video recorders revolutionized the video world when it was introduced Instead of having to enter many different details date starting time finish time programme which was often tiresome and liable to errors all you have to do is enter a number up to nine digits long which can be found in any TV programme listing Once you have done that all the relevant details for the recording are stored ...

Page 6: ...ve the following conditions If your new plug uses a built in fuse this should be a 3A fuse If your new plug does not contain a built in fuse please do not use any fuses in your fusebox with a rating of more than 5A Please destroy the old cut off plug so that it cannot be used elsewhere 4 Connect the blue cable neutral N to the terminal in the plug which is marked with the letter N or coloured blac...

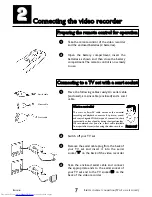
Page 7: ... enclosed a mains cable enclosed and a scart cable P PA AR RD DO ON N W Wh ha at t i is s a a s sc ca ar rt t c ca ab bl le e The scart or Euro AV cable serves as the universal recording and playback connector for picture sound and control signals With this type of connection there is practically no loss of quality during the signal transfer We recommend that you use a scart cable available from s...

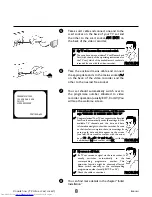
Page 8: ...ATULATIONS YOU NOW OWN A NEW PHILIPS VIDEO RECORDER CONTINUEPOK P PR RO OB BL LE EM M 8 8 M My y s sc cr re ee en n i is s s st ti il ll l b bl la an nk k 4 4 If a TV set receives a signal via the scart socket it usually switches automatically to the corresponding programme number This automatic function might be adversely affected Please switch manually to the corresponding programme number usual...

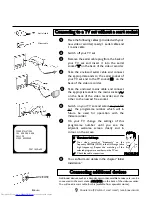
Page 9: ...g cables provided with your new video recorder ready 1 aerial cable and 1 mains cable 2 Switch off your TV set C Co on nn ne ec ct ti in ng g t to o a a T TV V s se et t w wi it th ho ou ut t a a s sc ca ar rt t s so oc ck ke et t 3 Remove the aerial cable plug from the back of your TV set and insert it into the aerial socket 2 2on the back of the video recorder 4 Take the enclosed aerial cable an...

Page 10: ... c co or rr re ec ct tl ly y Always point the remote control at the video recorder and not at the TV set AUTO INSTALL SEARCHING 00 TV CHANNELS FOUND hhhh_______________ PLEASE WAIT 3 The initial setting of channel date and time is completed T TI IP P T Th he e T Te el le et te ex xt t c cl lo oc ck k r re es se et ts s a au ut to om ma at ti ic ca al ll ly y If a TV channel which has Teletext is s...

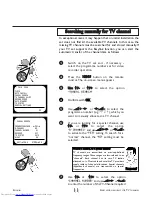
Page 11: ... be selected P PA AR RD DO ON N W Wh ha at t i is s a a c ch ha an nn ne el l o or r a a s sp pe ec ci ia al l c ch ha an nn ne el l TV channels are transmitted on precisely defined frequency ranges These ranges are also referred to as channels Each channel has its own TV station allocated to it Most cable and satellite TV providers supply tables of channel allocations Special channels hyperband c...

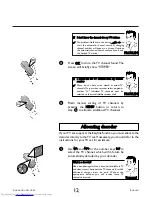
Page 12: ... On your video recorder select programm number E2 Individual TV channels must be selected on the actual satellite receiver itself 9 Finish manual sorting of TV channels by pressing the M ME EN NU U button or return to step 3 to allocate additional TV channels 1 Use P P and P P or the number keys 0 0 9 9 to select the TV channel which will in future be automatically decoded by your decoder A Al ll ...

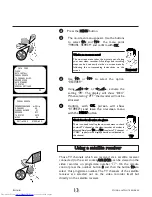
Page 13: ...F the decoder will not be allocated P PA AR RD DO ON N W Wh ha at t i is s a an n o on n s sc cr re ee en n m me en nu u The on screen menu takes the mystery out of using your new video recorder All settings and recording steps can be done easily via the on screen menu by following the corresponding instructions on the screen 6 Confirm with O OK K screen will show STORED and leave the on screen me...

Page 14: ...ption AUTO INSTALL automatic channel search and confirm with O OK K 2 Press the M ME EN NU U button on the remote control The on screen menu appears 8 8 T Th he e v vi id de eo o r re ec co or rd de er r i is s n no ot t f fi in nd di in ng g a al ll l t th he e T TV V c ch ha an nn ne el ls s 4 4 In exceptional cases it may happen that the set does not find all the available TV channels In this c...

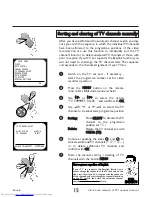
Page 15: ...menü erscheint 4 Use S P or QS to select the TV channel to be allocated a programme position 5 S So or rt ti in ng g Press S SE EL LE EC CT T to allocate theTV channel to the programme position set P 01 D De el le et te e Delete the TV channel set with C CL LE EA AR R C CL L 6 Continue repeating the steps 4 and 5 to allocate additional TV channels P 02 P 03 or to delete additional TV channels and ...

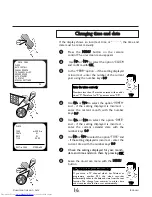
Page 16: ...1 Press the M ME EN NU U button on the remote control The on screen menu appears If the display shows an incorrect time or the time and date must be reset manually MAIN MENU CLOCK AUTO INSTALL MANUAL SEARCH TV CHANNEL ALLOC RECORD SPEED AUTO STANDBY TV SYSTEM SPECIAL SETTINGS OK CLOCK YEAR Q2000P MONTH 01 DATE 01 TIME 20 00 EXITPMENU STOREPOK 7 Check the settings displayed for year month date and ...

Page 17: ... P P Confirm O OK K Enter 0 0 9 9 or S P a an nd d QS Interrupt S ST TA AN ND DB BY Y O ON N m m Abandon M ME EN NU U I In n t th he e e ev ve en nt t o of f a a p po ow we er r c cu ut t Channel data are stored for around 1 year time and timer data remain in the memory of the video recorder for around 3 hours You can check and or change many functions and settings of your video recorder via the m...

Page 18: ...he section Removing picture interference in this chapter 4 4 When playing many rental videos or older poorer quality cassettes it may not be possible to completely filter out picture and sound interference There is nothing wrong with the video recorder P PR RO OB BL LE EM M T TI IP P A Au ut to om ma at ti ic c s sw wi it tc ch h o of ff f Many functions pause still picture search switch themselve...

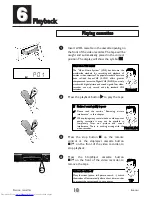
Page 19: ...a minus sign 8 8 A Af ft te er r i in ns se er rt ti in ng g a a c ca as ss se et tt te e t th he e v vi id de eo o r re ec co or rd de er r s sh ho ow ws s n no o r re em ma ai in ni in ng g p pl la ay yi in ng g t ti im me e 4 4 The set needs a little time to calculate the remaining playing time After a few seconds the display should change from to the corresponding value P PR RO OB BL LE EM M 2...

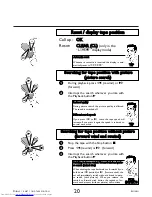
Page 20: ...splay mode T TI IP P A Au ut to om ma at ti ic c r re es se et t Whenever a cassette is inserted the display is auto matically reset to 00 00 00 1 Stop the tape with the Stop button h S Se ea ar rc ch hi in ng g f fo or r t ta ap pe e p po os si it ti io on n w wi it th ho ou ut t p pi ic ct tu ur re e f fo or rw wa ar rd d w wi in nd d a an nd d r re ew wi in nd d 3 Interrupt the search wherever ...

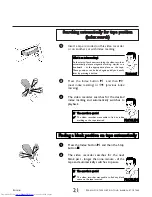
Page 21: ...hese positions can be found again quickly and easily later by pressing a button 1 Press the Index button E and then the Stop button h F Fi in nd di in ng g a a b bl la an nk k p po os si it ti io on n o on n t ta ap pe e a au ut to om ma at ti ic ca al ll ly y 2 The video recorder searches for the next blank part longer than one minute of the tape and automatically switches to pause P PR RO OB BL ...

Page 22: ...FO OR R E EX XP PE ER RT TS S P Pl la ay y c co om mp pa ac ct t V VH HS S c ca as ss se et tt te es s You can of course also use this video recorder to play back compact VHS cassettes To do this you will need the appropriate cassette adapter Its dimensions match those of a normal VHS cassette The adapter is recognised and treated by the set as aVHS cassette P PR RO OB BL LE EM M 8 8 T Th he e c c...

Page 23: ...from the display P PR RO OB BL LE EM M W Wh ha at t i is s t tr ra ac ck ki in ng g Tracking is the name given to the process of optimizing picture and sound playback During this process the speed of the tape is adjusted in such a way that all kinds of interference are removed or in the case of old VHS cassettes minimised T Tr ra ac ck ki in ng g a ad dj ju us st tm me en nt t i is s r re et ta ai...

Page 24: ...80 minute cassette This chapter explains how to set the desired recording speed Selecting the recording speed 1 Switch on theTV set and if necessary select the programme number set for video recorder operation W Wh ha at t i is s e er ra as se e p pr ro ot te ec ct ti io on n VHS cassettes can be protected from over recording by breaking off a thin strip of plastic arrow This erase protection can ...

Page 25: ... ev vi ic ce e 4 4 Signals from additional devices such as a camcorder other video recorder PCs etc are received via the scart socket of the video recorder The programme numbers E1 and E2 are allocated for these sources S Se el le ec ct ti in ng g t th he e r re ec co or rd di in ng g s sp pe ee ed d You have the option of two playback and recording speeds Standard Play SP offers the usual first c...

Page 26: ...r rd di in ng g s sp pe ee ed d 1 Press the M ME EN NU U button on the remote control The on screen menu appears 3 Use P PS S o or r Q QS S to select the desired recording speed SP Standard Play or LP Long Play 4 Confirm with O OK K The screen will show the message STORED 5 Stop selection of recording speed with M ME EN NU U P PA AR RD DO ON N S St ta an nd da ar rd d P Pl la ay y L Lo on ng g P P...

Page 27: ...nu appears 6 Use P PS S o or r Q QS S to select the setting ON to activate automatic recording from a satellite receiver or OFF to deactivate it Confirm with O OK K The screen will show the message STORED 4 Use P P or P P to select the option SPECIAL SETTINGS and confirm with O OK K 5 Use P P or P P to select the option SAT RECORDING 7 Programme the data on the satellite receiver for the desired r...

Page 28: ...ssible W Wh ha at t i is s D Di ir re ec ct t R Re ec co or rd d The Direct Record function means you can record in seconds when the video recorder is switched off When the record button is pressed the video recorder automatically recognises which TV channel has been selected on the TV set and starts to record the corresponding programme R Re eq qu ui ir re em me en nt t 1 1 T Th he e T TV V s se ...

Page 29: ...ly records the correct programme P PA AR RD DO ON N W Wh ha at t i is s D Di ir re ec ct t R Re ec co or rd d The Direct Record function means you can record in seconds when the video recorder is switched off When the record button is pressed the video recorder automatically recognises which TV channel has been selected on the TV set and starts to record the corresponding programme R Re eq qu ui i...

Page 30: ... correctly recognise theVPS signal of a TV channel 8 8 I I g ge et t t th he e e er rr ro or r m me es ss sa ag ge e S SE EL LE EC CT T P PR RO OG G N NR R 4 4 You have entered a correct PlusCode programming number but automatic recognition of the correct TV channel has failed Please enter the programme number under which your video recorder has stored the desired TV channel using the buttons 0 0 ...

Page 31: ...ammes will be completely recorded even if they are rescheduled In the input box START use S SE EL LE EC CT T to switch recognition of these signals on or off F FO OR R E EX XP PE ER RT TS S S Se el le ec ct ti in ng g t th he e r re ec co or rd di in ng g s sp pe ee ed d You have the option of two playback and recording speeds Standard Play SP offers the usual first class picture quality By using ...

Page 32: ...recording without erase protection E Er rr ro or r m me es ss sa ag ge e A AL LL L T TI IM ME ER RS S O OC CC CU UP PI IE ED D All the available memory locations in your video recorder for timer and VIDEO Plus programming are full Delete a programmed recording see chapter Delete a programmed recording k k a an nd d v v a ar re e f fl la as sh hi in ng g i in n t th he e d di is sp pl la ay y o of ...

Page 33: ...eo recorder has successfully completed a programmed recording or if it has been manually deleted Your video recorder can store up to six timer programmings 4 Use S S P P o or r Q QS S to select the input field DATE and enter the date of your desired recording P PA AR RD DO ON N F FO OR R E EX XP PE ER RT TS S 5 Use S S P P o or r Q QS S to select the input field PROG and enter the programme number...

Page 34: ... from over recording by breaking off a thin strip of plastic arrow This erase protection can be overridden by sticking one or more strips of adhesive tape tightly over the gap which has been created F FO OR R E EX XP PE ER RT TS S S Se el le ec ct ti in ng g t th he e r re ec co or rd di in ng g s sp pe ee ed d You have the option of two playback and recording speeds Standard Play SP offers the us...

Page 35: ...ar re e f fl la as sh hi in ng g i in n t th he e d di is sp pl la ay y o of f t th he e v vi id de eo o r re ec co or rd de er r A recording was programmed but there is no cassette in the machine Insert a cassette ready for recording without erase protection A recording was programmed but the video recorder was not switched into timer mode with the standby button Press S ST TA AN ND DB BY Y O ON ...

Page 36: ...video recorder 2 The display shows the actual starting time e g START 20 00 Change if necessary the displayed start time with P P or P P Confirm with T TU UR RB BO O T TI IM ME ER R F FO OR R E EX XP PE ER RT TS S A Ac ct ti iv va at te e V VP PS S P PD DC C VPS Video Programming Service and PDC signals Programme Delivery Control are transmitted by TV channels at the start and end of transmissions...

Page 37: ...ngs A recording was programmed but there is no cassette in the machine Insert a cassette ready for recording without erase protection C Ca as ss se et tt te e i is s e ej je ec ct te ed d a af ft te er r p pr ro og gr ra am mm mi in ng g A cassette with erase protection was inserted Please deactivate the erase protection or insert another cassette which is ready for recording C Ca as ss se et tt t...

Page 38: ...s s a a m me em mo or ry y l lo oc ca at ti io on n For technical reasons your video recorder has access to a limited number of drawers in which you can store your programming requirements Drawers occupied by programme recording details are only available for use again after the video recorder has successfully completed a programmed recording or if it has been manually deleted P PA AR RD DO ON N U...

Page 39: ...s will of course be recorded 2 To deactivate the child lock press the C CH HI IL LD D L LO OC CK K button u u for a few seconds until u disappears 1 Press the C CH HI IL LD D L LO OC CK K u button for a few seconds until the display shows u The child lock is now activated Switch off the video recorder with the Standby button m m on the remote control The set can now only be switched on with the re...

Page 40: ...t the option SPECIAL SETTINGS and confirm with O OK K 4 Use S S P P or Q QS S to select the setting ON continuous playback or OFF no continuous playback and confirm with O OK K The screen will show STORED 3 Use P P or P P to select the option REPEAT PLAY 7 Press playback button C C to start the playback or continuous playback depending on the setting 5 Complete the adjustment of continuous playbac...

Page 41: ...sion systems 1 During playback press the M ME EN NU U button on the remote control The on screen menu appears 2 Use P P or P P to select the option TV SYSTEM and confirm with O OK K 3 Use S S P P or Q QS S to select the desired TV system or B W for black and white playback and confirm with O OK K MAIN MENU CLOCK AUTO INSTALL MANUAL SEARCH TV CHANNEL ALLOC RECORD SPEED AUTO STANDBY TV SYSTEM SPECIA...

Page 42: ...se et tt ti in ng gs s ON The corresponding symbol for each type of operation playback recording etc appears briefly on the screen OFF OSD information is not shown P PA AR RD DO ON N T TI IP P 1 During playback press the M ME EN NU U button on the remote control The on screen menu appears 2 Use P P or P P to select the option SPECIAL SETTINGS and confirm with O OK K 4 Use S S P P or Q QS S to sele...

Page 43: ...ich these signals are transmitted 1 Switch the video recorder on and make sure there is no cassette in the video recorder 3 The video recorder will now transmit a test image on this frequency 2 Press at the same time the S ST TO OP P button h h on the remote control and the S ST TO OP P E EJ JE EC CT T button on the front of the video recorder until the modulator frequency of the set appears in th...

Page 44: ...o or r If you have connected the video recorder to theTV set with a scart cable you can switch off the modulator when there is interference with the picture or sound see below 1 Switch the video recorder on and make sure there is no cassette in the video recorder 3 The video recorder will now transmit a test image on this frequency 2 Press at the same time the S ST TO OP P button h h on the remote...

Page 45: ...located to video operation 4 4 Check that theTV channel number allocated to video operation is correct 4 4 Cable connection loose missing Check the connections N No o r re ec co or rd di in ng g p po os ss si ib bl le e 4 4TV channel not stored or wrongly selected 4 4 Cassette with erase protection inserted PROBLEM POSSIBLE CAUSE SOLUTION P Pr ro og gr ra am mm me ed d r re ec co or rd di in ng g ...

Page 46: ...NOTES ENGLISH 46 46 N No ot te es s ...

Page 47: ...STOP or STANDBY mode Forward wind tape ä During playback Forward picture search PLAY K ä Play back recorded cassette V Vi id de eo o r re ec co or rd de er r d di is sp pl la ay y 6 5 Current operating mode Long Play Child lock activated No function Timer Enter date Timer Enter start time Timer Enter programme Timer Enter finish time VPS PDC signal detected Tape position in seconds Programme numbe...

Page 48: ...3103 166 25041 0095 ω VR 210 07 ENGLISH ...

Page 49: ...c ca ab bl le e D D QUICK HELP 8 8 M My y T TV V s se et t h ha as s m mo or re e t th ha an n o on ne e s sc ca ar rt t s so oc ck ke et t 4 4 Then you have a more modern TV set Please check with the aid of the operating instructions for the TV set which of the scart sockets on the set is intended for use with a video recorder 8 8 I I c ca an n t t s se ee e t th he e w we el lc co om me e s sc c...

Page 50: ... HA AV VE E Y YO OU U C CO ON NN NE EC CT TE ED D A A S SC CA AR RT T C CA AB BL LE E Y YE ES S N NO O lYour set should automatically switch over to the programme number allocated to video recorder operation If it does not select the corresponding programme number manually EXT AV 0 l Switch on the TV set and on the TV set select the programme number to be used for video recorder operation l On the...

Reviews: