Philips TL960A/00T Operating Instructions Manual Download Page 9

9

1

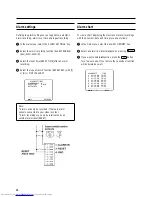
Switch the monitor/television set on.

2

Insert the cassette into the appliance with the window
facing upwards.
Inserting the cassette automatically switches on the
appliance.

3

Press button

G

PLAY

.

The word ’PLAY’ will appear in the display, along with the
current total recording time for time-lapse recordings,
e.g.: 24h.
In the 24h mode, in the menu BASIC SETTINGS, you can
select between ’24HA’ (audio on) and ’24H’ (audio off).

4

To interrupt playback, press button

h

STOP

.

The word ’STOP’ will appear in the display.

5

To remove the cassette, press button

J

EJECT

.

Note:
* The video recorder automatically cleans the video
heads before playing back every tape. This keeps the
playback quality as good as possible.
* The sound on 12h + 24h recordings may be poorer
than on 2h recordings. There is no sound on other long
time recordings.

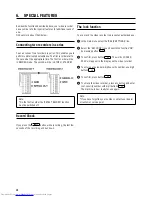
Fast forward and rewind

1

To stop the tape, press the

h

STOP

button. Turn outside

rotary control

!

"

to the left or right. The tape

will be fast forwarded or rewound at high speed.

2

Press button

h

STOP

as soon as you have found the

required tape position.

The time-lapse/picture search function

1

Press button

G

PLAY

.

2

With the inner dial

$

you can play back the tape in

different time-lapse speeds, e.g.: 12, 24, ... hours.

3

Turn outer rotary control

!

"

to select different

picture search speeds.

Note:
* The picture quality is poorer when using the picture
search function. The sound is switched off.

Still picture/slow motion

1

Press button

G

PLAY

.

2

Press button

R

STILL

. The picture will stop.

Every time you press

R

STILL

again, the picture will

move on one frame.
Keep button

R

STILL

pressed. The recording will be

played back in super slow motion.

3

Turn outer rotary control

!

"

. You can change

the speed of the playback in several stages.
The sound is switched off during slow motion playback.

4

Turn inner dial

$

. You can play back individual pictures

forwards and backwards.

5

Press button

G

PLAY

to play back at the normal speed

again.

Note:
* If the still picture vibrates vertically, press button

MENU/TRACKING

and then button

TU

until the vi-

bration is minimal. Confirm by pressing button

OK

.

Tape position.
Establishing your current position on the
tape.

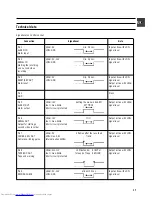
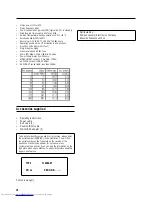
The tape length is indicated on the cassette in minutes, e.g.:
’E120’ is 120 minutes of playing time (= 2:00 hours).
You will find the tape length printed on the left hand side of
the front narrow edge.
However, the actual playing time might be a little longer than
specified (e.g.: 2:05 hours).
You can read the exact number of minutes played in the
display during fast forward, rewinding, recording, playing
back and pause/stop, e.g.: ’U1:25’.

3.

PLAYING A PRE-RECORDED CASSETTE

Summary of Contents for TL960A/00T

Page 1: ...LE FOR COMPLIANCE COULD VOID THE USER S AUTHORITY TO OPERATE THE EQUIPMENT This digital apparatus does not exceed the Class A limits for radio noise emissions from digital apparatus as set out in the Interference causing equipment standard entitled Digital Apparatus ICES 003 of the Department of Communications Safety Should any solid object or liquid fall into the cabinet turn off the unit and hav...

Page 2: ...e frayed power cords damaged or cracked wire insulation and broken plugs They may result in a shock or fire hazard Periodically examine the cord and have it replaced by your service technician if appearance indicates damage or deteriorated insulation 7 Power Cord Protection Power supply cords should be routed so that they are not likely to be walked on or pinched by items placed upon or against th...

Page 3: ... service this video product yourself as opening or removing covers may expose you to dangerous voltage or other hazards Refer all servicing to qualified service personnel 16 Conditions Requiring Service Unplug this video product from the wall outlet and refer servicing to qualified service personnel under the following conditions a When the power supply cord or plug is damag ed b If liquid has bee...

Page 4: ...4 ...

Page 5: ...es Do not place the appliance near a heat source e g radiator Ensure that no objects or liquids are allowed to penetrate the appliance If liquid is spilt on it unplug it immediately from the mains and call the customer service department Contents Page 1 SUMMARY OF BUTTONS CONTROLS AND SOCKETS 6 The front of the appliance 6 The rear of the appliance 6 2 INSTALLATION HOW TO INSTALL YOUR VIDEO RECORD...

Page 6: ... hSTOP Stop mSTANDBY Switch off Rewind Fast forward Jog inner dial The rear of the appliance 4 Mains socket EXT 1 Scart socket AV Euroconnec tor AUDIO IN CINCH audio input socket AUDIO OUT CINCH audio output socket VIDEO IN BNC video input socket VIDEO OUT BNC video output socket Control socket Pin1 ALARM IN Pin2 SERIAL IN Pin3 ALARM RESET REC OUT Pin4 GND earth Pin5 ALARM OUT Pin6 SERIAL OUT Pin7...

Page 7: ...ideo recorder switches on automatically when you insert a cassette or press button mSTANDBY When SET CLOCK appears in the display or if the clock time flashes in the display e g 20 00 you must set the clock When PL POWER LOSS appears on the screen press button S CL Connections on the control socket Do not connect any external voltage sources to the 9 contacts on the control terminal as this could ...

Page 8: ... 98 vw 0 9 OK MENU Basic settings Define the basic settings on your appliance input via SCART or BNC socket position of OSD camera synchronisation and locking function 1 In the main menu select the BASIC SETTINGS line 2 Select the SCART or BNC socket as the recording source REC SOURCE If no recording source has been connected or if the recording source has been incorrectly selected in the basic se...

Page 9: ...speeds e g 12 24 hours 3 Turn outer rotary control to select different picture search speeds Note The picture quality is poorer when using the picture search function The sound is switched off Still picture slow motion 1 Press button GPLAY 2 Press button RSTILL The picture will stop Every time you press RSTILL again the picture will move on one frame Keep button RSTILL pressed The recording will b...

Page 10: ... position for recordings recorded on another machine If you need to do so proceed as follows 1 Press button GPLAY twice 2 Press button MENU TRACKING 3 Press button TU until the playback quality is op timised 4 Press button OK This setting will be retained until the cassette is removed Note Cleaning function Select the 3h playback mode Dur ing playback hold the MENU TRACKING button for sev eral sec...

Page 11: ... start recording on a cassette that is erase protected the word PROTECTED will appear in the display The cassette will be automatically ejected If the end of the cassette is reached during recording the appliance will stop automatically If you have ac tivated repeat recording REPEAT REC the tape will wind back to the beginning The video will then start recording at the beginning of the tape Existi...

Page 12: ... be recorded if there are alarm sensors connected to your video recorder Alarm recordings can only be interrupted by an external alarm reset RESET Alarm chart To view a chart displaying the most recent alarm recordings with their number date and time proceed as follows 1 In the main menu select the ALARM MEMORY line 2 Select an alarm line Start playback by pressing GPLAY 3 If you want to delete al...

Page 13: ...line press button S CL 8 Press button MENU TRACKING twice The video record er is now in standby and cannot be operated Notes If a timer is programmed DATE START STOP TIMER will appear in the display on the video recorder Interrupting a TIMER recording and standby mode You cannot operate the video recorder manually while a programmed recording is being made To interrupt the programmed recording pre...

Page 14: ...he nREC button while recording the last few seconds of the recording will be shown The lock function You can lock the video recorder to prevent unauthorised use 1 In the main menu select the BASIC SETTINGS line 2 Select the SEC CODE line and switch the function ON by pressing button S CL 3 To confirm press button OK The words LOCKED XXXX will appear in the display on the video recorder 4 To enter ...

Page 15: ...eset deleted No playback from video recorder No recording on the cassette The wrong VCR channel number on the television set has been selected or the channel has been set wrong The connecting cable between the monitor television set and the video recorder has been disconnected Bad playback quality on video recorder Use TRACKING function if the recording was made on another machine Poor quality or ...

Page 16: ...ood as possible only use branded VHS cassettes This operating manual is printed on recycled paper This helps to preserve our environment Use your local facilities for environmentally friendly disposal of packaging This electronic appliance contains many materials that can be recycled Find out whether your old one can be recycled in any way Recommended servicing This machine is designed for longevi...

Page 17: ...12V Iout max 50mA Short circuit protected Setting the menu in ALARM SETTINGS Output active with HIGH signal level Pin 6 SERIAL OUT Output for starting a second video recorder HIGH 12V Iout max 50mA Short circuit protected 10 sec Output active with LOW signal level Pin 7 CAMERA SW OUT Camera switching pulse HIGH 5V LOW max 0 8V Internal pullup 5kOhm 4 frames after the recorded frame Output active w...

Page 18: ... 1 V p p 3dB 75 Ohm AUDIO IN socket 10dB 50 kOhm AUDIO OUT socket 6dB less than 1kOhm Accessories supplied Operating instructions Power cable BNC cable 2 Double CINCH cable CINCH BNC adapter 2 To be able to identify your appliance if it is stolen please enter the serial number PROD NO in the illustration You will find the serial number on the type plate on the reverse of the appliance It will also...

Reviews: