background image

10

EN

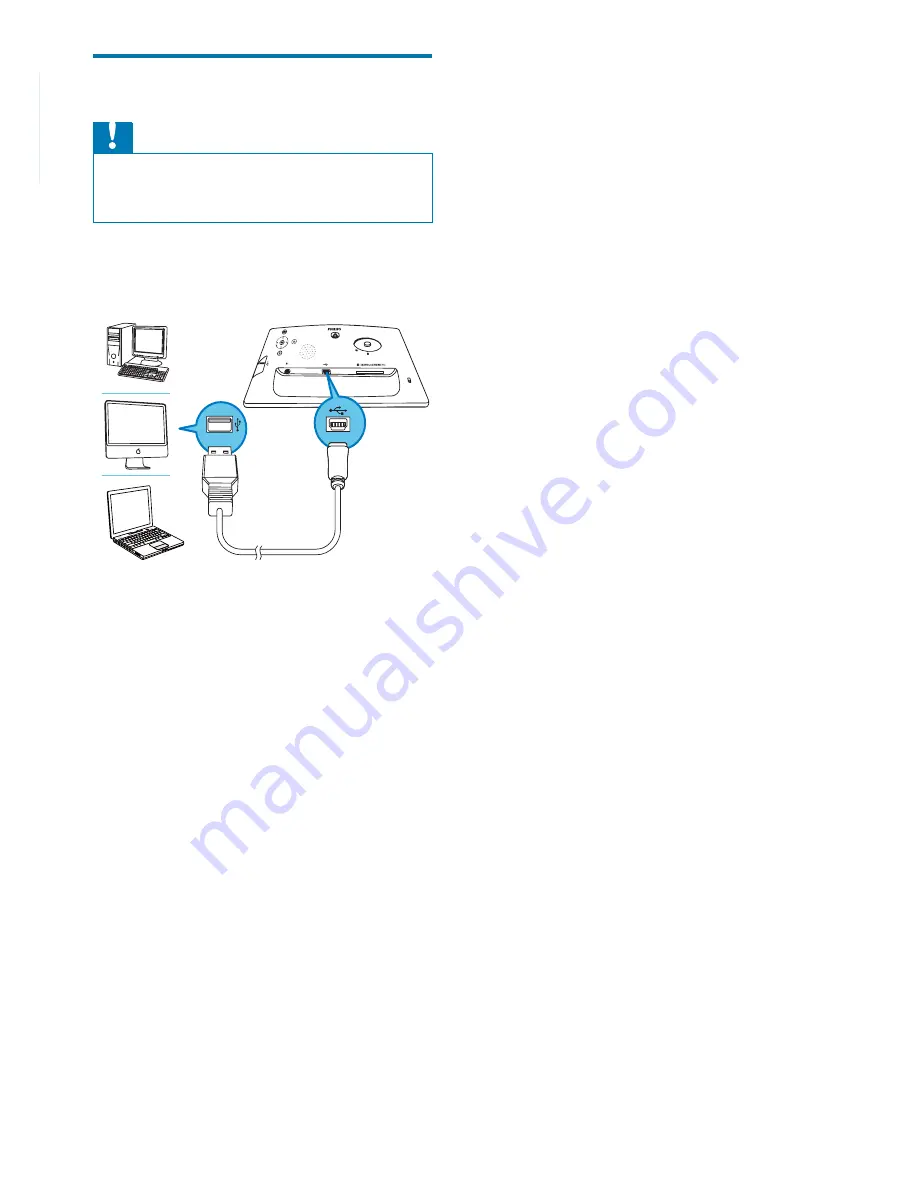
Connect PC

Caution

Do not disconnect the PhotoFrame from the PC when 

fi les are transferring between the PhotoFrame and the 
PC.

1

  Connect a suitable USB cable to the 

PhotoFrame and to the PC.

You can drag and drop fi les from the 

»

PC to the internal memory of the 
PhotoFrame.

2

  After all copy and save actions are 

complete, disconnect the USB cable from 
the PC and the PhotoFrame.

Summary of Contents for SPF2017

Page 1: ...Register your product and get support at SPF4008 SPF4208 PhotoFrame EN User manual ...

Page 2: ...an album 18 Create an album 18 Delete an album 18 Rename an album 19 7 Slideshow 20 Select slideshow sequence 20 Select a transition effect 20 Select slideshow frequency 21 Display collage photos 21 Select photo background 22 8 Setup 24 Select on screen language 24 Adjust display brightness 24 Protect Unprotect content of memory card 25 Set time and date 25 Set time and date format 26 Show clock 2...

Page 3: ...ir shops Failure to do so shall void any warranty stated or implied Any operation expressly prohibited in this manual any adjustments or assembly procedures not recommended or authorised in this manual shall void the warranty The making of unauthorized copies of copy protected material including computer programs files broadcasts and sound recordings may be an infringement of copyrights and constit...

Page 4: ...n countries such asThe Netherlands Belgium Norway Sweden and Denmark In U S A Philips Consumer Lifestyle North America has contributed funds for the Electronic Industries Alliance EIA Electronics Recycling Project and state recycling initiatives for end of life electronics products from household sources In addition the Northeast Recycling Council NERC a multi state non profit organization focused ...

Page 5: ...OR AT NETLEDNINGENS STIK OG STIKKONTAKT ER NEMTTILGÆNGELIGE Paikka Ilmankierto VAROITUS SIJOITA LAITE SITEN ETTÄVERKKOJOHTO VOIDAANTARVITTAESSA HELPOSTI IRROTTAA PISTORASIASTA Plassering Ventilasjon ADVARSEL NÅR DETTE UTSTYRET PLASSERES MÅ DU PASSE PÅ AT KONTAKTENE FOR STØMTILFØRSEL ER LETTE Å NÅ Banned Substance Declaration This product complies with RoHs and Philips BSD AR17 G04 5010 010 require...

Page 6: ...ce or hang it on the wall for a continuous play You can use Philips PhotoFrame Manager an application software on a PC to transfer photos or video music files from a PC to your PhotoFrame easily by drag and drop You can also use it to manage photos and albums on the PhotoFrame For details refer to User Manual of Philips PhotoFrame Manager in the supplied CD ROM What s in the box Philips Digital Pho...

Page 7: ...rowse mode and calendar mode c Select the previous next right left option d OK 1 2 3 Quick start guide Get started Play Setup Eng PhotoFrame a b l m k h g j f i e d c For music video Pause or resume play Confirm a selection e Enter the main menu f Slot for a USB flash drive g DC Socket for the AC DC power adaptor h Slot for a USB cable to PC ...

Page 8: ...EN 7 E n glis h i SD MMC xD MS MS Pro Slot for an SD MMC xD MS MS Pro card j Kensington lock k Stand hole l Wall mounting hole m Speaker ...

Page 9: ...pplied stand to the back of the PhotoFrame 1 Insert the stand into the PhotoFrame 2 Position the indication on the stand to the position 3 Turn the stand anti clockwise 45 degrees to the position and lock it to the PhotoFrame firmly Connect power Note When you position the PhotoFrame ensure that the power plug and outlet are easily accessible 1 Connect the power cord to the DC socket of the PhotoFr...

Page 10: ...ect a storage device Caution Do not remove a storage device from the PhotoFrame when files are transferring from or to the storage device You can play photos music or video in one of the following storage device which is connected to the PhotoFrame Secure Digital SD Secure Digital SDHC Multimedia Card Multimedia Card xD card Memory Stick Memory Stick Pro with adaptor USB memory drive However we do ...

Page 11: ...nsferring between the PhotoFrame and the PC 1 Connect a suitable USB cable to the PhotoFrame and to the PC You can drag and drop files from the PC to the internal memory of the PhotoFrame 2 After all copy and save actions are complete disconnect the USB cable from the PC and the PhotoFrame ...

Page 12: ...K to confirm Photos in the album are displayed in thumbnail mode 4 Press to start slideshow play In slideshow mode press to display the next previous photo In slideshow mode press to toggle between slideshow browse and calendar mode Tip In slideshow mode the PhotoFrame displays all photos automatically In browse mode the PhotoFrame displays the current photo and you can press to display the next pr...

Page 13: ...urce and then press OK to confirm 3 Select an album folder and then press OK to confirm To select files in a sub folder repeat step 3 4 Select a file to play To select all files press and hold OK 5 Press to start play During play To stop press and hold To pause press OK To resume press OK again To play in full screen press To stop play in full screen press To adjust volume press To select the next prev...

Page 14: ...o pause press OK To resume press OK again To stop press To select the next previous file press To adjust volume press To mute play press and hold until the icon is displayed To change repeat mode press repeatedly Play background music 1 In the main menu select Music and then press OK to confirm 2 Select a source and then press OK to confirm 3 Select an album folder and then press OK to confirm To sele...

Page 15: ...14 EN 7 Select Yes and then press OK to start play ...

Page 16: ...ect Photos and then press OK to confirm In slideshow or browse mode you can press OK to browse photos in thumbnail mode 2 Select a photo source and then press OK to confirm 3 Select an album and then press OK to confirm Photos in the album are displayed in thumbnail mode 4 Press to select a photo and then press OK to confirm To select all photos displayed on the screen press and hold OK for more than ...

Page 17: ...fects and then press OK to confirm 2 Select an effect and then press OK to confirm Select a photo frame 1 In Photo Menu select Frames and then press OK to confirm 2 Select a frame and then press OK to confirm Rotate a photo 1 In Photo Menu select Rotate and then press OK to confirm 2 Select an orientation and then press OK to confirm Zoom and crop a photo 1 In Photo Menu select Zoom and Crop and then pr...

Page 18: ...a file 1 In the main menu select Photos Video Music and then press OK to confirm 2 Select a source and then press OK to confirm 3 Select an album folder and then press OK to confirm To select a sub folder repeat Step 3 4 Select a photo file and then press OK to confirm To select all photos files in the ablum folder press and hold OK 5 Press to access the menu list To copy 1 In the menu list select Copy t...

Page 19: ...nfirm A keypad is displayed 4 To enter the new name up to 24 characters select an alphabet number and then press OK to confirm To switch between uppercase and lowercase select abc on the displayed keypad and then press OK to confirm 5 When the name is complete select Enter and then press OK to confirm Delete an album 1 Select an album 2 Press to access the album menu 3 Select Delete Album and then pre...

Page 20: ...n press OK to confirm A keypad is displayed 4 To enter the new name up to 24 characters select an alphabet number and then press OK to confirm To switch between uppercase and lowercase select abc on the displayed keypad and then press OK to confirm 5 When the name is complete select Enter and then press OK to confirm ...

Page 21: ...sequence and then press OK to confirm 3 Select an option and then press OK to confirm Select a transition effect 1 In the main menu select Slideshow and then press OK to confirm 2 Select Transition Effect and then press OK to confirm 3 Select a transition effect and then press OK to confirm Tip If you select Random all available transition effects randomly apply to all slideshow photos ...

Page 22: ...t a transition time and then press OK to confirm Display collage photos 1 In the main menu select Slideshow and then press OK to confirm 2 Select Collage and then press OK to confirm 3 Select Multi and then press OK to confirm 4 Select a layout 5 Press Right to select Photo 1 6 Press Right again to access the photo source options 7 Select a photo from a photo source ...

Page 23: ...n the optimal layout of photos and displays the collages in slideshow mode Select photo background You can select a background border color for photos that are smaller than the screen of the PhotoFrame 1 In the main menu select Slideshow and then press OK to confirm 2 Select Background Color and then press OK to confirm 3 Select a background color Auto fit RadiantColor and then press OK to confirm If ...

Page 24: ...EN 23 E n glis h If you select RadiantColor the PhotoFrame extends the color on the edges of a photo that is smaller than the full screen to fill the screen without black bars or aspect ratio distortion ...

Page 25: ...t Language Setting and then press OK to confirm 4 Select a language and then press OK to confirm Adjust display brightness You can set the brightness of the PhotoFrame to achieve the best view 1 In the main menu select Setup and then press OK to confirm 2 Select Brightness and then press OK to confirm 3 Press to adjust brightness and then press OK to confirm ...

Page 26: ...e device 1 In the main menu select Setup and then press OK to confirm 2 Select Memory Card and then pres OK to confirm 3 Select Delete enable Delete disable and then press OK to confirm Set time and date 1 In the main menu select Setup and then press OK to confirm 2 Select Time and Date and then press OK to confirm 3 Select Set time Set date and then press OK to confirm 4 Press and OK to enter the curre...

Page 27: ...w clock You can show clock or calendar in slideshow on the PhotoFrame 1 In the main menu select Setup and then press OK to confirm Set time and date format You can set the format of the time and date displayed on the PhotoFrame 1 In the main menu select Setup and then press OK to confirm 2 Select Time and Date and then press OK to confirm ...

Page 28: ...me before you set an event reminder Create an event reminder 1 In the main menu select Setup and press OK to confirm 2 Select Event Reminder and then press OK to confirm 2 Select Time and Date and then press OK to confirm 3 Select Show clock and then press OK to confirm 4 Select an option and then press OK to confirm No clock No clock is displayed In slideshow Clock is displayed Both Both clock and cal...

Page 29: ...s displayed 4 To enter the new name up to 24 characters select an alphabet number and then press OK to confirm To switch between uppercase and lowercase select abc on the displayed keypad and then press OK to confirm 5 When the name is complete select Enter and then press OK to confirm Set event time and date Note Ensure that you set the current time and date of the PhotoFrame before you set time and...

Page 30: ...Reminder and then press OK to confirm 3 Select a reminder and then press OK to confirm 4 Select Delete reminder and then press OK to confirm 4 Select Set time Set date and then press OK to confirm 5 Press and OK to set the time date and then press OK to confirm Tip When the reminder alerts you can press any button once to stop the reminder To stop the snooze function press the same button twice Set on ...

Page 31: ...ain menu select Setup and then press OK to confirm 5 Select Yes and then press OK to confirm Select a reminder photo You can select a photo to display for a reminder Each event reminder activates the latest defined photo only If there is no defined photo the reminder takes the default Philips start up photo 1 In the main menu select Setup and then press OK to confirm 2 Select Event Reminder and then pr...

Page 32: ...etup and then press OK to confirm 2 Select DEMO and then press OK to confirm 3 Select On and then press OK to confirm 2 Select Event Reminder and then press OK to confirm 3 Select Snooze and then press OK to confirm 4 Select an options and then press OK to confirm ...

Page 33: ...o on Auto off select Set On Off Off Set display auto on off by time You can configure the time for the PhotoFrame to turn on or off the display automatically Note Ensure that you set the current time and date of the PhotoFrame before you set the auto on off function 1 In the main menu select Setup and then press OK to confirm 2 Select Smart power and then press OK to confirm ...

Page 34: ...button sound 1 In the main menu select Setup and then press OK to confirm 6 Press and OK to set the time for auto on auto off function and then press OK to confirm Tip Weekday Monday 00 00 to Friday 23 59 Weekend Saturday 00 00 to Sunday 23 59 Set auto orientation You can display photos in the correct orientation depending the horizontal vertical orientation of the PhotoFrame 1 In the main menu sele...

Page 35: ... OK to confirm 3 Select On to turn on the button sound and then press OK to confirm To turn off the button sound select Off and then press OK to confirm View status of the PhotoFrame You can find the free space connected media and the firmware version of the PhotoFrame 1 In the main menu select Setup and then press OK to confirm ...

Page 36: ...EN 35 E n glis h Set to factory default 1 In the main menu select Setup and then press OK to confirm 2 Select Settings and then press OK to confirm 3 Select Default and then press OK to confirm ...

Page 37: ...ng Slideshow Sequence Transition Effect Frequency Collage Background Color Screen background Black White Gray Auto fit Radiant color Setup function Brightness adjustment Language Status Event reminder with snooze Beep on off Set time and date Clock display enable disable Auto on off 9 Product information Note Product information is subject to change without prior notice Picture Display Viewing angl...

Page 38: ...ility WindowsVista Windows 2000 XP or later Regulatory Approvals BSMI C Tick CCC CE GOST PSB Switzerland Other convenience Kensington lock compatible On Screen Display languages English Spanish German French Italian Dutch Danish Russian Simplified Chinese Traditional Chinese Portuguese ...

Page 39: ...photo continuously for 72 hours without any damage to the LCD screen Can I use the PhotoFrame during its display auto off periods Yes You can press to wake up the PhotoFrame Why does my PhotoFrame not show some of my photos The PhotoFrame supports only JPEG photos Ensure that these JPEG photos are not damaged Why does my PhotoFrame not show some of my music files The PhotoFrame only supports MP3 MP...

Page 40: ... Glossary A Aspect ratio Aspect ratio refers to the length to height ratio ofTV screens The ratio of a standardTV is 4 3 while the ratio of a high definition or wideTV is 16 9 The letter box allows you to enjoy a picture with a wider perspective on a standard 4 3 screen J JPEG A very common digital still picture format A still picture data compression system proposed by the Joint Photographic Exper...

Page 41: ...12NC 2009 Koninklijke Philips Electronics N V All rights reserved UM_V1 0G_V1 0 Document order number ...

Reviews: