MAINTENANCE & SAFETY
MAINTENANCE & SAFETY (See
0
)
CD player and disc handling
• If the CD player cannot read CDs correctly, use a
cleaning CD to clean the lens before taking the set
to repair.
• The lens of the CD player should never be touched!
• Sudden changes in the surrounding temperature
can cause condensation on the lens of your CD
player. Playing a CD is then not possible. Do not
attempt to clean the lens but leave the set in a
warm environment until the moisture evaporates.
• Always close the CD door to avoid dust on the lens.
• To clean the CD, wipe in a straight line from the
centre towards the edge using a soft, lint-free
cloth. Do not use cleaning agents as they may dam-
age the disc.
• Never write on a CD or attach any stickers to it.
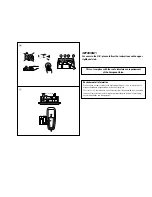
Tape deck maintenance
To ensure quality recording and playback of the tape
deck, clean parts
A
,
B
and
C
as shown, once a
month. Use a cotton bud slightly moistened with alco-
hol or a special head cleaning fluid to clean the deck.
1
Open the cassette door.
2
Press
PLAY
1
and clean the roller
C
.
3
Press
PAUSE
;
and clean the heads
A
, and the
capstan
B
.
4
After cleaning, press
STOP/OPEN
9/
.
Safety Information
•
Place the set on a hard, flat and stable surface
so that the system does not tilt.
• Do not expose the set, batteries, CDs to humidity,
rain, sand or excessive heat caused by heating
equipment or direct sunlight.
• The apparatus shall not be exposed to dripping or
splashing.
• Adequate ventilation with a minimum gap of 6 inch-
es between the ventilation holes and surrounding
surfaces is necessary to prevent heat build-up.
• The ventilation should not be impeded by covering
the ventilation openings with items, such as news-
papers, table-cloths, curtains, etc
..
• No objects filled with liquids, such as vases, shall
be placed on the apparatus.
• No naked flame sources, such as lighted
candles, should be placed on the apparatus.
• The mechanical parts of the set contain
self-lubricating bearings and must not be oiled or
lubricated.
• To clean the set, use a dry cloth. Do not use any
cleaning agents containing alcohol, ammonia, ben-
zene or abrasives as these may harm the housing.
No sound /power
–
Volume not adjusted
• Adjust the VOLUME
–
Power Cord not securely connected
• Connect the AC power cord properly
–
Batteries flat / incorrectly inserted
• Insert (fresh) batteries correctly
–
Headphones connected to the set
• Disconnect headphones
–
Electrostatic discharge/interference
• Unplug the set. If batteries inserted, remove batteries
from the battery compartment. Press and hold
STANDBY ON
y
for 10 seconds, then re-plug /
replace battery supply, and try activating the set again.
– CD contains non-audio files
• Press
SEARCH
∞
or
§
. once or more to skip to
a CD audio track, instead of the data file
Severe radio hum or noise
–
Electrical interference: set too close to TV, VCR or
computer
• Move the set to increase the distance
Remote control does not function properly
–
Batteries flat/ incorrectly inserted
• Insert (fresh) batteries correctly
–
Distance/ angle between the set too large
• Reduce the distance/ angle
Poor radio reception
–
Weak radio signal
• FM / MW: Adjust the FM / MW telescopic aerial
indication
– CD-R(W) is blank/ not finalized
• Use a finalized CD-R(W)
indication
–
No CD inserted
• Inserted a suitable disc
–
CD badly scratched or dirty
• Replace/ clean CD, see Maintenance
–
Laser lens steamed up
• Wait until lens has cleared
The CD skips tracks
–
CD damaged or dirty
• Replace or clean CD
–
shuffle or program is active
• Switch off shuffle / program
Sound skips during MP3 playback
– MP3 file made at compression level exceeding
320kbps
• Use a lower compression level to record CD tracks
into MP3 format
–
Disc damaged or dirty
• Replace or clean disc
Poor cassette sound quality
– Dust and dirt on the heads, etc.
• Clean deck parts, see Maintenance
– Use of incompatible cassette types
(METAL or CHROME)
• Only use NORMAL (IEC
I
) for recording
Recording does not work
– Cassette tab(s) may be broken
• Apply adhesive tape over the missing tab space
If a fault occurs, first check the points listed below before taking the set for repair. If you are
unable to remedy a problem by following these hints, consult your dealer or service centre.
WARNING:
Do not open the set as there is a risk of electric shock! Under no
circumstances should you try to repair the set yourself, as this will invalidate the
warranty.
TROUBLESHOOTING


