background image

Battery recycling

HANDLE CONTAINS A NICKEL CADMIUM BATTERY. BATTERY
MUST BE RECYCLED OR DISPOSED OF PROPERLY.

The battery inside your Sonicare cannot be replaced, but is easily
removed for recycling.At the end of product life and prior to
disposal, please remove the battery from the handle by following
the instructions below.

Please note that this process is NOT reversible.

C

Do not throw the appliance away with the normal household
waste at the end of its life, but hand it in at an official collection
point for recycling. By doing this you will help to preserve the
environment.

Removing the batteries

Please note that this process is NOT reversible.

To remove the batteries yourself, you will need a flat-head (standard)
screwdriver. Basic safety precautions should be observed when
following the procedure outlined below. Be sure to protect your eyes,
hands, fingers and the surface on which you are working.

CAUTION

Caution should be exercised when using any household tools (such as
a screwdriver) to remove the battery.

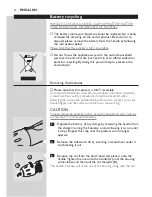
1

Deplete the battery of any charge by removing the handle from

the charger, turning the Sonicare on and allowing it to run until
it stops. Repeat this step until the product will no longer
operate.

C

2

Remove the soft-touch rib by inserting a screwdriver under it

and breaking it out.

C

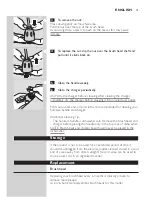
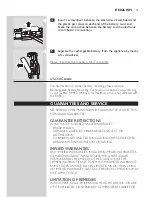
3

Remove the nut from the brush head and place it onto the

handle.Tighten the nut onto the handle (A) until the housing
comes loose and then pull the nut forward (B).

The handle internals will come out of the housing along with the nut.

ENGLISH

14

B

A

Summary of Contents for Sonicare Elite 7000 Series

Page 1: ...elite e7000 the sonic toothbrush s e r i e s ...

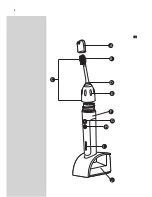
Page 2: ...2 B J F D E H G I A C 1 ...

Page 3: ...ENGLISH 4 FRANÇAIS 17 ESPAÑOL 31 SONICARE ELITE 7000 ...

Page 4: ...TANT SAFEGUARDS READ ALL INSTRUCTIONS BEFORE USE Sonicare has been carefully engineered for both effectiveness and safety However basic safety precautions should always be followed when using any electrical product especially when children are present DANGERS To reduce the risk of electrocution and fire 1 DO NOT plug the charger into an incorrect voltage source outlet It has been designed for use ...

Page 5: ...clean your brush head with soap and water after each use 7 Do not use charger base outdoors 8 Unplug the charger base before cleaning and assure that it is dry before plugging it into an electrical outlet 9 Brush heads and charger base should never be placed in a dishwasher for cleaning MEDICAL WARNINGS 1 Consult your dental professional before using this product if you have had oral or gum surger...

Page 6: ...rica SAVETHESE INSTRUCTIONS Preparing for use To attach the Sonicare brush head C 1 Align the front of the brush head with the front of the toothbrush handle Match the bars on the brush head with the notches inside the top of the handle and slide the brush head onto the handle C 2 Screw the brush head nut clockwise until it is firmly tightened If the brush head rattles during use tighten the nut f...

Page 7: ...e removing it from your mouth otherwise toothpaste may splatter Rinse the brush head and bristles after each use Clean the brush head weekly including under the nut A fully charged Sonicare will provide approximately 2 weeks of typical use 2 minutes of brushing twice a day making it easy to travel without the charger Remember voltage converters and plug adapters DO NOT guarantee voltage compatibil...

Page 8: ... 45 degree angle between your brackets and gumline Using light pressure gently move the bristles in a small circular motion so that the long bristles reach between your teeth for 2 seconds Then gently turn roll the brush handle so the bristles clean the bracket and the rest of the tooth before you move the bristles to the next tooth Continue this until you have brushed all of your teeth Please not...

Page 9: ... handle is still in the charger press and hold the power button for 5 seconds You will hear 1 beep to indicate that the Easy start feature has been deactivated 4 To reactivate Easy start while handle is still in the charger press and hold the power button for 5 seconds You will hear 2 beeps to indicate that the Easy start feature has been activated Using the Easy start feature beyond the initial r...

Page 10: ...f 3 ways You may opt to keep the factory default setting of a 2 minute brushing time with Quadpacer feature activated You may choose to extend your brushing time to 2 1 2 minutes by adding an additional timing interval of 30 seconds with Quadpacer feature active You may choose a 2 minute brushing time but with the Quadpacer feature turned off To change the Quadpacer settings 1 Place the handle in ...

Page 11: ...between 2 speed settings Normal speed for optimum brushing performance or Reduced speed when an even more gentle action is desired Each time you turn your Sonicare on it will begin brushing at the Normal speed setting To change the speed setting C 1 From Normal to Reduced speed press the Dual Speed Control button once during brushing 2 From Reduced to Normal speed press the Dual Speed Control butt...

Page 12: ...es The number of blinking LEDs indicates the level to which the battery has been charged When the battery reaches full charge the LEDs stop blinking and illuminates continuously About once a minute the charge indicator LEDs go out momentarily and then come back on This indicates that the battery is being maintained at full charge The full charge indication will persist until the handle is removed ...

Page 13: ...ded for cleaning your Sonicare handle and charger Additional CleaningTip The Sonicare handle is dishwasher safe Remove the brush head and charger before placing the handle only in the top rack of dishwasher NOTE Brush heads and charger base should never be placed in the dishwasher Storage If the product is not to be used for an extended period of time it should be unplugged from the electrical out...

Page 14: ...es yourself you will need a flat head standard screwdriver Basic safety precautions should be observed when following the procedure outlined below Be sure to protect your eyes hands fingers and the surface on which you are working CAUTION Caution should be exercised when using any household tools such as a screwdriver to remove the battery 1 Deplete the battery of any charge by removing the handle...

Page 15: ...ARANTEES AND SERVICE SEE SEPARATE PHILIPS WORLDWIDE GUARANTEE LEAFLET FOR STANDARD GUARANTEE GUARANTEE RESTRICTIONS WHAT IS NOT COVERED UNDER WARRANTY BRUSH HEADS DAMAGE CAUSED BY MISUSE ABUSE NEGLECT OR ALTERATIONS NORMAL WEAR ANDTEAR INCLUDING CHIPS SCRATCHES ABRASIONS DISCOLORATION OR FADING IMPLIED WARRANTIES ANY IMPLIED WARRANTIES INCLUDING IMPLIED WARRANTIES OF MERCHANTABILITY AND FITNESS FO...

Page 16: ...st 24 hours This function provides additional time for brushing troublesome areas where plaque collects and gum disease starts It is recommended you use the extra 30 seconds of brushing time to re brush troublesome areas massage your gums or brush your tongue see Features Problem The Sonicare toothbrush does not work I feel a tickling sensation when I use Sonicare The brush head rattles when I use...

Page 17: ... deux vitesses ITémoins de charge DEL J Chargeur MISES EN GARDE IMPORTANTES LISEZ CE MODE D EMPLOI AVANT UTILISATION La brosse à dents Sonicare a été spécialement conçue pour une utilisation sûre et efficace Néanmoins vous devez suivre quelques mesures de sécurité élémentaires lorsque vous utilisez un produit électrique surtout s il y a des enfants à proximité DANGERS Pour diminuer le risque d éle...

Page 18: ...illez consulter la section Informations Consommateurs du présent manuel et communiquer avec l un de nos représentants 5 Ne placez pas le cordon d alimentation près d une surface chauffante 6 Si votre pâte à dents préférée comprend du peroxyde d hydrogène du bicarbonate de sodium ou tout autre bicarbonate commun dans les pâtes à dents à action blanchissante il est important que vous nettoyiez soign...

Page 19: ...tre site Web Service Consommateurs 1 800 682 7664 Amérique du Nord Si vous appelez de l extérieur de l Amérique du Nord communiquez avec le Service Consommateurs Philips de votre pays Informations Internet www sonicare com Amérique du Nord www philips com extérieur de l Amérique du Nord CONSERVEZ CES INSTRUCTIONS Préparation à l emploi Pour fixer la tête de brossage Sonicare C 1 Alignez l avant de...

Page 20: ...n autre manche en le forçant car vous pourriez causer des dommages Utilisation de l appareil Conseils utiles La tête de brossage est fournie avec un capuchon de voyage Retirez le avant de mettre votre Sonicare en marche Pour éviter les éclaboussures placez la tête de brossage dans votre bouche avant de mettre l appareil Sonicare en marche et arrêtez le avant de la retirer de votre bouche Rincez la...

Page 21: ...vos dents divisez votre cavité buccale en quatre sections dents du haut face externe dents du haut face interne dents du bas face externe et dents du bas face interne Commencez par la première section dents du haut face externe et brossez vos dents pendant 30 secondes avant de passer à la deuxième section dents du haut face interne Continuez de brosser chaque section pendant 30 secondes chacune ju...

Page 22: ...assez les soies autour de toutes les surfaces de restauration pour bien les nettoyer Poches parodontales Votre dentiste vous a peut être informé que vous avez des poches parodontales où la plaque bactérienne peut s accumuler Dans ce cas après avoir brossé les dents pendant 2 minutes brossez doucement ces zones pour améliorer la santé des gencives Caractéristiques spéciales Fonction Easy start La f...

Page 23: ...t la fonction Smartimer qui assure automatiquement la durée de brossage optimale de 2 minutes recommandée par les dentistes Après 2 minutes la brosse à dents Sonicare s arrêtera automatiquement Si vous souhaitez effectuer une pause ou arrêter de vous brosser les dents au cours du cycle de 2 minutes appuyez sur le bouton marche arrêt Lorsque vous appuyez à nouveau sur ce bouton la fonction Smartime...

Page 24: ...r le bouton de contrôle à deux vitesses et observez quels témoins lumineux DEL sont allumés 3 Appuyez et maintenez appuyé le bouton de contrôle à deux vitesses pendant que les témoins lumineux parcourent lentement le temps d intervalle des options d installation C Témoin vert sur la position 4 la fonction Quadpacer est active réglage par défaut C Témoin vert sur la position supérieure 5e réglage d...

Page 25: ...in de charge des piles C Si la charge des piles de l appareil Sonicare est faible vous entendrez 3 bips à la fin du cycle de brossage de 2 minutes et le témoin de charge DEL s allumera en jaune et clignotera rapidement pendant 30 secondes Le témoin de charge faible vous indique qu il y a encore un maximum de 3 cycles de 2 minutes de brossage restants Placez votre Sonicare sur le chargeur lorsque v...

Page 26: ...ge Appuyez doucement sur le système de fermeture Poussez la bague de serrage vers le haut pour l ôter de la tête de brossage N utilisez pas d objets pointus pour appuyer sur le système de fermeture pour ne pas l endommager C 4 Pour replacer la bague de serrage coulissez la le long du manche jusqu à ce que vous entendiez un clic C 5 Nettoyez le manche chaque semaine 6 Nettoyez le chargeur périodiqu...

Page 27: ...ue N utilisez que les modèles de remplacement de têtes de brossage Sonicare pour ce modèle Recyclage des piles LE MANCHE CONTIENT UNE PILE DE NICKEL CADMIUM QUI DOIT ÊTRE RECYCLÉE OU DÉPOSÉE DANS UN ENDROIT ASSIGNÉ À CET EFFET Les piles de votre Sonicare ne peuvent pas être remplacées mais peuvent être facilement retirées pour être recyclées À la fin de la durée utile du produit et avant de le jet...

Page 28: ... manche Serrez la ensuite A jusqu à ce que l enveloppe extérieure se détache et poussez la bague de serrage en avant B Le contenu du manche sortira de l enveloppe extérieure avec la bague de serrage C 4 Insérez un tournevis entre la plaque du circuit imprimé et la partie en plastique près du fond des piles Dévissez et cassez les connections entre les piles et le circuit imprimé en 2 endroits C 5 S...

Page 29: ...IES IMPLICITES LES RESTRICTIONS CI DESSUS PEUVENT NE PAS S APPLIQUER À VOUS RESTRICTION DES RECOURS NI LA SOCIÉTÉ PHILIPS ORAL HEALTHCARE INC NI AUCUNE DE SES SOCIÉTÉS ASSOCIÉES OU FILIALES NE POURRONT EN AUCUN CAS ÊTRETENUES RESPONSABLES POUR DES DOMMAGES SPÉCIFIQUES ACCESSOIRES OU CORRÉLATIFS À LA SUITE D UNE RUPTURE DE LA GARANTIE D UNE RUPTURE DE CONTRAT D UNE NÉGLIGENCE D UNE FAUTE DÉLICTUELL...

Page 30: ...esse réduite Nettoyez le manche la tête de brossage et le chargeur soigneusement voir Nettoyage Remplacez la tête de brossage Le témoin jaune clignotant indique qu il y a moins de 3 cycles de brossage restants Rechargez votre Sonicare pendant au moins 24 heures Cette fonction offre quelques secondes supplémentaires de brossage des zones prédisposées au risque de l apparition de la plaque et de mal...

Page 31: ...2 velocidades I Pilotos LED de carga J Cargador PRECAUCIONES IMPORTANTES LEATODAS LAS INSTRUCCIONES ANTES DE USARLO Sonicare ha sido diseñado cuidadosamente teniendo en cuenta tanto la eficacia como la seguridad Sin embargo se deben seguir siempre unas precauciones básicas de seguridad al usar cualquier producto eléctrico especialmente cuando haya niños PELIGROS Para reducir el riesgo de electrocu...

Page 32: ...Cliente de este manual y póngase en contacto con uno de nuestros representantes 5 Mantenga el cable de red alejado de superficies calientes 6 Si su dentífrico favorito contiene peróxido bicarbonato sódico u otro bicarbonato frecuentes en los dentífricos blanqueadores es importante que limpie bien el cabezal del cepillo con agua y jabón después de cada uso 7 No use el cargador en exteriores 8 Desen...

Page 33: ...ponerse en contacto con el Centro de Atención al Cliente o visitar nuestra página Web Centro de Atención al Cliente 1 800 682 7664 en Norteamérica Fuera de Norteamérica póngase en contacto con el Centro de Atención al Cliente de Philips en su país Información en Internet www sonicare com Norteamérica www philips com fuera de Norteamérica CONSERVE ESTAS INSTRUCCIONES Preparación para su uso Para fi...

Page 34: ... correctamente No intente encajar a la fuerza un mango en este cargador ya que podría dañarlo Uso del aparato Consejos útiles El cabezal del cepillo tiene un práctico capuchón Retire el capuchón del cabezal antes de encender su Sonicare Introduzca el cabezal del cepillo en su boca antes de poner su Sonicare en marcha y asegúrese de apagarlo antes de sacarlo de su boca De lo contrario la pasta de d...

Page 35: ...superior externa y cepille durante 30 segundos antes de pasar a la sección 2 parte superior interna Cepille cada una de las cuatro secciones durante 30 segundos hasta completar los 2 minutos 5 Tras completar el ciclo de cepillado de 2 minutos emplee un tiempo adicional para cepillar la superficie de masticación de los dientes 6 Presione el botón de encendido apagado para encender o apagar el cepil...

Page 36: ...llado Easy start Todos los modelos Sonicare incluyen la función Easy start fácil encendido activada que le ayuda a acostumbrarse al cepillado con Sonicare Durante los catorce primeros usos la potencia de cepillado irá aumentando progresivamente hasta alcanzar la potencia total La función Easy start está activada si inmediatamente después de encender el cepillo Sonicare escucha dos pitidos Una vez ...

Page 37: ...rrumpir o parar el cepillado durante esos dos minutos pulse el botón de encendido apagado Vuelva a pulsar el botón de encendido apagado y la función Smartimer continuará desde donde se detuvo B Smartimer se volverá a ajustar automáticamente al inicio de un ciclo de 2 minutos si se detiene el cepillado durante 30 segundos o más se vuelve a colocar el mango en el cargador Temporizador Quadpacer de i...

Page 38: ...ad dual Manténgalo pulsado mientras se van iluminando los pilotos de las opciones de intervalos de tiempo C Piloto verde en posición 4 Quadpacer activado posición predeterminada C Piloto verde en la posición superior 5ª posición de 2 5 minutos Quadpacer activado con un intervalo de tiempo adicional de 30 segundos C Piloto amarillo en la posición inferior 1ª ningún intervalo de tiempo establecido Q...

Page 39: ...cepillo Sonicare tiene la batería baja oirá tres pitidos después de cepillarse durante dos minutos y el botón de indicador de carga parpadeará en color amarillo durante 30 segundos El indicador de batería baja indica que quedan 3 cepillados o menos de 2 minutos Cuando no lo use deje el cepillo Sonicare en el cargador para mantener la batería llena Indicador de carga con varios pilotos Cuando el ma...

Page 40: ...ncima de la parte superior del cabezal Evite utilizar objetos afilados para quitar el precinto ya que se podrían ocasionar daños C 4 Para volver a colocar la tuerca deslice la tuerca por el eje del cabezal y tire hasta que encaje en su sitio C 5 Limpie el mango todas las semanas 6 Limpie el cargador con frecuencia DESENCHUFE el cargador antes de limpiarlo Después de limpiar el cargador séquelo bie...

Page 41: ... Reciclado de las baterías EL MANGO CONTIENE UNA BATERÍA DE NÍQUEL CADMIO QUE DEBE RECICLARSE O DESECHARSE ADECUADAMENTE No se puede cambiar la batería del cepillo Sonicare pero se puede quitar fácilmente para reciclarla Al final de la vida útil del producto y antes de deshacerse de él quite la batería del mango siguiendo las instrucciones indicadas a continuación Tenga en cuenta que este proceso ...

Page 42: ...a y tire de la tuerca B Los elementos situados en el interior del mango saldrán de la carcasa junto con la tuerca C 4 Inserte un destornillador entre la placa del circuito electrónico y la pieza de plástico junto a cada extremo de la batería gire y rompa la conexión entre la batería y la placa del circuito electrónico en dos zonas C 5 Con un destornillador separe la batería recargable del aparato ...

Page 43: ...CIDAS EN ESTA GARANTÍA LIMITADA ALGUNOS ESTADOS NO ADMITEN LÍMITES EN LA DURACIÓN DE UNA GARANTÍA IMPLÍCITA ENTAL CASO LA LIMITACIÓN ANTERIOR NO SE APLICARÍA LIMITACIÓN DE RECURSOS EN NINGÚN CASO PHILIPS ORAL HEALTHCARE INC O CUALQUIERA DE SUS EMPRESAS AFILIADAS O SUBSIDIARIAS SERÁ RESPONSABLE DE DAÑOS ESPECIALES ACCIDENTALES O DERIVADOS DEL INCUMPLIMIENTO DE LA GARANTÍA O DEL CONTRATO NEGLIGENCIA...

Page 44: ... en la posición de velocidad reducida Limpie bien el mango el cabezal y el cargador consulte el capítulo Limpieza Sustituya el cabezal por otro nuevo Si el piloto parpadea en amarillo significa que quedan menos de 3 cepillados Recargue el cepillo Sonicare durante al menos 24 horas Esta función proporciona tiempo adicional para cepillar las zonas problemáticas en las que se acumula la placa y en la...

Page 45: ...45 ...

Page 46: ...46 ...

Page 47: ...47 ...

Page 48: ...he Philips shield are registered trademarks of Koninklijke Philips Electronics N V Quadpacer Sonicare Elite and the Sonicare logo are trademarks of Philips Oral Healthcare Inc and or KPENV 4235 020 01173 Philips Oral Healthcare Inc 35301 SE Center Street Snoqualmie WA 98065 U S A Outside North America 1 425 396 2000 www philips com North America 1 800 682 7664 www sonicare com ...

Reviews: