background image

30

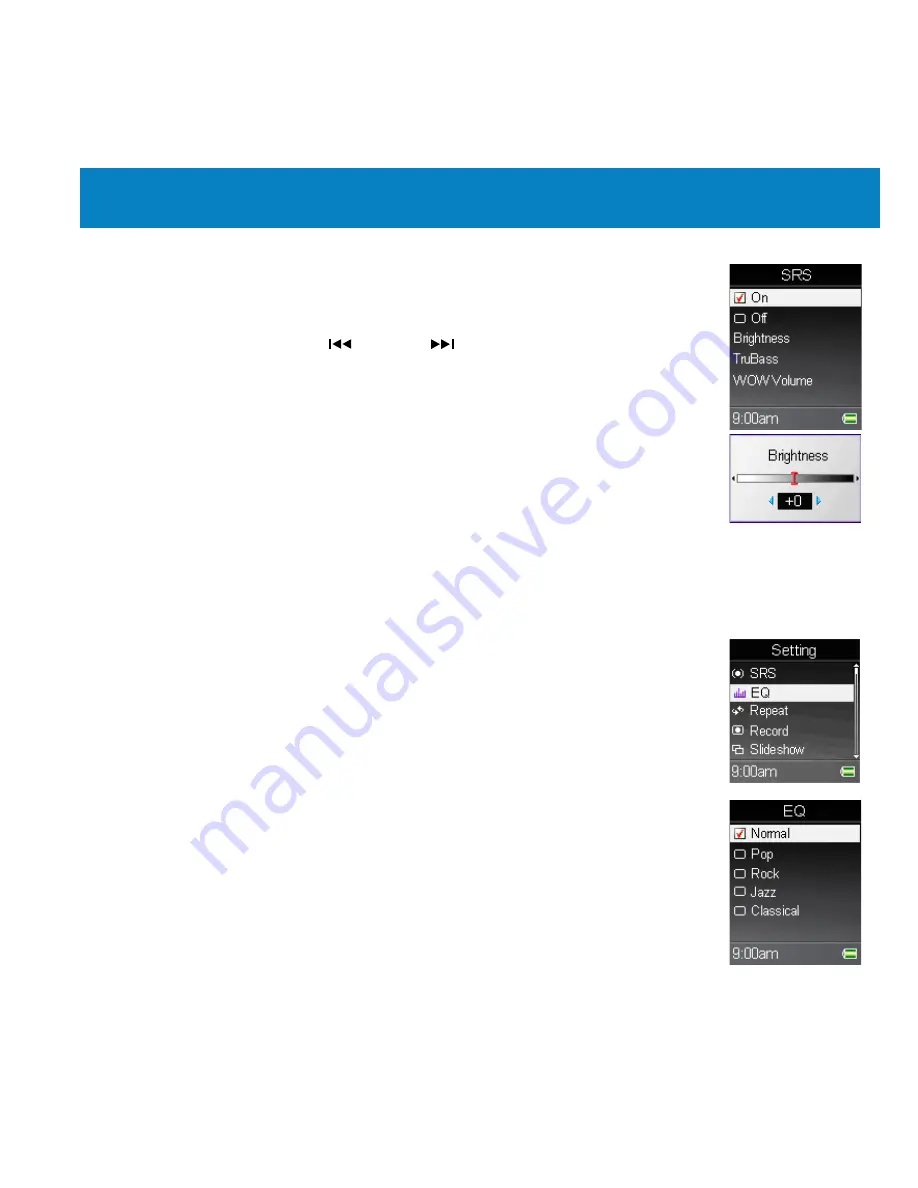
WOW Volume, and adjust their values. Select and enter these three 
options and a status bar appears.  Adjust the value by pressing the 

the Navigator key Left 


or Right


, then press the Navigator key 

or the PLAY key to con�rm.

 Brightness: indicates the SRS effect�s brightness.

 TruBass: TruBass is a patented SRS technology that enhances 

bass performance and delivers the perception of deep rich bass.

 WOW Volume: indicates the WOW effect�s volume.

Set EQ

The  SA5000  provides  Pop,  Rock,  Jazz,  and  Classical  EQ  modes.  Note: 

Once EQ is enabled, SRS settings will be disabled.
.  Select the Setting option in the Main Menu and press the Navigator 

key or the PLAY key to enter. 

2.  Select and open the EQ option.
3.  Press the Navigator key Up or Down to select Normal, Pop, Rock, Jazz 

or Classical, then press the Navigator key or the PLAY key to con�rm.

Summary of Contents for SA5000

Page 1: ...SA5000 Philips Digital audio player User manual EN User manual 1 ...

Page 2: ...pline in your country Country Helpdesk Tariff min Keep ready China 4008 800 008 Local tariff Date of Purchase Model number and Serial number Hong Kong 2619 9663 Local tariff Date of Purchase Model number and Serial number Korea 02 709 1200 Local tariff Date of Purchase Model number and Serial number ...

Page 3: ...ng the Li Polymer Battery 11 Battery Status 12 Lock Switch 13 CD 14 Connecting and Disconnecting 14 Connecting to a Computer 15 Safely Removing from a Computer 16 Basic Usage 16 Power On 16 Power Off 17 Select and Enter a Function 17 Music 17 Music Playback 19 Adding Songs to a Playlist 19 Removing a Song from a Playlist 20 Deleting a Song from the Device ...

Page 4: ...eshow 24 Rotate Photo 25 Puzzle 26 Multimedia 26 Play multimedia 27 Notes 27 Read txt File 28 Browser 28 Browse Contents 29 Setting 29 SRS 30 Set EQ 31 Set Repeat Mode 32 Record Quality Source 33 Slide Interval Slide Repeat Transitions 34 Power Off 34 Backlight Off 35 Brightness 35 Language ...

Page 5: ...ng 40 Language Learning Function 41 Synchronize Songs 43 Specifications 44 Update Recovery Firmware 44 Update Firmware 45 Recover Firmware 46 Important Safety Information 46 General Maintance 47 Hearing Safety 47 Traf c Safety 48 Copyright Information 48 Disposal of your old product 49 Modi cations ...

Page 6: ...manual before installing the provided utility Introduction tells you about the main features of the SA5000 and lists the accessories that included in the package Getting Started introduces the function keys on the SA5000 and shows the LCD Display s status in different modes Connect and Disconnect describes how to safely connect and disconnect the SA5000 to and from your PC using the USB cable prov...

Page 7: ...slideshow function TXT File Reader supports TXT les Voice Recorder provides a synchronous voice recording function Recorded les will be stored in WAV format Recorded les will be stored in WAV format A B Section Repeat enables users to repeat a particular section during normal playback Using this function users can focus on repeated playback to learn a language EQ and SRS effect you are able to sel...

Page 8: ...witch is switched to lock position all function keys are disabled Accessories Please check that all the following accessories are included when you open the packing box If any of the items are damaged or missing please immediately contact the vendor where you purchased the SA5000 In ear headphones Line In Cable CD Rom with software and user manual USB Cable ...

Page 9: ... 1 Display Screen Status and information is shown in this window 2 MIC Built in microphone 3 Record Repeat A B Press to start stop recording not available in Playback Mode Press to activate A B repeat function during Playback Mode ...

Page 10: ...increase volume level 8 Down Volume Down Press to select items During playback press to decrease volume level 9 Left Previous Rewind Press to select options During playback press to go to the previous track or press and hold to rewind a track 10 Right Next Forward Press to select options During playback press to go to the next track Press and hold to fast forward a track 11 PLAY Enter Press to con...

Page 11: ... 2 Function Name Shows the name of the function selected 3 Scroll Press the up down key to select other functions 4 Function Icon Shows the icons of the other functions 5 Clock Shows the time adjust ment required 6 Battery Status Shows the status of the battery s capacity 1 2 3 4 5 6 ...

Page 12: ... track edited info required F Equalizer Shows the music performance G Playback Time Bar Shows the playback s progress H Track Timer Displays an on going timer for the cur rent playback le I Track Number Display the current track number and the total number of tracks J Clock Displays the current time adjustment required K Repeat Indicates the Repeat Mode selected L EQ SRS Indicates the SRS status o...

Page 13: ...he supplied USB cable to the SA5000 and the USB A type male end to your computer 3 While the player is recharging you will see the icon in the display When the battery is fully charged you will see the icon The built in battery takes about three hours to charge 80 percent and ve hours to fully charge 4 Safely disconnect the USB cable when you are nished recharging Battery Status Critically Low Ful...

Page 14: ...it to unlock and the buttons function as normal Card Slot The SA5000 has a memory card slot you can insert a Micro SD memory card into The player will read and execute the les inside After inserting a card a Memory Card folder ap pears in the functions Select and open the folder to choose a le inside to execute If there is no card inserted you will not see the Memory Card folder ...

Page 15: ...tware The CD contains the following Philips Firmware Manager The Firmware Manager allows you to update or recover rmware for the SA5000 User Manual and Frequently Asked Questions Adobe Acrobat Reader Adobe Acrobat Reader is a free software program that allows you to view and print Portable Document Format PDF les To read the SA5000 User Manual you have to install Adobe Acrobat Reader ...

Page 16: ...omputer 3 Then turn on the SA5000 4 Once the SA5000 is connected to computer and powered on it should be detected by the computer s operating system and you will be able to manage files in the player or copy files using the computer 5 You will see the images below during connection The left image is displayed when the SA5000 is connecting to the computer and the right image is displayed when the S...

Page 17: ...appears in the task bar Double click the icon to display the Safely Remove Hardware dialog box You can nd all USB devices connected to the computer in the display To remove the SA5000 close all the related programs Select USB Mass Storage Device and click the Stop button 2 When you see the window shown on the left side select USB Mass Storage Device and click OK 3 When following message appears yo...

Page 18: ...to use Power On Before any operations can be performed you have to rst turn on the device Follow the steps below to turn on the SA5000 Power Off Once the device is turned on you can turn it off in any mode Follow the steps below to turn off your SA5000 1 In any modes press the Play Pause button for about 2 seconds 2 The screen will display Bye 3 When the screen turns dark the device is turned off ...

Page 19: ...he function 3 The submenu for the selected function appears Music Playback The SA5000 supports MP3 and WAV Follow the steps below to play music voice recording 1 Select and enter the Music option in the Main Menu 2 Press the Navigator key Up or Down to select how you want the music les sorted Select All List to play all the music les stored Select Artist to select all the songs by an artist Select...

Page 20: ...press the Navigator key Right once to go to the next track 5 Press the Navigator key up to increase the volume level or press the Navigator key down to decrease the volume level The volume bar is shown at the bottom of display Note refer to Synchronize Songs section to synchronize music to make sure all MP3 info is imported correctly Note Music les on the micro SD card are only accesible by select...

Page 21: ...nt to add the song 4 Press the Navigator key or the PLAY key to save the playlist A Writing message appears 5 Repeat steps 1 4 to add more songs to the playlist Removing a Song from a Playlist 1 Select and enter the Music option from the Main Menu 2 Select the playlist you want to edit 3 Press the Navigator key Up or Down to select a song to delete and press the Menu button for 2 seconds to enter ...

Page 22: ... press the MENU button for 2 seconds to enter the submenu 4 Select Delete in the submenu and press the Navigator key or the PLAY key to activate 5 A con rm box will show up select Yes or by pressing the the Navigator key Left or Right then press the Navigator key or the PLAY key to con rm 6 You will see a delete percentage on the screen After the percentage reaches 100 a Delete Finish message appe...

Page 23: ...ness TruBass or WOWVolume and adjust their values Brightness indicates the SRS effect s brightness TruBass TruBass is a patented SRS technology that enhances bass performance and delivers the perception of deep rich bass WOWVolume indicates the WOW effect s volume SRS WOW Enhancement Effect The SA5000 supports SRS WOW effect WOW is a special combination of SRS audio technologies that creates a thr...

Page 24: ...ssical then press the Navigator key or the PLAY key to con rm Note Once EQ is enabled the SRS WOW settings will be disabled Set Repeat Mode 1 In Playback Mode enter the submenu 2 Select the Repeat option 3 Select one of the options in the Repeat mode submenu a Normal Play the selected tracks in sequence b Repeat one Repeat the current track c Repeat All Repeat all selected tracks d Shuf e Play all...

Page 25: ...show in the display Select and enter a folder where the photo belongs to rst if necessary 3 Use the Up or Down key to select a thumbnail 4 Press the Navigator key or the PLAY key to view the full screen photo 5 After one photo is selected to view in full screen you can view it on the display There are left and right arrows at the bottom of the photo Press the Navigator key Left to view the previou...

Page 26: ...ide Interval section Note You can also have photos appear in a slideshow after performing a rotation when necessary Simply press the Navigator key or the PLAY key Rotate Photo You can rotate photos to suit the display for better viewing when necessary 1 To rotate one photo enter the submenu while viewing the photo Select either the 90cw or 90ccw option and press the Navigator key or the PLAY key t...

Page 27: ...ng the black box and try to restore the photo Ex press the Navigator key Up to bring the piece below the box upwards press the Navigator key Right to move the piece at the left of the box to the right Quit by press the Menu button once Hold the Menu button to undo the previous steps 3 You have 500 steps to complete the puzzle After all the pieces are replaced in order the black box will disappear ...

Page 28: ...le list and press the Navigator key or the PLAY key to play the selected le Select and enter a folder where the le is located rst if necessary 3 Press the button to pause or resume the Multimedia playback Note The Multimedia will be played broad wise to t the screen and to create a better view Note If you want to delete a Multimedia le in the le list please refer to the Music Delete a Song from De...

Page 29: ... or the PLAY key to read it Select and enter a folder where the video belongs rst if necessary 3 Press the Navigator key Up or Down to read the complete text Note If you want to delete text les from the le list please refer to the Music Delete a Song from Device section Note Unicode text les can be read on the SA5000 correctly To open the text les on a computer select Save as and choose the Code t...

Page 30: ...owser option in the Main Menu and press the Navigator key or the PLAY key to enter 2 Select the le you want to browse and press the Navigator key or the PLAY key to open a selected le Select and enter a folder where the le is located rst if necessary 3 Then you can watch a Multimedia le view a photo listen to music or read a note depending on what sort of le it is You can also operate functions su...

Page 31: ...bled the EQ settings will be disabled 1 Select the Setting option in the Main Menu and press the Navigator key or the PLAY key to enter 2 Select SRS from the sub menu and press the Navigator key or the PLAY key to enter 3 Select On and press the Navigator key or the PLAY key to con rm 4 To turn off the effect choose the Off option 5 Also you can select other sound effects Field Brightness TruBass ...

Page 32: ...logy that enhances bass performance and delivers the perception of deep rich bass WOWVolume indicates the WOW effect s volume Set EQ The SA5000 provides Pop Rock Jazz and Classical EQ modes Note Once EQ is enabled SRS settings will be disabled 1 Select the Setting option in the Main Menu and press the Navigator key or the PLAY key to enter 2 Select and open the EQ option 3 Press the Navigator key ...

Page 33: ...Select one option from the Repeat mode submenu then press the Navigator key or the PLAY key to con rm a Normal Play the selected tracks in sequence b Repeat one Repeat the current track c Repeat All Repeat all the selected tracks d Shuf e Play all the selected tracks in a random order once e Shuf eREP Playsandrepeatsalltheselectedtracksinrandomorder ...

Page 34: ...t and enter the Record option 3 Select and enter the Quality option 4 Select and enter Source 5 You can set the record source to Mic or Line in by selecting the options in Source Select Mic to record using the built in microphone Select Line in to record audio from an external device connected to the Line in In ear headphones Jack ...

Page 35: ...f and press the Navigator key or the PLAY key to set the slideshow repeat option 6 Press the Menu button once to go back to upper level menu Select and open the Transitions option Select an option and then press the Navigator key or the PLAY key to con rm Off shows no transition effect Random shows Push Alpha Blend Horizontal Vertical effect randomly Push Alpha Blend change to another photo with a...

Page 36: ...at meets your needs then press the Navigator key or the PLAY key to con rm Backlight Off The backlight timer program can help save power After having been idle for a selected amount of time the device will turn the backlight off Press any button to turn the backlight on 1 Select the Setting option in the Main Menu 2 Select the Backlight Off option 3 Select an option that meets your needs then pres...

Page 37: ...rightness option 3 Adjust the brightness setting then press the Navigator key or the PLAY key to con rm Language 1 Select the Setting option in the Main Menu 2 Select the Language option 3 Select a language you want to use then press the Navigator key or the PLAY key to con rm ...

Page 38: ...t the Time Format item and then select 12 hour or 24 hour format to adjust how you want the time to be displayed 4 Select Set Time or Set date to change the time or date settings 5 The current set time or date is displayed 6 Set the time or date then press the Navigator key or the PLAY key to con rm ...

Page 39: ...t the Setting option in the Main Menu 2 Select the Master Reset option 3 Select theYes option and then press the Navigator key or the PLAY key to con rm Note All the adjustments that you made will be recovered Info 1 Select the Setting option in the Main Menu 2 Select the Info option 3 You can read the device s information on the screen ...

Page 40: ... source using the Line in cable 2 Press the Menu button and press the Navigator key Up or Down to scroll to Settings Press the Navigator key to select Settings 3 Press the Navigator key Up or Down to scroll to Record Press the Navigator key to select Record 4 Press the Navigator key Up or Down to scroll to Source Press the Navigator key to select Source 5 Press the Navigator key Up or Down to scro...

Page 41: ...ther an interview or a speech To create a Microphone Recording follow step 1 2 and 3 from page 38 Line in and the following steps below 1 Press the Navigator key Up or Down to scroll to Mic Press the Navigator key to select Mic source 2 Press the REC A B button to start recording 3 On the display a recording le should be generated and placed under the RECORD folder The le name sequence is Voice ye...

Page 42: ...of language learning 1 Press the REC A B button to set the starting point of the playback The A B icon will appear on the middle bottom of the screen 2 Press the REC A B button again to set the nishing point The A B icon will appear on the screen You will hear the repeating playback that you had set previously over and over again 3 Press the REC A B button again to return to normal playback The A ...

Page 43: ...ow the steps below Note The following Multimedia les are suported mov and M JPEG avi les For more infromation about Multimedia les see page 26 1 Connect the SA5000 to the computer 2 Use Windows Explorer to nd the les which you want to transfer to SA5000 3 Drag your mouse to select and highlight the les See pictures below ...

Page 44: ...ht one indicates that the SA5000 is under reading and writing processes 6 After managing the les by computer follow the Safely Remove from Computer section to safely remove SA5000 to prevent system or device corrupt 7 After disconnecting and restarting SA5000 database will be refreshed After the progress bar is lled your SA5000 is ready for media enjoyment ...

Page 45: ...equency 20 to 20K Hz SNR 90dB LCD module 1 8 TFT 128x160 pixels module Line In Voice Reording Record format WAV USB Flash Disk 1 Meets USB speci cation revision 2 0 2 Supports OS Windows ME Windows 2000 Windows XP Home Pro I O Input 1 Stereo Audio out Line in jack 3 5mm 2 USB interface EMI and Safety CB Interface Language Simpli ed Chinese English Earphones Stereo output 32mW rms 16Mw channel Batt...

Page 46: ...s Firmware Manager from the CD ROM before then remove it from your computer by deleting the Philips Firmware Manager le from the desktop 2 Download the new Philips Firmware Manager from the website 3 Connect the SA5000 to your computer using the USB cable 4 Double click the Philips Firmware Manager icon on the desktop to start the program You will see the window shown as in the image 5 Click Updat...

Page 47: ...ically be installed on the desktop of your computer 4 Double click the Philips Firmware Manager icon on the desktop to start the program If your device needs to be recovered the program will detect this You will see the window shown as in the image 5 Click the Recover button to recover your Firmware 6 Disconnect the SA5000 safely from your computer Note If you update the Firmware all data saved in...

Page 48: ...se any cleaning agents containing alcohol ammonia benzene or abrasives as these may harm the set Active mobile phones in the vicinity may cause interference Backup your les Please ensure that you retain the original les you have downloaded to your device Philips is not responsible for any loss of data if the product becomes damaged or not readable legible About operating and storage temperatures O...

Page 49: ... guarantees compliance with the maximum sound power of its audio players as deter mined by relevant regulatory bodies only with the original model of provided headphones In case this one needs replacement we recommend that you contact your retailer to order a model identical to that of the original provided by Philips Traf c safety Do not use the headphones while driving or cycling as you may caus...

Page 50: ...of copyright laws and international treaties The making of unauthorized copies of copy protected material including computer pro grammes les broadcasts and sound recordings may be an infringement of copyrights and constitute a criminal offence This equipment should not be used for such purposes Disposal of your old product Your product is designed and manufactured with high quality materials and c...

Page 51: ... old product with your normal household waste The correct disposal of your old product will help prevent poten tial negative consequences to the environment and human health Modi cations Modi cations not authorized by the manufacturer may void user authority to operate this ...

Page 52: ...philips com wk6085 Specifications are subject to change without notice Trademarks are the property of Koninkijke Philips Electronics N V Or their respective owners 2006 Koninkijke Philips Electronics N V All right reserved ...

Reviews: