background image

37

Amplifier system

Audio out

2 x 5mW

S/N ratio

>80dB

Frequency response

20Hz - 20KHz

Connections

I/O Interface

5 pin mini USB connector.

Memory capacity

built-in (SA220)

64 MB *

built-in (SA230)

128 MB *

* full memory capacity may not be available as some memory will be reserved for the device.

Supported format

mp3

8kbps-320kbps

WMA

5kbps-160kbps

multi-format support

yes 

codec upgradable

yes 

Display 

2 row icon and 2 row

12 character text display.

Backlight:

green

(

FM TUNER

), 

orange

(

MUSIC

), 

red

(

VOICE

)

Voice recording system

Mic sensitivity

Max. Voice recording time: up to 4 hours if using all the built-in memory.
For extra recording time use the MMC/ SD combined with the built-in memory.

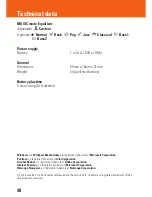
Technical data

Summary of Contents for SA220

Page 1: ...Audio Audio SA220 SA230 SA235 SA238 Digital Audio Player ...

Page 2: ...llation 11 13 Power supply Battery 14 Connecting disconnecting RUSH 15 Transferring MP3 WMA files 16 Transferring RUSH VOICE files Uploading 17 Downloading 18 Deleting files upgrading 19 General operation Switching on off 20 Power saving standby mode 21 Selecting function 21 Navigating main submenu options 21 Adjusting volume 22 Some display icons 22 Interactive backlight 23 Button lock 23 Using t...

Page 3: ... MUSIC VOICE only Memory size selecting memory options 26 Equalizer Custom Favorite MUSIC mode only Equalizer sound options 27 Custom adjustable personal sound options 28 Favorite 28 29 TUNER Auto tuning 30 Manual tuning and station storing 31 Selecting presets 31 VOICE Recording Deleting Preparation for VOICE recording quality 32 Recording 32 Deleting VOICE files 33 Troubleshooting 34 36 Technica...

Page 4: ...4 Neck strap Armband If you would like help or more information on your RUSH product visit the Philips website http www audio philips com rush A B A C B Controls and Connections ...

Page 5: ...5 1 2 3 8 4 5 6 7 CARD INSERT 9 10 Controls and Connections ...

Page 6: ...ts pauses MUSIC and VOICE playback confirms a menu setting option for selection right hand side soft key for MENU to access the main menu SETTING and submenus in your selected function locks buttons during playback to prevent them from being pressed Press for 2 seconds to de activate left hand side soft key for BACK to exit menu displays MUSIC saves a track for Favorites program list TUNER selects...

Page 7: ... MUSIC radio TUNER VOICE voice recording and playback 6 VOLUME adjusts the volume 7 USB connect the supplied USB cable here and to the USB port of your computer 8 MIC microphone for voice recording 9 Battery compartment for one AAA LR03 or UM4 battery 0 CARD INSERT insert your SD MMC card here as shown see page 5 If you want to use a memory card please make sure you use the RUSH formatter to forma...

Page 8: ...ck strap ring Active mobile phones in the vicinity may cause interference to the device Take care when using headphones Hearing Safety Listen at a moderate volume Using headphones at high volume can impair your hearing Traffic Safety Do not use headphones while driving or cycling as you may cause an accident Copyright information Unauthorized duplication and distribution of Internet CD recordings ...

Page 9: ...by the device for playback You should also only use Windows Explorer for uploading and downloading to manage your VOICE files software upgradeable and supports future playback formats can be used to transfer document and other types of files to and from your computer Supplied Accessories Make sure all items listed are in the package purchased If any item is missing please contact your dealer One U...

Page 10: ...T remove your MMC SD from the CARD INSERT slot when you are transferring files between the device and your computer If you want to use a memory card please make sure you use the RUSH formatter to format your card before using for the first time see page 26 Minimum computer system requirements Pentium MMX 166MHz processor or better USB port with Windows 98 Me 2000 XP 96MB RAM 50MB RAM drive space C...

Page 11: ...o your PC You can download this service pack from http www microsoft com windows2000 downloads servicepacks default asp 1 Insert the RUSH CD ROM into your CD ROM drive 2 An introduction screen appears Select the language that suits you best English Français Italiano Deutsch or Español 3 Select your product 4 Your PC then starts and completes automatic installation of the required PC application ...

Page 12: ...Software installation 12 5 Select and install the MUSICMATCH Jukebox or plug in which most suits you Follow all the screen instructions to complete installation ...

Page 13: ...ukebox click View MUSICMATCH tutorial or you can also visit www musicmatch com MUSICMATCH Jukebox software allows you to manage your music collection on your personal computer For example convert CD music tracks to MP3 and WMA files create save music playlists download MP3 files to RUSH ...

Page 14: ...l indicates the power level E g or 3 blocks indicate full power BATTERY LOW is shown when battery power is very low Any recording activity stops The device will switch off automatically TIP This device does not have an on board function for rechargeable batteries ALWAYS check the device is loaded with a fresh battery before connecting to your computer Batteries contain chemical substances dispose ...

Page 15: ... READY Disconnecting RUSH from your PC 1 Click on the Unplug or Eject Hardware removal icon on your PC task tray 2 Follow the screen instructions 3 When you reach the message The USB Mass Storage device can now be safely removed from the system click OK before you unplug RUSH from your PC TIP For Windows98 users there is no removal icon Instead please check your RUSH shows the READY display before...

Page 16: ...g uploading formatting DO NOT disconnect RUSH until the device shows the READY display 1 Create open a music playlist 2 Click File y Send to Device y Download Playlist to Mass Storage Your songs will automatically appear in the Files to Download window 3 Select tracks to be downloaded from the list 4 Click Download 5 After tracks have been transferred to the device click Done to exit Check your do...

Page 17: ...ill be recognized by the device for playback You should also only use Windows Explorer for uploading and downloading to manage your VOICE files y To make voice recordings please read VOICE pages 32 33 Uploading 1 In Windows Explorer select the files you want to transfer from your RUSH player ...

Page 18: ...RUSH device display READING during transfer Downloading 1 In Windows Explorer select the RUSH VOICE files you want to transfer from your computer 2 Drag and drop from your computer s folder named VOICE left hand side window to the RUSH folder window right TIP The RUSH voice WAV files can be played on any WAV supported computer playback software ...

Page 19: ...r to manage your files directly from the player itself see page 25 Deleting tracks To clear all tracks from the device memory click from your PC task bar Start yPrograms y Philips RUSH Audio player y Format Upgrading your device Visit hhtp www audio philips com rush for more information and software upgrades ...

Page 20: ...on display 20 Switching ON OFF Switching On This device plays from the last function selected before you switched off Press and hold 2 OK for 2 seconds y Display RUSH splash screen y Plays from the last function selected before you switched the device off The device starts to play according to the device s status y No files is shown if no files on RUSH or in the memory card y If in MUSIC VOICE mod...

Page 21: ...lect your function Navigating main submenu options 1 During playback press right hand side MENU soft key y Display shows list of options under the menu 2 Press 3 4 to scroll and view the list of options 3 Press 2 OK to select your option y Display shows your selected function highlighted E g EQ 4 Press 3 4 and 2 OK to scroll and select your submenu option 5 Press left hand side BACK soft key once ...

Page 22: ... 1 repeats the current track file continuously Rpt All repeats all tracks files continuously Shuffle plays tracks in random order Custom mode to fine tune music mode frequencies Button lock activated Insert your headphones FM tuner mode selected for the first time Special features Depending on your function you can adjust a variety of settings Function Adjustable SETTING menus MUSIC Playmode EQ Me...

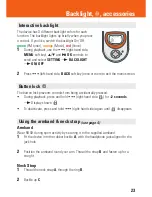
Page 23: ... more to exit the menu screen Button lock The button lock prevents controls from being accidentally pressed During playback press and hold right hand side for 2 seconds y Display shows To deactivate press and hold right hand side again until disappears Using the armband neck strap see page 4 Armband Wear RUSH during sport activity by securing it to the supplied armband 1 Fit the device into the ru...

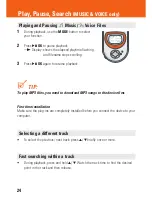
Page 24: ... OK again to resume playback TIP To play MP3 files you need to download MP3 songs to the device first First time installation Make sure the plug ins are completely installed before you connect the device to your computer Selecting a different track To select the previous next track press 3 4 briefly once or more Fast searching within a track During playback press and hold 3 4 Watch the track time ...

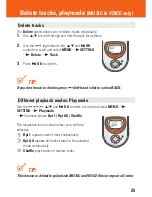
Page 25: ...P If you don t want to delete press left hand side to select BACK Different playback modes Playmode Use the 3 4 and 2 OK controls to scroll and select MENU y SETTING y Playmode y Submenu shows Rpt 1 Rpt All Shuffle The respective icon is shown when you confirm a selection Rpt 1 repeats current track continuously Rpt All repeats all tracks stored in the selected mode continuously Shuffle plays trac...

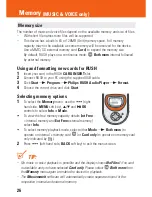
Page 26: ...RUSH Audio Player y Format 4 Choose the correct drive and click Start Selecting memory options 1 To select the Memory menu use the right hand side MENU soft key 3 4 and 2 OK controls to select Info or Mode To view the free memory capacity details Int Free internal memory and Ext Free external memory select Info To select memory playback mode select either Mode y Both mem to operate on internal mem...

Page 27: ...assical 4 Use 3 4 to scroll through the 8 possible options Normal Rock Pop Jazz Classical Bass1 Bass 2 Custom Normal 5 Press 2 OK to select the desired sound option 6 Press left hand side BACK soft key to exit the menu screen 7 You can also create your own sound with the Custom option see next chapter TIP An EQ icon is only shown if you have selected the option in the EQ menu during playback No ic...

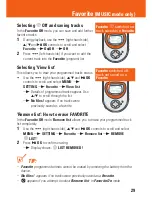
Page 28: ...tries in the device memory for music playback You can add tracks numbered from 01 10 to Favorite at different times You can also switch to normal playback Off or switch off the device without deleting the list Use the right hand side 3 4 and 2 OK controls to scroll and select MENU y SETTING y Favorite y shows 3 submenus On Off View list and Remove list Check out the submenu options as follows Sele...

Page 29: ...appear Use 3 4 to scroll through the list y No files appears if no tracks were previously saved as a favorite Remove list How to erase FAVORITE In the Favorite Off mode Remove list allows you to erase your programmed track list completely 1 Use the right hand side 3 4 and 2 OK controls to scroll and select MENU y SETTING y Favorite y Remove list y REMOVE LIST 2 Press 2 OK to confirm erasing y Disp...

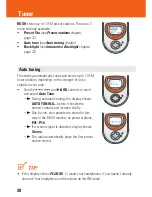
Page 30: ...in your area Use the and 2 OK controls to scroll and select Auto Tune y During automatic tuning the display shows AUTO TUNING before it shows the station s details and location briefly y One by one your presets are stored in this way in the RUSH memory as preset stations P01 P10 y If a stereo signal is detected display shows Stereo y The radio automatically plays the first preset station stored TI...

Page 31: ...shows STEREO 2 Use the right hand side 3 4 and 2 OK controls to scroll and select SETTING y Preset Stn y A preset station number P01 10 blinks 3 While the preset blinks press right hand side preset station STN soft key once or more to select a preset station location P01 10 4 Press 2 OK to confirm overwrite a current preset Selecting presets When listening to the radio press left hand side STN sof...

Page 32: ...croll and select the desired quality High Medium or Low 32K 16K or 8kHz sampling rate respectively TIP Default setting Low 8kHz sampling rate allows maximum recording time Adjust the sound quality if you like For extra recording time use a memory card combined with the RUSH built in memory Recording Once you have set your desired recording quality you can enter the recording mode instantly 1 In VO...

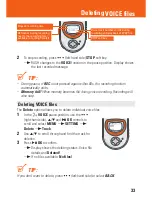
Page 33: ...ou to delete individual voice files 1 In the VOICE pause position use the right hand side 3 4 and 2 OK controls to scroll and select MENU y SETTING y Delete y Track 2 Use 3 4 to scroll through and find the track for deletion 3 Press 2 OK to confirm y Display shows the deleting status Voice file details and Deleted y If no files available No files TIP If you don t want to delete press left hand sid...

Page 34: ...eadphone plug into jack completely Corrupted file track Clear all tracks from the device memory Click from your PC task bar Start y Programs y Philips RUSH Audio player y Format If there is still no response from the above tips the Flash memory may have been corrupted Please check out the following steps to recover your player 1 Restart your computer 2 Remove the battery from the battery compartme...

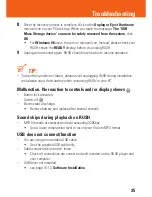
Page 35: ...nstallation and always use a fresh battery when connecting RUSH to your PC Malfunction No reaction to controls and or display shows Button lock activated Switch off Electrostatic discharge Remove battery and replace after several seconds Sound skips during playback on RUSH MP3 file made at compression level exceeding 320Kbps Use a lower compression level to record your file into MP3 format USB doe...

Page 36: ...AVORITE program list FAVORITE option switched off Use the right hand side 3 4 and 2 OK controls to scroll and select MENU y SETTING y Favorite y On Off y On Environmental information All redundant packing material has been omitted We have done our utmost to make the packaging easily separable into two materials cardboard box and polyethylene bags protective foam sheet Your set consists of material...

Page 37: ...e memory will be reserved for the device Supported format mp3 8kbps 320kbps WMA 5kbps 160kbps multi format support yes codec upgradable yes Display 2 row icon and 2 row 12 character text display Backlight green FM TUNER orange MUSIC red VOICE Voice recording system Mic sensitivity Max Voice recording time up to 4 hours if using all the built in memory For extra recording time use the MMC SD combin...

Page 38: ...s and Windows Media Audio are registered trademarks of Microsoft Corporation Pentium is a registered trademark of Intel Corporation Acrobat Reader is a registered trademark of Adobe Corporation Internet Explorer is a registered trademark of Microsoft Corporation Netscape Navigator is a registered trademark of Netscape Corporation All rights reserved All trade names referenced are the service mark ...

Page 39: ...SA220 SA230 SA235 SA238 W Meet Philips at the Internet http www audio philips com lkw0326 hk ...

Reviews: