background image

Philips Sound Solutions 

The Ultimate Edge™ Soundcard Users Guide 

31

8. Appendix C 

Disabling the Integrated Sound 

To disable the on-board audio you need to enter the system BIOS setup. Most computers only 
allow you to enter the setup right after power up and just before the operating system starts 
loading. A message may appear briefly to inform you that you can enter the setup. Typically, this 
message shows up at one of the corners of the screen and says something like 

“Press Del to enter setup”, or “Press F1 to enter setup”.  

Some computers allow you to enter setup at any time. Refer to your PC’s documentation on how 
to enter the setup utility. Find out how to enter the setup utility in your system and invoke it. 

Warning: Do not change anything that you are not sure what it is, or your system may not 
function properly. 

In the setup utility usually there is a list of options. One is the Standard Features that includes the 
time/date, and PC’s basic peripherals such as hard drive, keyboard, mouse, etc. Another is the 
Advanced BIOS Features. Yet another is PnP and/or PCI Configuration. You may enter each of 
these menus and look at the list of the options they provide. Use the arrow keys on the keyboard 
to navigate through the setup utility. 

Find the menu that contains the controls for the audio and sound feature. Select the menu by 
moving the highlight on this menu, and hit Enter. 

Locate the Audio or Sound device and select it using the arrow keys. Read the direction at the 
bottom of the screen on how to change the settings. It may be the Page Up/Down keys, or +/- or 
something else. Change the setting from “On” to “Off”, or from “Enable” to “Disable”, or whatever 
the options are in your PC. 

Save your settings and exit. Typically, the F10 key saves the changes and provides you with the 
exit menu. You may have to press the “Esc” key to once or twice to see the exit menu. Select 
save and exit. You may also type “Y” for yes to save and exit. 


Summary of Contents for PSC724 Ultimate Edge

Page 1: ...User s Guide Ultimate Edge 5 1 High Definition 24 bit Sound Card plus PSA2 HD Philips Sound Solutions PHILIPS ...

Page 2: ...l titles trademarks and copyright and restricted rights notices shall be reproduced on all copies of the Software You may not modify copy or adapt the Software merge the Software into another program or create derivative works based upon the Software You may not transfer your rights under this Agreement to any third parties Identified Software Your license rights to the Software are conditioned up...

Page 3: ...closure of the Software is restricted in accordance with FAR 12 212 52 227 14 DFARS 227 7202 DFARS 252 227 7013 as well as by this Agreement Trademarks Certain of the product and Philips names used in this Agreement the Software and the written user documentation may constitute trademarks of the Philips its licensors or other third parties You are not authorized to use any such trademarks Export A...

Page 4: ...odeling QSound Multi Speaker Systems QMSS QMSS Q3D QSurround QXpander QInteractive3D Audio Pix and the Q logo are trademarks of QSound Labs Inc EAX and Environmental Audio Extensions are trademarks of Creative Technology Ltd In the United States and other countries Microsoft and Windows are registered trademarks of Microsoft Corporation DirectX and DirectSound are trademarks of Microsoft Corporati...

Page 5: ...System 5 2 2 3 Disabling the Integrated Sound 6 2 2 4 Uninstalling the Old Soundcard and Drivers 6 2 2 5 Installing the New Soundcard 9 2 2 6 Speaker Connection 10 2 2 6 1 Digital Speakers 10 2 3 Software Installation 11 3 The Philips Sound Agent 2 HD 12 3 1 Basic Interface Operation 12 3 2 Compact Control Panel 14 3 3 Main Control Panel 16 3 3 1 Effects Tab 16 3 3 2 Equalizer Tab 18 3 3 3 Setup T...

Page 6: ...ormation 28 6 Appendix A 29 Useful Tips For Speaker setup 29 6 1 Ideal Listening Scenario Speakers 29 6 2 Ideal Listening Scenario Headphones 29 6 3 Avoid Reflective Surfaces Speakers 29 6 4 Balance the Speakers and Headphones 29 7 Appendix B 30 Uninstalling the Old Drivers and the Soundcard 30 8 Appendix C 31 Disabling the Integrated Sound 31 9 Appendix D 32 Troubleshooting 32 ...

Page 7: ... Media PC We are confident that you will experience the ultimate in PC audio performance and features This document contains information that should help you with learning all the features of your new soundcard and the PSA2 HD graphical user interface It includes instructions on how to install the new hardware and software drivers Please take a few minutes and familiarize yourself with the soundca...

Page 8: ...nd natural But more importantly it creates virtual 3D surround over a two speaker setup Active Dynamic Filtering found in the new QSizzle and QRumble components feature low mid and high frequency enrichment algorithms that help restore sonic fidelity for highly compressed digital audio files such as MP3s and WMAs Simply put it makes MP3 s sound great QInteractive3D technology offers precise 3D sou...

Page 9: ...4 x 768 recommended 20 MB of available hard drive space PCI 2 2 compliant slot Windows 2000 or Windows XP Operating System NOTE Each operating system has its own minimum requirements that should be observed In addition various games and DVD applications may require higher limits than listed above 1 3 Audio Performance Signal to Noise Ratio 104 dB Total Harmonic Distortion Noise 0 004 Frequency Res...

Page 10: ...add on or an on board audio device If it is on board audio device it must be disabled in BIOS Remember to uninstall all audio drivers using either the uninstall program associated with the drivers or use the one in the system Control Panel Add or Remove Programs 2 1 2 Step 2 Install the Ultimate Edge in one of the available PCI slots preferably one that is away from the AGP slot Installing the sou...

Page 11: ...refore please remove or disable the existing sound system before installing the Ultimate Edge soundcard This is very important and failure to do so may result in the Ultimate Edge not working properly The following paragraphs and illustrations will help to determine the type of sound system existing on your PC Please go to the appropriate section to disable or remove the old sound system 2 2 2 Ide...

Page 12: ...activate the BIOS utility For useful examples on how to disable the on board audio please refer to Appendix C Once you have disabled the on board audio proceed to 2 2 5 Installing the new Soundcard section of this manual 2 2 4 Uninstalling the Old Soundcard and Drivers Uninstall the drivers for any previously installed soundcards This is very important and failure to do so may result in improper o...

Page 13: ...er Unscrew the old soundcard and save the screw for the Ultimate Edge soundcard Remove the analog audio cable if connected from the old soundcard but do not disconnect the other end This cable is usually connected to the CD ROM drive or DVD ROM drive You will need this cable for the Ultimate Edge soundcard Remove the old soundcard by firmly pulling it out Select an available PCI slot and remove it...

Page 14: ...Philips Sound Solutions The Ultimate Edge Soundcard Users Guide 8 ...

Page 15: ... it into the slot Be sure the soundcard is aligned properly and fits snugly into the slot Connect the cable to the CD In Video In or Aux In connector on top edge of the card see Figure 5 You can connect the analog lines from CD ROM or DVD ROM drive to this input Use the screw from the slot cover to secure the soundcard to the frame of the computer chassis Put the cover back on the PC and connect t...

Page 16: ...ve a set of PC stereo speakers connect them to the green jack labeled Front on the end bracket of the soundcard See the diagram in Figure 6 Connect the Rear speakers to the black jack and connect the Center LFE to the peach color jack on the end bracket of Ultimate Edge soundcard 2 2 6 1 Digital Speakers If you have digital speakers or any type of digital decoder box that uses a digital audio S PD...

Page 17: ...tructions on the screen If Autorun is disabled click on the Start menu at the bottom of the screen and click on Run Type the following in the Run window and click OK D autolauncher exe where D is your CD drive designator letter Once the installation is complete you will be asked to restart the computer After the reboot the Philips Sound Agent 2 icon will appear in the Windows System Tray or Systra...

Page 18: ...stem determines the nature of the audio processing and spatial algorithms that deliver the best quality sound possible However sound quality is personal and subjective That is why PSA2 HD allows the capability to adjust and fine tune the audio to suit individual taste The following sections provide a detail description of the PSA2 HD features 3 1 Basic Interface Operation To launch and setup Phili...

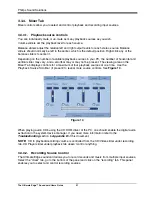
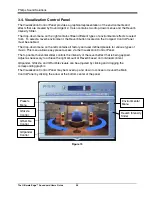
Page 19: ... the top level controls However to set or change some of the settings you need to expand to the Main Control Panel Use the Resize button when you need to expand the Main control panel again Mute Button Resize Button Drop down Pull up arrow Figure 8 The Visualization Control Panel provides a graphic representation of the advanced audio processing features of the Ultimate Edge soundcard It also incl...

Page 20: ...SA2 HD interface and its operation Reverb This button toggles the QSound Environmental Modeling QEM on or off However some games apply their own environmental effects which are not controlled by this button Environmental modeling uses reverb reflected sound and delay to create the impression that the listener is in a particular environment QEM provides a wide range of high quality environmental mo...

Page 21: ...ormalize Toggles Normalization automatic volume leveling on or off The button label illuminates when Normalization is enabled 3D Effects Toggles 3D Effects on or off This does not affect 3D audio games but does affect non 3D audio games utilizing the 2D to 3D remixing feature The button label illuminates when 3D Effects are enabled To enable automatic audio features such as QSurround QMSS and QXpa...

Page 22: ...the desired set of controls The following is a description of each tab from left to right 3 3 1 Effects Tab The Effects Tab is the first of the Main Control Panel tabs Below is a description of all the features on the Effects tab QSizzle QSizzle is a mid and high frequency treble enhancement algorithm that helps to compensate for the loss of presence punch and signal detail that often results from...

Page 23: ...rate 3D audio enhancement algorithms are provided to maximize the spatial experience no matter what the combination of signal type and output hardware When 3D Effects are enabled the audio processor will automatically choose the appropriate algorithm 3D mode according to your output configuration and the type of input signal The 3D Effects indicator LED s on front panel and the indicators on the E...

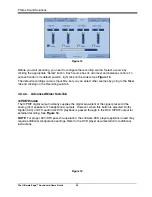
Page 24: ...led by that slider When a slider is set to the center position frequencies within this band are left flat and the gain is 0dB See Figure 11 Figure 11 To boost the level of a given band move its slider above the centerline To cut the relative level of a given band move its slider below the centerline Maximum boost or cut is 12dB on each frequency level Sliders can be individually centered by right ...

Page 25: ...processing spatial algorithms and the number of outputs to suit your preference The following is a detailed explanation of each output mode and each control on this tab See Figure 12 Figure 12 Speaker Test Utility The Speaker Test Utility can be utilized to test the current speaker configuration for proper connection to the soundcard Testing each speaker channel ensures each speaker is positioned ...

Page 26: ...level of the subwoofer Balance Slider This slider allows you to balance the left and the right speakers It affects the front and the rear speakers only The Loop Playback button allows the test to repeat until the stop button is pressed If the Loop Sounds is off the sound will play once for each click of a speaker button The Auto button sends the test sound to each speaker once and moves to the nex...

Page 27: ...may or may not be present The viewing area on the Mixer Tab displays controls for a maximum of four playback sources at one time Use the Playback Source Scrollbar if present to reveal more source controls See Figure 14 Figure 14 When playing audio CD s using the CD ROM driver of the PC one should enable the digital audio extraction in the system device manager If you need more information refer to...

Page 28: ... going to the Mixer tab and clicking on the Recording sub tab 3 3 4 3 Advanced Mixer Sub Tab S PDIF Enable The S PDIF digital output normally supplies the digital equivalent of the signal present at the analog front speakers or headphones outputs However when this button is selected Dolby Digital AC3 or DTS audio from DVD playback is passed through to the RCA S PDIF output for external decoding Se...

Page 29: ...abled may result in no sound or garbled playback Listen To Analog Inputs Enable this button to monitor the playback from the analog inputs CD In Line In Mic In and Aux In during recording Enabling this button will enable Front Speakers or Headphones button or All Available Speakers and Outputs with Effects QMSS button to be selected Front Speakers or Headphones Enable this button to monitor the an...

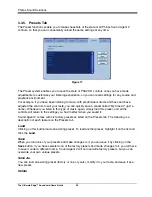
Page 30: ...enever you listen to this type of music again simply load this preset and all the controls will return to the settings you had in effect when you saved it Sound Agent 2 comes with six factory presets as listed on the Presets tab The following is a description of each feature on the Presets tab Load Clicking on this button loads an existing preset To load another preset highlight it on the list and...

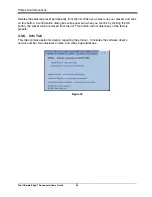
Page 31: ...this button a confirmation dialog box will appear and when you confirm by clicking the OK button the preset will be removed from the list This button will not delete any of the factory presets 3 3 6 Info Tab This tab contains useful information regarding the product It includes the software driver s version number manufacturer s name and web page addresses Figure 18 ...

Page 32: ... menu on the left contains all factory and user defined presets for various types of music This menu allows easy preset access via the Visualization Control Panel The top center horizontal slider controls the intensity of the reverb effect that is being applied Adjust as necessary to achieve the right amount of Reverb based on individual content QXpander QSizzle and QRumble visuals can be adjusted...

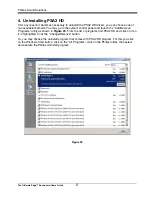
Page 33: ...stem control panel and launch the Add Remove Programs utility as shown in Figure 20 From the list of programs find PSA2 HD and click on it so it is highlighted Click the Change Remove button Or you may choose the uninstall program that comes with PSA2 HD program For this you click on the Windows Start button click on the All Programs click on the Philips folder then select and execute the Philips ...

Page 34: ...omputer operating system IE Windows 2000 or XP On screen error information Other hardware connected to the soundcard 5 1 Internet Address Technical support and driver http www philips com support The web site for Europe is http www philips com sound Philips general web site is http www philips com ce 5 2 Technical Support Information Toll Free telephone numbers Available 6 00 AM 10 00 PM Central S...

Page 35: ...ter and if you move around this doesn t change your position relative to the speakers 6 3 Avoid Reflective Surfaces Speakers If possible keep your speakers away from reflective surfaces For example if your setup is in a corner and one speaker is very close to a sidewall this will degrade imaging This is because sound waves will bounce off the wall and arrives at your ears slightly later than the w...

Page 36: ...ng is removed If you are not familiar with Device Manager just follow these steps Right click on My Computer icon and select Properties If the icon is not displayed on the desktop click on the Start button and Right click on My Computer then select Properties A new window will open On Windows 2000 and XP select the Hardware tab on top and click on the Device manager button at the middle of the win...

Page 37: ...list of options One is the Standard Features that includes the time date and PC s basic peripherals such as hard drive keyboard mouse etc Another is the Advanced BIOS Features Yet another is PnP and or PCI Configuration You may enter each of these menus and look at the list of the options they provide Use the arrow keys on the keyboard to navigate through the setup utility Find the menu that conta...

Page 38: ...system CD ROM drive could be used to play audio CD s However it must be configured to extract the audio digitally and send it over the system data lines to the soundcard to be played Here are the steps to enable this feature Windows 2000 1 Right click on My Computer On Windows 2000 this icon on desktop On Windows XP it is in the upper right portion of the Start menu 2 Scroll down to Properties and...

Page 39: ...ears from the System Tray go to the start menu click on Programs Windows 2000 or Windows XP click on Philips then click on Philips PSA2 HD then click on PSA2 HD Control Panel 9 When playing DVD there is background music but no dialog or the dialog is very low Check speaker connection This may happen if the front speakers are not connected while the rear and subwoofer are If the speakers are connec...

Page 40: ...g Inputs is causing feedback when recording from Microphone The microphone is too close to the speaker or the Mic In recording level is too high Please remove the microphone away from the speaker or lower the level of Mic In slider from the Mixer Tab Recording in the Main Control Panel ...

Reviews: