background image

Philips Sound Solutions 

Sonic Edge™ Soundcard User’s Guide 

13

2.2.1.   Soundcard External Connection 

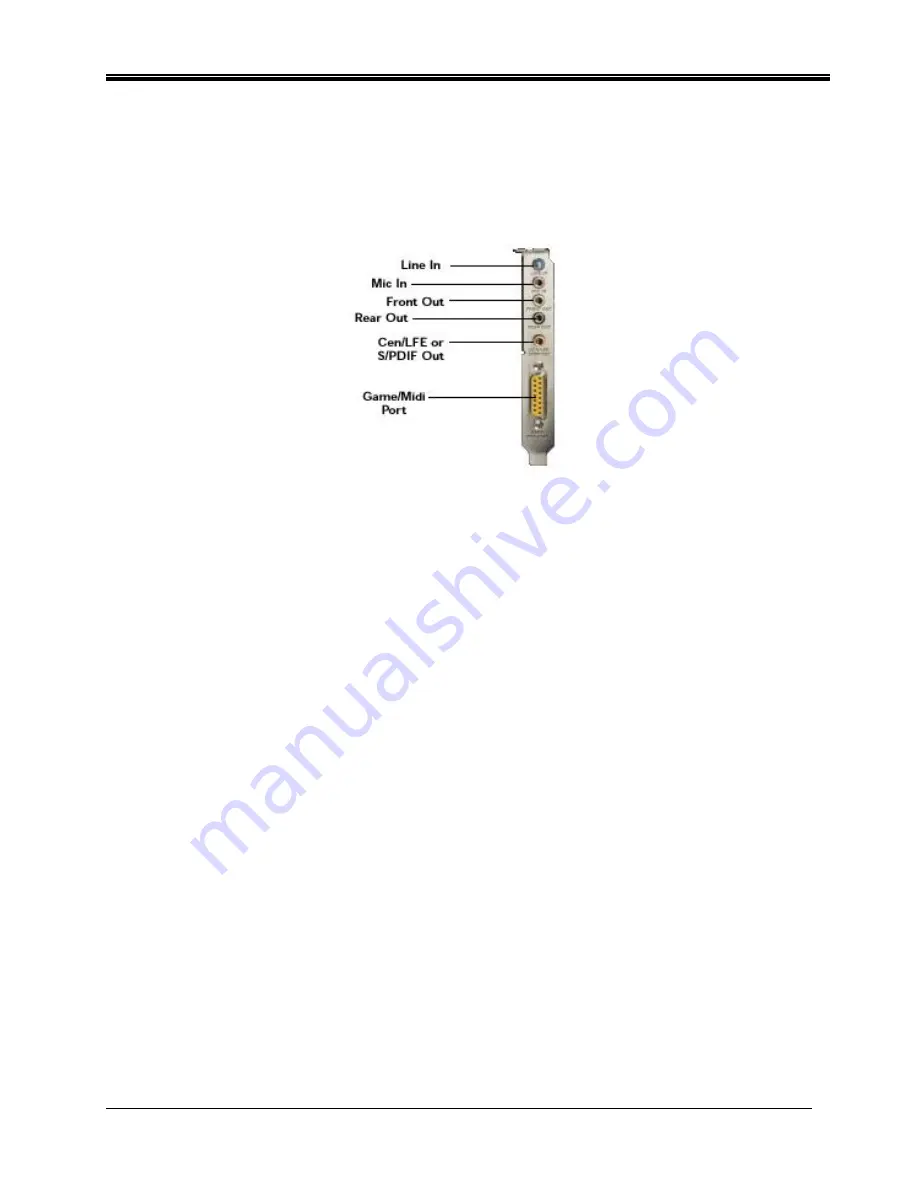
There are five jacks and one large D-connector (Game/Midi port) on the end bracket (see 

Figure 6

). 

External analog stereo sources with line level output can be connected to light blue 3.5mm stereo 
jack at the top of the soundcard bracket. A microphone can be connected to the pink 3.5mm mono 
jack. An analog or digital joystick and/or MIDI devices can be connected to the large connector at the 
bottom of the bracket. 


Figure 6


Connect your speakers to the soundcard on the back of your PC. It is strongly recommended that 
you refer to the documentation that came with your speakers to determine the type and connection 
specification. 

Power up the PC and have the installation CD that came with your new soundcard ready. 


Summary of Contents for PSC 605

Page 1: ...Sonic Edge 5 1 PSC605 with PSA2 User s Guide Philips Sound Solutions August 2002 PHILIPS ...

Page 2: ...T THE USE OF THE LICENSED SOFTWARE OR ANY COPIES THEREOF WILL NOT INFRINGE ANY PATENT COPYRIGHT TRADEMARK OR OTHER RIGHT OF THIRD PARTIES 4 Updated This license does not grant you the right to any upgrades or updates of the Licensed Software However Philips will be entitled to offer updates and or modifications to the Licensed Software at its discretion 5 Changes of the agreement No changes of thi...

Page 3: ...ent Modeling QSound Multi Speaker Systems QMSS Q3D QSound QXpander QInteractive3D Audio Pix and the Q logo are trademarks of QSound Labs Inc EAX and Environmental Audio Extensions are trademarks of Creative Technology Ltd In the United States and other countries Microsoft and Windows are registered trademarks of Microsoft Corporation DirectX and DirectSound are trademarks of Microsoft Corporation ...

Page 4: ...d Soundcard and Drivers 11 2 2 Installing the New Soundcard 12 2 2 1 Soundcard External Connection 13 2 3 Software Installation 14 3 Using The Philips Sound Agent 2 PSA2 15 3 1 Basic interface operation 15 3 2 Details of Compact Control Panel 16 3 2 1 Master Volume 16 3 2 2 Mute 16 3 2 3 Resize 16 3 2 4 Close 16 3 2 5 Default 16 3 2 6 Help 16 3 2 7 Reverb 16 3 2 8 QSizzle 17 3 2 9 QRumble 17 3 2 1...

Page 5: ...nter Slider 22 3 3 4 9 LFE Slider 22 3 3 4 10 Balance Slider 22 3 3 4 11 Test Button 22 3 3 5 Mixer Tab 23 3 3 5 1 Playback source controls 23 3 3 5 2 Recording Source Control 24 3 3 5 3 Advanced Tab 25 3 3 5 3 1 Microphone Boost 25 3 3 5 3 2 S PDIF Capture 25 3 3 5 3 3 Select S PDIF In to Digital or Analog Out 25 3 3 5 3 4 Select S PDIF Input Device 1 or 2 25 3 3 6 Presets Tab 26 3 3 6 1 Load 26 ...

Page 6: ...33 Useful Tips For Speaker set up And More 33 6 1 1 Ideal Listening Scenario Speakers 33 6 1 2 Ideal Listening Scenario Headphones 33 6 1 3 Avoid Reflective Surfaces Speakers 33 6 1 4 Balance the Speakers and Headphones 33 7 Appendix B 35 Uninstalling the Old Drivers and the Soundcard 35 8 Appendix C 36 Disabling the Integrated Sound 36 ...

Page 7: ...CD audio and MP3 reproduction that will transform your PC into a sonic powerhouse All controls effects and enhancements are bundled into a new unified graphical audio control center Philips Sound Agent 2 The new Philips Sound Agent 2 includes a full suite of studio quality audio DSP processes that automatically add features depth and richness to all audio sources Streaming Internet media DVD movie...

Page 8: ...ressed digital audio files such as MP3s and WMAs with natural replacement harmonics that compensate for lost sonic details Simply put it makes MP3 s sound great Exclusive QMSS technology creates a virtual 5 1 channel surround field and fills the sound gap between speakers to create a complete 360 degree wrap around audio experience that is smooth and natural Normalization smoothes out the volume d...

Page 9: ...0 X 600 Screen resolution 1024 X 780 recommended Headphones or amplified speakers 35 MB of available hard drive space Windows 98SE Windows ME Windows 2000 and Windows XP Please Note Each operating system has its own minimum requirements which should be observed In addition various games and DVD applications may require higher limits than listed above ...

Page 10: ... the following items in your Sonic Edge package The Sonic Edge Soundcard The Sonic Edge installation CD The Sonic Edge User s Guide on the installation CD Quick Start Guide QSG Analog audio cable to connect CD ROM DVD ROM drive to soundcard Bundled applications on the installation CD Warranty card Europe only ...

Page 11: ...rd you need to determine if your PC already has a soundcard or integrated sound device on the motherboard Your system can only have one active sound system Therefore you should remove or disable the existing sound system before installing Sonic Edge This is very important and failure to do so may result in your Sonic Edge not working properly If your PC does not have any type of sound system proce...

Page 12: ... shown in Figure 1 If the sound system is integrated on the motherboard usually the connectors are similar to the add on card but they are not on a bracket They might be stacked up in two rows Figure 2 shows examples of on board audio connectors Figure 2 2 1 2 Disabling the Integrated Sound To disable your integrated sound on board audio you will have to enter the system BIOS utility Warning Do no...

Page 13: ...connect the power cable and all devices that are connected to the computer CAUTION STATIC ELECTRICITY CAN PERMANENTLY DAMAGE TO YOUR SOUNDCARD To Prevent Damage 1 Always hold your soundcard by its edges Avoid touching any electronic components on your soundcard 2 Use a grounding strap or touch any non painted surface of your computer chassis before you begin installation to discharge static electr...

Page 14: ...log lines from CD ROM or DVD ROM drive to any one of these inputs There are also two digital input lines S PDIF IN Any standard S PDIF output line can be connected to any one of these two inputs If your CD player has an S PDIF output line it is perfectly all right to connect both the analog and the digital outputs of a CD ROM player to the appropriate input You can select from the Mixer Panel whic...

Page 15: ...op of the soundcard bracket A microphone can be connected to the pink 3 5mm mono jack An analog or digital joystick and or MIDI devices can be connected to the large connector at the bottom of the bracket Figure 6 Connect your speakers to the soundcard on the back of your PC It is strongly recommended that you refer to the documentation that came with your speakers to determine the type and connec...

Page 16: ...ard Drivers button and follow the directions on your screen If for any reason the installation program is not launched from the CD click on the Windows Start menu and select Run Type the following in the window that opens and press Enter D autolauncher exe Where D is the name of your CD Drive Once the installation is complete the installation program will ask you to restart your PC After the PC re...

Page 17: ...llow you enable or disable all of the features and effects provided by PSA2 The purpose of this panel is to take up very little space on your screen while providing easy access to most common controls To set or change settings you need to expand to the Main Control Panel using the Resize Button See Figure 9 Resize Button Figure 9 The Main Control Panel is in the center of the expanded mode and is ...

Page 18: ... to a predefined state All effects except 3D Reverb effects are turned off Speaker mode selection and 3D effects remain unchanged All playback mixer sliders except microphone are un muted Record sliders remain as set by user Fader and volume sliders are set to their factory default levels and Presets go to Neutral 3 2 6 Help This button launches the on line help system It contains detailed descrip...

Page 19: ... When on enhances the mid high frequency range of the audio stream The button label lights up when QSizzle is enabled 3 2 9 QRumble Turn on or off the QRumble effect When on it enhances the low frequency range of the audio stream The button label lights up when QRumble is enabled 3 2 10 Normalize Toggles Normalization automatic volume leveling on or off The button label lights up when Normalizatio...

Page 20: ...l cover down to reveal the Main Control Panel by clicking on the arrow at the middle of the lower edge of the Visualization Panel Once the Main Control Panel is open you can choose any of the tabs to select the desired set of controls See Figure 12 Figure 12 3 3 2 Effects Tab The Effects Tab is the first of the Main Control Panel tabs It contains controls and indicators for 3D enhancements and act...

Page 21: ...ur speaker volume becomes a thing of the past The label Normalization Active appears in illuminated text when Normalization is enabled and Normalization Off when disabled 3 3 2 4 3D Effects The goal of 3D effects processing is to maximize immersion and realism for any type of listening material and every type of output hardware two or more speakers headphones or even the unique combination of spea...

Page 22: ...iven band move its slider below the centerline Maximum boost or cut is 12dB on each direction Sliders can be individually centered by right clicking anywhere within the slider area or collectively by clicking the Reset button on top right corner of the panel Sliders can also be collectively centered by clicking the Default button on the compact panel Please note that the default button resets seve...

Page 23: ...ight rear left and rear right 3 3 4 4 5 1 Channel Speakers mode This is the home theater surround sound mode It provides 6 output channels that are set up as left and right front left and right rear center and subwoofer The subwoofer is also called the Low Frequency Effects LFE speaker 3 3 4 5 Digital Output S PDIF Philips Sonic Edge soundcard features two digital inputs and one digital output You...

Page 24: ... speakers 3 3 4 8 Center Slider Center controls the level of output on the center speaker only Use this slider to adjust the volume on the center speaker 3 3 4 9 LFE Slider This slider provides control for the volume level of the subwoofer 3 3 4 10 Balance Slider This slider allows you to balance the left and the right speakers It affects the front and the rear speakers 3 3 4 11 Test Button The Te...

Page 25: ...as you wish Volume sliders set the playback level for each source Balance sliders adjust the relative left and right output levels for each stereo source Balance sliders should normally be left in the center which is the default position Right click any of the balance sliders to center it The viewing area on the Mixer Tab displays controls for a maximum of four playback sources at one time Use the...

Page 26: ...level and balance controls To set each slider in its default position right click on that slider Drag the scrollbar from side to side to scroll Source Controls across the viewing area to reveal more controls that may otherwise be hidden The Microphone Boost button located on the Advanced tab provides extra amplification for weak microphone signals If distortion occurs turn Boost off To view additi...

Page 27: ...n occurs turn Boost off 3 3 5 3 2 S PDIF Capture This button enables recording from one of the digital input lines If you select S PDIF Capture to be the source for recording the Recording sub tab of the Mixer becomes unavailable Note S PDIF input recording is limited to 44 1 KHz 16 bit stereo and 48 KHz 16 bit stereo Any other recording formats may produce unpredictable results 3 3 5 3 3 Select S...

Page 28: ...rols to suit your taste you can quickly save a preset called Drums n Bass Whenever you listen to this type of music again simply load this preset and all the controls will return to the settings you had in effect when you saved it Your Sound Agent comes with several factory presets as listed on the Presets tab 3 3 6 1 Load Clicking on this button loads an existing preset 3 3 6 2 Save When you load...

Page 29: ...ation dialog box will appear and when you confirm by clicking the OK button the preset will be removed from the list This button does not work if you have selected one of the factory presets 3 3 7 Info Tab This tab contains useful information regarding the product It includes the software driver s version number manufacturer s name and the web page address for possible upgrade software Figure 20 ...

Page 30: ...ider The selection menu on the right contains all the choices for Reverb environmental effects The menu on the left contains the list of presets for various types of music The Slider controls the intensity of the effect that is applied to the music The Visualization Screen may be moved up and down to conceal or reveal the Main Control Panel by means of the button at the center of its lower edge Fi...

Page 31: ...tility as shown in Figure 22 from Windows XP From the list of programs find Philips Sound Agent 2 and click on it so it is highlighted Click the Add Remove button in Windows 98 ME or Change Remove in Windows 2000 XP OR you may choose the uninstall program that comes with the Philips Sound Agent 2 program For this you click on the Windows Start button click on the Programs or All Programs in XP tab...

Page 32: ...ble Computer operating system IE Windows 98SE ME etc On screen error information Other hardware connected to your soundcard 5 1 Internet Address You can find vast amount of useful information on the web The URL for USA web site is http wwwphilips com ce The web site for Europe is http www philips com sound 5 2 Technical Support Information Toll Free telephone numbers Available 6 00 AM 10 00 PM Cen...

Page 33: ... outside of the product Product repair and or part replacement due to misuse accidents unauthorized repair or other external causes not within the control of Philips Consumer Electronics A product that requires modification or adaptation to enable it to operate in any country other than the country for which it was designed manufactured approved and or authorized or repair of products damaged by t...

Page 34: ...lips The repair center may keep defective parts Repair Center Address Philips Electronics 1001 Snapps Ferry Rd Greeneville TN 37745 Make sure you write your name address RMA number and model number in at least two places on the package The RMA desk will provide returning shipping address In U S A Puerto Rico and U S Virgin Islands all implied warranties including implied warranties of merchantabil...

Page 35: ...change your position relative to the speakers In case you wish to use the Speaker Headphone output mode you should not select the types that completely cover your ears and isolate the sound coming from the front speakers Special headphones sometimes called open air headphones or the compact types as well as ear bud headphones can be used successfully 6 1 3 Avoid Reflective Surfaces Speakers If pos...

Page 36: ... Soundcard User s Guide 34 If each speaker has separate volume controls try to set them as equally as possible You can use the Philips Sound Agent 2 test utility to help you judge the volumes This practice applies to headphones as well ...

Page 37: ... thing is removed If you are not familiar with Device Manager just follow these steps Right click on My Computer icon and select Properties If your desktop does not show an icon for My Computer click on the Start button and Right click on My Computer then select Properties A new window will open On Windows 2000 and XP select the Hardware tap on top and click on the Device manager button at the mid...

Page 38: ...re not sure what it is or your system may not function properly In the setup utility usually there is a list of options One is the Standard Features that includes the time date and PC s basic peripherals such as hard drive keyboard mouse etc Another is the Advanced BIOS Features Yet another is PnP and or PCI Configuration You may enter each of these menus and look at the list of the options they p...

Reviews: