background image

6

Philips · PPX 4150

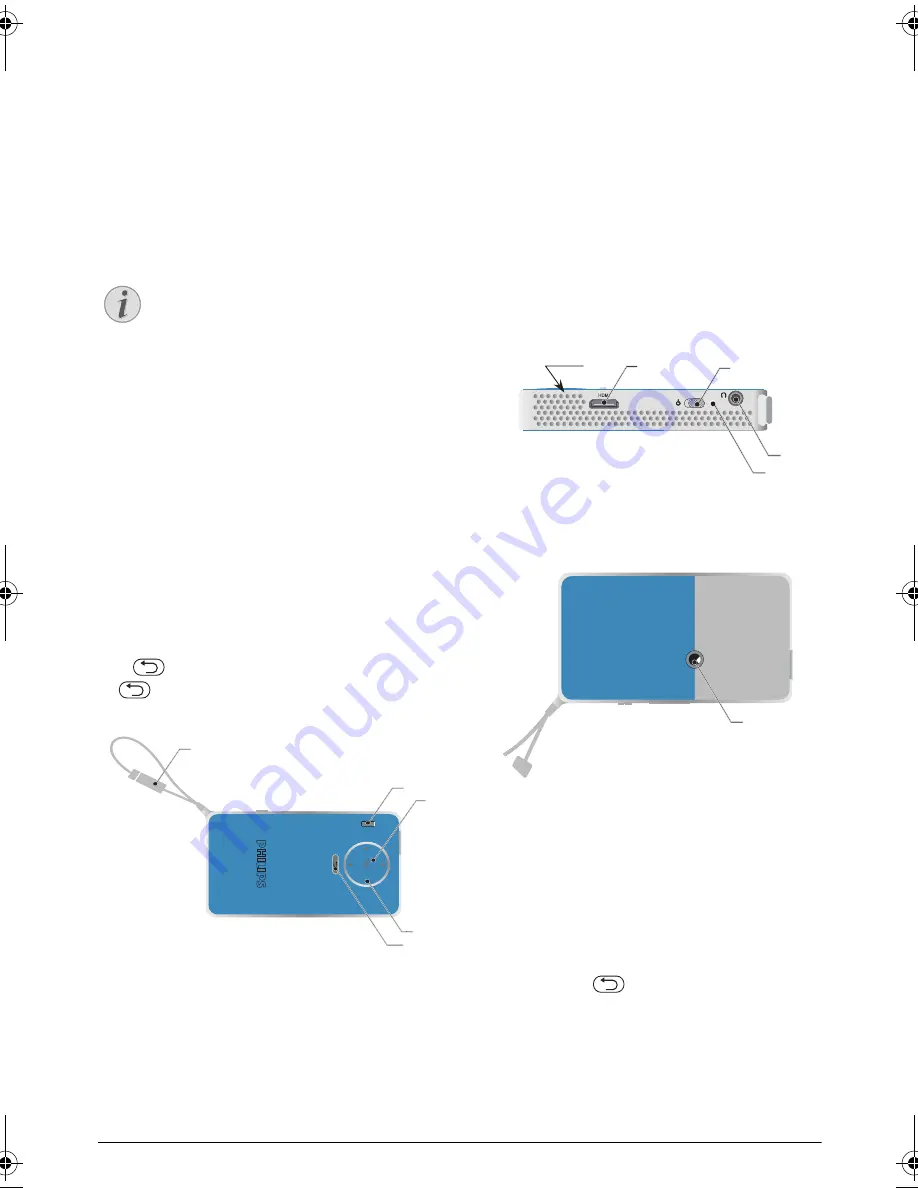
2 Overview

Top of the Device 

1

 – USB cable

USB connection for a computer / port for power 
supply

USB connection for a USB storage medium

2

 – Focus wheel for image sharpness.


3

 – 

OK

 key

à

 – Confirm entry / start, stop video/music play-

back or slideshow.

4

 – Navigation keys

/

 – Navigating / during music playback select 

previous, next title when image display is switched 
off / during video/picture playback wake Quick set-
ting bar.

À/Á

 – Navigating / during music playback: adjust 

volume level / during video playback start forward or 
backward / during picture playback select previous, 
next picture.

5

 – 


keys

 – One menu step back, one directory level 

back / cancelling a function

Side View

1

 – Loudspeak (on the other side)

2

 – 

 – HDMI port for a playback device (with 

adapter cable)

– 

Ã

 – On/Off switch

– 

Ï

 – Audio output – headphone connection or 

connection for external speakers

5

 – Battery status monitor

Charge indicator with connected power supply:

Red: Charging battery

Green: battery is fully charged

Bottom of the Device

1

 – Tripod socket

Overview of the Menu 
Functions

1

After switching on the device the main menu 
appears.

2

Press Select the desired menu using the navigation 
keys 

/

,

 À/Á

.

3

Confirm with 

à

.

4

By pressing the 

 key you will return to the main 

menu or to the previous function.

Symbols in the Statusbar

The charge level of the battery is displayed on the top 
right of the screen. When the icon is red, recharge the 
battery.

Notice

Note that the distance to the projection sur-
face must be a minimum of 0.3 meters and a 
maximum of 2.1 meters. If the Pocket Projec-
tor is located outside of this range, it may not 
be possible to focus the image. Turn the focus 
wheel carefully so as to avoid damaging the 
lens.

a

c

b

e

d

b

a

c

d

e

a

PPX4150_UM_EN_253617510.book  Page 6  Vendredi, 6. février 2015  2:49 14

Summary of Contents for picopix PPX 4150

Page 1: ...PPX 4150 EN User Manual EN User Manual Register your product and get support at www philips com welcome ...

Page 2: ...n the Statusbar 6 Initial Operation 7 Setting up the Device 7 Connect Power Supply Charge Battery 7 Initial Installation 7 Connexion 8 Connecting to Devices with HDMI Output 8 Connecting the headphones 8 functions 9 Flashlight 9 SOS Light 9 Warning Light 9 Settings 10 Overview of the Menu Functions 10 Service 11 Care Instructions for the Battery 11 Battery deep discharge 11 Cleaning 12 Device Over...

Page 3: ...Symbols Used What s in the Box 1 PicoPix Projector 2 HDMI to mini HDMI cable 3 Quick Start Guide Product Highlights Connecting to devices with HDMI output With the HDMI to mini HDMI cable you can connect the projector to a computer or laptop see also Con necting to Devices with HDMI Output page 8 Notice Troubleshooting This symbol designates tips that will help you to use your device more effectiv...

Page 4: ...oisture can appear inside the device which can lead to malfunctions if the device is moved from a cold to a warm area after a cold room is heated when this device is placed in a damp room Proceed as follows to avoid any moisture build up 1 Seal this device in a plastic bag before moving it to another room in order for it to adapt to room con ditions 2 Wait one to two hours before you take the devi...

Page 5: ...f Improper mainte nance can result in injuries or damage to the device Your device must be repaired by an authorised service centre Find details of authorised service centres on the war ranty card Do not remove the type label from your device this would void the warranty ...

Page 6: ...le 3 Ã On Off switch 4 Ï Audio output headphone connection or connection for external speakers 5 Battery status monitor Charge indicator with connected power supply Red Charging battery Green battery is fully charged Bottom of the Device 1 Tripod socket Overview of the Menu Functions 1 After switching on the device the main menu appears 2 Press Select the desired menu using the navigation keys À Á...

Page 7: ...jection sur face or wall Note that the distance to the projection surface must be a minimum of 0 3 meters and a max imum of 2 1 meters Make sure the projector is in a secure position 3 Use the focus wheel on the top to adjust the image sharpness 4 Select the desired menu language using 5 Confirm with à CAUTION Mains Voltage at the Site of Installation Check whether the mains voltage of the power s...

Page 8: ...e function press During playback you can access different settings vol ume smart settings contrast brightness saturation use to select the desired setting and À Á to finalize your settings Connecting the headphones 1 Before connecting the headphones turn down the volume on the device 2 Connect the headphones to the projector s head phone slot The device speakers deactivate automat ically when the ...

Page 9: ...is equipped with an SOS Light function The flashes are issued according to the rule Morse 3 short 3 long 3 short Your equipment can not be considered as approved rescue beacon 1 Switch the device on using the on off on the side 2 After the initial screen press à 3 Use the navigation keys to select SOS Light 4 Confirm with à 5 The SOS Light is activated 6 For exit the function press Warning Light Y...

Page 10: ...eiling The device is hanging from the ceiling in an upside down position the image is rotated through 180 degrees Smart Settings Select predefined settings for brightness contrast colour saturation If you mod ify these settings the setting is switched to Stand ard Brightness Adjust brightness Contrast Adjust contrast Saturation Adjust saturation Sound Settings Volume Adjust the volume Bass Set the...

Page 11: ... weeks dis charge the battery a little by using the device before storing it If the device only works using the USB connec tion or with the power supply the battery is defective Keep the device and the battery away from sources of heat Battery deep discharge When the battery is in deep discharge or the device is not used for a longer period proceed as followed 1 Connect the device to the power sup...

Page 12: ...nutes the firmware update is now completed and the device restart 8 Check firmware version in the information page of the device Press à Maintenance enter in Information menu DANGER Instructions for Cleaning Use a soft lint free cloth Never use liquid or easily flammable cleansers sprays abrasives polishes alcohol etc Do not allow any moisture to reach the interior of the device Do not spray the d...

Page 13: ...ut ers headphone socket or the line out socket The volume setting on the computer should not be too high Only the initial screen appears and not the image from the external device Check if the cables are connected to the right sock ets Please check that the external device is switched on Only the initial screen appears and not the image from the connected computer Please make sure the HDMI cable c...

Page 14: ...ment temperature is too high the devices turns automatically from maximum level of brightness to minimum level of brightness in order to protect the high power LED Use the device with lower environment tempera tures Bad image or color quality when connecting with HDMI Use the supplied HDMI cable PPA1290 Third party cables may cause signal distortions Problems Solutions ...

Page 15: ... up to 50 lumen Contrast ratio 1300 1 Projected image size 10 60 inch Screen distance 0 35 m up to 2 12 m Focus Manual Focus length 10 6 mm Built in rechargeable battery Battery type LiPol Capacity 1800 mAh 3 7V Charging time 3 h Operating time 65 min Operating time ECO mode up to 2h Manufacturer GREAT POWER BATTERY CO LTD Accessories Following accessories are available for your device MHL cable P...

Page 16: ...the equipment and receiver Connect the equipment into an outlet on a cir cuit different from that to which the receiver is connected Consult the dealer or an experienced radio TV technician for help Canada Regulatory Compliance This device complies with Industry Canada CAN ICES 3 B NMB 3 B For Mexico only PROYECTOR DE BOLSILLO PicoPix Alimentación 100 240V 50 60Hz 1A Sal 5 Vcc 2 A Proyector 5 Vcc ...

Page 17: ...uments SAS PHILIPS approved products Sagemcom Documents SAS shall not be held liable for any damage resulting from electromagnetic interference that occurs from the use of any interface cables other than those designated as Sagemcom Documents SAS PHILIPS products All rights reserved No part of this publication may be reproduced stored in a retrieval system or transmitted in any form or by any mean...

Page 18: ...SAS under license from Koninklijke Philips N V È 2015 Sagemcom Documents SAS All rights reserved Sagemcom Documents SAS Documents Business Unit Headquarters 250 route de l Empereur 92848 Rueil Malmaison Cedex FRANCE Tel 33 0 1 57 61 10 00 Fax 33 0 1 57 61 10 01 www sagemcom com Simplified Joint Stock Company Capital 8 479 978 509 448 841 RCS Nanterre ...

Reviews: