background image


EN            38           
 

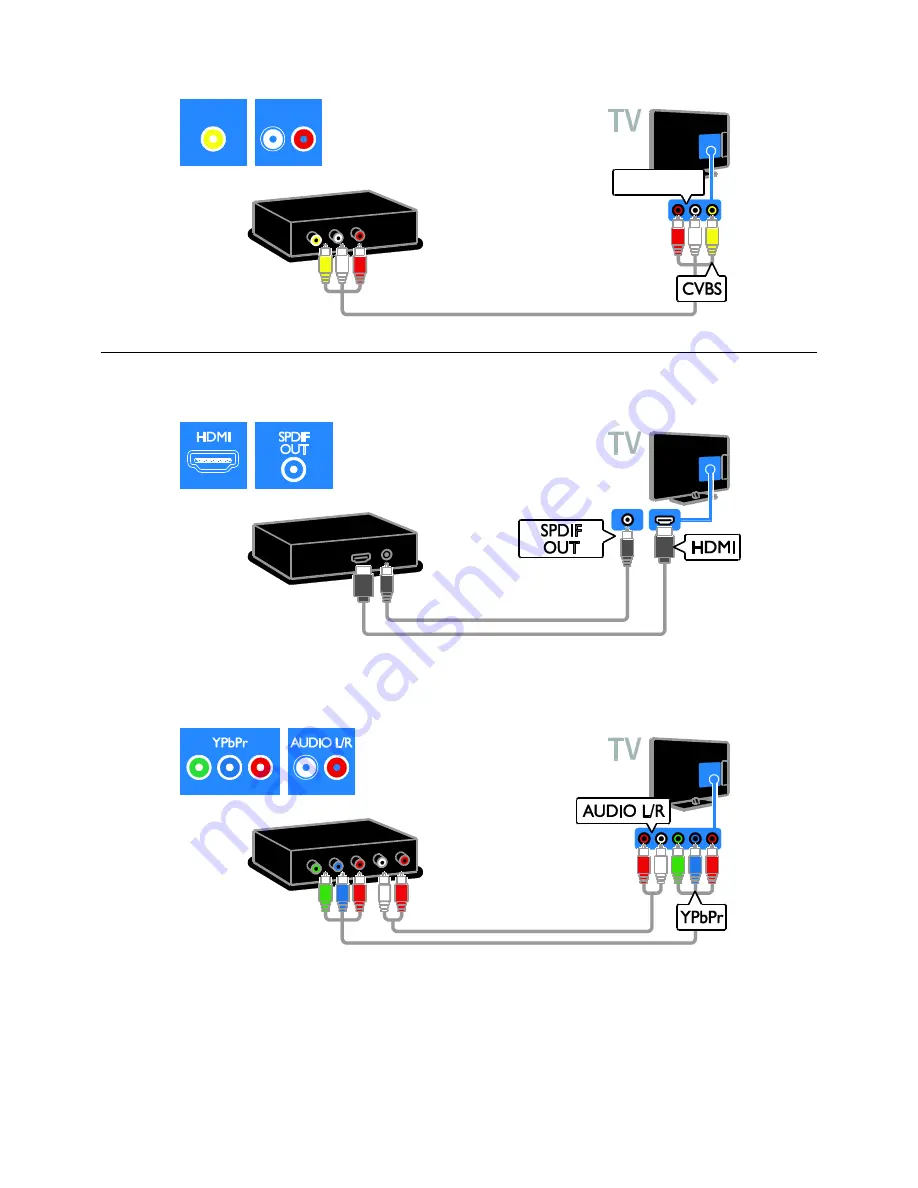
Connect the game console with a composite cable (CVBS) and an audio L/R cable to the TV. 

AUDIO L/R

CVBS

AUDIO  L/R


Home theater 

Connect the home theater with an HDMI cable and a coaxial cable to the TV. 


Connect the home theater with a component video cable (Y Pb Pr) and an audio L/R cable to the 
TV. 


Summary of Contents for PFL307D

Page 1: ...EN User Manual Register your product and get support at www philips com welcome PFL30x7D PFL35x7D PFL37x7D PFL40x7D PFL40x7G PFL47x7G ...

Page 2: ...guage settings 29 Universal access settings 30 Other settings 30 Update software 31 Restore default settings 31 5 Connect your TV 32 About cables 32 Connect devices 34 Connect more devices 40 Watch a connected device 42 Network and the Internet 42 6 Troubleshooting 45 General issues 45 Channel issues 45 Picture issues 46 Sound issues 46 Connection issues 47 Network issues 47 Contact Philips 48 7 P...

Page 3: ...e TV While you watch a digital channel you can Pause TV at any time and catch up with the broadcast later The broadcast is stored on a USB hard drive Video calls Applicable to PFL4xx7 only Add a new dimension to your calls and contact your friends and relatives on the big screen You can make video calls on your TV with a Philips HD Media box and a Philips TV video camera both sold separately Enjoy...

Page 4: ...7x7 PFL47x7 32 to 46 inch TVs 1 Remote control sensor Point the remote control at the sensor Make sure that the line of sight between the remote control and the TV is not blocked by furniture or other objects For PFL30x7 PFL35x7 and PFL40x7 32 to 47 inch TVs 1 Remote control sensor Point the remote control at the sensor Make sure that the line of sight between the remote control and the TV is not ...

Page 5: ...ch channels 15 Volume Adjust volume 16 Mute Mute or restore audio 17 Color buttons Select tasks or options The buttons function according to the services offered by the service provider 18 EXIT Exit from menus or TV functions 19 0 9 Numeric buttons Select TV channels or enter text 20 Dot Use for digital channels input EasyLink controls Note EasyLink controls are available when the connected device...

Page 6: ...ower plug power cord and outlet socket at all times Risk of damage to the TV Two people are required to lift and carry a TV that weighs more than 25kg or 55lbs When stand mounting the TV use only the supplied stand Secure the stand to the TV tightly Place the TV on a flat level surface that can support the combined weight of the TV and the stand When wall mounting the TV use only a wall mount that...

Page 7: ...mperatures If the TV is transported in temperatures below 5 C or 41 F unpack the TV and wait until the TV temperature matches room temperature before connecting the TV to the power outlet Screen care Risk of damage to the TV screen Never touch push rub or strike the screen with any object Unplug the TV before cleaning Clean the TV and frame with a soft damp cloth Never use substances such as alcoh...

Page 8: ...ps Customer Care for service or repairs Any operation expressly prohibited in this manual or any adjustments and assembly procedures not recommended or authorised in this manual shall void the warranty Pixel characteristics This LCD LED product has a high number of color pixels Although it has effective pixels of 99 999 or more black dots or bright points of light red green or blue may appear cons...

Page 9: ...B V High Tech Campus 5 5656 AE Eindhoven The Netherlands Trademarks and copyrights Windows Media is either a registered trademark or trademark of Microsoft Corporation in the United States and or other countries Manufactured under license from Dolby Laboratories Dolby and the double D symbol are trademarks of Dolby Laboratories The terms HDMI and HDMI High Definition Multimedia Interface and the H...

Page 10: ...for PFL4xx7G only All other registered and unregistered trademarks are the property of their respective owners Sustainability Energy efficiency This TV is designed with energy efficient features To access these features press the green button on the remote control Energy saving picture settings You can apply a combination of energy saving picture settings While you watch TV press the Green button ...

Page 11: ... Para evitar o vazamento de pilhas ou baterias o que pode resultar em danos à saúde ambientais e ao produto recomendamos que i Em caso de aparelhos com pilhas removí veis retire as quando não estiver em uso por um longo perí odo ii Não misture pilhas antigas com novas ou de zinco carbono com alcalinas etc iii Não exponha o produto com pilhas baterias em seu interior a altas temperaturas Pilhas e b...

Page 12: ... PDF version of this user manual Email us a specific question Chat online with Philips Consumer Care available in certain countries only Search the TV forum Your question may have already been answered by the Philips TV community of users Visit www supportforum philips com Contact Philips You can contact Philips Consumer Care in your country for support The number is available in the leaflet accom...

Page 13: ...me disconnect the TV from the mains plug Automatic switch off You can save energy with this TV s energy efficiency settings The settings are enabled by default so that if there is no user interaction such as pressing a remote control button or a control on the rear panel for four hours the TV will automatically switch to standby To disable automatic switch off 1 While you watch TV press the Green ...

Page 14: ... name appears when the channels are selected 1 While you watch TV press LIST The channel list is displayed 2 Select the channel to rename then press OPTIONS 3 Select Rename channel then press OK 4 Press the Navigation buttons to select each character then press OK Press OK in the entry screen to enable the Onscreen Keyboard or Press ABC or abc to select an uppercase or lowercase letter 5 Once comp...

Page 15: ...3 Press OK to confirm Use smart settings Your TV comes with smart picture and sound settings You can apply these settings or customize them Select your preferred picture setting 1 While you watch TV press ADJUST 2 Select Smart picture 3 Select an option then press OK Personal Apply your personalized picture settings Vivid Rich and dynamic settings ideal for daytime viewing Football Ideal settings ...

Page 16: ...retched 4 3 Display the classic 4 3 format View program guide You can view information about digital TV channels using program guides provided by broadcasters This information can include Channel schedules for the day Now and next or up to 8 days if supported by your broadcaster Synopsis of programs Note Program guides are available in certain countries only Set program guide Before you use the pr...

Page 17: ...ilable media server programs are as follows For PC Windows Media Player 11 or higher or TVersity For Mac Twonky 2 Switch on media sharing on your computer using the media server For more information on how to set up the media server refer to the website of the media server Play files 1 Press 2 Select Browse network then press OK If the network installation starts follow the onscreen instructions 3...

Page 18: ...ress to start the slideshow Press to pause Press to stop Press Navigation buttons to search for a picture Press EXIT to exit content browser Picture slideshow options Press OPTIONS to access or exit the following picture options Slideshow transitions Select the transition from one picture to the next Slideshow frequency Select the display time for each picture in the slideshow Repeat Play once Vie...

Page 19: ...ne Pay for a video on demand VOD program Vote Chat What you need To enjoy this service you need the following digital channels with interactive services a wired or wireless home network connected through a Universal Plug and Play router uPnP For network connection see Connect your TV Network and the Internet Page 42 Access interactive TV Most channels that offer interactive services invite you to ...

Page 20: ...amage or loss of data in the device Formatting removes all data from the connected USB hard drive The USB hard drive is formatted exclusively for this TV Keep it permanently connected to the TV You cannot access the USB hard drive contents from another TV or PC Do not overload the USB port If you connect a USB hard drive device that consumes more than 500mA power make sure that it is connected to ...

Page 21: ...y games consoles projected on a wide screen TV with excellent sound Before you start connect your game console to this TV See Connect your TV Connect devices Game console Page 37 For easy access add the game console to the Home menu 1 Press 2 Select Add your devices Game console then press OK 3 Follow the onscreen instructions to add the game console Game settings The Game option in the Smart pict...

Page 22: ...sound Retain picture quality If your TV picture quality is affected by the picture processing features of other devices you can switch on Pixel Plus Link to retain picture quality Maximize display for subtitled video Some video subtitles can create a separate subtitle bar under the video which limits the video display area To maximize the video display area you can switch on auto subtitle shift an...

Page 23: ...dio device through the Adjust menu EasyLink autostart Switch off TV speakers automatically and stream TV audio to the connected HDMI CEC audio device Select speaker output with Adjust menu If EasyLink or EasyLink autostart is selected you can change how the TV audio is streamed to the connected HDMI CEC device 1 While you watch TV press ADJUST 2 Select Speakers then press OK 3 Select one of the fo...

Page 24: ...ote Make sure that the picture format of the TV is set to Auto format or Movie expand 16 9 Switch off connecting device You can set the TV to switch off connecting HDMI CEC compliant devices if they are not the active source The TV switches the connecting device to standby after 10 minutes of inactivity 1 Press 2 Select Setup TV settings EasyLink 3 Select Auto switch off devices On then press OK t...

Page 25: ...e enter 8888 to override any existing codes Lock or unlock channels 1 In the child lock menu select Channel lock 2 Select the channel to lock or unlock then press OK 3 If prompted enter the child lock code with the Numeric buttons 4 Restart the TV to activate the lock Note If you access the channels from the channel list you are prompted to enter your lock code Age rating You can set your TV to di...

Page 26: ...splayed Note The wallpaper is displayed for 240 minutes or for the duration of the sleeptimer For information about the sleeptimer see Use more of your TV Set locks and timers Sleeptimer Page 25 Load TV wallpaper You can also load your own picture as the wallpaper Note When you load a new picture it overrides the existing picture 1 Connect the USB storage device to the TV 2 Press 3 Select Browse U...

Page 27: ...e reduction Filter and reduce noise Color temp Change the color balance Custom color temp Customize color temperature setting Available if Color temp Custom is selected only Digital Crystal Clear Control advanced settings to fine tune each pixel to match surrounding pixels Produce a brilliant high definition image Advance sharpness Enable superior sharpness especially on lines and contours in the ...

Page 28: ...loss in intensity or signal strength Select audio format If a Analog TV channel broadcaster streams audio in several formats you can select an audio format 1 Press 2 Select Setup Channel settings Language 3 Select a setting then press OK Mono Stereo If stereo broadcasting is available select mono or stereo audio 4 Press EXIT to exit Reset picture and sound You can restore the default picture and s...

Page 29: ...e procedure Update channel list When the TV was switched on for the first time a full installation of channels was performed By default when there are changes to these channel lists the TV updates them automatically You can also manually update the channels Note If you are prompted to enter a code enter 8888 Automatic update To add or remove digital channels automatically leave the TV in standby m...

Page 30: ...k or press the Red button to turn it off 3 Press EXIT to exit Other settings TV demo You can start a demo to find out more about the features on this TV Note Demos are not supported on MHEG channels 1 While you watch TV press 2 Select Setup Watch demos then press OK 3 Select a demo then press OK 4 Press to exit Location To make sure that the correct TV settings are applied you can select where the...

Page 31: ...rive 1 Connect a USB storage device 2 Press 3 Select Setup Update software then press OK The update assistant starts 4 Follow the onscreen instructions to start the update Note The update assistant directs you to the Philips support website See the installation instructions on the website to complete the update Update from digital broadcast When available the TV can receive software updates throug...

Page 32: ...use a SCART cinch adapter to connect the device to a SCART connector on the TV HDMI An HDMI connection has the best picture and sound quality An HDMI cable combines video and audio signals Connect HDMI for high definition HD TV signals and to switch on EasyLink An HDMI Audio Return Channel ARC connector allows output of TV audio to an HDMI ARC compliant device Connect HDMI cables shorter than 5 me...

Page 33: ...udio Left Right CVBS connections provides standard picture quality On certain models the video input socket on your TV is labelled as VIDEO AV IN or COMPOSITE VGA You can connect VGA to display PC content on the TV VGA only transmits video For sound also connect to AUDIO IN ...

Page 34: ...nect the disc player with an HDMI cable to the TV Connect the disc player with a component video cable Y Pb Pr and an audio L R cable to the TV Connect the disc player with a composite cable CVBS and an audio L R cable to the TV AUDIO L R CVBS AUDIO L R ...

Page 35: ... Connect the digital TV receiver with an antenna cable to the TV Connect the digital TV receiver with an HDMI cable to the TV Connect the digital TV receiver with a component video cable Y Pb Pr and an audio L R cable to the TV ...

Page 36: ...th a composite cable CVBS and an audio L R cable to the TV AUDIO L R CVBS AUDIO L R Video recorder Connect the recorder with an antenna cable to the TV Connect the recorder with a component video cable Y Pb Pr and an audio L R cable to the TV ...

Page 37: ...a composite cable CVBS and an audio L R cable to the TV AUDIO L R CVBS AUDIO L R Game console Connect the game console with an HDMI cable to the TV Connect the game console with a component video cable Y Pb Pr and an audio L R cable to the TV ...

Page 38: ...cable CVBS and an audio L R cable to the TV AUDIO L R CVBS AUDIO L R Home theater Connect the home theater with an HDMI cable and a coaxial cable to the TV Connect the home theater with a component video cable Y Pb Pr and an audio L R cable to the TV ...

Page 39: ... cable CVBS and an audio L R cable to the TV AUDIO L R CVBS AUDIO L R Digital camera onPublish Connect the digital camera with a USB cable to the TV For certain camera models only Digital camcorder Connect the digital camcorder with an HDMI cable to the TV ...

Page 40: ... component video cable Y Pb Pr and an audio L R cable to the TV Connect the digital camcorder with a composite cable CVBS and an audio L R cable to the TV Connect more devices USB hard drive Connect the USB hard drive with a USB cable to the TV ...

Page 41: ... English Computer Connect the computer with an HDMI cable to the TV Connect the computer with a DVI HDMI cable and an audio cable to the TV Connect the computer with a VGA cable and an audio cable to the TV ...

Page 42: ...ect the device icon from the Home menu 3 Press OK to confirm From Source menu You can also press SOURCE to display a list of connector names Select the connector that connects the device to the TV 1 Press SOURCE 2 Press the Navigation buttons to select a connector in the list 3 Press OK to confirm Remove device If the device is no longer connected to the TV you can remove it from the Home menu 1 P...

Page 43: ...een instructions to install the network 6 Wait for the TV to find the network connection 7 If you are prompted agree to the End User License Agreement Wi Fi ready This section is only for Wi Fi ready TVs With the Philips wireless USB adapter PTA127 you can connect the TV to your home network wirelessly You can share content between your connected devices using DLNA Note The wireless network operat...

Page 44: ... the PIN code in your router software to connect select WPS pin and note down the code To enter the encryption key manually select Standard and enter the key when prompted Set secured connection with WPS encryption 1 To set the secured connection with a PIN code select the WPS pin and press OK 2 Write down the 8 digit PIN code shown on TV and enter it in the router software on your PC See the rout...

Page 45: ...channel blocking feature child lock Enter 8888 The TV menu is in the wrong language Change the menu to your preferred language For more information see Set up your TV Language settings Menu language Page 29 Subtitles are not visible when you play a movie file from a USB storage device Subtitle files that are not hard coded into a video file for example srt sub idx are not supported You want to upg...

Page 46: ...signal output of the device The picture from broadcasts is scrambled You may need a Conditional Access Module to access content Check with your service operator An e sticker banner displaying information appears on the TV display The TV is in Shop mode To remove the e sticker set the TV to Home mode then restart the TV See Setup your TV Other settings Location Page 30 The computer display on the T...

Page 47: ...device do not play or display smoothly The transfer performance of the USB storage device may limit the data transfer rate to the TV which causes poor playback Network issues This section is applicable to certain models only You want to establish a wireless connection between your TV and home network Refer to Connect your TV Network and the Internet Wi Fi ready for instructions on how to connect y...

Page 48: ...ips com support You can also consult and contribute to the Philips TV community at www supportforum philips com If you wish to speak with or email a Philips representative contact the Philips Consumer Care in your country You can find the contact details in the leaflet accompanying this TV or at www philips com support Take note of your TV model and serial number before you contact Philips These n...

Page 49: ...cifications at www philips com support Reception Antenna input 75 ohm coaxial F type TV system PAL M PAL N NTSC M SATVD T SBTVD T Video playback NTSC PAL Display and sound Picture Display Display type edge LCD LED backlight Diagonal size 56 cm 22 inch 61 cm 24 inch 81 cm 32 inch 99 cm 39 inch 107 cm 42 inch 117 cm 46 inch 119 cm 47 inch Aspect ratio 16 9 widescreen Panel resolution For HD models 1...

Page 50: ...68 60 Hz 1280 x 1024 60 Hz 1360 x 768 60 Hz For Full HD TV only 1920 x 1080 60 Hz Video formats Resolution refresh rate 480i 60 Hz 480p 60 Hz 576i 50 Hz 576p 50 Hz 720p 50Hz 60 Hz 1080i 50Hz 60 Hz 1080p 24Hz 25Hz 30Hz 50Hz 60 Hz Multimedia Supported multimedia connections USB Connect only USB devices which consumes 500mA of power or less NTFS FAT 16 Read only FAT 32 Ethernet LAN RJ 45 Available on...

Page 51: ...ndows XP Macrovision Network Media Server for Microsoft Windows Fuppes for Linux uShare for Linux Connectivity Rear NETWORK Ethernet LAN RJ 45 available on certain models only Service port SERV U AUDIO IN DVI VGA stereo 3 5mm mini jack VGA PC input Component and Audio Y Pb Pr Audio L R SPDIF OUT Cinch Digital Audio Out ANTENNA IN 1 Air 75 ohm coaxial ANTENNA IN 2 Cable 75 ohm coaxial ARC HDMI 3 Si...

Page 52: ...40x7G 400mm x 400mm M6 117 cm 46 inches For PFL47x7G 400mm x 400mm M6 119 cm 47 inches For PFL30x7D 200mm x 200mm M6 For PFL40x7G 400mm x 400mm M6 Warning Follow all instructions provided with the TV mount TP Vision Netherlands B V bears no responsibility for improper TV mounting that results in accident injury or damage To prevent damage to cables and connectors leave a gap of at least 5 5 cm 2 2...

Page 53: ...ngth of the screw To find the length of the screw add the thickness of your wall mount to the screw length as shown in the graphic For PFL40x7G 32 inch TVs Before you mount the TV on the wall find the correct length of the screw To find the length of the screw add the thickness of your wall mount to the screw length as shown in the graphic For PFL40x7G 42 inch TVs Before you mount the TV on the wa...

Page 54: ... add the thickness of your wall mount to the screw length as shown in the graphic For PFL47x7G 32 to 46 inch TVs Before you mount the TV on the wall find the correct length of the screw To find the length of the screw add the thickness of your wall mount to the screw length as shown in the graphic Help version UMv 123007782335 20120817 ...

Page 55: ...ater system 38 connect PC 41 connect recorder 36 connect TV receiver 35 connect USB 17 connected device add 42 connected device remove 42 connected device rename 42 connectors 32 contact information on Internet 12 contact Philips 12 content rating 25 D demo 30 devices 34 devices add 42 devices watch 42 digital camcorder 39 digital camera 39 digital channels 29 disc player connect 34 display 49 dis...

Page 56: ...solutions 50 picture format 16 picture settings 27 picture settings reset 28 Pixel Plus link 24 placement stand or wall mount 30 position 30 power 49 product support 12 R rear controls 4 recorder connect 36 reinstall 31 remote control 5 remove connected device 42 rename connected device 42 S safety 6 Scenea enable 26 Scenea load wallpaper 26 screen care 7 screen saver 26 sensors 4 settings assista...

Page 57: ...lish T trademarks and copyrights 9 TV receiver connect 35 TV speakers mute 13 U universal access enable 30 V VGA 33 volume 13 W wall mount 52 wallpaper 26 wireless dongle 43 Y YouTube 18 YPbPr component video 32 ...

Page 58: ...e sua residência Grande São Paulo 2938 0245 Demais Regiões do País 0800 701 0245 Fale conosco pelo chat www philips com br Lista de Postos Autorizados TP Vision Brasil A lista completa e atualizada dos nossos postos autorizados está disponível em nosso site www philips com br ...

Page 59: ...eles causados por agentes da natureza e acidentes Excluem se igualmente desta garantia defeitos decorrentes do uso dos produtos em serviços não domésticos residendais regulares ou em desacordo com o uso recomendado ESTÃO EXCLUÍDAS DA GARANTIA ADICIONAL AS PILHAS OU BATERIAS FORNECIDAS JUNTO COM O CONTROLE REMOTO Nos municípios onde não exista assistência técnica autorizada TP Vision as despesas de...

Page 60: ... 2012TPVision Netherlands B V All rights reserved ...

Reviews: