background image

17

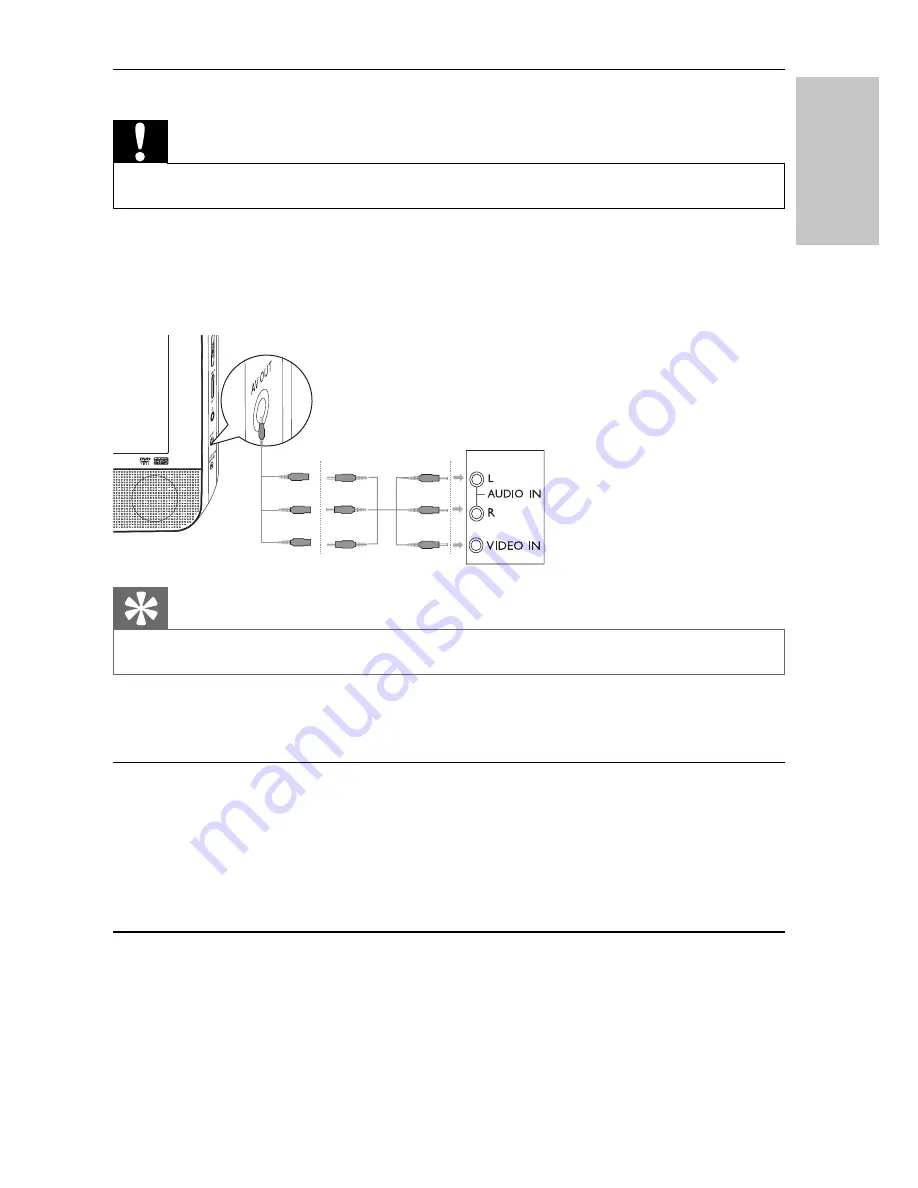
Connect additional equipment

Caution

Turn off your player before connecting to any additional equipment.

You can connect the player to a TV or an amplifi er to enjoy DVDs or Karaoke.
Match the color of the AV cables (the AV cable connected to TV is not supplied) 
with the jacks: the yellow cable is for the yellow video jack, the red/white cable is for 
the red/white audio jacks.

Tip

To conserve energy, press  

AV MODE

 to turn off the front panel display.

4  Use your player

Turn on

1


Slide the  

POWER

 switch on the main unit. 

The power indicator turns on.

»

To turn on the second screen, slide the  

»

OFF

/

ON

 switch on the second 

screen to the

ON

 position. 

Select OSD language

You can choose a different language for the on-screen display text.

1

 Press 


SETUP

.

The setup menu appears.

»

TV

English

EN

Summary of Contents for PET7432

Page 1: ... get support at www philips com welcome PET7432 EN User manual 3 DA Brugervejledning 23 DE Benutzerhandbuch 43 ES Manual del usuario 63 FR Mode d emploi 83 IT Manuale utente 103 NL Gebruiksaanwijzing 123 SV Användarhandbok 143 ...

Page 2: ...Overview of the remote control 10 Overview of the second screen 12 3 Get started 12 Install remote control battery 13 Use in a car 13 Use at home 16 4 Use your player 17 Turn on 17 Select OSD language 17 Play discs 18 Play options 18 5 Adjust settings 19 Set the main unit 19 Set the second screen 20 6 Product information 20 7 Troubleshooting 21 En g li sh EN ...

Page 3: ...ld with the apparatus When a cart is used use caution when moving the cart apparatus combination to avoid injury from tip over l Unplug this apparatus during lightning storms or when unused for long periods of time m Refer all servicing to qualified service personnel Servicing is required when the apparatus has been damaged in any way such as power supply cord or plug is damaged liquid has been spi...

Page 4: ...stening what sounds normal can actually be loud and harmful to your hearing To guard against this set your volume to a safe level before your hearing adapts and leave it there To establish a safe volume level Set your volume control at a low setting Slowly increase the sound until you can hear it comfortably and clearly without distortion Listen for reasonable periods of time Prolonged exposure to...

Page 5: ...sted batteries and old equipment Recycling Your product is designed and manufactured with high quality materials and components which can be recycled and reused When you see the crossed out wheel bin symbol attached to a product it means the product is covered by the European Directive 2002 96 EC Never dispose of your product with other household waste Please inform yourself about the local rules ...

Page 6: ...t ikke utsettes for regn eller fuktighet 2 Your portable DVD player Congratulations on your purchase and welcome to Philips To fully benefit from the support that Philips offers register your product at www philips com welcome Introduction Your portable DVD player plays digital video discs that conform to the universal DVD Video standard With it you can play movies with true cinema picture quality ...

Page 7: ...nit x 1 Second screen x 1 AC power adaptor x 1 DSA 9W 09 F DVE or AY4132 Philips Remote control Car adaptor x 1 AV cable x 2 Car mount travel bag x 1 Stereo headphone x 2 User Manual x 1 Quick Start Guide x 1 Overview of the main unit a BRIGHTNESS Adjusts screen brightness EN ...

Page 8: ...options relating to the current activity or selection g AV MODE Turns off the front panel display when the player is connected to TV h Charging indicator Power indicator i POWER Turns on off DVD player j VOL Increases or decreases volume k Headphone jack l AV OUT Audio video output jack m DC IN Power supply socket n IR Remote control sensor o Navigates through the menus Searches backward forward a...

Page 9: ...rview of the remote control a SETUP Accesses or exits the setup menu b DISPLAY Displays play information c ZOOM Zooms in or out of the picture d SUB Selects DVD subtitle language i j k l m e f h a b c d g EN ...

Page 10: ...returns to the menu g AUDIO For DVD selects an audio language For VCD selects an audio mode h ANGLE Selects a different viewing angle of a DVD i 0 9 Inputs numbers j Stops disc play k Adjusts brightness of the screen backlight l Navigates through the menus Searches backward forward at different speeds OK Confirms an entry or selection Starts pauses or resumes disc play m Skips to the previous or ne...

Page 11: ...o input jack c Headphone jack d VOL Decreases or increases volume e BRIGHTNESS Adjusts screen brightness f OFF ON Turns off on the second screen 3 Get started Caution Use the controls only as stated in this user manual Always follow the instructions in this chapter in sequence EN ...

Page 12: ...Never mix different brands or types of batteries Risk of product damage When the remote control is not used for long periods remove the batteries Perchlorate Material special handling may apply See www dtsc ca gov hazardouswaste perchlorate For first time use 1 Remove the protective tab to activate the remote control battery To replace the remote control battery 1 Open the battery compartment 2 Ins...

Page 13: ... front seat headrest a Position the bracket on the bars of the headrest b Fasten the screw to fix the bracket firmly on the bars 2 Fix the DVD mount bracket to the portable DVD player Note There are three holes on the bracket Use any one as you like 3 Aim the screw of the bracket to the screw nut on the back of the DVD player Screw tight the bracket onto the DVD player 4 Install the DVD player to th...

Page 14: ...on to release the DVD player from headrest To attach the second screen repeat the above steps Connect the second screen Caution Turn off your player before you connect the second screen A main unit B second screen 1 Connect the supplied AV cable to the AV OUT jack on the main unit the AV IN jack on the second screen En gl i sh EN ...

Page 15: ...ble connector end of the AC cable to the DC IN jack on the second screen 3 Connect the one connector end to the car cigarette lighter socket Use at home Connect power Caution Risk of product damage Ensure that the power supply voltage corresponds to the voltage pointed on the back or the underside of the player Risk of electric shock When you unplug the AC adaptor always pull the plug from the soc...

Page 16: ...ble is for the yellow video jack the red white cable is for the red white audio jacks Tip To conserve energy press AV MODE to turn off the front panel display 4 Use your player Turn on 1 Slide the POWER switch on the main unit The power indicator turns on To turn on the second screen slide the OFF ON switch on the second screen to the ON position Select OSD language You can choose a different lang...

Page 17: ... If not press OK If a menu appears select an item then press OK to start play To pause press OK Press again to resume play To stop press twice To select the previous next item press or To start search within video audio press or once or more Play options 1 During play press OPTION to select some play options For DVD Audio Subtitle Repeat Time Disp For VCD Audio Repeat Time Disp For audio CDs Repea...

Page 18: ... display options Display Setup Page Brightness Adjust screen brightness Contrast Adjust screen contrast Screen Display Select display ratio Battery Life Setup Page LCD Backlight Adjust the default brightness level of screen backlight Preference Page Audio Select audio language DVD Subtitle Select DVD subtitle language DivX Subtitle Select DivX subtitle language Disc Menu Select disc menu language ...

Page 19: ...rtuguese Spanish Swedish and Turkish Set the second screen You can also set the second screen To adjust volume level for the second screen press VOL on the second screen To adjust the brightness of the second screen press BRIGHTNESS on the second screen 6 Product information Note Product information is subject to change without prior notice Dimensions Main unit Second screen 200 x 155 x 39 mm 200 ...

Page 20: ...er and get support at www philips com welcome No power Ensure that both plugs of the mains cord are properly connected Ensure that there is power at the car cigarette lighter or AC outlet No sound Ensure that the AV cable is connected correctly Distorted picture Clean the disc With a clean soft lint free cloth wipe the disc outwards from the center Make sure that the video output format of the dis...

Page 21: ... to the remote control Ensure that the path between the remote control and the player is clear from obstacles From a close distance point the remote control directly at the player Replace the remote control batteries The function does not work for this disc Refer to the disc instructions The player feels warm When the player is in use for a long period of time its surface will be heated This is no...

Page 22: ... 2009 Koninklijke Philips Electronics N V All rights reserved ...

Reviews: