background image

15

EN


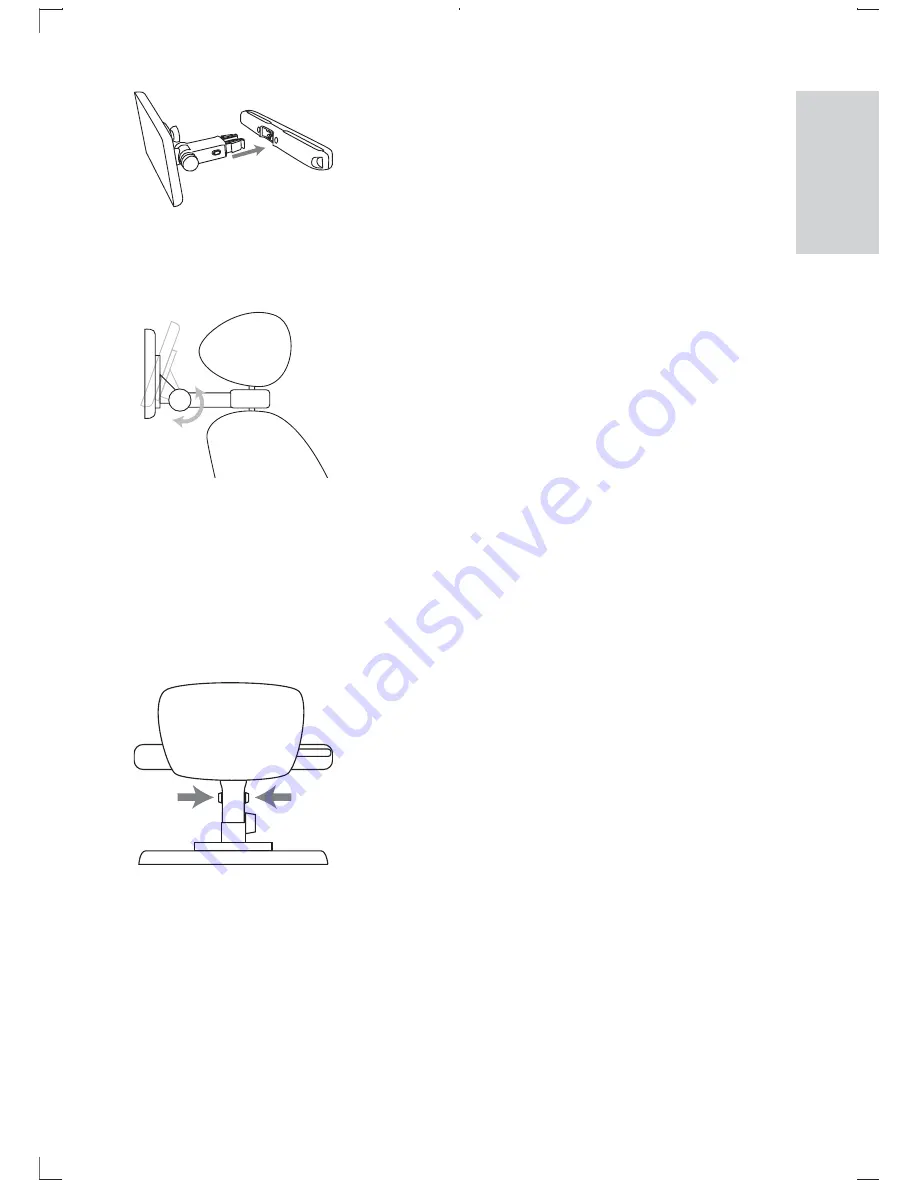
 Buckle DVD bracket into the headrest mount bracket.

Adjust the viewing angle.


Release the node.

Adjust the viewing angle as desired.

Fasten the node.

Press the release button to release the DVD player from headrest.


To attach the second screen, repeat the above steps.

English

Summary of Contents for PD7042

Page 1: ...om welcome PD7042 Mode d emploi 103 Manuale utente 129 Manual del usuario 155 Användarhandbok 181 User manual 3 Brugervejledning 27 Benutzerhandbuch 51 Gebruiksaanwijzing 77 Register your product and get support at ...

Page 2: ...er 10 Introduction 10 What s in the box 10 Overview of the main unit 11 3 Get started 13 Use on car 13 Use at home or outdoor 17 4 Use your player 19 Turn on 19 Select OSD language 19 Play discs 20 Play options 20 Adjust brightness of screen backlight 20 5 Adjust settings 21 Adjust settings 21 E nglis h ...

Page 3: ...4 EN 6 Product information 23 7 Troubleshooting 24 8 Notice 25 Recycling 25 Disposal of your old product and batteries 25 ...

Page 4: ...o not install near any heat sources such as radiators heat registers i For countries with a polarized mains do not defeat the safety purpose of the polarized or grounding type plug A polarized plug has two blades with one wider than the other A grounding type plug has two blades and a third grounding prong The wide blade or the third prong are provided for electrician for replacement of the obsole...

Page 5: ... plug is damaged liquid has been spilled or objects have fallen into the apparatus the apparatus has been exposed to rain or moisture does not operate normally or has been dropped o Battery usage CAUTION To prevent battery leakage which may result in bodily injury property damage or damage to the unit Install all batteries correctly and as marked on the unit Do not mix batteries old and new or car...

Page 6: ...olonged listening what sounds normal can actually be loud and harmful to your hearing To guard against this set your volume to a safe level before your hearing adapts and leave it there To establish a safe volume level Set your volume control at a low setting Slowly increase the sound until you can hear it comfortably and clearly without distortion Listen for reasonable periods of time Prolonged e...

Page 7: ...demarks of Dolby Laboratories This item incorporates copy protection technology that is protected by U S patents and other intellectual property rights of Rovi Corporation Reverse engineering and disassembly are prohibited ABOUT DIVXVIDEO DivX is a digital video format created by DivX Inc This F G HG FJ H K device must be registered in order to play DivXVideo on Demand VOD content To generate the ...

Page 8: ...9 EN This apparatus includes this label E nglis h ...

Page 9: ...et up You can also select sound track subtitle languages and different angle of view again depending on DVD disc Besides you can restrict the play of discs that are not suitable for children You can play the following discs on the DVD player including CD R CD RW DVD R and DVD RW DVD Video Video CD Audio CD MP3 CD DivX ZF What s in the box Check and identify the contents of your package Main unit x...

Page 10: ...setup menu c Skips to the previous or next title chapter or track d OPEN Opens the disc compartment e DISC MENU For DVD accesses or exits disc menu ForVCD turns on or off PBC Playback Control mode ForVCD version 2 0 or SVCD with PBC turned on returns to the menu a h i j k l m n o b c d e f g E nglis h ...

Page 11: ...ches between the DVD and audio video AV input mode i Power and charging indicator j ON OFF Turns on off DVD player k VOL Increases or decreases volume l Headphone jack m AV OUT Audio video output jack n DC IN Power supply socket o Navigates menus Searches backward forward at different speeds OK Starts pauses or resumes disc play Stops disc play ...

Page 12: ...k of the apparatus Write the numbers here Model No __________________________ Serial No ___________________________ Use on car Preparation Warning Remove the mounting kit and the DVD player from the seat when the DVD player is not in use To use the player in a car attach the main unit and the second screen to the back of the front seat headrests A DVD player fastening screw node B Viewing angle ad...

Page 13: ... of the headrest b 0 2 Fix the DVD mount bracket to the portable DVD player Note There are three holes on the bracket Use any one as you like 3 Aim the screw of the bracket to the screw nut on the back of the DVD player Screw tight the bracket onto the DVD player 4 Install the DVD player to the headrest ...

Page 14: ... mount bracket 5 Adjust the viewing angle a Release the node b Adjust the viewing angle as desired c Fasten the node 6 Press the release button to release the DVD player from headrest To attach the second screen repeat the above steps E nglis h ...

Page 15: ...yer 1 Connect the supplied car adaptor to the DC IN jack on the player 2 Connect the other end of the car adaptor to the car cigarette lighter socket Connect a player as dual screen 1 Connect the supplied AV cable to the AV OUT jacks on the players 2 Slide DVD AV IN switch on the player which is to be used as dual screen to AV IN The two players play the same content ...

Page 16: ...e plug from the socket Never pull the cable Use only the supplied AC adaptor to charge the battery Charge the player in power off mode only Perchlorate Material special handling may apply See www dtsc ca gov hazardouswaste perchlorate 1 Connect the supplied AC adaptor to the player and to the AC outlet 2 Slide the ON OFF switch to OFF position The CHR indicator turns on red When the battery is ful...

Page 17: ...rged Connect to TV Caution Turn off your player before connecting to any additional equipment Match the color of the AV cables the AV cable connected toTV is not supplied with the jacks the yellow cable is for the yellow video jack the red white cable is for the red white audio jacks L R VIDEO IN ...

Page 18: ...ose a different language for the on screen display text 1 Slide the DVD AV IN switch to DVD 2 Press SETUP The setup menu is displayed 3 Go to General Setup Page OSD Lang on screen display language 4 Press to select an option 5 Press OK 6 Press SETUP to exit Video Batt Life Last Memory Deutsch Set OSD Language Italiano Espanol E nglis h ...

Page 19: ...again to resume play To stop press twice To select the previous next item press or To start search within video audio press or once or more Play options 1 During play press OPTIONS to select some play options 2 Follow the on screen instructions Adjust brightness of screen backlight Note You can adjusts brightness of the screen backlight to match lighting conditions During play press BRIGHTNESS rep...

Page 20: ...t play from the point where the video was stopped last time Angle Mark Select angle mark display options Video Setup Page Brightness Adjust screen brightness Contrast Adjust screen contrast 9 Select a display ratio 9 Select aTV standard Battery Life Setup Page LCD Backlight Adjust the default brightness level of screen backlight Preference Page Preference Audio Select a audio language Subtitle Sel...

Page 21: ...title Select a DivX subtitle language Password Change the password 3308 by default DivXVOD Get DivX registration code Default Restore original settings 3 Press to go back to previous menu level 4 Press SETUP to exit ...

Page 22: ...utput DC 9 12V 0 8A minimum Power consumption 7 2 W Operating temperature range 0 45 C Laser wavelength 650 nm Video output Format PAL NTSC Output level 1Vp p 20 Load impedance 75 Audio line out Audio out analog audio Output level 2V 10 Load impedance 10 K Audio distortion noise 80 1KHz Frequency response 20Hz 20KHz 1dB Signal noise ratio 80 dB Channel separation 80 dB Dynamic range 80 dB E nglis ...

Page 23: ...Q Clean the disc With a clean soft lint free cloth wipe the disc outwards from the center Q Make sure that the video output format of the disc is compatible with theTV Q Change the video output format to match yourTV or program Q The LCD is manufactured using high precision technology You may however see tiny black points and or bright points red blue green that continuously appear on the LCD This...

Page 24: ...ectronic products The correct disposal of your old product helps prevent potentially negative consequences on the environment and human health Disposal of your old product and batteries Your product is designed and manufactured with high quality materials and components which can be recycled and reused Never dispose of your product with other household waste Please inform yourself about the local ...

Page 25: ... local regulations regarding the disposal of packaging materials exhausted batteries and old equipment This product complies with the radio interference requirements of the European Community Your product contains batteries covered by the European Directive 2006 66 EC which cannot be disposed of with normal household waste Please inform yourself about the local rules on separate collection of batt...

Page 26: ...Specifications are subject to change without notice 2011 Koninklijke Philips Electronics N V All rights reserved PD7042_12_UM_V1 1 ...

Reviews: