background image

P-SCAN

ON       OFF

Pb

DIGITAL 

OUT

DIGITAL 

IN

AUX

IN

TV
IN

LINE

OUT

AUDIO

VIDEO 

OUT

CVBS

S-VIDEO

FM ANTENNA

AM

L

R

~ AC MAINS

SPEAKER SYSTEMS (8

)

SUB-

WOOFER

SURROUND

CENTER

FRONT

L

R

SL

SUB

SR

C

Pr

Y

Front Speaker 

(Right)

Center Speaker

Front Speaker 

(Left)

Rear Speaker 

(Surround Left)

.047"

(12mm)

PUSH IN

PUSH

DOWN

Subwoofer

a

b

c

Rear Speaker 

(Surround Right)

FM Antenna

AM Antenna

Rear of TV 

(example only)

75 

V

L

R

AUDIO

OUT

S-VIDEO 

IN

VIDEO IN

P

r/Cr

P

b/Cb

Y

Y

MX5500D

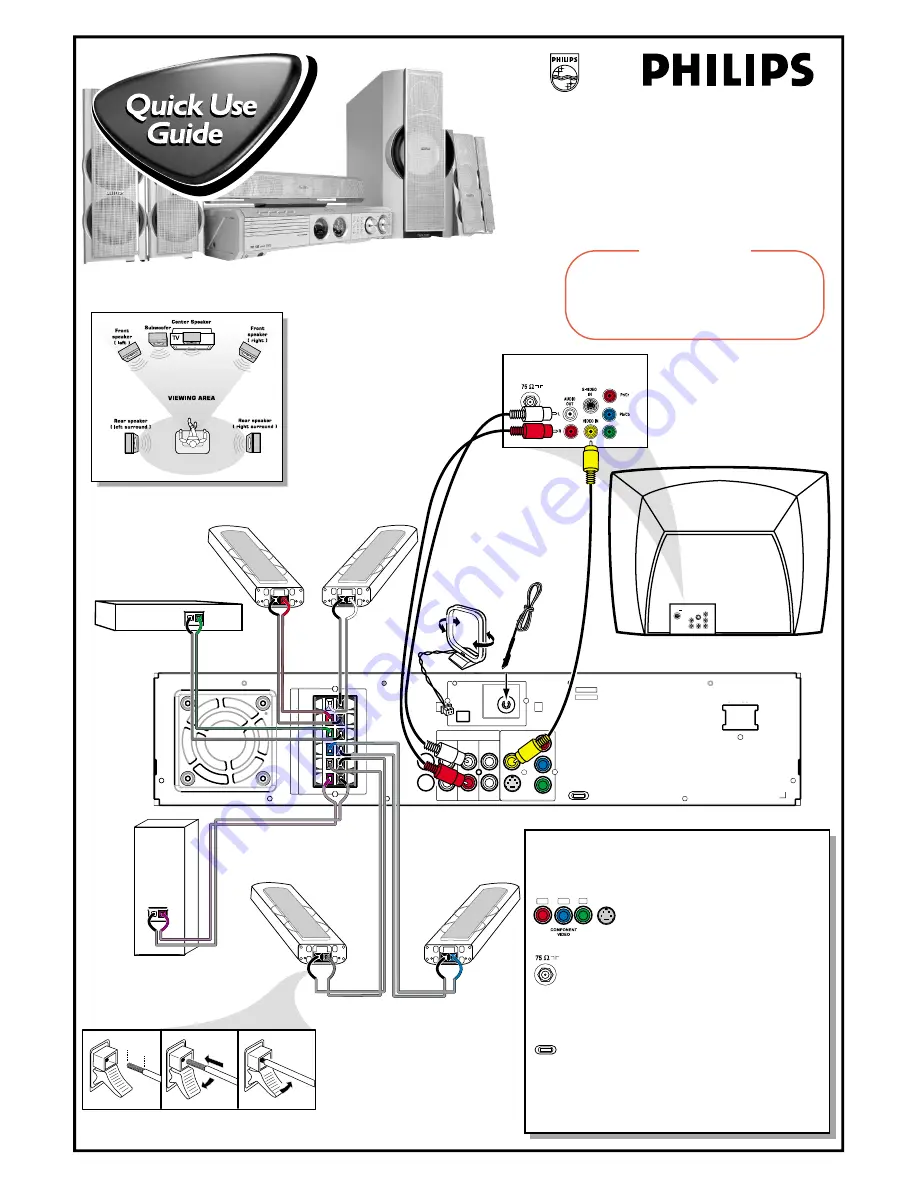
Use this simple and quick way to

watch your favorite DVD movie

and enjoy your Home Cinema

experience!

Connecting Speaker Cable

Recommended Speaker Setup

Helpful Hints

You only need to make one video connection to your TV in
order to view the DVD playback.

If your TV has S-Video or Component
(Pr Pb Y) video jacks

, use one of these

video connections instead for higher picture
quality.

If your TV has only a single Antenna In jack

, you

will need an accessory RF modulator.  The RF modulator
converts the video from the DVD system so it can play
through the TV’s Antenna connector. Refer to your
owner’s manual for proper connection.

Do not switch the


P-SCAN


to ‘ON’  position

,

unless you have connected the DVD system to a
Progressive Scan TV using the Component (Pr Pb Y)
video jacks.

When listening to TV programs

, press 

TV/AV

 button on

the remote to set the DVD system to TV/AV mode in order for
the sound to be heard.

Pr/Cr

Pb/Cb

Y

S-VIDEO 

IN

ANTENNA IN

P-SCAN

ON       OFF

12nc: 3139 115 22081

Printed in China

IMPORTANT!

Attach the front speakers and the rear (surround)

speakers to the mini speaker stands before making

the connections to the DVD system.

Refer to owner’s manual for detailed set up

instructions.

Summary of Contents for MX5500D/37

Page 1: ...has S Video or Component Pr PbY video jacks use one of these video connections instead for higher picture quality If yourTV has only a single Antenna In jack you will need an accessory RF modulator The RF modulator converts the video from the DVD system so it can play through theTV s Antenna connector Refer to your owner s manual for proper connection Do not switch the P SCAN to ON position unless...

Page 2: ...des Do not use channel 3 or 4 on theTV unless you are using an RF modulator See yourTV manual for more details 3 Press OPEN CLOSE 0 on the front of the DVD system and load a disc then press the corresponding OPEN CLOSE 0 again to close the disc tray Make sure the disc label is facing up For double sided discs load the side you want to play face up 4 Playback will start automatically If a disc menu...

Page 3: ...ips representatives are ready to help you with any questions about your new product We can guide you through Connections First time Setup or any of the Features We want you to start enjoying your new product right away CALL US BEFORE YOU CONSIDER RETURNING THE PRODUCT 1 800 531 0039 or Visit us on the web at www philips com MX5500D MX5500D ...

Page 4: ... as set out in the Radio Interference Regulations of the Canadian Department of Communications Français Cet appareil numérique n emet pas de bruits radioélectriques dépassant les limites applicables aux appareils numériques de Class B prescrites dans le Règlement sur le Brouillage Radioélectrique édicté par le Ministère des Communications du Canada Manufactured under license from Dolby Laboratorie...

Page 5: ...RCE VOLUME PROG TUNING CLOCK TIMER SURROUND SEARCH 5 DISC CHANGER OPEN CLOSE EJECT MEDIA SLOT DVD DI SC SU R R RI G H T CENTRE L E FT SUB S U R L 0 9 7 5 3 1 2 4 6 8 TV AV DISC MEDIA TUNER AUX DI 1 2 3 4 5 6 7 8 9 0 REPEAT REPEAT DISC SKIP DISC MENU PROGRAM SYSTEM MENU DIM SLEEP SUB TV VOL VOICE MUTE SEATING ZOOM PREV NEXT STOP PLAY PAUSE A B SURR SOUND VOL OK 0 º ª fi ...

Page 6: ... qualify for as the owner of your model t This bolt of lightning indi cates uninsulated material within your unit may cause an electrical shock For the safety of everyone in your household please do not remove product covering s The exclamation point calls attention to features for which you should read the enclosed literature closely to prevent operating and maintenance problems WARNING TO PREVEN...

Page 7: ...e guarantees you ll receive all the information and special offers for which you qualify plus easy access to accessories from our convenient home shopping network And most importantly you can count on our uncompromising commitment to your total satisfaction All of this is our way of saying welcome and thanks for investing in a Philips product Sincerely Lawrence J Blanford President and Chief Execu...

Page 8: ...t or table specified by the manufacturer or sold with the apparatus When a cart is used use caution when moving the cart apparatus combination to avoid injury from tip over 13 Unplug this apparatus during lightning storms or when unused for long periods of time 14 Refer all servicing to qualified service personnel Servicing is required when the apparatus has been damaged in any way such as power s...

Page 9: ...luding interference that may cause undesired operation Environmental information All unnecessary packaging has been omitted We have tried to make the packaging easy to separate into three materials cardboard box polystyrene foam buffer and polyethylene bags protective foam sheet Your system consists of materials which can be recycled and reused if disassembled by a specialized company Please obser...

Page 10: ...emote control 21 Selecting the color system that corresponds to yourTV 21 Step 4 Selecting speaker layout 22 Changing seating control position 22 Setting the speakers channels 23 Step 5 Setting language preference 23 Disc Operations Playable discs 24 Playing discs 24 Turning on off auto Eco standby mode 25 Using the Disc Menu 25 Basic playback controls 25 Resuming playback from the last stopped po...

Page 11: ...ndVolume Controls Sound Control 41 Selecting surround sound 41 Turning on off clear voice effect 41 Changing subwoofer volume level 41 Adjusting Bass Treble level 41 Selecting digital sound effects 41 Volume Control 41 Other Functions Switching on off 42 Switching to active mode 42 Switching to Eco Power standby mode 42 Switching to standby mode view clock 42 Dimming system s display screen 42 Rec...

Page 12: ...S Care of disc To clean a CD wipe it in a straight line from the center towards the edge using a soft lint free cloth Do not use cleaning agents as they may damage the disc Write only on the printed side of a CDR W and only with a soft felt tipped pen Handle the disc by its edge do not touch the surface Care of the cabinet Use a soft cloth slightly moistened with a mild detergent solution Do not u...

Page 13: ...rs too close to your TV Allow adequate ventilation around the DVD system 1 1 3 3 2 4 Center speaker and DVD system Front Speaker Left Front Speaker Right Surround Speaker Left Surround Speaker Right Subwoofer Connections Step 1 Set up the speakers 1 Before connecting the speakers to the DVD system firmly attach the mini speaker stands to the front and the surround speakers using the supplied screw...

Page 14: ...he P SCAN switch to OFF Connections P SCAN ON OFF Pb DIGITAL OUT DIGITAL IN AUX IN TV IN LINE OUT AUDIO VIDEO OUT CVBS S VIDEO FM ANTENNA AM L R WOOFER SURROUND CENTER FRONT L R SL SUB SR C Y AUDIO OUT Pr Cr Pb Cb Y S VIDEO IN VIDEO IN COMPONENT VIDEO IN AUDIO OUT Pr Cr Pb Cb Y S VIDEO IN VIDEO IN COMPONENT VIDEO IN 2 1 3 Pr IMPORTANT If both S Video and Component Pr PbY Video connections are used...

Page 15: ...plied to connect the DVD system s S VIDEO OUT jack to the S Video input jack or labeled asY C or S VHS on theTV 2 To hear theTV channels through this DVD system use the audio cables white red to connect TV IN L R jacks to the corresponding AUDIO OUT jacks on theTV 3 Set the P SCAN switch to OFF IMPORTANT If yourTV only has a single Antenna In jack or labeled as 75 ohm or RF In you will need an RF ...

Page 16: ...ion of this manual DIGITAL OUT DIGITAL IN AUX IN L R SPEAKER SYSTEMS SUB WOOFER SURROUND CENTER FRONT L R SL SUB SR C Front Right Front Left Surround Right Surround Left Subwoofer Center Connections FM ANTENNA AM SPEAKER SYSTEMS SUB WOOFER SURROUND CENTER FRONT L R SL SUB SR C DIGITAL OUT DIGITAL IN AUX IN TV IN LINE OUT AUDIO VIDEO OUT CVBS S VIDEO L R Pr Pb Y 1 2 FM antenna AM antenna fix the cl...

Page 17: ...er cord to the power outlet Never make or change any connections with the power switched on On the DVD system AUTO INSTALL PRESS PLAY may appear on the display panel Press É Å on the front panel to store all available radio stations or press Ç to exit see page 37 Tuner Operations DVD VIDEO DIGITAL SURROUND SYSTEM STOP PLAY PAUSE SEATING TREBLE BASS SOURCE VOLUME PROG TUNING CLOCK TIMER SURROUND SE...

Page 18: ...ect the DVD system s AUX IN R L jacks to the AUDIO OUT jacks on theVCR or cable satellite box Before starting operation press AUX DI on the remote to select AUX in order to activate the input source Using theVCR for recording DVDs Some DVDs are copy protected You cannot record or dub protected discs using aVCR 3 Connect the DVD system s CVBS jack to the VIDEO IN jack on theVCR 4 Connect the DVD sy...

Page 19: ...mote to select DI in order to activate the input source Recording digital 2 Connect the DVD system s DIGITAL OUT jack to the DIGITAL IN jack on a digital recording device DTS DigitalTheater System compatible with a Dolby Digital decoder for example Before starting operation set the DIGITAL OUTPUT according to the audio connection See page 33 Setting the digital output Connections optional for exam...

Page 20: ...n installation only on the main unit see page 37 Ç STOP Exits an operation DISC stops playback or clears a program see page 25 27 TUNER erases a preset radio station see page 38 S SEARCH T PREV NEXT DISC searches backward forward or selects a track see page 25 TUNER tunes the radio frequency up down or selects a preset radio station see pages 37 38 On the remote it can only tunes the radio frequen...

Page 21: ...channel mode Turns on off clear voice sound effect see page 41 MUTE Mutes or restores the volume see page 41 DIM Turns on off the dim mode see page 42 SLEEP Sets the sleep timer function see page 40 SUB Adjusts subwoofer s sound level see page 41 ª TVVOL AdjustsTV volume PhilipsTV only see page 42 º REPEAT A B Repeats a specific section on a disc see page 26 ZOOM Enlarges a picture on theTV screen...

Page 22: ... 4 6 SELECT CLOCK OR TIMER CLOCK 01 38 PM 13 38 13 38 1 Press STANDBY ON to switch on the DVD system 2 Press and hold CLOCK TIMER until SELECT CLOCK OR TIMER appears 3 Press T if necessary to change the display to CLOCK then press CLOCK TIMER again to confirm 4 Press S T to set the minutes and hours To increase the speed hold down S or T The changes in minutes will roll over to the hours 5 Press P...

Page 23: ...ceeding to next step If playback begins press Ç to stop playback 2 Press and hold DISC MEDIA on the remote until PAL or NTSC appears on the display panel To change the setting repeat step 2 Selecting the color system that corresponds to yourTV This DVD system is compatible with both NTSC and PAL In order for a DVD to play on this DVD system the color system of the DVD theTV and the DVD system shou...

Page 24: ...matically adjust for optimum performance DISC MENU SYSTEM MENU SEATING ZOOM PREV NEXT VOL 7 8 9 0 SOUND SURR 3 1 2 4 1 Press SURR or SURROUND on the front panel repeatedly to select Multi channel 2 Press SEATING The seating control diagram which represents your current speaker layout appears on theTV screen To change the speaker layout see Selecting speaker layout 3 Use the joystick 1 2 3 4 on the...

Page 25: ...e the menu Press SYSTEM MENU Step 5 Setting language preference You can select your preferred language settings so that this DVD system will automatically switch to the language for you whenever you load a disc If the language selected is not available on the disc the disc s default setting language will be used instead Except the DVD system s menu language it will remain once selected 1 In disc m...

Page 26: ...TANT If the inhibit icon or X appears on theTV screen when a button is pressed it means the function is not available on the current disc or at the current time Playing discs 1 Adjust SOURCE control until DISC X appears on the display panel or press DISC MEDIA on the remote 2 Turn on theTV power and set to the correct Video In channel See page 21 Setting the TV You should see the blue Philips DVD ...

Page 27: ...ront panel DVD system s display panel Turning on off auto Eco standby mode This is a power saving feature the system will automatically switch to Eco standby mode if you do not press any buttons within 30 minutes after a disc has stopped playing 1 2 STANDBY ON STOP 13 38 AUTO ECO ON 1 Press and hold STANDBY ON to switch the system to standby mode The clock appears 2 Press and hold Ç until AUTO ECO...

Page 28: ... point 2 Press REPEAT A B again at the point to end the section The section A and B can be set only within the same chapter track The section will now repeat continuously 3 Press REPEAT A B again to resume normal playback Program favorite tracks audio CDs andVCDs You can play the contents of the disc in the order you want by programming the order of the tracks to be played Up to 99 tracks can be s...

Page 29: ... If the DVD system is disconnected from the power supply the program will be erased Using the menu bar to program IMPORTANT You have to turn on yourTV and set to the correctVideo In channel See page 21 Setting the TV Disc Operations 1 Stop playback then press SYSTEM MENU The menu bar will appear across the top of theTV screen 2 Use the joystick 1 2 to select and press 4 to enter the program menu 3...

Page 30: ...toggle between program on and off To clear the program Stop playback then press and hold Ç Note Repeat function is not possible during MP3 program playback Disc Operations REPEAT REPEAT DISC SKIP DISC MENU PROGRAM SYSTEM MENU SEATING ZOOM PREV NEXT STOP PLAY PAUSE OK 1 6 2 3 5 3 Playing MP3 Picture disc Kodak JPEG IMPORTANT You have to turn on yourTV and set to the correctVideo In channel See page...

Page 31: ...camcorder or digital camera with memory card function JPEG images stored in a memory card using a memory card adaptor for PC MP3 files Directories Memory card Picture CD Media Slot Operations Playing JPEG pictures from memory card 1 Remove the memory card from your digital camera and plug it into the PC card adaptor not supplied 2 Insert the PC card adaptor into the media slot on your player 3 Adj...

Page 32: ...OM OFF from the menu ANGLE for DVD only Select to view the same scene from different angles if the DVD is recorded with multiple angles STEP FORWARD Select to advance the still picture one frame forward To resume normal playback press ÉÅ PBC ON OFF for VCD 2 0 with PBC feature Select between PBC On and Off PBC OFF the playback will start automatically PROGRAM Stop playback then select this to ente...

Page 33: ...NU NOTE Some of the features in the Setup Menu are described in Getting Started Setting theTV shape The format you select must be available on the disc If it is not the setting forTV Shape will not affect the picture during playback Follow the steps of Using the Setup Menu and select TV Shape 4 3 panscan 4 3 letterbox 16 9 Set TV shape mode TV Shape TVSystem VideoOutput Screensaver 4 3 panscan Sel...

Page 34: ...en saver function On Select this if you wish to dim theTV screen when disc playback is stopped or paused for more than five minutes It is to prevent your display device from becoming damaged Setting the analog output Set Analog Output to match your DVD home cinema system s playback capability This function can also be accessed via the SURR button on the remote control or SURROUND on the front pane...

Page 35: ...select PCM only the surround mode will automatically change to STEREO Setting the PCM output Set your PCM Pulse Code Modulation output only after you have set the system s Digital Output to PCM only See Setting the digital output Follow the steps of Using the Setup Menu and select PCM Output 48 kHz 96 kHz Set PCM output to 48K or 96K DigitalOutput AnalogOutput Nightmode Speakers SpeakerLayout PCM ...

Page 36: ...ut the volume High volume outputs will be softened and low volume outputs are brought upward to an audible level This feature is only available for movies with Dolby Digital mode Restoring to original settings Follow the steps of Using the Setup Menu and select Defaults Reset Load factory settings ParentalControl Password Defaults MenuLanguage Reset Pressing 2 on the remote will restore all the it...

Page 37: ...a higher level rating To disable Parental Controls and have all discs play choose NO PARENTAL Set Parental control Parental Control Password MenuLanguage Defaults 6 Press SYSTEM MENU again to remove the menu Rating explanations NO PARENTAL It will play all discs 8 ADULT Mature material should be viewed only by adults due to graphic sexual material violence or language 7 NC 17 No children under age...

Page 38: ... 5 6 1 2 3 7 8 9 0 SURR SOUND 1 7 2 3 6 4 5 SETUP MENU Change Change password ParentalControl Password MenuLanguage Defaults DVD Menu Options 4 Use the numeric keypad 0 9 to enter your original four digit password at Enter code If you are asked to enter the code for the first time key in 1234 If you forget your password press Ç four times to restore to the default password 1234 5 Enter your new fo...

Page 39: ...TUNING FREQ MODE appears Presetting radio stations You can store up to 40 preset radio stations in the memory starting from FM and followed by AM bands Notes The system will exit presetting mode if no button is pressed within 20 seconds If no stereo frequency is detected during Plug and Play CHECK ANTENNA appears Using the Plug and Play Plug and Play allows you to store all available radio station...

Page 40: ...tored in one of the presets the same radio station will not store under another preset number If no preset number is selected automatic preset will begin from preset 1 and all your former presets will be overridden Tuner Operations Manual presetting You can choose to store only your favorite radio stations 1 In tuner mode press PROGRAM or PROG on the front panel 2 Press 1 2 or use the numeric keyp...

Page 41: ...minutes will roll over to the hours 6 Press CLOCK TIMER again to store the setting Once the timer is set it will always switch on unless you deactivate it icon will remain on the display panel It indicates the timer is activated At the preset time the selected sound source will play for 30 minutes before it switches to Eco Power standby mode if no button is being pressed within the time frame DISC...

Page 42: ...15 SLEEP will show on the display panel except if OFF is selected Before the system switches to Eco Power standby mode a countdown of 10 seconds is displayed SLEEP 10 SLEEP 9 SLEEP 1 SLEEP To check or change the setting Press SLEEP once to show the remaining time before switching off If you continue pressing the SLEEP button the next SleepTimer option will appear on the display panel To cancel the...

Page 43: ... select CLEAR VOICE OFF Changing subwoofer volume level Press SUB on the remote to adjust subwoofer volume level 6dB to 6dB Adjusting Bass Treble level The BASS low tone andTREBLE high tone features enable you to define the sound processor settings 1 Press BASS or TREBLE The level indicator appears 2 Within five seconds use the VOLUME control to adjust the Bass orTreble level 3 to 3 If the volume ...

Page 44: ...g device to LINE OUT or DIGITAL OUT See pages 16 17 Connections optional 2 Select the source to record from your DVD system DISC MEDIA SLOT TUNER TV AV or AUX DI and start playback if necessary You can only record from DISC if using DIGITAL OUT to connect the external recording device 3 Start recording on the external recording device Notes All the sound control features are available for selectio...

Page 45: ... CompositeVideo Output 1 0Vp p 75 Ω S Video Output Y 1 0Vp p 75 Ω C 0 286Vp p 75 Ω Audio DAC 24 Bits 96 kHz Frequency Response 4 Hz 20 kHz 44 1 kHz 4 Hz 22 kHz 48 kHz 4 Hz 44 kHz 96 kHz Digital Output Input SPDIF Sony Philips digital interface Coaxial PCM IEC 60958 Dolby Digital DTS IEC 60958 IEC 61937 MAIN UNIT Power Supply Rating 120V 60 Hz Power Consumption 155 W Dimensions w x h x d 435 mm x 1...

Page 46: ...ressive ScanTV Check the video connection If both S Video and Component Pr PbY Video connections are used to connect to your TV the video signal will go to S Video automatically every time when you power up the DVD system To change the setting refer to Video Output see page 32 Sometimes a small amount of picture distortion may appear This is not a malfunction Clean the disc see page 10 TVs have a ...

Page 47: ...d surround speakers are connected correctly see page 14 Press SURROUND button to select a correct surround sound setting see page 41 Make sure the source you are playing is recorded or broadcast in surround sound DTS Dolby Digital etc If the signal is too weak adjust the antenna or connect an external antenna for better reception Increase the distance between the system and yourTV or VCR Tune in t...

Page 48: ...ft and right surround left and right and center DTS DigitalTheater Systems This is a surround sound system but it is different from Dolby Digital The formats were developed by different companies JPEG A still picture data compression system proposed by the Joint Photographic Expert Group which features small decrease in image quality in spite of its high compression ratio MP3 A file format with a ...

Page 49: ...to digital data Sampling frequency numerically represents how many time the original analog signal is sampled per second Seating control It gives the user a perfect sound and movie experience anywhere in the room providing maximum flexibility and real total immersion because the user can choose their preferred seat Surround A system for creating realistic three dimensional sound fields full of rea...

Page 50: ...product the local Philips service organization will attempt to provide service although there may be a delay if the appropriate spare parts and technical manual s are not readily available MAKE SUREYOU KEEP Please keep your sales receipt or other document showing proof of purchase Attach it to this owner s manual and keep both nearby Also keep the original box and packing material in case you need...

Reviews: