background image

40

H

in

ts & t

ip

s

v

 Please note that each additional cordless 

handset must be GAP-compatible. Check 

with your dealer.

1

  On your base station, press 

M

81

 and 

OK

.

2

  Use the numerical keypad to enter a four-digit 

pin code, or press 

OK

 to accept the default 

code 

0000

. Press 

OK

.

3

  On the additional cordless handset press 

/

51

. Con

fi

 rm 

AUTO

 with 

OK

. The cordless 

handset is now automatically registered on the 
base station and accepts the pin code from 
the base station.

After the registration process the display shows 

the number under which the cordless handset is 
registered on the base station (for example 

2

).

  Deregistering

If  you would like to deregister an additional cord-

less handset from your base station, the proce-
dure is as follows:

1

  On your base station, press 

M

82

 and 

OK

.

2

 On the numeric keypad, enter the cord-

less handset you want to deregister. Press 

OK

handset


2

Your base station will now release the connection 

to the additional cordless handset.

 Registering a cordless handset on more 

than one base station

You can register a cordless handset on up to four 

base stations.

1

  Register your cordless handset automatically 

on the 

fi

 rst base station, as described above.

2

  On the second base station, press 

M

81


and 

OK

.

3

  Use the numerical keypad to enter a four-digit 

pin code, or press 

OK

 to accept the default 

code 

0000

. The pin code may be identical to 

the pin code on the 

fi

 rst base station. Con

fi

 rm 

with 

OK

.

4

  On the cordless handset press 

/

51

 and 

select 

Custom

. Con

fi

 rm with 

OK

.

5

 Use 

/

 to select a free storage location and 

con

fi

 rm with 

OK

.

6

  Enter the same pin code that you set on the 

second base station and con

fi

 rm  with 

OK

The cordless handset is establishing a connec-

tion to the base station; this may take a few 
moments.

7

 Use 

/

 to select the number you want to use 

to register the cordless handset on the second 
base station. This number appears on the dis-
play of  the cordless handset when it is set to 
the second base station. Con

fi

 rm with 

OK

.

8

 Repeat steps 

2

 to 

7

 to register your cordless 

handset to further base stations (maximum of  
four base stations).

 Priority

With function 52 you can de

fi

 ne the base station 

via which you make phone calls if  you have reg-

istered your cordless handset to more than one 
base station. If  you select the 

None

 option, the 

cordless handset will automatically set itself  to 
the base station in range.

1

  On the cordless handset, press 

/

 and 

52

.

2

  From the list of  base stations, select the one 

to which you want to assign priority, or select 

None

.

3

 Con

fi

 rm with 

OK

. Press 

C

 twice.

v

 If  the required language does not appear 

on the display of  your cordless handset, 
check whether the cordless handset is reg-
istered to the base station. Use function 

202 to set the display language on the base 

station (see chapter 

Settings 

/    Country 

and language).

 Care and maintenance

 Cleaning the machine

Use a soft, 

fl

 uff-free cloth. You can also use a 

special cloth for cleaning machines (see Order-
ing Service). Never use liquid or gaseous cleaning 
agents (sprays, scouring agents, polishes, alcohol 
etc.). Do not allow any moisture to penetrate in-
side the device.

 Cleaning the scanner glass

1

  Open the scanner cover. 

Summary of Contents for MF-JET 495

Page 1: ...PHILIPS ...

Page 2: ...el paper exit tray Display symbols on the base station Cordless handset Display symbols on the cordless handset à if the à symbol lights up the rechargeable battery is charged If the ì symbol appears on the display the rechargeable battery is almost flat silent ringing lights up when you make a call and flashes when you receive a call W an SMS has been received and can be read on the dis play of t...

Page 3: ...opy w help Á scan X stop return to stand by mode M to select functions v if this symbol flashes please read the information on the display send SMS the lamp above the button lights up if you receive an SMS message call up directory entries choose between options move the cursor on the display C return to previous menu to delete OK confirm selec tion keypad for numbers keypad for text input ...

Page 4: ...phone calls On your cordless handset you can delete the redial list or check the duration of the last fax transmission or last telephone call see chapter Hints tips Logs 3 Ring tone 3 RING On your cordless handset you can select a ring tone and adjust the ring volume see chapter Cordless handset Ringer volume You can switch to silent mode with the function 33 see chap ter Cordless handset Silent c...

Page 5: ...l reception 21 Audible signals 21 Muting 21 Internal phone calls 21 Additional telephone 21 Locate the cordless handset 22 Switching on and off 22 Fax 23 Sending a fax Y 23 Directory 23 Redial L 24 Broadcast À 25 Resolution f F 25 Contrast O 25 Receiving faxes 25 Memory lock 25 Send report 26 Delayed transmission 26 Polling 26 Copy 27 Inserting a document 27 Standard copy K 27 Optional copy K 27 S...

Page 6: ...y only be opened by authorised service personnel Unplug the MF JET 495 from the mains and telephone line before cleaning Do not use liquid or aerosol cleaning agents such as sprays alcohol or polishes Do not expose the machine to rain or any other form of moisture There is a risk of electric shock or fire If any liquid is accidentally spilled into the MF JET 495 immediately remove the power plug a...

Page 7: ... is A4 210 297 mm 80 g m Follow the instructions of the manufacturer v Do not load paper while the MF JET 495 is printing In the event of a paper jam see chapter Hints and tips Paper feed Installation Unpacking Unpack the box and check that it includes the following telephone cable with plug country specific mains cable with plug power supply ink cartridges and starter card Plug n Print paper tray...

Page 8: ...ry compartment 2 Close the battery compartment v The base station and cordless handset are matched to one another at the factory You do not have to make any adjustments Before you use the handset for the first time the rechargeable batteries need to recharge for at least 12 hours Do not use the cordless handset any fur ther than 50 m indoors and 300 m out doors from the base station The cordless h...

Page 9: ... on the same line there is no guarantee that a particular SMS will be received on your multifunctional machine or on the other handset However you can only receive SMS messages on one device at any one time Try to disable SMS reception on the additional cordless phone If you intend using special auxiliary devices with your multifunctional machine please contact your dealer Same socket You can conn...

Page 10: ...s of the original type Original cordless handsets can be ordered using the enclosed order form or contact ing the call center see chapter Hints tips Ordering information Power supply Connect the power supply unit to the back of your MF JET 495 at the side Then use the mains cable to connect the power supply unit to the mains After you have connected the multifunctional device to the mains it will ...

Page 11: ...emove card Repeat the process with the same card for the second cartridge Cartridge alignment After the ink cartridges have been inserted your multifunctional machine will print a test page that will help you align the print heads of the two car tridges correctly This is necessary to achieve the best possible print quality 1 Use the number keypad to enter the number of the field in which the arrow...

Page 12: ...Photo Impression for creative processing and improved print quality for your digital photos 3 Paper Port for quicker management of your scanned documents 4 Acrobat Reader for display and printing of PDF data v First install the software Connect the MF JET 495 to the PC with a USB cable only when instructed to do so by the installation program Before starting the installation program close all open...

Page 13: ... on the screen and connect the machine to the PC with a USB ca ble Click on Next to confirm high speed systems will open the window described in 7 without confirmation The USB port is at the back of the machine 7 Click on Next to confirm The installation program will automatically search for a suit able driver for your MF JET 495 8 Make sure the CD ROM drives button is highlighted and click on Nex...

Page 14: ... running Installing individual products 1 In the start window click on Install pro ducts 2 If you want to install specific products click on Advanced 3 Select a product by clicking on relevant but ton Example Installing Photo Impression Click Next and follow the instructions on the screen You will be prompted to accept a license agreement The program offers you a default directory where Photo Impr...

Page 15: ...ant product A PDF file gives you information on the selected product Contents of the installation CD To find out what s on the installation CD click on the Browse contents button in the start window Uninstalling the products 1 To delete a product once it has been installed click on the Uninstall products button in the start window If you want to uninstall all the products click on All After Photo ...

Page 16: ...with Paper Port You can choose Repair or Remove Follow the instructions on the screen 2 If you want to delete specific products click on Advanced The CD ROM will take you through the uninstall process for the selected product v Click on Menu at any time to return to the start window ...

Page 17: ...elect function 202 LANGUAGE and press OK Choose with and press OK v The cordless handset automatically takes over the setting you have made on the base station HELP function w Press w twice You will receive a printout ex plaining how to use the most important func tions It also specifies how to obtain further HELP pages concerning other features of your machine ISDN connection Your multifunctional...

Page 18: ...ive faxes immediately set the number of fax rings to 0 zero Your cordless handset will ring with a short delay because the fax switch has to check whether a fax is to be received Completely silent operation If for example you do not wish to be disturbed by calls or faxes arriving at night you may set the number of both ringing signals TOTAL RINGS and FAX RINGS to 0 In this setting your ma chine wi...

Page 19: ... of ringing signals as soon as a message was recorded you should preferably switch this function off It is possible that the answering machine not only counts the messages received but also the number of fax calls If your answering machine records fax signals but your multifunctional machine cannot receive faxes you should check the connection of your external answering machine Connect the exter n...

Page 20: ...lection from the entries on the base station To establish a connection to the other party press the dial key Correcting entries 1 On your cordless handset press 12 and select with the desired entry 2 Press OK to edit the entry 3 Delete the number or name using C and con firm the new entry with OK Deleting entries 1 On your cordless handset press 13 and select with the desired entry 2 Press OK to d...

Page 21: ...handset will be switched off The symbol on the display will start to flash Press OK again to carry on the call Internal phone calls If you have registered more than one cordless handset on your base station you can make inter nal calls between two handsets Press the number of the cordless handset you wish to call for example 2 and the dial key Press the button to end the call Press and to call all...

Page 22: ...et you want e g 2 and the dial key then hang up with For an internal press OK the number of the handset you want e g 2 and the dial key Not possible Not possible Locate the cordless handset If you have mislaid your cordless handset or ad ditional cordless phones you can use function 83 to find them On the base station press M 83 and OK twice All the cordless handsets registered on the base station...

Page 23: ...ivated see Send report If you want to cancel the transmission press X twice Directory The memory in your MF JET 495 can store about 200 names and number The precise number de pends on the length of the entries In the list you can store individual entries names and numbers and groups comprising several entries The available special characters are shown above the letter keys on the right and can be ...

Page 24: ...der Use to select the entry or group you wish to delete 3 Press OK 4 Confirm with OK Print Press M 15 and OK The directory is printed in alphabetical order Transfer to a PC If you have connected your MF JET 495 to a PC you can transfer the directory to the PC to edit it On your PC click on Start Programs MF Inkjet Restore Address Book You can transfer the directory from the PC to the MF JET 495 an...

Page 25: ...ored in memory storage capacity approx 50 pages If the memory is full no further pages can be stored and certain functions can no longer be performed To empty the memory insert paper or a cartridge and start printout of the faxes by pressing Y v When a fax message is completely printed out it will be deleted from the memory If the printing process was interrupted all fax messages that have not bee...

Page 26: ... m Press OK 4 Set the contrast and other settings and con firm each entry with OK Polling By means of this function documents which have been prepared for collection from another machine can be retrieved You can also allow a document to be polled from your multifunctional machine Polling reception 1 Press M 32 and OK 2 Enter the polling number and press Y Delayed polling 1 Press M 32 and OK 2 Ente...

Page 27: ...ur or black and white twice Optional copy K 1 Insert a document see Inserting a docu ment 2 Press one of the two K keys copy in colour or black and white once You can now make the following settings 3 Enter the desired number of copies and press OK NUMBER OF COPIES 4 The copying quality of the MF JET 495 is higher than the resolution used for fax trans mission If necessary changethedefaultsetting ...

Page 28: ...tura tion Colour saturation is judged in propor tion to brightness Use to change the setting is more grey is more saturated Confirm with OK SATURATION 9 For colour copying If you have chosen colour copy you can adjust the RGB values All colours can be defined as combinations of red R green G and blue B You can change the values for each of these basic col ours with Press OK RGB 10 You can adjust t...

Page 29: ...zontal stripes Scanning a document Á There are three ways to scan a document via PC Variant 1 Press Á on the multifunctional device to open the scan window on the PC This window enables you to choose between a number of different ways of processing docu ments You do this by clicking on the required symbol Cust The scanned document can be edited in Paint eMail The scanned document can be sent as an...

Page 30: ...ult under Select Format and Page s by clicking on the appropriate symbol Variant 3 To scan a document open a graphic applica tion Paper Port or Photo Impression and choose the scan function Choose the MF TWAIN driver to start scanning v To view and edit the document you have scanned first close the MF TWAIN driver Click on the lower left icon to create a preview click on the lower right icon to st...

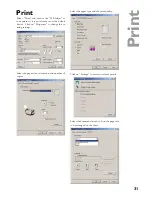
Page 31: ...s the default device Click on Properties to change the ex isting settings Select the paper size orientation and number of copies Select the paper type and the print quality Click on Settings to create or select a profile Select the document layout i e how the pages are to be arranged on the sheet ...

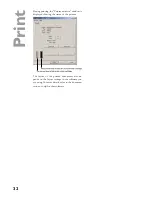
Page 32: ...r monitor window is displayed showing the status of the printer The layout of the printed documents also de pends on the layout settings in the software you are using For more details refer to the documen tation or help for that software ...

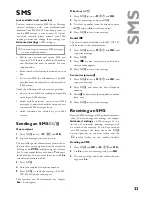
Page 33: ...evant key To type capital letters hold down and press the desired key You can move the cursor with and delete characters with 3 Press 4 Enter the recipient s telephone number 5 Press to send the message The MF JET 495 will print a send report This function can be deactivated see chapter Fax Send report Directory 1 Press twice or M 41 and OK 2 Type your message and press 3 To select a number from t...

Page 34: ... OK NEW Press OK The newly arrived SMS mes sages will be printed ALL Press OK All SMS messages will be printed Deleting an SMS 1 Press M 43 and OK 2 You can now choose which messages to de lete using SELECTED Press OK and choose the mes sages to delete using Confirm with OK ALREADY READ Press OK to delete the mes sages that you have already read ALL Press OK All messages will be deleted ...

Page 35: ...OK SMS alternative reception You might wish to receive SMS from a second provider In that case you will have to enter a sec ond provider number to receive SMS messages 1 Press M 4621 and OK 2 Enter the second provider number for SMS reception and press OK Automatic printing Press M 451 and OK Use to choose whether SMS messages should be printed out automatically or not and press OK Beep Press M 45...

Page 36: ...36 Advanced settings Printer settings M 261 OK Paper size M 262 OK Paper type M 263 OK Reduction M 264 OK Left right margins ...

Page 37: ...If a fax transmission fails you can use this func tion to check the line you will hear a connection being set up 1 Press M 35 and OK The built in loud speakerisswitchedonandyouwillhearthedial tone Insert the document Dial the number and press Y Fax transmission is started 2 Press M 35 then OK twice Fax reception is started Before you call the technical service If you can t solve your problem with ...

Page 38: ...lot below the control panel to update the cartridge infor mation 10 The cartridge is loaded when the following ap pears on the display Action completed Remove card Cartridge capacity The machine records ink consumption and from this calculates the amount left v The amount left is only valid if you load each new cartridge with the chip card sup plied Press M 73 and OK Press to see the current capac...

Page 39: ...our digit interlock code and press OK 3 Enter the code one more time and press OK v When a code is already registered the machine asks you first to give the old code before allowing you to modify it Locking the keyboard 1 Press M 712 and OK 2 Enter the four digit interlock code see Enter ing the code and press OK 3 Use to select WITH and press OK The access code must be entered each time the machi...

Page 40: ...tom Confirm with OK 5 Use to select a free storage location and confirm with OK 6 Enter the same pin code that you set on the second base station and confirm with OK The cordless handset is establishing a connec tion to the base station this may take a few moments 7 Use to select the number you want to use to register the cordless handset on the second base station This number appears on the dis p...

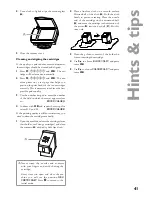
Page 41: ...inting quality is still not satisfactory you need to clean the cartridges manually 1 Open the machine release the cartridges from their holder see Change cartridges and clean the contacts A with a dry fluff free cloth v Never touch the nozzles and contacts with your fingers and avoid shaking the cartridge Every time you open and close the ma chine you will see the question New cartridge Press X to...

Page 42: ...polling 34 FAX ANSW 25 Set fax memory reception 35 MANUAL CALL 37 Manual fax transmission SMS Service 41 SEND SMS 33 Send an SMS message 42 READ SMS 33 Read SMS messages 43 DELETE SMS 34 Delete SMS messages from the memory 44 PRINT SMS 34 Print out SMS messages 45 PARAMETERS 35 Settings for sending SMS 46 SMS CENTERS 35 Set access numbers for SMS Print 51 FUNCTIONS LIST 42 Print a list of function...

Page 43: ...on type USB slave 1 1 Operating systems Windows 98 SE 2000 ME XP Scanner driver TWAIN WIA SMS Gateway V23 Memory 30 messages Scanner Type CCD colour Resolution 600 600 dpi Scanning area 210 297 mm Scanning width 206 mm Flatbed scanning speed b w 10 5 seconds page colour 17 5 seconds page Resolution 256 grey tones Printer Type colour bubble ink jet Resolution 2400 1200 dpi Printing speed b w up to ...

Page 44: ... extent all terms and conditions implied by law are hereby excluded This guarantee does not affect the customer s statutory rights B Exclusions from guarantee SAGEM shall have no liability under the guaran tee in respect of damage defects breakdown or malfunction due to failure to properly follow the installation proc ess and instructions for use or an external cause to the equipment including but...

Page 45: ...o SAGEM The repair and delivery costs will be invoiced to the customer The foregoing shall apply unless otherwise agreed in writing with the customer and only for the UK If any provision of this guarantee shall be held to be in whole or in part invalid or illegal due to an obligatory rule applicable to consumers pursuant to their national legislation such invalidity or il legality shall not impair...

Page 46: ... 20 correcting entries base station 24 entries cordless handset 20 country selection 17 creative copy 27 cursor key 3 D delayed transmission 26 delete entries base station 24 entries cordless handset 20 key 3 SMS messages 34 deregistering a handset 40 description of the ma chine 2 dial key cordless hand set 4 directory A Z base sta tion 3 23 add group 24 add name 23 cancel 24 modify 24 print 24 tr...

Page 47: ...ase station 24 on the cordless hand set 20 registering cordless handset of original type 39 resolution 25 fine photo mode 25 key 3 normal mode 25 standard mode 25 super fine mode 25 RGB 28 ringer volume 20 ring signal type 20 S safety instructions 6 saturation 28 scan 29 inserting a document 29 key 3 scan settings contrast 35 origin 35 resolution 35 saturation 35 zooming 35 scan window 29 select c...

Page 48: ...ially contact your dealer if problems occur during operation This operating manual has been printed on chlo rine free recycled paper to meet the highest envi ronmental standards abc5103 506 4149 1 GB INT C6 The cardboard box and the protective cardboard can be recycled as waste paper corresponding to your country s demands dispose the plastic foils either for recycling or with your rubbish This el...

Reviews: