background image

8

EN

3  Get started

Caution


Use of controls or adjustments or performance of 

procedures other than herein may result in hazardous 

laser exposure or other unsafe operation.

Always follow the instructions in this chapter in 

sequence.

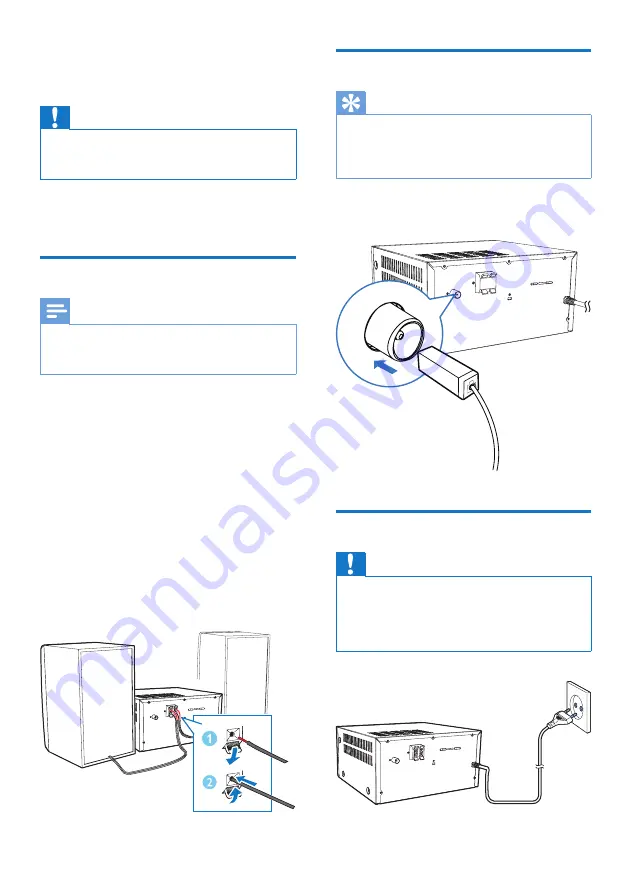
Connect speakers

Note


Insert the stripped portion of each speaker wire into 

the socket completely.


For better sound quality, use the supplied speakers only.

For the right speaker, find the sockets on 

the back of the main unit marked "R".

Insert the red wire into the red (+) socket, 

and the black wire into the black (-) socket.

For the left speaker, find the sockets on the 

main unit marked "L". 

Repeat step 2 to insert the left speaker 

wire. 

To insert each speaker wire:

Hold down the socket flap.

Insert the speaker wire fully.

Release the socket flap.


Connect FM antenna

Tip


For optimal reception, fully extend and adjust the 

position of the antenna.


For better FM stereo reception, connect an outdoor 

FM antenna to the 

FM AERIAL

 socket.

Connect the supplied FM antenna to the 

FM 

AERIAL

 socket on back of the product.


Connect power

Caution


Risk of product damage! Ensure that the power supply 

voltage corresponds to the voltage printed on the back 

or the underside of the unit.


Before you connect the AC power cord, ensure that 

you have completed all other connections.


Connect the power cable to the wall socket.


Summary of Contents for mcm3350

Page 1: ...www philips com support User manual Always there to help you Register your product and get support at MCM3350 Question Contact Philips ...

Page 2: ......

Page 3: ...p tracks 11 Program tracks 12 5 Listen to the radio 13 Tune to a radio station 13 Program radio stations automatically 13 Program radio stations manually 13 Select a preset radio station 13 Display RDS information 13 6 Adjust sound 15 Select a preset sound effect 15 Adjust volume level 15 Mute sound 15 7 Other features 16 Set the alarm timer 16 Set the sleep timer 16 Listen through headphone 16 Li...

Page 4: ...ver look into the laser beam inside this apparatus Never place this apparatus on other electrical equipment Keep this apparatus away from direct sunlight naked flames or heat Ensure that you always have easy access to the power cord plug or adaptor to disconnect the apparatus from the power The device shall not exposed to dripping or splashing Do no place any source of danger on the device e g liq...

Page 5: ...to sound even at normally safe levels can also cause hearing loss Be sure to use your equipment reasonably and take appropriate breaks Be sure to observe the following guidelines when using your headphones Listen at reasonable volumes for reasonable periods of time Be careful not to adjust the volume as your hearing adapts Do not turn up the volume so high that you can t hear what s around you You...

Page 6: ... cardboard box polystyrene foam buffer and polyethylene bags protective foam sheet Your system consists of materials which can be recycled and reused if disassembled by a specialized company Please observe the local regulations regarding the disposal of packaging materials exhausted batteries and old equipment The making of unauthorized copies of copy protected material including computer programs...

Page 7: ...is unit you can enjoy audio from discs USB devices and other external devices listen to radio stations You can enrich sound output with below sound effect Digital Sound Control DSC The unit supports these media formats What s in the box Check and identify the contents of your package Main unit Remote control with one AAA battery 2 x Speakers with cables 1 x FM wire antenna Short user manual Safety...

Page 8: ... pause play e VOLUME knob Adjust volume f Open or close the disc compartment g Stop play Erase a program h Disc compartment i Headphone socket j AUDIO IN Connect external audio devices a d e c b f g h i j k l o m n p k Connect USB storage devices l SOURCE Select a source DISC USB TUNER AUDIO IN m ANTENNA socket Connect with the FM antenna n SPEAKER OUT socket Connect with the speakers o Voltage se...

Page 9: ...album g DISPLAY RDS Adjust display brightness During playback display the play information For selected FM radio stations display RDS information if available h SLEEP TIMER Set sleep timer Set alarm timer i CLOCK Set the clock View clock information j PROG Program tracks Program radio stations Auto store FM radio stations k Mute or unmute the sound l SOUND Enrich sound effect with Digital Sound Co...

Page 10: ...peaker find the sockets on the main unit marked L 4 Repeat step 2 to insert the left speaker wire To insert each speaker wire 1 Hold down the socket flap 2 Insert the speaker wire fully 3 Release the socket flap Connect FM antenna Tip For optimal reception fully extend and adjust the position of the antenna For better FM stereo reception connect an outdoor FM antenna to the FM AERIAL socket Connec...

Page 11: ...etween working mode and standby mode Note The product switches to standby mode after 15 minutes inactive Switch to ECO power standby mode Press and hold for more than two seconds The red ECO power standby indicator turns on In Eco power standby mode press to switch between working mode and ECO power standby mode Note The product switches to ECO power standby mode after 15 minutes in standby mode S...

Page 12: ...clock information in working mode press CLOCK Select a source On the main music system Press SOURCE repeatedly to select a source DISC starts playing disc if there is disc inserted in the CD compartment USB starts playing mp3 files if there is music stored in the connected USB device FM start FM broadcasting AUDIO IN start playing music if there is other audio product connected to the device via A...

Page 13: ...B device into the socket 2 Press USB to select the USB source Play starts automatically If not press Control play Start pause or resume play Stop play Select an album or a folder Press to skip to the previous or next track Press and hold to search backward forward within a track Play a track or all tracks repeatedly Play tracks randomly Not applicable for the programmed tracks Skip tracks When pla...

Page 14: ...o activate the program mode PRG program and 001 PR 01 are displayed 2 For MP3 tracks press to select an album 3 Press to select a track and then press PROG to confirm 4 Repeat steps 2 to 3 to program more tracks 5 Press to play the programmed tracks During play PRG program is displayed To erase the program Press twice ...

Page 15: ...ion strength The first programmed radio station is broadcast automatically Program radio stations manually 1 Tune to a radio station 2 Press PROG to activate program mode PRG program displays on the screen 3 Press to allocate a number from 1 20 to this radio station and then press PROG to confirm The preset number and the frequency of the preset station are displayed 4 Repeat steps 1 3 to program ...

Page 16: ...14 EN Radio text message Mono Stereo Time ...

Page 17: ...reset sound effect Press SOUND repeatedly to select a preset sound effect Balance Balance Clear Clear Powerful Powerful Warm Warm and Bright Bright Adjust volume level On the remote control press VOL repeatedly On the main unit rotate the volume knob Mute sound Press to mute or unmute the sound ...

Page 18: ...n standby mode press SLEEP TIMER repeatedly to activate or deactivate timer If timer is activated is displayed Tip Alarm timer is not available in AUDIO IN mode Note If CD USB source is selected but no disc is placed or no USB device is connected the FM source is selected automatically Set the sleep timer This music system can switch to standby automatically after a set period of time When the mus...

Page 19: ...3 player or other mobile devices 1 Use a USB cable to connect the USB socket of product with the USB socket of your devices AUDIO IN 2 Connect the product to power Once the device is recognized the charging starts Note Philips does not guarantee the compatibility of this product with all devices Ajust the display brightness Press and hold DISPLAY RDS repeatedly to adjust the display brightness DIM...

Page 20: ...o Stereo 46dB S N Ratio 22 dBf 48 dBf Search Selectivity 32 dBf Total Harmonic Distortion 3 Signal to Noise Ratio 45 dB USB USB DirectVersion 2 0 Full Speed Charging support 5V 500mA Disc LaserType Semiconductor Disc Diameter 12 cm 8 cm Support Disc CD DA CD R CD RW MP3 CD Audio DAC 24 Bits 44 1 KHz Total Harmonic Distortion 3 1 KHz Frequency Response 20 Hz 20 kHz 44 1 KHz S N Ratio 80 dBA General...

Page 21: ...aximum 999 File name in Unicode UTF8 maximum length 32 bytes Unsupported USB formats Empty albums an empty album is an album that does not contain MP3 WMA files and will not be shown in the display Unsupported file formats are skipped For example word documents doc or MP3 files with extension dlf are ignored and not played WMA AAC WAV PCM audio files DRM protected WMA files wav m4a m4p mp4 aac WMA...

Page 22: ...nutes after track play reaches the end and no control is operated Remote control does not work Before you press any function button first select the correct source with the remote control instead of the main unit Reduce the distance between the remote control and the unit Insert the battery with its polarities signs aligned as indicated Replace the battery Aim the remote control directly at the se...

Page 23: ...21 EN ...

Page 24: ...is sold under the responsibility of Gibson Innovations Ltd and Gibson Innovations Ltd is the warrantor in relation to this product Philips and the Philips Shield Emblem are registered trademarks of Koninklijke Philips N V and are used under license from Koninklijke Philips N V MCM3350_12_UM_V1 0 ...

Reviews: