background image

English

Printed in China

CLASS 1

LASER PRODUCT

MCM128B

PDCC-JH-0647

Meet Philips at the Internet

http://www.philips.com

MCM128B_05_Back cover

22/11/06, 17:27

70

Summary of Contents for MCM128B

Page 1: ...Micro Hi Fi System MCM128B ...

Page 2: ...a possible shock hazard should it be inserted into a 13 Amp socket elsewhere How to connect a plug The wires in the mains lead are coloured with the following code blue neutral N brown live L As these colours may not correspond with the colour markings identifying the terminals in your plug proceed as follows Connect the blue wire to the terminal marked N or coloured black Connect the brown wire t...

Page 3: ...3 TUN I N G M I C R O S Y S T E M M C M 1 2 8 iR USB DIRECT SOURCE VOLUME BAND OPEN CLOSE PROG CLOCK TUNING 1 2 3 8 9 4 5 6 7 0 STANDBY ON ...

Page 4: ...h a safe volume level Set your volume control at a low setting Slowly increase the sound until you can hear it comfortably and clearly without distortion Listen for reasonable periods of time Prolonged exposure to sound even at normally safe levels can also cause hearing loss Be sure to use your equipment reasonably and take appropriate breaks Be sure to observe the following guidelines when using...

Page 5: ... Deutsch Nederlands Italiano Svenska Dansk Suomi English 6 Index CAUTION Use of controls or adjustments or performance of procedures other than herein may result in hazardous radiation exposure or other unsafe operation ...

Page 6: ...Power saving automatic standby 11 Adjusting volume and sound 11 CD Operation Playing a disc 12 Basic playback controls 12 Playing an MP3 disc 12 Different play modes Shuffle and Repeat 13 Programming track numbers 13 Reviewing the programme 13 Erasing the programme 13 Radio Reception Tuning to radio stations 14 Maintenance 14 USB Connection Using USB connectivity 15 16 Clock Timer Setting the cloc...

Page 7: ...ltage indication beside the voltage selector of your system is identical with the voltage of your local power supply If not please consult your dealer Place the system on a flat hard and stable surface The apparatus shall not be exposed to dripping or splashing Install the unit near the AC outlet and where the AC power plug can be easily reached Place the system in a location with adequate ventila...

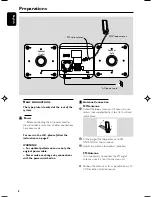
Page 8: ... Antenna It is unnecessary to connect the FM pigtail antenna since it is fixed to the main unit Position the antenna as far as possible from aTV VCR or other radiation source Preparations Rear connections The type plate is located at the rear of the system A A A A A Power Before connecting the AC power cord to the wall outlet ensure that all other connections have been made For users in the U K pl...

Page 9: ...mpedance lower than the speakers supplied Please refer to the SPECIFICATIONS section of this manual Before using the remote control 1 Pull out the plastic protective sheet 2 Select the source you wish to control by pressing one of the source select keys on the remote control for example CD TUNER 3 Then select the desired function for example É í ë Replacing battery lithium CR2032 into the remote c...

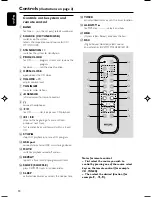
Page 10: ...ume level 7 TUNING 0 tunes to radio stations 8 iR SENSOR infrared sensor for remote control 9 n connect headphones 0 ÉÅ for CD starts or pauses CD playback 1 2 skips to the beginning of a current track previous next track fast searches back and forward within a track CD STOP 9 stops CD playback or erase a CD program USB port connects to external USB mass storage device MUTE switches playback sound...

Page 11: ... to standby 15 minutes after a CD playback has ended and no control is operated Adjusting volume and sound 1 Press VOLUME to increase or decrease volume Display shows the volume level and a number from 0 32 2 Press DSC repeatedly to select the desired sound effect JAZZ POP CLASSIC ROCK 3 Press DBB on the remote control to switch bass enhancement on or off Display shows if the DBB is activated 4 Pr...

Page 12: ...k are displayed during disc playback To select a different track Press 1 2 once or repeatedly until the desired track number appears in the display To find a passage within a track 1 Press and hold down on 1 2 The disc is played at high speed and low volume 2 When you recognise the passage you want release 1 2 Normal playback continues To interrupt playback Press 2 during playback The display free...

Page 13: ... and REPEAT functions cannot be used simultaneously SHUFFLE play is not available in the programe mode Programming track numbers Programme in the STOP position to select and store your disc tracks in the desired sequence If you like store any track more than once Up to 40 tracks can be stored in the memory 1 In the stop position use the 1 2 to select your desired track number For MP3 you may press...

Page 14: ... a mild detergent solution Do not use a solution containing alcohol spirits ammonia or abrasives Cleaning Discs When a disc becomes dirty clean it with a cleaning cloth Wipe the disc from the centre out Do not use solvents such as benzene thinner commercially available cleaners or antistatic spray intended for analogue records Cleaning the disc lens After prolonged use dirt or dust may accumulate ...

Page 15: ... This means that e g Word documents doc or MP3 files with extension dlf are ignored and will not be played AAC WAV PCM NTFS audio files DRM protected WMA files WMA files in Lossless format Playing a USB mass storage device 1 Make sure that your MCM128 is being powered 2 Press SOURCE repeatedly or USB on the remote to enter USB mode Display with USB DIRECT 3 Plug a compatible USB mass storage devic...

Page 16: ...mains please ensure sufficient power supply to your USB devices by replacing recharging the batteries You may not be able to play bought tracks in your USB device through this system such as those bought from the Apple iTunes or Microsoft PlaysForSure websites This micro system is designed for playback of digital music formats MP3 and WMA only and does not supportWMA DRM AAC WAV M4a M4b etc Never ...

Page 17: ...ash 4 Press 1 2 to set the hours 5 Press TIMER again The clock digits for the minutes flash 6 Press 1 2 to set the minutes 7 Press TIMER to confirm the time The timer is now set and actiated Notes If source CD is selected and no disc is in the CD tray or the disc has an error TUNER will be selected automatically At the set time of wake up the set will turn on at volume level 12 To activate and dea...

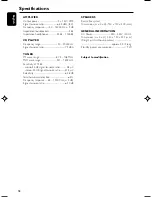
Page 18: ...MW wave range 531 1602 kHz Sensitivity at 75 Ω mono 26 dB signal to noise ratio 2 8 µV stereo 46 dB signal to noise ratio 61 4 µV Selectivity 28 dB Total harmonic distortion 5 Frequency response 63 12500 Hz 3 dB Signal to noise ratio 40 dB SPEAKERS Bass reflex system Dimensions w x h x d 150 x 150 x 200 mm GENERAL INFORMATION AC Power 220 230V 50Hz Dimensions w x h x d 150 x 150 x 244 mm Weight wi...

Page 19: ...Use a finalised CD RW or CD R or a correct MP3 CD format disc If the signal is too weak adjust the antenna or connect an external antenna for better reception Increase the distance between the Micro HiFi System and yourTV orVCR Remove and reconnect the AC power plug and switch on the system again Adjust the volume Disconnect the headphones Check that the speakers are connected correctly Check if t...

Page 20: ...English Printed in China CLASS 1 LASER PRODUCT MCM128B PDCC JH 0647 Meet Philips at the Internet http www philips com ...

Reviews: