background image

4

l

Unplug this apparatus during lightning 
storms or when unused for long periods 
of time. 

m

 5HIHUDOOVHUYLFLQJWRTXDOLÀHGVHUYLFH

personnel. Servicing is required when 
the apparatus has been damaged in any 
way, such as power-supply cord or plug 
is damaged, liquid has been spilled or 
objects have fallen into the apparatus, 
the apparatus has been exposed to rain 
or moisture, does not operate normally, 
or has been dropped.

n

Battery usage CAUTION – To prevent 
battery leakage which may result in 
bodily injury, property damage, or 
damage to the unit: 

Install all batteries correctly, + and - 

‡

as marked on the unit. 
Do not mix batteries (old and new 

‡

or carbon and alkaline, etc.).
Remove batteries when the unit is 

‡

not used for a long time.
Batteries (battery pack or batteries 

‡

installed) shall not be exposed to 

H[FHVVLYHKHDWVXFKDVVXQVKLQHÀUH

or the like.

o

Apparatus shall not be exposed to 
dripping or splashing. 

p

Do not place any sources of danger on 

WKHDSSDUDWXVHJOLTXLGÀOOHGREMHFWV

lighted candles). 

q

Where the plug of the Direct Plug-
in Adapter is used as the disconnect 
device, the disconnect device shall 
remain readily operable.

1 Important

Safety

Important Safety Instructions

a

Read these instructions.

b

Keep these instructions.

c

Heed all warnings.

d

Follow all instructions.

e

Do not use this apparatus near water.

f

Clean only with dry cloth.

g

Do not block any ventilation openings. 
Install in accordance with the 
manufacturer’s instructions.

h

Do not install near any heat sources 
such as radiators, heat registers, stoves, 

RURWKHUDSSDUDWXVLQFOXGLQJDPSOLÀHUV

that produce heat. 

i

Protect the power cord from being 
walked on or pinched, particularly at 
plugs, convenience receptacles, and 
the point where they exit from the 
apparatus.

j

Only use attachments/accessories 

VSHFLÀHGE\WKHPDQXIDFWXUHU

k

Use only with the cart, stand, tripod, 

EUDFNHWRUWDEOHVSHFLÀHGE\WKH

manufacturer or sold with the apparatus. 
When a cart is used, use caution when 
moving the cart/apparatus combination 
to avoid injury from tip-over. 

EN

Summary of Contents for MCM103

Page 1: ...Register your product and get support at www philips com welcome EN User manual ZH CN Ⴌ߀ Ҭ MCM103 ...

Page 2: ... Search within a track 13 Display play information 13 Repeat play 13 Random play 14 Program tracks 14 7 Adjust volume level and sound effect 15 Adjust volume level 15 Select a preset sound effect 15 Enhance bass 15 Mute sound 15 8 Listen to radio 15 Tune to a radio station 15 Program radio stations automatically 15 Program radio stations manually 16 Select a preset radio station 16 9 Other feature...

Page 3: ...ot place any sources of danger on WKH DSSDUDWXV H J OLTXLG ÀOOHG REMHFWV lighted candles q Where the plug of the Direct Plug in Adapter is used as the disconnect device the disconnect device shall remain readily operable 1 Important Safety Important Safety Instructions a Read these instructions b Keep these instructions c Heed all warnings d Follow all instructions e Do not use this apparatus near...

Page 4: ...aratus Never place this apparatus on other electrical equipment Keep this apparatus away from direct sunlight QDNHG ÁDPHV RU KHDW Never look into the laser beam inside this apparatus Ensure that you always have easy access to the power cord plug or adaptor to disconnect this apparatus from the power Caution Use of controls or adjustments or performance of procedures other than herein may result in...

Page 5: ...rate collection of batteries because correct disposal helps to prevent negative consequences for the environmental and human health Environmental information All unnecessary packaging has been omitted We have tried to make the packaging easy to separate into three materials cardboard box polystyrene foam buffer and polyethylene bags protective foam sheet Your system consists of materials which can...

Page 6: ...e and ZHOFRPH WR 3KLOLSV 7R IXOO EHQHÀW IURP WKH support that Philips offers register your product at www Philips com welcome Introduction With this unit you can enjoy music from audio discs USB devices and other external devices directly listen to FM radio stations You can enrich sound output with these sound effects Digital Sound Control DSC Dynamic Bass Boost DBB The unit supports these media f...

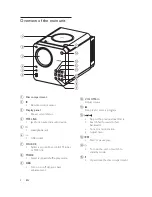
Page 7: ... the unit or switch to standby mode o Open close the disc compartment Overview of the main unit a Disc compartment b IR Remote control sensor c Display panel Show current status d MP3 LINK Jack for an external audio device e Headphone jack f USB socket g SOURCE Select a source Disc USB FM tuner or MP3 link h MODE 6HOHFW D UHSHDW VKXIÁH SOD PRGH i DBB Turn on or off dynamic bass enhancement EN ...

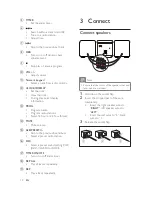
Page 8: ...election keys DISC TUN USB MP3 LINK Select a source DISC TUNER USB or MP3 LINK c SLEEP Set the sleep timer d SHUF Play tracks randomly USB MP3 LINK REP REP ALL CLOCK DISPLAY SHUF a s b c d e f g h i j k l m n o p g q r f p FM antenna Improve FM reception q AC MAINS Power cord q p E n gl i s h EN ...

Page 9: ...e g Skip to the previous next track h DBB Turns on or off dynamic bass enhancement i Stop play or erase a program j VOL Adjust volume k Numeric keypad Select a track from a disc directly l CLOCK DISPLAY Set the clock View the clock During play select display information m PROG Program tracks Program radio stations Select 12 hour or 24 hour format n MUTE Mute volume o ALB PRESET Skip to the previou...

Page 10: ...____ Serial No ___________________________ Prepare the remote control Caution Risk of explosion Keep batteries away from KHDW VXQVKLQH RU ÀUH 1HYHU GLVFDUG EDWWHULHV LQ ÀUH 1 Open the battery compartment 2 Insert 2 AAA batteries with correct polarity as indicated 3 Close the battery compartment Connect power Caution Risk of product damage Ensure that the power supply voltage corresponds to the vol...

Page 11: ...roperly Auto install radio stations When you connect the unit to the power VXSSO IRU WKH ÀUVW WLPH RU QR UDGLR VWDWLRQ LV stored in this unit Plug and Play is activated to store all available radio stations automatically 1 Connect the unit to the power supply AUTO INSTALL PLEASE PRESS PLAY STOP CANCEL press the PLAY button to auto install to cancel press displays 2 Press on the main unit to start ...

Page 12: ...ect different play information Repeat play Play a track repeatedly 1 During play press REP REP repeat is displayed the current track is played repeatedly 5 Play Play discs 1 Press DISC to select the disc source 2 Press to open the disc compartment 3 Insert a disc with the printed side facing up then close the disc door Play starts automatically Play from USB Note Ensure that the USB device contain...

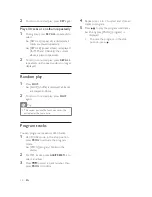
Page 13: ...MP3 and USB only the current album is played repeatedly 2 To return to normal play press REP ALL repeatedly until repeat mode is no longer displayed Random play 1 Press SHUF 6 8 VKXIÁH LV GLVSOD HG DOO WUDFNV are played randomly 2 To return to normal play press SHUF again Tip 7KH UHSHDW DQG VKXIÁH IXQFWLRQV FDQQRW EH activated at the same time Program tracks You can program a maximum of 40 tracks ...

Page 14: ... PROG for 2 seconds to activate automatic program mode AUTO auto is displayed All available stations are programmed in the order of waveband reception strength 7KH ÀUVW SURJUDPPHG UDGLR VWDWLRQ LV broadcast automatically 7 Adjust volume level and sound effect Adjust volume level 1 During play press VOL to increase decrease the volume level Select a preset sound effect 1 During play press DSC repea...

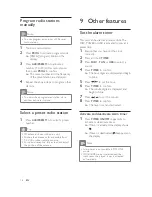
Page 15: ...Note Alarm timer is not available in MP3 LINK mode If DISC USB source is selected and the track cannot be played tuner is activated automatically Program radio stations manually Note You can program a maximum of 20 preset radio stations 1 Tune to a radio station 2 Press PROG to activate program mode PROG program blinks on the display 3 Press ALB PRESET to allocate a number 1 to 20 to this radio st...

Page 16: ... To deactivate sleep timer 1 Press SLEEP repeatedly until OFF is displayed When sleep timer is deactivated disappears on the display Listen to an external device You can listen to an MP3 player through this unit 1 Press MP3 LINK to select MP3 LINK source 2 Connect the supplied MP3 link cable to MP3 LINK jack 3 5 mm on the unit the headphone jack on an external device 3 Start to play the device see...

Page 17: ...ector size 512 bytes MP3 bit rate data rate 32 320 Kbps and variable bit rate Directory nesting up to a maximum of 8 levels Number of albums folders maximum 99 Number of tracks titles maximum 999 ID3 tag v2 0 or later 10 Product information Note Product information is subject to change without prior notice 6SHFLÀFDWLRQV PSOLÀHU Rated Output Power 2X5W RMS Frequency Response 60 16kHz 3dB Signal to ...

Page 18: ...8QVXSSRUWHG ÀOH IRUPDWV DUH VNLSSHG RU example Word documents doc or MP3 ÀOHV ZLWK H WHQVLRQ GOI DUH LJQRUHG DQG not played 9 3 0 DXGLR ÀOHV Supported MP3 disc formats ISO9660 Joliet Maximum title number 512 depending RQ ÀOH QDPH OHQJWK Maximum album number 255 Supported sampling frequencies 32 kHz 44 1kHz 48 kHz Supported Bit rates 32 256 kbps variable bit rates E n gl i s h EN ...

Page 19: ... extend the FM antenna Timer does not work Set the clock correctly Switch on the timer Clock timer setting erased Power has been interrupted or the power cord has been disconnected Reset the clock timer 11 Troubleshooting Warning Never remove the casing of this apparatus To keep the warranty valid never try to repair the system yourself If you encounter problems when using this apparatus check the...

Page 20: ... 2010 Koninklijke Philips Electronics N V All rights reserved MCM103_93_UM_V1 0 ...

Reviews: